
Subscribe to Our Youtube Channel
Related Manuals for Klarstein BRISA


Summary of Contents for Klarstein BRISA
- Page 1 BRISA Dunstabzugshaube Cooker hood Campana extractora Hotte aspirante Cappa aspirante 10041402 www.klarstein.com...
-
Page 3: Table Of Contents
Sehr geehrter Kunde, wir gratulieren Ihnen zum Erwerb Ihres Gerätes. Lesen Sie die folgenden Hinweise sorgfältig durch und befolgen Sie diese, um möglichen Schäden vorzubeugen. Für Schäden, die durch Missachtung der Hinweise und unsachgemäßen Gebrauch entstehen, übernehmen wir keine Haftung. Scannen Sie den folgenden QR-Code, um Zugriff auf die aktuellste Bedienungsanleitung und weitere Informationen rund um das Produkt zu erhalten. -
Page 4: Sicherheitshinweise
SICHERHEITSHINWEISE • Lesen Sie sich alle Hinweise vor der Benutzung sorgfältig durch und bewahren Sie die Bedienungsanleitung zum späteren Nachschlagen gut auf. • Die Montagearbeiten dürfen nur von einer Elektrofachkraft oder einer qualifizierten Person durchgeführt werden. Bevor Sie die Dunstabzugshaube verwenden, stellen Sie sicher, dass die Spannung (V) und die auf der Dunstabzugshaube angegebene Frequenz (Hz) der Spannung und Frequenz der Stromversorgung in Ihrem Haushalt entsprechen. - Page 5 Wichtige Hinweise zum Abluftbetrieb WARNUNG Vergiftungsgefahr durch zurückgesaugte Abgase! Betreiben Sie das Gerät nicht im Abluftbetrieb, wenn es zusammen mit einer raumluftabhängigen Feuerstätte betrieben wird und keine ausreichende Luftzirkulation garantiert wird. Raumluftabhängige Feuerstätten wie Gas-, Öl-, Holz- oder Kohleheizungen, Boiler oder Durchlauferhitzer beziehen die Luft aus dem Raum und führen sie durch ein Abluftrohr oder einen Kamin ins Freie.
-
Page 6: Geräteübersicht
GERÄTEÜBERSICHT Dunstabzugshaube Trägerplatte für Kunststoffrohr Motorgehäuse Luftauslass Montageplatte Aktivkohlefilter Kunststoffrohr Abdeckung des Aktivkohlefilters... -
Page 7: Installation
INSTALLATION Installation mit Abluft Hinweis: Beachten Sie die Sicherheitshinweise zur Bedienung des Gerätes, wenn die Luft nach außen abgeführt wird. Wenn die Dunstabzugshaube gleichzeitig mit einem Gerät in Betrieb ist, das seine Energie aus einer anderen Quelle als Strom bezieht, darf der Unterdruck im Raum 4 Pa nicht übersteigen (4 x 10⁻⁵ Bar). - Page 8 Die nicht benötigten Öffnungen sind mit einer Kunststoffabdeckung versehen. Diese Kunststoffabdeckung kann durch Drehen gegen den Uhrzeigersinn leicht abgenommen und optional an einer anderen, nicht benötigten Öffnung angebracht werden. Verwendung der Dunstabzugshaube als Ablufthaube (mit Abluft ins Freie) Wenn die Dunstabzugshaube werkseitig mit einem Aktivkohlefilter ausgestattet ist, muss dieser entfernt werden.
- Page 9 • Bei Verwendung von flexiblen Rohren ist das Rohr immer straff zu montieren, um den Druckverlust zu minimieren. • Bei horizontaler Verlegung des Abluftrohrs ist ein Mindestgefälle von 1 cm pro Meter oder ein Neigungswinkel von 2° einzuhalten. Ansonsten könnte Kondenswasser in den Motor der Dunstabzugshaube laufen.
- Page 10 Einbaumaße...
- Page 11 Lochgröße: 857 x 95 mm Gehäuse...
-
Page 12: Einbau Der Dunstabzugshaube
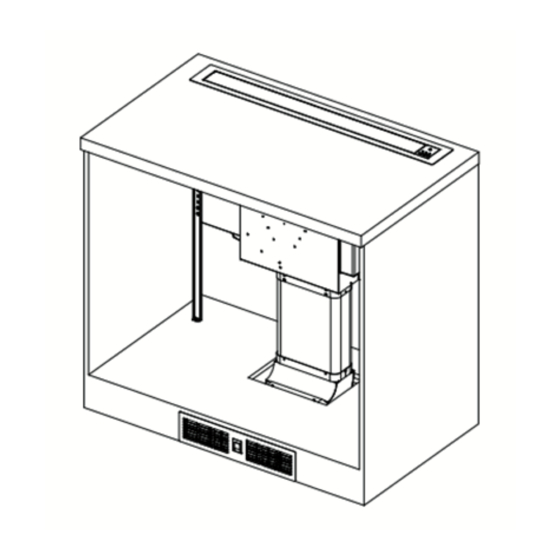
EINBAU DER DUNSTABZUGSHAUBE Teileübersicht... - Page 13 Schneiden Sie die Öffnung entsprechend der angegebenen Lochgröße aus. Installieren Sie die Dunstabzugshaube im Gehäuse.
- Page 14 • Richten Sie Teil E auf die geeignete Höhe aus. • Verbinden Sie Teil A und Teil E mit 4 Schrauben (Teil H). • Befestigen Sie Teil E mit 2 Schrauben (Teil F) an der Platte. • Verbinden Sie Teil A und Teil B mit 4 Schrauben (Teil G). •...
- Page 15 Die Installation ist hiermit abgeschlossen.
-
Page 16: Bedienung
BEDIENUNG Gerät ein-/ ausschalten Lüfterdrehzahl Lüfterdrehzahl verringern erhöhen Automatische Verzögerung ein/aus Dunstabzugshaube anheben/absenken Wenn Sie die Ausziehtaste 2 Sekunden lang drücken, beginnt sich die Dunstabzugshaube zu heben und verharrt in der höchsten verfügbaren Position. Durch erneutes Drücken der Taste fährt die Dunstabzugshaube wieder herunter. Hinweis: Stellen Sie sicher, dass der Kern beim Ein- und Ausfahren nicht blockiert oder behindert wird. -
Page 17: Reinigung Und Wartung
REINIGUNG UND WARTUNG Hinweis: Trennen Sie die Dunstabzugshaube vor Wartungs- oder Reinigungsarbeiten vom Stromnetz, indem Sie den Gerätestecker ziehen oder den Schutzschalter der Hausinstallation oder die Schraubsicherung der Hausinstallation ganz herausdrehen. • Die Dunstabzugshaube darf nicht mit einem Dampfreiniger gereinigt werden. •... - Page 18 nicht aus und wiederholen sie die Prozedur bei Bedarf. Ersetzen Sie den Schaumstoff -Fettfi lter nach maximal 5-6 Waschvorgängen durch einen neuen Filter. • Fettfi lter aus Metall müssen nicht ersetzt werden, wenn sie übermäßig gesättigt sind, sondern einmal im Monat von Hand oder in der Spülmaschine (60 °C) gewaschen werden.
-
Page 19: Fehlerbehebung
FEHLERBEHEBUNG Fehler Mögliche Ursache Lösung Das Licht ist an, aber der Das Rotorblatt des Schalten Sie das Motor läuft nicht. Lüfters ist blockiert. Gerät aus und lassen Sie es ausschließlich Der Motor ist kaputt. von qualifiziertem Fachpersonal reparieren. Das Licht ist aus und der Das Licht ist kaputt. -
Page 20: Produktdatenblatt
PRODUKTDATENBLATT Angaben nach Verordnung (EU) Nr. 65/2014 Mess- und Berechnungsmethoden nach EN 61591:1997+A1:2006+A2:2011+A11:20 14+A12:2015 Artikelnummer 10041402 Bezeichnung Symbol Wert Einheit Jährlicher Energieverbrauch AEC hood 37,0 kWh/Jahr Energieeffizienzklasse Fluiddynamische Effizienz FDE hood 32,9 Klasse für die fluiddynamische Effizienz Beleuchtungseffizienz LE hood Lux/W Beleuchtungseffizienzklasse Fettabscheidegrad... - Page 21 Angaben nach Verordnung (EU) Nr. 66/2014 Mess- und Berechnungsmethoden nach EN 61591:1997+A1:2006+A2:2011+A11:20 14+A12:2015 Artikelnummer 10041402 Bezeichnung Symbol Wert Einheit Jährlicher Energieverbrauch AEC hood 37,0 kWh/Jahr Zeitverlängerungsfaktor Fluiddynamische Effizienz FDE hood 32,9 Energieeffizienzindex EEI hood 43,5 Gemessener Luftvolumenstrom Q BEP 374,5 m³/h im Bestpunkt Gemessener Luftdruck im...
-
Page 22: Spezielle Entsorgungshinweise Für Verbraucher In Deutschland
SPEZIELLE ENTSORGUNGSHINWEISE FÜR VERBRAUCHER IN DEUTSCHLAND Entsorgen Sie Ihre Altgeräte fachgerecht. Dadurch wird gewährleistet, dass die Altgeräte umweltgerecht verwertet und negative Auswirkungen auf die Umwelt und menschliche Gesundheit vermieden werden. Bei der Entsorgung sind folgende Regeln zu beachten: • Jeder Verbraucher ist gesetzlich verpflichtet, Elektro- und Elek- tronikaltgeräte (Altgeräte) sowie Batterien und Akkus getrennt vom Hausmüll zu entsorgen. - Page 23 • Bei einem Vertrieb unter Verwendung von Fernkommunikationsmitteln ist die unentgeltliche Abholung am Ort der Abgabe auf Elektro- und Elektronikgeräte der Kategorien 1, 2 und 4 gemäß § 2 Abs. 1 ElektroG, nämlich „Wärmeüberträger“, „Bildschirmgeräte“ (Oberfläche von mehr als 100 cm²) oder „Großgeräte“...
-
Page 24: Hinweise Zur Entsorgung
HINWEISE ZUR ENTSORGUNG Wenn es in Ihrem Land eine gesetzliche Regelung zur Entsorgung von elektrischen und elektronischen Geräten gibt, weist dieses Symbol auf dem Produkt oder auf der Verpackung darauf hin, dass dieses Produkt nicht im Hausmüll entsorgt werden darf. Stattdessen muss es zu einer Sammelstelle für das Recycling von elektrischen und elektronischen Geräten gebracht werden. - Page 25 Dear customer, Congratulations on your purchase. Please read the following instructions carefully and follow them to prevent potential damage. We accept no liability for damage caused by disregarding the instructions and improper use. Please scan the QR code to access the latest operating instructions and further information about the product.
-
Page 26: Safety Instructions
SAFETY INSTRUCTIONS • Read all instructions carefully before use and keep this user manual in a safe place for future reference. • The installation work may only be carried out by an electrician or a qualified person. Before using the cooker hood, make sure that the voltage (V) and frequency (Hz) indicated on the cooker hood correspond to the voltage and frequency of the power supply in your household. - Page 27 Important notes on exhaust air operation WARNING Danger of poisoning from recirculated exhaust gases! Do not operate the appliance in extract air mode if it is operated together with a room air-dependent fi replace and suffi cient air circulation is not guaranteed. Room air-dependent fi replaces such as gas, oil, wood or coal heaters, boilers or instantaneous water heaters draw the air from the room and lead it outdoors through an exhaust pipe or chimney.
-
Page 28: Device Overview
DEVICE OVERVIEW Cooker Hood Support plate for plastic pipe Motor housing Air outlet Mounting panel Activated carbon filter Plastic pipe Cover of the activated carbon filter... -
Page 29: Installation
INSTALLATION Installation with exhaust air Note: Observe the safety instructions for operating the unit when the air is discharged to the outside. If the cooker hood is in operation at the same time as an appliance that draws its energy from a source other than electricity, the negative pressure in the room must not exceed 4 Pa (4 x 10⁻⁵ bar). - Page 30 Use of the cooker bonnet as an exhaust bonnet (with exhaust air to the outside) If the cooker bonnet is equipped with an activated carbon filter at the factory, this must be removed. It is only useful if you operate your cooker bonnet in recirculation mode.
- Page 31 • The angle of the bend of the exhaust air pipe should not be less than 120°. Align the pipe horizontally. Alternatively, the pipe should go up from the starting point and be led to an outer wall. • If the exhaust air is led into an exhaust air duct, the end of the inlet connection must be directed in the direction of flow.
- Page 32 Installation dimensions...
- Page 33 Hole size: 857 x 95 mm Housing...
-
Page 34: Installation Of The Cooker Bonnet
INSTALLATION OF THE COOKER BONNET Parts overview... - Page 35 Cut out the opening according to the indicated hole size. Install the cooker bonnet in the housing.
- Page 36 • Align part E to the appropriate height. • Connect part A and part E with 4 screws (part H). • Secure part E to the plate with 2 screws (part F). • Connect part A and part B with 4 screws (part G). •...
- Page 37 The installation is now complete.
-
Page 38: Operation
OPERATION Switching the appliance on/off Decrease the Increasing the fan speed fan speed Automatic delay on/off Raising/lowering the cooker bonnet When pressing the pull-out button for 2 seconds, the cooker bonnet starts to lift and remains in the highest available position. Press the button again to lower the cooker bonnet again. -
Page 39: Cleaning And Maintenance
CLEANING AND MAINTENANCE Note: Disconnect the cooker bonnet from the power supply before carrying out maintenance or cleaning work by pulling out the appliance plug or completely unscrewing the circuit breaker of the domestic installation or the screw fuse of the domestic installation. - Page 40 • Metal grease fi lters do not need to be replaced when they are over-saturated, but washed once a month by hand or in the dishwasher (60 °C). Allow the fi lter to dry thoroughly and carefully reinsert it in the cooker bonnet. Do not use alkaline dishwashing detergents (pH value above 7).
-
Page 41: Troubleshooting
TROUBLESHOOTING Problem Potential cause Solution The light turns on but The rotor blade of the Switch off the appliance the motor does not run. fan is blocked. and have it repaired by qualified personnel only. The motor is broken. The light is off and the The light is broken. -
Page 42: Product Data Sheet
PRODUCT DATA SHEET Information according to Regulation (EU) No. 65/2014 Measurement and calculation methods according to EN 61591:1997+A1:2006+A2:2 011+A11:2014+A12:2015 Item number 10041402 Description Symbol Value Unit Annual Energy Consumption AEC hood 37.0 kWh/Year Energy Efficiency class Fluid Dynamic Efficiency FDE hood 32.9 Fluid Dynamic Efficiency class Lighting Efficiency... - Page 43 Information according to Regulation (EU) No 66/2014 Measurement and calculation methods according to EN 61591:1997+A1:2006+A2:2 011+A11:2014+A12:2015 Item number 10041402 Designation Symbol Value Unit Annual Energy Consumption AEC hood 37.0 kWh/year Time extension factor Fluid Dynamic Efficiency FDE hood 32.9 Energy Efficiency Index EEI hood 43.5 Measured air volume flow at the...
-
Page 44: Disposal Considerations
DISPOSAL CONSIDERATIONS If there is a legal regulation in your country regarding the disposal of electrical and electronic equipment, this symbol on the product or on the packaging indicates that this product must not be disposed of with household waste. Instead, it must be taken to a collection point for the recycling of electrical and electronic equipment. - Page 45 Cher client, chère cliente, Toutes nos félicitations pour l’acquisition de ce nouvel appareil. Lisez attentivement les consignes suivantes et suivez-les pour éviter d'éventuels dommages. Nous ne saurions être tenus pour responsables des dommages dus au non-respect des consignes et à la mauvaise utilisation de l’appareil.
-
Page 46: Consignes De Sécurité
CONSIGNES DE SÉCURITÉ • Lisez attentivement toutes les consignes avant d'utiliser l'appareil et conservez le mode d'emploi pour vous y référer ultérieurement. • Les travaux de montage ne doivent être effectués que par un électricien ou une personne qualifiée. Avant d'utiliser la hotte, assurez-vous que la tension (V) et la fréquence (Hz) indiquées sur la hotte correspondent à... - Page 47 Remarques importantes pour l'utilisation en extraction d'air MISE EN GARDE Risque d‘intoxication par ré-aspiration de gaz de combustion Ne jamais utiliser la fonction d’extraction de l’appareil en même temps qu’un foyer dépendant de l’air ambiant si un apport suffi sant en air frais n'est pas garanti. Les foyers dépendants de l’air ambiant tels que les systèmes de chauff age au gaz, au fuel, au bois ou au charbon, les chauff e-eaux électriques, les chaudières, extraient l’air de la pièce et le rejette à...
-
Page 48: Descriptif De L'appareil
DESCRIPTIF DE L'APPAREIL Hotte aspirante Plaque de support pour tuyau en plastique Boîtier du moteur Évacuation d'air Plaque de montage Filtre à charbon actif Tube en plastique Cache du filtre à charbon actif... -
Page 49: Installation
INSTALLATION Installation avec extraction Remarque : Respectez les consignes de sécurité et d'utilisation de l'appareil en cas d'extraction d'air vers l'extérieur. Lorsque la hotte aspirante fonctionne en même temps qu'un appareil tirant son énergie d'une source autre que l'électricité, la dépression dans la pièce ne doit pas dépasser 4 Pa (4 x 10⁻⁵ bar). Installation en mode recyclage d'air Si vous ne disposez pas d'une extraction vers l'extérieur, vous n'avez pas besoin de conduit. - Page 50 Utilisation de la hotte aspirante comme hotte d'extraction (évacuation de l'air vers l'extérieur) Si la hotte aspirante est équipée en usine d'un filtre à charbon actif, vous devez le retirer. Il n'est utile que si vous utilisez votre hotte aspirante en mode recyclage d'air.
- Page 51 • L'angle de courbure du conduit d'évacuation ne doit pas être inférieur à 120°. Alignez le tube horizontalement. Le conduit peut aussi monter du point de départ et être dirigé vers un mur extérieur. • Si l'air évacué est dirigé vers un conduit d'évacuation, l'extrémité du raccord doit être orientée dans le sens de l'écoulement.
- Page 52 Dimensions d'installation...
- Page 53 Taille de l'ouverture : 857*95 mm Boîtier...
-
Page 54: Installation De La Hotte Aspirante
INSTALLATION DE LA HOTTE ASPIRANTE Aperçu des pièces... - Page 55 Découpez l'ouverture en fonction de la taille spécifiée. Installez la hotte dans le boîtier.
- Page 56 • Ajustez la pièce E à la hauteur appropriée. • Reliez la pièce A et la pièce E avec 4 vis (pièce H). • Fixez la pièce E à la plaque avec 2 vis (pièce F). • Reliez la pièce A et la pièce B avec 4 vis (pièce G). •...
- Page 57 L'installation est maintenant terminée.
-
Page 58: Utilisation
UTILISATION Allumer / éteindre l'appareil Diminuer la Augmenter vitesse du la vitesse du ventilateur ventilateur Différé automatique marche / arrêt Monter/baisser la hotte aspirante Appuyez sur le bouton d'extension pendant 2 secondes pour faire monter la hotte jusqu'à rester dans la position la plus élevée disponible. Appuyez à nouveau sur le bouton pour faire redescendre la hotte. -
Page 59: Nettoyage Et Maintenance
NETTOYAGE ET MAINTENANCE Remarque : Avant d'effectuer des travaux d'entretien ou de nettoyage, débranchez la hotte aspirante de l'alimentation électrique en tirant sur la fiche de l'appareil ou en dévissant complètement le disjoncteur de l'installation domestique ou le fusible à vis de l'installation domestique. •... - Page 60 • Les fi ltres à graisse en mousse doivent être trempés dans de l'eau chaude savonneuse pendant 1 à 2 heures une fois par mois. Ne pas essorer les fi ltres à graisse et répéter la procédure si nécessaire. Remplacez le fi ltre à graisse en mousse par un fi ltre neuf après un maximum de 5 à...
-
Page 61: Résolution Des Problèmes
RÉSOLUTION DES PROBLÈMES Problème Cause possible Solution L'éclairage est allumé La pale du ventilateur Éteignez l'appareil et mais le moteur ne est bloquée. faites-le réparer par fonctionne pas. un personnel qualifié Le moteur est exclusivement. endommagé. L'éclairage est éteint et L'éclairage est cassé. -
Page 62: Fiche De Données Produit
FICHE DE DONNÉES PRODUIT Informations selon le règlement (UE) n ° 65/2014 Méthodes de mesure et de calcul selon EN 61591: 1997 + A1: 2006 + A2: 2011 + A11: 2014 + A12: 2015 Numéro d'article 10041402 Description Symbole Valeur Unité... - Page 63 Informations selon le règlement (UE) n ° 66/2014 Méthodes de mesure et de calcul selon EN 61591: 1997 + A1: 2006 + A2: 2011 + A11: 2014 + A12: 2015 Numéro d'article 10041402 Description Symbole Valeur Unité Consommation annuelle AEC de la hotte 37,0 kWh/an d'énergie...
-
Page 64: Informations Sur Le Recyclage
INFORMATIONS SUR LE RECYCLAGE S‘il existe une réglementation pour l‘élimination ou le recyclage des appareils électriques et électroniques dans votre pays, ce symbole sur le produit ou sur l‘emballage indique que cet appareil ne doit pas être jeté avec les ordures ménagères. - Page 65 Estimado cliente: Le felicitamos por la adquisición de este producto. Lea atentamente el siguiente manual y siga cuidadosamente las instrucciones de uso con el fin de evitar posibles daños. La empresa no se responsabiliza de los daños ocasionados por un uso indebido del producto o por haber desatendido las indicaciones de seguridad.
-
Page 66: Indicaciones De Seguridad
INDICACIONES DE SEGURIDAD • Lea atentamente todas las indicaciones antes de utilizar el aparato y conserve este manual de instrucciones para consultas posteriores. • Los trabajos de instalación sólo pueden ser realizados por un electricista cualificado o una persona cualificada. Antes de utilizar la campana extractora, asegúrese de que la tensión (V) y la frecuencia (Hz) indicadas en la campana extractora se corresponden con la tensión y la frecuencia de la red eléctrica de su hogar. - Page 67 Indicaciones importantes sobre la función de extracción de aire ADVERTENCIA ¡Peligro de intoxicación por la recirculación de gases! No utilice el aparato en modo de extracción de aire si lo emplea junto con una chimenea que depende del aire ambiente, ya que no se garantiza una circulación sufi ciente del aire.
-
Page 68: Descripción General Del Aparato
DESCRIPCIÓN GENERAL DEL APARATO Campana extractora Placa de soporte para tubo de plástico Carcasa del motor Salida del aire Bandeja Filtro de carbón activo Tubo de plástico Tapa del filtro de carbón activado... -
Page 69: Instalación
INSTALACIÓN Instalación con salida de aire Nota: Siga las instrucciones de seguridad para el funcionamiento de la unidad cuando el aire se expulsa al exterior. Si la campana extractora funciona al mismo tiempo que un aparato que obtiene su energía de una fuente distinta a la eléctrica, la presión negativa en el local no debe superar los 4 Pa (4 x 10⁻⁵ bar). - Page 70 Las aberturas que no son necesarias están cubiertas con una tapa de plástico. Esta tapa de plástico se puede retirar fácilmente girándola en sentido contrario a las agujas del reloj y, opcionalmente, se puede acoplar a otra abertura que no sea necesaria.
- Page 71 • Cuando se utilicen tuberías flexibles, siempre hay que montar la tubería firmemente para minimizar la pérdida de presión. • Si el tubo de aire de escape se coloca horizontalmente, debe mantenerse una pendiente mínima de 1 cm por metro o un ángulo de inclinación de 2°. De lo contrario, la condensación podría llegar al motor de la campana extractora.
- Page 72 Dimensiones de la instalación...
- Page 73 Tamaño del orificio: 857 x 95 mm Carcasa...
-
Page 74: Montaje De La Campana Extractora
MONTAJE DE LA CAMPANA EXTRACTORA Índice de piezas... - Page 75 Recorte la abertura según el tamaño de orificio indicado. Instale la campana extractora en la carcasa.
- Page 76 • Alinee la pieza E a la altura adecuada. • Conecte la parte A y la parte E con 4 tornillos (parte H). • Fije la parte E a la placa con 2 tornillos (parte F). • Conecte la parte A y la parte B con 4 tornillos (parte G). •...
- Page 77 Con esto, la instalación ha finalizado.
-
Page 78: Funcionamiento
FUNCIONAMIENTO Encender/ apagar el aparato Disminuir el Aumentar el nivel nivel Encendido automático Subir/bajar la tapa de la cocina Al pulsar el botón de extracción durante 2 segundos, la campana extractora comienza a elevarse y permanece en la posición más alta disponible. Pulse de nuevo el botón para volver a bajar la cubierta. -
Page 79: Limpieza Y Mantenimiento
LIMPIEZA Y MANTENIMIENTO Nota: Desconecte la campana extractora de la red eléctrica antes de realizar trabajos de mantenimiento o limpieza, sacando el enchufe del aparato o desenroscando completamente el disyuntor de la instalación doméstica o el fusible roscado de la instalación doméstica. •... - Page 80 • Los fi ltros antigrasa metálicos no necesitan ser sustituidos cuando están sobresaturados, sino lavados una vez al mes a mano o en el lavavajillas (60 °C). Deje secar bien el fi ltro y vuelva a colocarlo con cuidado en la campana extractora.
-
Page 81: Reparación De Anomalías
REPARACIÓN DE ANOMALÍAS Error Posible causa Solución La luz está encendida, El aspa está bloqueada. Desconecta el aparato pero el motor no para que lo repare El motor está averiado. funciona. personal técnico cualificado. La luz está apagada y el La luz está... -
Page 82: Ficha Del Producto
FICHA DEL PRODUCTO Información según el Reglamento (UE) n.º 65/2014 Métodos de medición y cálculo según EN 61591:1997+A1:2006+A2:2011+A11:2014 +A12:2015 Número del artículo 10041402 Descripción Símbolo Valor Unidad Consumo energético anual AEC campana 37,0 kWh/año Clase de eficiencia energética Eficiencia fluidodinámica FDE campana 32,9 Clase de eficiencia fluidodinámica... - Page 83 Información según el Reglamento (UE) nº 66/2014 Métodos de medición y cálculo según EN 61591:1997+A1:2006+A2:2011+A11:2014 +A12:2015 Número del artículo 10041402 Descripción Símbolo Valor Unidad Consumo energético anual AEC campana 37,0 kWh/año Factor de extensión temporal Eficiencia fluidodinámica FDE campana 32,9 Índice de eficiencia energética EEI campana 43,5...
-
Page 84: Indicaciones Sobre La Retirada Del Aparato
INDICACIONES SOBRE LA RETIRADA DEL APARATO Si en su país existe una disposición legal relativa a la eliminación de aparatos eléctricos y electrónicos, este símbolo estampado en el producto o en el embalaje advierte de que no debe eliminarse como residuo doméstico. En lugar de ello, debe depositarse en un punto de recogida de reciclaje de aparatos eléctricos y electrónicos. - Page 85 Gentile cliente, La ringraziamo per l'acquisto del dispositivo. La preghiamo di leggere attentamente le seguenti indicazioni e di seguirle per evitare eventuali danni. Non ci assumiamo alcuna responsabilità per danni scaturiti da una mancata osservanza delle avvertenze di sicurezza e da un uso improprio del dispositivo.
-
Page 86: Avvertenze Di Sicurezza
AVVERTENZE DI SICUREZZA • Leggere attentamente tutte le istruzioni prima dell'uso e conservare il manuale per consultazioni future. • Il montaggio può essere eseguito solo da un tecnico qualificato. Prima di utilizzare la cappa aspirante, accertarsi che la tensione (V) e la frequenza (Hz) indicate corrispondano alla tensione (V) e alla frequenza (Hz) domestiche. - Page 87 Note importanti sulla modalità di scarico dell'aria AVVERTENZA pericolo di intossicazione da gas di scarico riaspirati! Non accendere il dispositivo in funzione di scarico mentre è attivo un impianto di riscaldamento che sfrutta l'aria dell'ambiente e se non è presente una ventilazione suffi ciente. Gli impianti di riscaldamento che sfruttano l'aria dell'ambiente (ad es.
-
Page 88: Descrizione Del Dispositivo
DESCRIZIONE DEL DISPOSITIVO Cappa aspirante Pannello di supporto per il tubo di plastica Alloggiamento del motore Uscita dell'aria Pannello di montaggio Filtri a carboni attivi Tubo di plastica Copertura del filtro a carboni attivi... -
Page 89: Installazione
INSTALLAZIONE Installazione con scarico all'esterno Nota: prestare attenzione alle avvertenze di sicurezza se si utilizza lo scarico all'esterno. Se la cappa aspirante è in funzione contemporaneamente a un altro dispositivo che trae energia da una fonte diversa dalla corrente, la depressione nella stanza non deve superare i 4 Pa (4 x 10⁻⁵ Bar). - Page 90 Utilizzo della cappa aspirante in funzione di scarico (con scarico verso l'ester- Se la cappa aspirante è dotata di un filtro a carbone attivo come impostazione di fabbrica, questo deve essere rimosso. L'utilizzo di tale filtro ha senso solo se la cappa viene usata in modalità...
- Page 91 • Nel caso di installazione orizzontale del tubo di scarico, è necessario assicurare una pendenza minima di 1 cm al metro o un'inclinazione di 2°. In caso contrario, la condensa potrebbe penetrare nel motore del cappa aspirante. • La curvatura del tubo di scarico non deve essere inferiore a 120°. Posizionare il tubo orizzontalmente.
- Page 92 Dimensioni per l'installazione a incasso...
- Page 93 Dimensioni dell'apertura per l'incasso: 857 x 95 mm Alloggia- mento...
-
Page 94: Incasso Della Cappa Aspirante
INCASSO DELLA CAPPA ASPIRANTE Descrizione dei componenti... - Page 95 Realizzare l'apertura rispettando le misure indicate. Installare la cappa nell'alloggiamento.
- Page 96 • Posizionare il componente E all'altezza giusta. • Collegare i componenti A e E con 4 viti (componente H). • Fissare il componente E al pannello con 2 viti (componente F). • Collegare i componenti A e B con 4 viti (componente G). •...
- Page 97 L'installazione è ora completa.
-
Page 98: Utilizzo
UTILIZZO Accendere/ spegnere il dispositivo Ridurre la Aumentare la velocità della velocità della ventola ventola Ritardo automatico on/off Sollevare/abbassare la cappa aspirante Premendo il tasto di sollevamento per 2 secondi, la cappa inizia a sollevarsi e si blocca nella posizione più elevata. Premendo nuovamente il tasto, la cappa si abbassa di nuovo. -
Page 99: Pulizia E Manutenzione
PULIZIA E MANUTENZIONE Nota: prima di realizzare pulizia o opere di manutenzione, scollegare la cappa dalla rete elettrica staccando la spina o disattivando l'interruttore di protezione o il fusibile a vite dell'impianto di distribuzione domestico. • Non pulire la cappa aspirante con un pulitore a vapore. •... - Page 100 • I fi ltri antigrasso in metallo non devono essere sostituiti quando sono troppo pieni, ma devono essere lavati una volta al mese a mano o in lavastoviglie (60 °C). Lasciare asciugare bene il fi ltro e inserirlo nuovamente nella cappa aspirante facendo attenzione.
-
Page 101: Risoluzione Dei Problemi
RISOLUZIONE DEI PROBLEMI Errore Possibile causa Soluzione La luce è accesa, ma il La pala della ventola è Spegnere il dispositivo motore non funziona. bloccata. e farlo riparare esclusivamente da Il motore è rotto. personale tecnico qualificato. La luce è spenta e il La luce è... -
Page 102: Scheda Informativa Del Prodotto
SCHEDA INFORMATIVA DEL PRODOTTO Indicazioni secondo il regolamento (UE) n. 65/2014 Metodi di misurazione e di calcolo secondo EN 61591:1997+A1:2006+A2:2011+A11 :2014+A12:2015 Numero articolo 10041402 Denominazione Simbolo Valore Unità Consumo energetico annuale AEC hood 37,0 kWh/anno Classe di efficienza energetica Efficienza fluidodinamica FDE hood 32,9 Classe per l'efficienza... - Page 103 Indicazioni secondo il regolamento (UE) Nr. 66/2014 Metodi di misurazione e di calcolo secondo EN 61591:1997+A1:2006+A2:2011+A11 :2014+A12:2015 Numero articolo 10041402 Denominazione Simbolo Valore Unità Consumo energetico annuale AEC hood 37,0 kWh/anno Fattore di incremento nel tempo Efficienza fluidodinamica FDE hood 32,9 Indice di efficienza energetica EEI hood...
-
Page 104: Avviso Di Smaltimento
AVVISO DI SMALTIMENTO Se nel vostro Paese sono vigenti regolamenti legislativi relativi allo smaltimento di dispositivi elettrici ed elettronici, questo simbolo sul prodotto o sull'imballaggio indica che non è consentito smaltire questo prodotto insieme ai rifiuti domestici. Il dispositivo deve invece essere portato in un centro di raccolta per il riciclaggio di dispositivi elettrici ed elettronici.
Need help?
Do you have a question about the BRISA and is the answer not in the manual?
Questions and answers