
Related Manuals for Broyhill BANCROFT A102015331


Summary of Contents for Broyhill BANCROFT A102015331
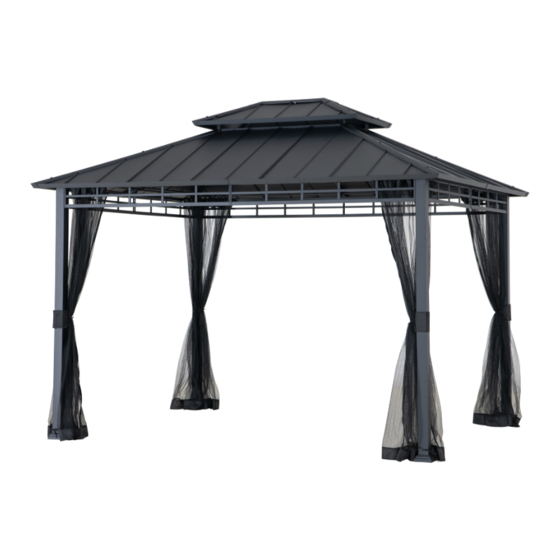
- Page 1 ASSEMBLY INSTRUCTIONS ITEM#: A102015331/A102015331B1/A102015331B2 SKU#: 810670189/810670187/810670188 BANCROFT 10X12FT HARD TOP METAL GAZEBO Need help? We are here for you! 1(866)578-6569 24/7 • Toll Free Production number: 2024100351...
-
Page 2: Warranty
GENERAL BEST PRACTICES FOR ASSEMBLY: • Please read and understand this entire manual before attempting to assemble or install the product. • Before beginning assembly of product, make sure all parts are present. Compare parts with package contents list and hardware contents list. -
Page 3: Exploded Drawing
EXPLODED DRAWING 3/26... -
Page 4: Parts List
PARTS LIST Label Part Number Description Part Image P00020087901 Post P00010056401 Post Base P00610030101 Base Cover Left Cross Beam P00040168401 (Long Side) Right Cross Beam P00040168501 (Long Side) Left Cross Beam P00040167601 (Short Side) Right Cross Beam P00040167701 (Short Side) Middle Beam P00050222201 Connector... - Page 5 P00050214101 Beam Connector 1 P00050214201 Beam Connector 2 Big Roof Long P00060295601 Panel Flashing 1 Big Roof Long P00060295701 Panel Flashing 2 Big Roof Short P00060295801 Panel Flashing 1 Big Roof Short P00060295901 Panel Flashing 2 Small Roof Low P00060296401 Long Panel Flashing Small Roof Low...
- Page 6 Big Roof Left Roof P00070142601 Panel Big Roof Right P00070142701 Roof Panel Big Roof Left P00070142801 Middle Roof Panel Big Roof Right P00070142901 Middle Roof Panel Big Roof Left P00070143001 Small Roof Panel Big Roof Right P00070143101 Small Roof Panel Small Roof Rafter P00080051601 Big Roof Rafter...
-
Page 7: Hardware List
HARDWARE LIST Label Part Number Description Part Image H100010090 Bolt M6*15 H100010050 Bolt M6*20 H100010101 Bolt M6*45 Flat washer H050030001 H040010004 Nut M6 M6 Rubber H050050018 Washer Plastic H990010031 Buckle H990050001 Ring Stake Φ8*180 H070010003 Allen Wrench H090030002 H090010017 Wrench M6 7/26... -
Page 8: Helpful Hints
HELPFUL HINTS • Tools needed and not included: • How many people needed for the installation work • Estimate assemble time: 150-180 minutes How many people needed for the installation 8/26... - Page 9 STEP 1 Insert Base Cover(C) onto post(A), assemble the post base(B) Rafter Connector(F) post(A) with bolts(H1), tighten by Allen wrench (HW1). 9/26...
- Page 10 STEP 2 Connecting Left Cross Beam (Long Side)(D1) and Right Cross Beam (Long Side)(D2) with bolt(H2), flat washer(H4) and nut(H5), Connecting Left Cross Beam (Short Side)(D3) and Right Cross Beam (Short Side)(D4) with bolt(H2), flat washer(H4) and nut(H5), tighten by wrench (HW1). 10/26...
- Page 11 STEP 3 Assemble the Left Cross Beam (Short Side)(D3) and Right Cross Beam (Short Side)(D4) to post(A) with bolts(H1), tighten by wrench (HW1). 11/26...
- Page 12 STEP 4 d1=d2 Rt∠90 Assembly Tip on Step 4: Please measure to make sure the length of d1 is equal to d2 before moving to next step to ensure a square frame and best results. Keep the beam at right angles to the post, the post at right angles to the ground, and keep the beam horizontal.
- Page 13 STEP 5 Assemble Rafter(G) Small Connector(K) and Rafter Connector(F) with bolts(H1), assemble the Beam Connector 2(Q) Rafter(G) with bolts(H1), tighten by wrench (HW1). 13/26...
- Page 14 STEP 6 Assemble Middle Beam Connector(E) and Beam Connector 1(P) to Middle Beam(J) with bolts(H1), tighten by wrench (HW1). 14/26...
- Page 15 STEP 7 Assemble Roof Panel Flashing(M1)&(M2) to Rafter(G) with bolts(H1), assemble the Middle Beam(J) to Big Roof Up Panel Flashing(M1)&(M2) with bolts(H1), assemble the Middle Beam Connector(E) to Cross Beam(D1/D2/ D3/D4) with bolts(H1), tighten by wrench (HW1). 15/26...
- Page 16 STEP 8 Assemble the Small Roof Low Panel Flashing(S1)&(S2) Rafter(G) with bolts(H1), tighten by wrench (HW1). Screw Hook(L) Small Connector(K). 16/26...
- Page 17 STEP 9 Spread the Small Roof Panel(U1)&(U2) on the small roof, assemble the Small Roof Panel(U1)&(U2) to Rafter(G) with bolts(H1), assemble the Small Roof Panel(U1)&(U2) to Small Roof Low Panel Flashing(S1)&(S2) with bolts(H1), tighten by wrench (HW1). 17/26...
- Page 18 STEP 10 Cover the Small Roof Rafter Cap(W1) and Top Cover(W3) on the small roof, Assemble the Small Roof Rafter Cap(W1) to Rafter(G) with bolts(H3) and rubber(HH1), Assemble the Top Cover(W3) Small Connector(K) with bolts(H1), tighten by wrench (HW1). 18/26...
- Page 19 STEP 11 Assemble Roof Small Beam(N1)&(N2) to Beam Connector 1(P) with bolts(H1), Assemble the Big Roof Small Beam(N1)&(N2) to Beam Connector 2(Q) with bolts(H1), tighten by wrench (HW1). 19/26...
- Page 20 STEP 12 Assemble the Short Mosquito Netting Rod (T1)&(T2) to Middle Beam(J) and Rafter(G) with bolts(H1), Assemble the Long Mosquito Netting Rod(T3)&(T4) to Middle Beam(J) and Rafter(G) with bolts(H1), tighten by wrench (HW1). 20/26...
- Page 21 STEP 13 Assemble the Middle Beam Decoration(Y) and Beam Connector 1(P) to Big Roof Panel Flashing (R1/R2/R3/R4) with bolts(H1), Assemble Rafter(G) to Big Roof Panel Flashing (R1/R2/R3/ R4) with bolts(H1), tighten by wrench (HW1). 21/26...
- Page 22 STEP 14 As shown in the picture, spread the Big Roof Panel (V1/V2/V3/V4/V5/V6/V7) on the long side of big roof, spread the Big Roof Panel (V2/V3/V4/V5/V6/V7) on the short side of big roof. 22/266...
- Page 23 STEP 15 Lock the Big Roof Panel (V1/V2/V3/V4/V5/V6/ Roof Panel Flashing(M1)&(M2),Rafter(G) and Big Roof Long Panel Flashing(R1/R2/R3/R4) with Plastic Buckle(HH2) and bolts(H1), tighten by wrench (HW1). 23/26...
- Page 24 STEP 16 Assemble Roof Rafter Cap(W2) to Rafter(G) with bolts(H3) and washer(HH1), tighten by wrench (HW1). 24/26...
- Page 25 STEP 17 Please do the matching of zippers for different panels as showing the picture Hang Mosquito Netting(X) on the Mosquito Netting Rod (T1/ T2/T3/T4) with Ring(HR), banding netting to the Post(A) with Velcro and rope. 25/26...
- Page 26 STEP 18 Use Stake (HS) to fix the assembled tent on the flat ground through the Post Base (B), and the product assembly is completed. 26/26...
Need help?
Do you have a question about the BANCROFT A102015331 and is the answer not in the manual?
Questions and answers
need model number for bancroft 10x12ft hard top metal gazebo sold by big lots is this the model number A102015331?
Yes, the model number for the Broyhill Bancroft 10x12ft hard top metal gazebo sold by Big Lots is A102015331.
This answer is automatically generated
Do I need to bolt down?
Yes, the Broyhill Bancroft A102015331 should be secured to the ground using stakes or anchors. Stakes are provided for installation on level ground, but if installing on a wood deck or concrete surface, appropriate anchors should be used.
This answer is automatically generated
How to order replacement parts in need 2 full roof panels