Table of Contents
Advertisement
Quick Links
Imported by
Amart Furniture
For any assistance with assembly or for missing parts please phone
Amart Furniture,
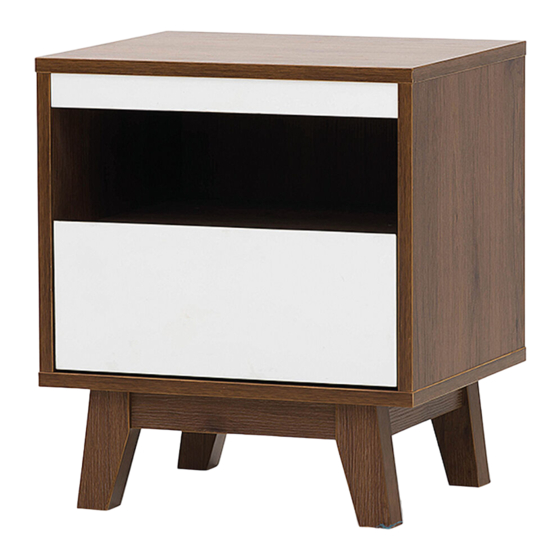
480MM
550MM
Pty Ltd, Qld, Brisbane Australia.
Customer Service Free call 1800 351 084
ASSEMBLY INSTRUCTION
ANDI 1 DRAWER BEDSIDE
ITEM CODE 54892
Imported by Amart Furniture Pty Ltd, Qld, Brisbane Australia.
For any assistance with assembly or for missing parts please phone
Amart Furniture, Customer Service Free call 1800 351 084
400MM
1
54892
Advertisement
Table of Contents

Related Manuals for Amart Furniture ANDI 54892


Summary of Contents for Amart Furniture ANDI 54892
- Page 1 ASSEMBLY INSTRUCTION ANDI 1 DRAWER BEDSIDE ITEM CODE 54892 Imported by Amart Furniture Pty Ltd, Qld, Brisbane Australia. For any assistance with assembly or for missing parts please phone Amart Furniture, Customer Service Free call 1800 351 084 400MM 480MM...
-
Page 2: Before You Start
PRE-ASSEMBLY PREPARATION Before you start: Choose a clean, level, spacious assembly area. Avoid hard surfaces that may damage the product Take care when lifting. Product should be assembled as near as possible to the point of use Ensure that you have all required contents for complete assembly Always read the assembly instructions carefully before beginning assembly. - Page 3 EXPLODED EXAMPLE LEFT SIDE PANEL RIGHT SIDE PANEL CROSSING BAR SHELF TOP PANEL BOTTOM PANEL SKIRTS DRAWER FRONT PANEL BACK PANEL DRAWER RIGHT PANEL DRAWER BACK PANEL DRAWER LEFT PANEL DRAWER BOTTOM PANEL cam pin cam pin dowel non-slip sticker cam lock M7x39mm M7x54mm...
-
Page 4: Dimensions (Mm)
PART NUMBER DIMENSIONS(MM) 1&2 393x360x18 40x440x15 375x440x15 5&6 395x478x18 50x265x25 180x434x15 9&10 60x150x40 475x392x2.5 110x330x15 110x383x15 110x330x15 324x393x2.5 54892... - Page 5 CAM LOCK INSTALL METHOD AS FOLLOWS 1.1cm 1.5cm Step 1 Step 2 Step 3 Lock Fix cam nut into the bottom of hole then tighten it. 54892...
- Page 6 STEP 1: Fix runners to left side panel and right side panel . CL CR Insert dowel to left side panel and right side panel . Bottom edge Front veneer edge Front veneer edge STEP 2: Insert dowel to crossing bar and shelf . Top edge Front veneer edge Left edge...
-
Page 7: Right Side Panel
STEP 3: Attach crossing bar and shelf to left side panel and right side panel with the dowel. Front veneer edge Front veneer edge Bottom edge Bottom edge STEP 4: Fix cam pin to top panel . Back veneer edge Left veneer edge 54892... - Page 8 STEP 5: Attach top panel to left side panel , crossing bar and right side panel with the cam locks .Attach crossing bar to top panel with screw Front veneer edge Front veneer edge Left veneer edge Bottom edge STEP 6: Attach bottom panel onto existing unit with screws Front veneer edge Front veneer edge...
- Page 9 STEP 7: Insert dowel to skirts .Fix cam pin to legs Attach non-slip stickers to the bottom of legs Bottom veneer edge Left edge Top edge Right edge Bottom edge Bottom edge STEP 8:Attach legs to skirts with the cam locks Bottom veneer edge Bottom veneer edge Left veneer edge...
- Page 10 STEP 9:Attach legs to skirts with the cam locks Bottom veneer edge Left veneer edge STEP 10: Attach the bottom parts to existing unit with screws Front veneer edge Bottom veneer edge Left veneer edge 54892...
- Page 11 STEP 11: Attach back panel onto existing unit with screws Right veneer edge STEP 12: Attach drawer left panel and drawer right panel drawer back panel with screw .Insert bottom panel to the existing unit. Bottom edge Bottom edge Bottom edge Bottom edge Front edge Front edge...
- Page 12 STEP 13: Fix cam pin to drawer front panel .Attach drawer front panel to the body of drawer with cam locks . Bottom edge Bottom venner edge Bottom edge Right veneer edge Top veneer edge Left veneer edge STEP 14: Fix runners to the bottom of drawer using screws .
- Page 13 STEP 15: Assemble drawers to the unit. Left veneer edge ASSEMBLY COMPLETE DO NOT PUSH OR DRAG THIS FURNITURE – IT WILL CAUSE DAMAGE TO THE LEGS 54892...
- Page 14 STEP 1: Fix bracket to back panel using screws M3.5*14MM . Put plastic string into bracket. NOTE - This product must be fixed to a wall. Please ensure the correct wall fixings are used. Failure to do so may result in personal injury or cause property damage if the product topples over.
- Page 15 STEP 2: Fix bracket onto the wall using screws M4*30MM. Join wallboard and the furniture with plastic sting. Furniture top Wallboard Bracket 54892...
- Page 16 SAFETY BRACKETS INSTRUCTIONS 1.Attach a bracket to the wallboard with the long screws provided. 2.Attach a bracket to the furniture frame under the top with the short screws provided. 3.Move the furniture into its final position. Thread a strap through the bracket as shown in the illustration, tighten strap until snug.
-
Page 17: Product Care
PRODUCT CARE: To protect your furniture,we suggest the following: *Avoid placing your furniture in direct sunlight. *Do not place furniture directly under windows. *Do not place sharp materials(knife,fork,etc) directly onto your furniture as sharp material may scrape and damage the finish. Do not place material with high temperature directly onto the surface of your furniture.
Need help?
Do you have a question about the ANDI 54892 and is the answer not in the manual?
Questions and answers