Advertisement
INSTALLATION INSTRUCTIONS
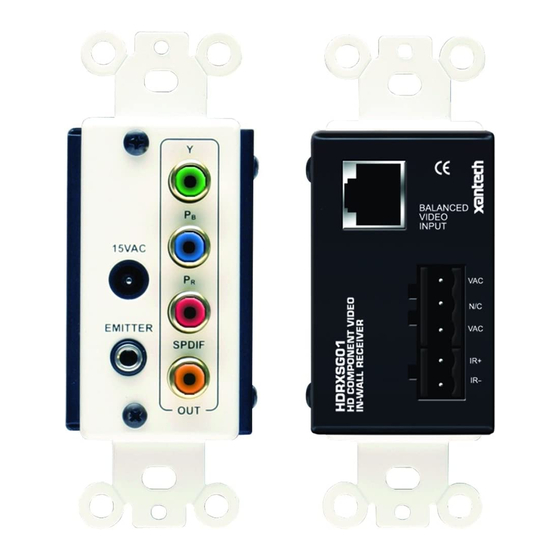
DESCRIPTION
The HDRXSG01 CAT5 receiver automatically senses and compensates for the both cable length and
wire quality for the simplest installation in the industry. It senses cable run length in 20-feet
increments and self-adjusts with no switches to set and no charts to consult, removing the guesswork
from high definition video distribution over CAT5 wire.
The HDRXSG01 receiver mounts in the zone up to 1000 feet from the HD44CC5 switcher, and
installs easily in a single-gang J-box. It contains a RJ45 input for the HD video and digital audio signal
as well as a standard IR pass through connection (requires separate wire run) and power connection.
Outputs include component video, digital audio via S/PDIF connection and IR signal.
The HDRXSG01 is to be used with either the HD44CC5 (video matrix transmitter) or HDTXSG01
(single transmitter module). Both the HD44CC5 and HDTXSG01 are sold separately.
SPECIFICATIONS
Size: 1 1/2" W x 2 1/4" D x 4" H
Weight: 0.38 lbs (0.17 kilos)
Bandwidth supports resolutions of 1080p, 1080i, 720p, 480p and 480i.
Includes external power supply (8VAC, 400mA, 50-60Hz)
Gold plated RCA connectors
08905063A
HDRXSG01
High Definition Receiver Module
- 1 -
Advertisement
Table of Contents

Related Manuals for Xantech HDRXSG01


Summary of Contents for Xantech HDRXSG01
-
Page 1: Installation Instructions
CAT5 wire. The HDRXSG01 receiver mounts in the zone up to 1000 feet from the HD44CC5 switcher, and installs easily in a single-gang J-box. It contains a RJ45 input for the HD video and digital audio signal as well as a standard IR pass through connection (requires separate wire run) and power connection. - Page 2 HD44CC5 first. Then connect power to the HDRXSG01. [3] On the HD44CC5, set the correct source to zone to route the signal to the HDRXSG01 from the connected High-Definition source. Refer to the HD44CC5 manual on how to use RS232 and IR RC68+ controls for source to zone routing.
- Page 3 QUICK INSTALLATION: HDTXSG01 and HDRXSG01 [1] Connect the High-Definition Source to the HDTXSG01. [2] Using CAT5 cable, connect the HDTXSG01 output to the HDRXSG01 input. [3] Connect the High-Definition Display to the HDRXSG01. [4] Installation Complete! No adjustments needed! 08905063A...
-
Page 4: Important Notice
The HDRXSG01 is supplied with a 8VAC, 400mA power supply. Do not use any power supply other than the one included with the HDRXSG01. The HDRXSG01 can be powered from either the front on the unit (DIN connection) or the rear of the unit (Screw Terminal connection). DO NOT USE FRONT AND REAR POWER SUPPLY CONNECTIONS AT THE SAME TIME.
Need help?
Do you have a question about the HDRXSG01 and is the answer not in the manual?
Questions and answers