
Related Manuals for Redtiger T700


Summary of Contents for Redtiger T700
- Page 1 T700 USER MANUAL Email: support@redtigercam.com Website: http://www.redtigercam.com Phone: +188 8966 8028...
- Page 3 WARNING: Be careful when using your camera and its accessories. Always be cautious of your surroundings to avoid injuring yourself and others. Make sure to follow all local laws including all privacy laws which may restrict recording in certain areas.
- Page 4 IC warning: This device contains licence-exempt transmitter(s)/receiver(s)/ that comply with Innovation Science and Economic Development Canada's licence-exempt RSS(s). Operation is subject to the following two conditions: 1. This device not cause interference. 2. This device must accept any interference, including interference that may cause undesired operation of the device.
-
Page 5: Table Of Contents
Contents Mainten Your Camera What's in the box? Mounting the Mirror Mounting the rear camera Mounting the GPS Meeting Your T700 T700 Power Tools Setting Up Your Camera Customizing Your T700 Redtiger Player ( PC ) Customer Service Product Information... -
Page 6: Mainten Your Camera
Mainten Your Camera Do not directly plug and unplug the cable or SD card, please perform related operations after camera off. We do not encourage you connection your camera with other hardwire kit, but if you insist to do this, please have a look of those lower than 6V and higher than 3A. -
Page 8: Mounting The Mirror
Mounting the Mirror Step 1: Pull out the lens of the T700 dash cam to match the rearview mirror of the vehicle. Step 2: Extend the straps around the back of the rear-view mirror and attach them to the bottom retaining hooks. - Page 9 Mounting the Mirror Step 3: Power on the dash cam with box included car charger, don't charge it with your own chargers. Step 4: Test the camera to make sure everything works.
-
Page 10: Mounting The Rear Camera
Mounting the rear camera How to install the rear camera We recommend installing the rear camera outside the car (above the license plate). The effect of the rear camera inside the car may be affected by the windshield. 1. Tear off the 3M tape on the rear lens and paste it above the license plate. - Page 11 Mounting the rear camera PLACEMENT OF REAR LENS INSIDE CAR Step 1: Confirm the accessories 1 pc mount bracket (2 pcs black iron sheets) 4 pcs screws (2 pcs small screws, 2 pcs large screws) Step 2: Place a iron sheet over the rear camera, aim it at the hole, and screw it on.
- Page 12 Mounting the rear camera Step 4:Stick the bracket to the rear windshield with 3M glue NOTE : 1. We suggest to install outside the car, the effect inside the car is far worse than outside the car. 2. If your car is a RV or a pickup truck, you can install the rear camera forward (the bracket is below), and turn on the "Upside down of rear camera"...
- Page 13 Mounting the rear camera Placement of rear cam outside car We suggest to install outside car, not inside Step 1: Tear off the release paper of 3M sticker on Rear lens. Step 2: Paste the rear lens directly above the license plate.
-
Page 14: Mounting The Gps
Mounting the GPS How to install the GPS GPS front and back Installation location Position 1: Considering that the front windshield of a motor vehicle has a large enough view of the sky, it is usually recommended that the GPS module be placed in the central console. At the corners of the central console and the edge of the windshield, after adopting hidden wiring, they are fixed with double-sided tape. - Page 15 Mounting the GPS Considering the use effect and installation convenience, we usually recommend customers to install it at position 1. Of course, you can also try to install it in other locations for testing, and choose the location you think is most suitable. (1) Install the GPS Antenna onto the camera, the GPS Antenna will start to search for a GPS signal.
-
Page 16: Meeting Your T700
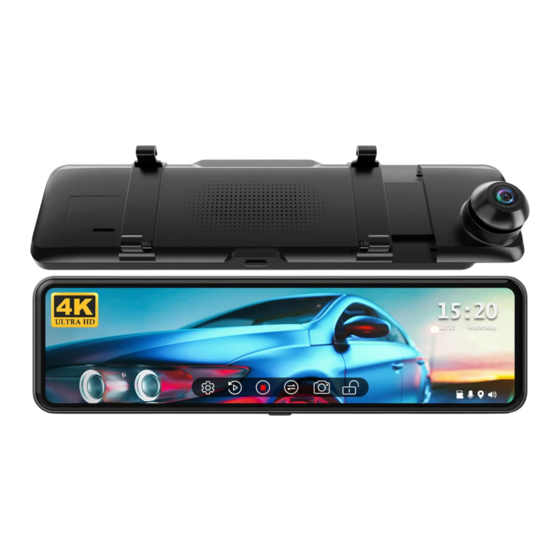
Meeting Your T700 Name Description Front Camera Record the front view of the vehicle Power Supply Port Connect the car charger Rear Camera Port Connect the rear view camera MicroSD Card Slot Insert a Micro SD card (maximum support 128G) -
Page 18: Setting Up Your Camera
Setting Up Your Camera Speed & Driving Direction: Once GPS is connected, the information will show Screen Brightness Adjustment: Slide the bar left and right to adjust the screen brightness Settings: Touch to enter the menu setting File Playback: Playback the video & Photo Start/ Stop Recording Front / Rear View Switch: Switch between front view &... - Page 19 Setting Up Your Camera While recording, swiping the screen up and down adjusts the angle of view. While recording, swipe the screen left or right to switch between front view, rear view, or split-screen view. Touch the touchscreen to diaplay the brightness scrollbar at the upper center, then slide right or left to adjust the brightness.
- Page 20 Setting Up Your Camera SD CARD With your camera off, insert the SD card into the card slot with the label facing the back of your camera.You can eject the card by pressing it into the slot with your fingernail. WIRING SET UP Connect your camera to a Cig charger using the included cig charge cable.
-
Page 21: Customizing Your T700
Customizing Your T700 Power ON/OFF If you turn on the engine (ACC on) while the cigar power adapter is connected,the power will be turned on automatically and the opening screen will be displayed. Press and hold the power button to turn off the power during startup,and then briefly press the power button again to turn on the... - Page 22 Customizing Your T700 Function Function Function Description Options Rear camera Adjust the brightness High/Middle/ brightness of the rear camera adjustment 2160P+1080P Adjust the video Resolution 1440P+1080P recording resolution 1080P+1080P 1munite/ Movie Clip Adjust the loop 2minutes/ Time recording duration 3minutes...
- Page 23 Customizing Your T700 Function Function Function Description Options When this setting is turned off, the time is Time always On/ Off not displayed when in therecording interface Set the common Language language, the default is English Latviešu 50Hz Flicker 60Hz...
- Page 24 Customizing Your T700 Function Function Function Description Options Adjust the sensitivity Off/Low/ of G-sensor ,it is G-Sensor Medium/ recommended sensitivity High to adjust to "Low" Split Screen/ Default The mode displayed Front camera/ booting on the screen Rear camera display...
- Page 25 Customizing Your T700 Function Function Function Description Options 24H Time style/ Time style 12H Time style Time zone Time Zone UTC -08:00 Set the vehicle speed KM/H Speed Unit display mode If you stay in other interface and forget to...
- Page 26 Customizing Your T700 Function Function Function Description Options The principle of the loop recording function is to only overwritethe Locked unlocked normal video to record On/Off a new video. If you want tolock the video loop video to be covered as well, please turn on this function.
- Page 27 Customizing Your T700 Mirror flip of rear image Upside down of rear image...
- Page 28 Customizing Your T700 Function Function Function Description Options This feature will allow you OK/Cancel Format to format inserted memory SD-Card card, all thedata will be deleted All setting will be Reset Setup OK/Cancel deleted Show On/Off reversing line Reversing Adjust the reversing line...
- Page 29 Customizing Your T700 NOTE If your car does not have a reversing system and you need a backup reversing system as an aid, you need to connect the red cable of the rear cam to the positive pole of your reversing lamp. If your car already has a reversing system, you just ignore the red cable onthe rear cam.
- Page 30 Customizing Your T700 Function Function Function Description Options Check the GPS signal reception details. (Number, Time, Information Longitude, Latitude) Check the product Product model and firmware Information version...
- Page 31 Customizing Your T700 Playback Mode When you turn on the power, the dash cam will start recording automatically. Please press the icon to pause the recording first. Click to enter the playback mode. Playback menu 1. Loop recording files 5. List of video files 2.
-
Page 32: Redtiger Player ( Pc )
Redtiger Player ( PC ) DOWNLOAD GPS PLAYER Download our GPS Player from website: https://www.redtigercam.com/pages/gps-player Transfer your recordings to computer Drag in GPS Player... - Page 33 Redtiger Player ( PC ) USE YOUR GPS PLAYER Footge Track Choose to see your Front / Rear View See your Speed and Location USE YOUR GPS PLAYER Watching Front & Rear at the same time Rear Front Folder...
-
Page 34: Customer Service
Behold the motif of complexity to us, simplicity to others, it's such a pleasure to listen to your advice, and we will promptly address any problems that arise. Redtiger Customer Service Team . E-MAIL WHATS APP FACE BOOK... -
Page 35: Product Information
Product Information Item Name 11" Stream Media Dash Camera Model REDTIGER T700 Screen Size 11" IPS Touch Screen Power Interface Type C 5V/3A Battery Super Capacitor Recording Resolution Front Camera: 3840*2160P, 2560*1440P, 1920*1080P Rear Camera: 1920*1080P Loop recording 1/2/3 mins...
Need help?
Do you have a question about the T700 and is the answer not in the manual?
Questions and answers