
Subscribe to Our Youtube Channel
Related Manuals for Redtiger T27


Summary of Contents for Redtiger T27
- Page 1 T27 USER MANUAL Email: help@redtigercam.com Website: http://www.redtigercam.com Phone: +188 8966 8028 (US)
- Page 3 WARNING: Be careful when using your camera and its accessories. Always be cautious of your surroundings to avoid injuring yourself and others. Make sure to follow all local laws including all privacy laws which may restrict recording in certain areas.
- Page 4 IC warning: This device contains licence-exempt transmitter(s)/receiver(s)/ that comply with Innovation Science and Economic Development Canada's licence-exempt RSS(s). Operation is subject to the following two conditions: 1. This device not cause interference. 2. This device must accept any interference, including interference that may cause undesired operation of the device.
-
Page 5: Table Of Contents
Contents What In Box? Mounting the Mirror Mounting the rear camera Mounting the GPS Meeting Your T27 T27 Power Tools Setting Up Your Camera Playback your T27 Customizing Your T27 Parking Mode ( Optional ) GPS Player (PC) Trouble Shooting... - Page 6 NOTES NOTES Before Installation Do not directly plug and unplug the cable or SD card, please perform related operations after camera off. Do not expose to the sun for a long time is the best, camera will heat on during its working, any damaged by high temperature will be added to 1 year free replacement warranty.
-
Page 7: What In Box
What In Box? T27 Mirror Dash Cam Backup Camera GPS Receiver Car Charger *1 Cable *1 3M Sticker*1 Mount Bracket*1 Screws *4 Backup Camera *1 Straps *4 (Inside of Vehicle) Cleaning User Manual*1 Tool *1 Cable Straps*5 Cloth *1... -
Page 8: Mounting The Mirror
Mounting the Mirror Step 1: Pull out the lens of the T27 dash cam to match the rearview mirror of the vehicle. Step 2: Extend the straps around the back of the rear-view mirror and attach them to the bottom retaining hooks. - Page 9 Mounting the Mirror Step 3: Power on the dash cam with box included car charger, don't charge it with your own chargers. Step 4: Test the camera to make sure everything works.
-
Page 10: Mounting The Rear Camera
Mounting the rear camera Rear Camera Upgrade New rear camera comes with a mounting bracket which supports both interior and exterior installation. Outside the car bracket Adjustable angle Fixed angle, not adjustable Inside the car bracket How to install the rear camera We recommend installing the rear camera outside the car (above the license plate). - Page 11 Mounting the rear camera 2. Remove the Panel Remove the inner panel of the trunk to expose the rear wiring compartment of the car. Open the trunk and look for a sturdy inner panel covering the other side of the license plate installation area.
- Page 12 Mounting the rear camera How to install the rear camera in the car...
- Page 13 Mounting the rear camera NOTE: If your car is a RV or a pickup truck, you can install the rear camera forward (the bracket is below), and turn on the "Upside down of rear camera" and turn off the "Rear Cam" Mirror Image" to adjust the image.If you need a license plate bracket, we also provide this accessory, feel free to CONTACT US.
-
Page 14: Mounting The Gps
Mounting the GPS Installation location Considering the use effect and installation convenience, we usually picture. Of course, you can also try to install it in other locations for testing, and choose the location you think is most suitable. - Page 15 Mounting the GPS Q: Why is my GPS not working? /How to use GPS ? A: If you cannot receive the signal after inserting the GPS, please follow the steps below. 1. The vehicle must be within a large area. 2.
-
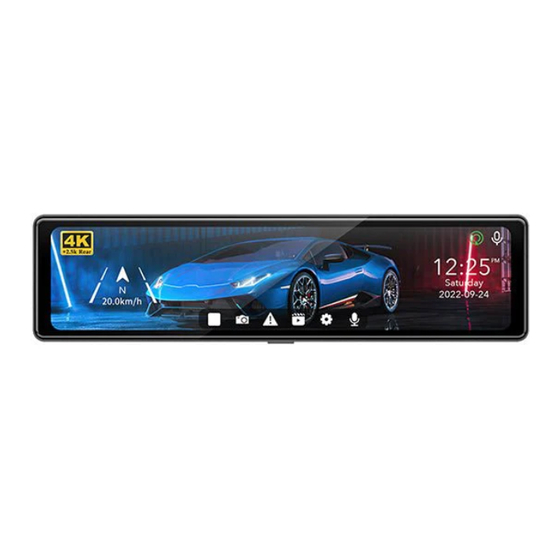
Page 16: Meeting Your T27
Meeting Your T27 Name Description Front Camera Record the front view of the vehicle. GPS Port Connect the GPS receiver. Micro SD Card Slot Insert a Micro SD card (Preferably with a 128G SD card). Rear Camera Port Connect the rear view camera. - Page 17 Meeting Your T27 Speed & Driving Direction: Once GPS is connected, the information will show Settings: Touch to enter the menu setting File Playback: Playback the video & Photo Start/ Stop Recording Snapshot: Take a Snapshot Date & Time Audio Record is on...
-
Page 18: T27 Power Tools
T27 Power Tools 1. Cig Charger Note: It is best to use the power cord that comes with our products, or our professional hardware kits. 2. Hardwire Kit Note: Not included, need to be purchased separately. -
Page 19: Setting Up Your Camera
Setting Up Your Camera SD CARD With your camera off, insert the SD card into the card slot with the label facing the back of your camera. You'll need a micro SD card (sold separately) to save your videos and photos. - Page 20 Setting Up Your Camera On the LEFT side of the screen: Slide up and down to adjust the angle of view. On the RIGHT side of the screen: Slide up and down to adjust the brightness. Anywhere on the screen: Swipe the screen left or right to switch between front view, rear view, or split-screen view.
-
Page 21: Playback Your T27
Playback Your T27 Playback Mode 1. Normal Recording 2. Emergency Recording When you turn on the power, the dash cam will start recording automatically. Click to enter the playback mode. - Page 22 Playback Your T27 Playback menu Front Normal Album Front Urgent Album Front Photo Rear Normal Album Rear Urgent Album Rear Photo Front Normal Album Rear Normal Album Front Urgent Album Rear Urgent Album Front Photo Rear Photo...
-
Page 23: Customizing Your T27
Customizing Your T27 When T27 Hardwire Kit is not connected... - Page 24 Customizing Your T27 Icon Function Introduce Resolution 4K+2.5K or 2.5K+2.5K Spilt Time "Looping recording duration 1/3/5 min" Sound Record ON/OFF G-sensor OFF/Low/ Middle/High Sensitivity Flicker 50HZ/60HZ Screensaver "OFF-Screen always on Mode Turn off screen-Screen off after 15s/1min/3min Time screensaver-Screen off after 15s/1min/3min"...
- Page 25 Customizing Your T27 Icon Function Introduce 24-Hour Time format-12H/24H Daylight ON/OFF Saving Time Time Format "Change the time display method to YY-MM-DD/DD-MM-YY/MM-DD-YY" Reverse Mode Full screen Display/Panorama Display Fatigue Remind after long time driving Reminder Timezone Select Corresponding Timezone Speed Unit...
- Page 26 Customizing Your T27 Reverse Mode Full screen Display 00:41 2.5K+2.5K Panorama Display 00:41 2.5K+2.5K...
- Page 27 Customizing Your T27 After T27 dedicated hardware kit is connected, the icon "enter time lapse" will occur on the screen. Collision Boot Recording When a car is hit or rubbed, the G sensor detects the impact and saves the next 20...
- Page 28 Customizing Your T27 Lapse Record When you set the Lapse Record mode, the dash cam will continue to record 12H/24/48H after the vehicle is turned off. How to set it up: clik into > set Collision Boot Recording to OFF > click...
-
Page 29: Parking Mode ( Optional )
Parking Mode ( Optional ) INSTALL YOU HARDWIRE KIT >>> power only when car key is on Red wire >> ACC >>> Always has power Yellow wire >> B+ >>> Any grounded (neg) screw Black wire >> Ground steering device. You could cut the head of wires and connect it to your fuse directly if your fuses is small. - Page 30 Parking Mode ( Optional ) SELECT PARKING MODE Professional installation of hardwire kit for T27, enter Parking Mode In Settings. Setting >> Parking Mode >> Collision Boot Recording/Lapse Record. COLLISION BOOT RECORDING > Select Sensitivity > Vehicle stalled > Collision or vibration be detected >...
-
Page 31: Gps Player (Pc)
GPS Player ( PC ) DOWNLOAD GPS PLAYER Download our GPS Player from website: https://www.redtigercam.com/pages/gps-player Transfer your recordings to computer Drag in GPS Player... - Page 32 GPS Player ( PC ) USE YOUR GPS PLAYER Footge Track Choose to see your Front / Rear View See your Speed and Location USE YOUR GPS PLAYER Watching Front & Rear at the same time Rear Front Folder...
-
Page 33: Trouble Shooting
Trouble Shooting ULTIMATE SOLUTION > Use a pin or needle to press the reset button on the back of the mirror. > Unplug all the accessories of camera and charge to see if it works. > Check your SD card is U3 Class10, if not,please change or leave message to us to get it. -
Page 34: Customer Service
Behold the motif of complexity to us, simplicity to others, it's such a pleasure to listen to your advice, and we will promptly address any problems that arise. Redtiger Customer Service Team . - Page 35 Customer Service Support WhatsApp Facebook LINE Email After sales: support@redtigercam.com Business Cooperation: contact@redtigercam.com Customer Phone Service: +1 888 966 8028 (US) Instagram: @redtiger_dashcam...
-
Page 36: Product Information
Product Information Item Name > 11.26" Stream Media Dash Camera Model > REDTIGER T27 Display/Touch Screen > 11.26 Inch Display Resolution > 440*1920 The Speaker > 1W 8R Software Support > Multilingual Translation Language Support > Yes G-Sensor > Yes Loop Video >... - Page 37 Product Information Features Rearview camera > WDR AHD Full Screen Touch > Yes GPS Trajectory > Yes Taking Pictures > Yes Camera Rotation > Yes Automatic Astern View > Yes Video Format > MP4 Image Format > JPG Storage Compression Mode >...
- Page 38 In an automobile-interconnection era, everything about charm journey is within the reach of eyes. Product and service are the foundation of Redtiger. We have an expert research and development team of "self-driving experts". Based on the personal needs of users, we use technology to drive product innovation.
Need help?
Do you have a question about the T27 and is the answer not in the manual?
Questions and answers