Table of Contents
Advertisement
Available languages
Available languages
Quick Links
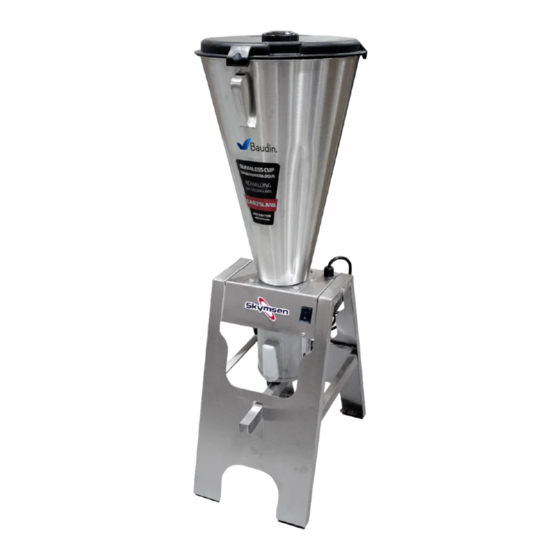
COMMERCIAL BLENDER, TILTING, STAINLESS STEEL BASE AND CUP
LICUADORA COMERCIAL, BASCULANTE, CABALLETE Y VASO EN INOXIDABLE
MODELO
LAR-15MB
LAR-25MB
70218.6 - INGLÊS/ESPANHOL
Data de Revisão: 06/11/2023
Metalúrgica Skymsen Ltda
Rodovia Ivo Silveira 9525
Volta Grande
88355-202 Brusque/SC/Brasil
CNPJ: 82.983.032/0001-19
www.skymsen.com – Fone: +55 47 3211 6000
- DUE TO THE CONSTANT IMPROVEMENTS INTRODUCED TO OUR EQUIPMENTS , THE INFORMATION CONTAINED IN THE PRESENT INSTRUCTION MANUAL
MAY BE MODIFIED WITHOUT PREVIOUS NOTICE .
Advertisement
Table of Contents

Related Manuals for Skymsen LAR-15MB


Summary of Contents for Skymsen LAR-15MB
- Page 1 Rodovia Ivo Silveira 9525 Volta Grande 88355-202 Brusque/SC/Brasil CNPJ: 82.983.032/0001-19 www.skymsen.com – Fone: +55 47 3211 6000 - DUE TO THE CONSTANT IMPROVEMENTS INTRODUCED TO OUR EQUIPMENTS , THE INFORMATION CONTAINED IN THE PRESENT INSTRUCTION MANUAL MAY BE MODIFIED WITHOUT PREVIOUS NOTICE .
- Page 2 SUMARY not in use, It is necessary to insert or remove any parts, It is necessary to insert or remove accessories, when cleaning, repairing or servicing the equipment. 1. INTRODUCTION ......2 1.1.5 Never use any equipment with damaged cords or/and 1.1 Safety ............
-
Page 3: Installation And Pre Operation
04- ON/OFF Switch label. TABLE 01 Avoid plugging this equipment in an extension cord or plug adapter. CARACTERÍSTICAS UNIT LAR-15MB LAR-25MB 3.3 Pre-Operation. Cup Capacity Rotation 3500 3500 Before using the Tilting Blender, you must wash with water... -
Page 4: Operation
“O” No. 04 (Pic. 01) 3.3.3 Cap Placement Remove the Lid No. 01 (Pic. 01) The cap may be used to view the products being processed as well as to add ingredients/products to be processed. (Pic. Hold tightly the Cup handle and with your foot press the Pedal No. -
Page 5: Maintenance
4.2 Operation Procedure 6. MAINTENANCE Remove the Lid with the Cap. Maintenance must be considered a set of procedures with the purpose to keep the equipment best operating With the equipment switched off, first put the LIQUID conditions , therefore increasing the equipment life and ingredient of the recipe, and then put the more solid safety. -
Page 6: Problem Solving
7. PROBLEM SOLVING The Tilting Blenders have been designed to operate with minimum maintenance need. However, some malfunctions may occasionally happen due to the natural wearing caused by long use of the equipment. If such problems occur with your Blender, refer to Table-02 in which the most common situations are listed with recommended solutions. - Page 7 8. ELECTRIC DIAGRAM VOLTAGE 220V/50Hz ON/OFF...
- Page 8 VOLTAGE 220V/60Hz ON/OFF...
- Page 9 INDICE cuando en mantenimiento ó otro tipo de servicio. 1.1.5 No use el equipo cuando tenga el cable o el enchufe damnificado. No deje que el cable de alimentación se quede en el borde de una mesa, o que toque superficies calientes. 1.
- Page 10 , antes de prender TABLA 01 el equipo. Asegúrese de que la tensión de la red eléctrica es compatible con la tensión indicada en la etiqueta existente CARACTERÍSTICAS UNIDAD LAR-15MB LAR-25MB en el cable eléctrico. Capacidad del Vaso 3.3 Pre-Operación Rotación...
-
Page 11: Operación
Agarre con fuerza la asa del vaso y presione con el pie el FIGURA 05 Pedal No 01 (Fig 03) soltando el Vaso para permitir que bascule. Abaje el Vaso para vaciar su contenido. Levante el vaso hasta que se quede trabado en su posición vertical. -
Page 12: Mantenimiento
El tiempo de procesamiento varía de acuerdo con el producto. Productos sólidos no deben ser procesados sin * Instalación – Verifique la instalación de su equipo de un liquido, porque puede ocurrir un sobre calentamiento y acuerdo con el ítem 2.1 de este manual. asi dañar el vedamiento. - Page 13 TABLA 02 PROBLEMAS CAUSAS SOLUCIONES - Falta de energía eléctrica. - Verifique si hay energía. - La maquina no prende. - Problemas con los circuitos - Llame el Servicio Técnico. eléctricos. - Problemas con los circuitos - Olor a quemado ó humo. - Llame el Servicio Técnico.
-
Page 14: Diagrama Eléctrico
8. DIAGRAMA ELÉCTRICO VOLTAJE 220V/50Hz PRENDE/APAGA... - Page 15 VOLTAJE 220V/60Hz PRENDE/APAGA...
- Page 16 ___________________________________________________________ ___________________________________________________________ ___________________________________________________________ ___________________________________________________________ ___________________________________________________________ ___________________________________________________________ ___________________________________________________________ ___________________________________________________________ ___________________________________________________________ ___________________________________________________________ ___________________________________________________________ ___________________________________________________________ ___________________________________________________________ ___________________________________________________________ ___________________________________________________________ ___________________________________________________________ ___________________________________________________________ ___________________________________________________________ ___________________________________________________________ ___________________________________________________________ ___________________________________________________________ ___________________________________________________________ ___________________________________________________________ ___________________________________________________________ ___________________________________________________________ ___________________________________________________________ ___________________________________________________________ ___________________________________________________________ ___________________________________________________________ ___________________________________________________________ ___________________________________________________________ ___________________________________________________________ ___________________________________________________________ ___________________________________________________________ ___________________________________________________________ ___________________________________________________________ ___________________________________________________________...
Need help?
Do you have a question about the LAR-15MB and is the answer not in the manual?
Questions and answers