Table of Contents

Subscribe to Our Youtube Channel
Related Manuals for UEi DT720


Summary of Contents for UEi DT720
- Page 1 DT720 Digital Temperature Logger INSTRUCTION MANUAL ENGLISH TYPE ºF T1 - T2 DT720 Digital thermometer ISED ENTER T1-T2 HOLD MIN/ RECALL CLEAR SETUP EXIT 1-800-547-5740 www.ueitest.com • email: info@ueitest.com...
-
Page 2: Table Of Contents
Table Of Contents FEATURES ................3 SAFETY NOTES ..............3 CONTROLS AND INDICATORS .......... 4 LCD DISPLAY FUNCTIONAL DESCRIPTION ..... 5 OVERVIEW ................6-7 OPERATING INSTRUCTIONS .........7-12 1. Temperature units..........7 2. Date ..............7-8 3. Time ...............8-9 4. Type ............... 9 5. -
Page 3: Features
• Follow the manufacturer’s maintenance procedures when servicing equipment • Place ONLY thermocouples (type K, J, T, E, R, S) in the DT720 thermocouple ports • Make sure your meter is set for the proper thermocouple type you are using •... -
Page 4: Controls And Indicators
Controls and Indicators (top view) TYPE ºF T1 - T2 DT720 Digital thermometer ENTER T1-T2 HOLD MIN/ RECALL CLEAR SETUP EXIT A. Thermocouple Inputs B. T1-T2 (Enter) C. Min/Max (down arrow) D. Power, Back light E. Recall, Setup (Exit) F. Hold, Log (up arrow) -
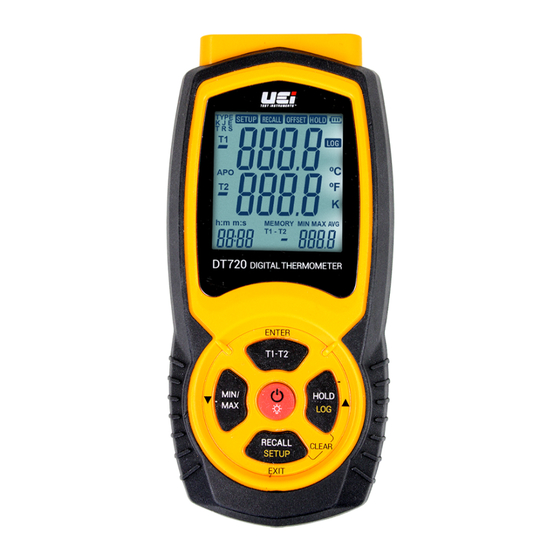
Page 5: Lcd Display Functional Description
LCD Display Functional Description TYPE SETUP RECALL OFFSET HOLD K J E T R S ºC ºF h:m m:s MEMORY MIN MAX AVG T1 - T2 A. Thermocouple type B. SETUP: Setup in progress C. RECALL: the logged readings are displayed. D. -
Page 6: Overview
Overview 1. POWER (BACKLIGHT) Press and hold the “ ” button to turn the thermometer on and off. Press the “ ” button to turn the backlight on and off. The backlight turns off automatically after 60 seconds without any button pressed. -
Page 7: Operating Instructions
than 1 second to start or exit “SETUP”.The “EXIT” function is activated in the “RECALL” and “SETUP” mode only. 7. RECALL Press the “RECALL” button to enter the recall mode. Press the “HOLD ( )” button to move to the next address and press the “MIN/MAX ( )”... -
Page 8: Date
Month Press the “ENTER” button while the “Mon” icon blinks. Change month with “ ” or “ ” button while “MM”:dd is blinking. Press the “ENTER” button to save the changed value. If you do not want to save the changed value, press the “EXIT” button. Date Press the “ENTER”... -
Page 9: Type
Press the “ENTER” button to save the changed value. If you do not want to save the changed value, press the “EXIT” button. 4. Type While the icon at the top of the LCD is blinking, press the “ ”, “... -
Page 10: Offset
hours 59 minutes 59 seconds) 7. Offset While the icon at the top of the LCD is blinking, press the “ ”, “ ” buttons to move to the “OFSt” item. Press the “ENTER” button with the “OFSt” icon blinking. While the “... -
Page 11: Holding The Displayed Temperature
internal temperature for T2, and the differential temperature for T1-T2 are shown in the secondary display in order. NOTE: The display shows “----” when a thermocouple is not connected. The display shows “OL “ (OVERLOAD) when the temperature being measured is outside the thermocouple’s valid range. -
Page 12: Starting And Stopping Logging
in its memory. At the end of the logging session you can view the logged readings on the display. Starting and Stopping Logging Recall function is enabled during logging. 1. Set the time and the logging interval, see “How to Change Setup Options”. -
Page 13: Cleaning And Decontamination
operator. Perform only those maintenance tasks that you are qualified to do. These guidelines will help you attain long and reliable service from your meter: 1. Calibrate your meter annually to ensure it meets original performance specifications. 2. Keep your meter dry. If it gets wet, wipe it dry immediately. Liquids damage electronic circuits. - Page 14 IMPORTANT SAFETY WARNINGS WARNING! Read entire Safety Notes section regarding potential hazard and proper instructions before using this meter. In this manual the word “WARNING” is used to indicate conditions or actions that may pose physical hazards to the user. The word “CAUTION” is used to indicate conditions or actions that may damage this instrument.
-
Page 15: Specifications
Specifications Environmental Operating Temperature 32˚ to 122˚F (0˚ to 50˚C) Storage Temperature -4˚ to 140˚F (-20 to 60˚) Humidity Non condensing <50°F (10°C) 85% RH: 50° to 86°F (10° to 30°C) 70% RH: 86° to 104°F (30° to 40°C) 45% RH: 104° to 122°F (40° to 50°C) General Dimensions 6.34 x 2.95 x 1.38in (161 x 75 x 35mm) -
Page 16: Electrical
Electrical Measurement J-type: -346˚ to +2192˚F (-210˚ to +1200˚C) range K-type: -328˚ to +2498˚F (-200˚ to +1370˚C) T-type: -418˚ to +752˚F (-250˚ to +400˚C) E-type: -238˚ to +1832˚F (-150˚ to +1000˚C) R-type: +32° to +3200°F (0° to 1760°C) S-type: +32° to +3200°F (0° to 1760°C) Display Resolution 0.1˚F/˚C <... -
Page 17: Fcc Information
FCC Information This device complies with part 15 of the FCC Rules. Operation is subject to the following two conditions: (1) This device may not cause harmful interference, and (2) this device must accept any interference received, including interference that may cause undesired operation. -
Page 18: Warranty
Any implied warranties, including but not limited to implied warranties of merchantability and fitness for a particular purpose, are limited to the express warranty. UEi shall not be liable for loss of use of the instrument or other incidental or consequential damages, expenses, or economic loss, or for any claim or claims for such damage, expenses or economic loss.
Need help?
Do you have a question about the DT720 and is the answer not in the manual?
Questions and answers