HITROL HTM-20N Series Instruction Manual
Vibration type level switch
Hide thumbs
Also See for HTM-20N Series:
- Instruction manual (15 pages) ,
- Instruction manual (25 pages)
Table of Contents
Advertisement
Quick Links
HTM-20N Series
HITROL CO., LTD.
HEAD OFFICE.FACTORY.R&D INSTITUDE
HITROL CO., LTD. 141, Palhakgol-gil, Jori-eup
Paju-si, Gyeonggi-do, Korea
TEL. : (+82)-31-950-9700
FAX. : (+82)-31-943-5600
www.hitrol.com
INSTRUCTION MANUAL
VIBRATION TYPE LEVEL SWITCH
HTM-20N Series
Doc. no. : HTM20N_IM_Eng_Rev.4.3
Issue date: 2023. 12
HITROL CO., LTD.
1
Advertisement
Table of Contents

Related Manuals for HITROL HTM-20N Series


Summary of Contents for HITROL HTM-20N Series
- Page 1 HTM-20N Series HITROL CO., LTD. HEAD OFFICE.FACTORY.R&D INSTITUDE HITROL CO., LTD. 141, Palhakgol-gil, Jori-eup Paju-si, Gyeonggi-do, Korea TEL. : (+82)-31-950-9700 FAX. : (+82)-31-943-5600 www.hitrol.com INSTRUCTION MANUAL VIBRATION TYPE LEVEL SWITCH HTM-20N Series Doc. no. : HTM20N_IM_Eng_Rev.4.3 Issue date: 2023. 12...
-
Page 2: Table Of Contents
HTM-20N Series Table of Contents Overview · · · · · · · · · · · · · · · · · · · · · · · · · · · · · 3 Safety and Environment · · · · · · · · · · · · · · · 11 Characteristics ·... -
Page 3: Overview
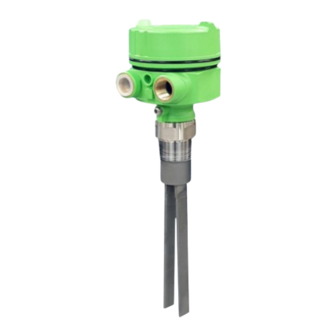
HTM-20N Series The HTM-20N Series is a tuning fork type vibration level switch that consists of one Overview membrane and two stainless forks to detect powder and output the state using the relay contact, which is applicable for alert and process control. -
Page 4: Specifications
HTM-20N Series Specifications Product Spec. Model HTM-20N-A HTM-20NH-A HTM-20N-B HTM-20NH-B HTM-20N-C Mounting Screw Screw, Flange Max. Temperature 80℃ 150℃ 80℃ 150℃ 60℃ Max. Process Pressure 10kg/㎠ 2kg/㎠ Power Source AC 90V~240V, 50/60Hz / DC +24V Output Signal DPDT Enclosure Weather-Proof, IP65... -
Page 5: Dimensions
HTM-20N Series Dimensions Weather-proof Version (PBT) HTM-20N-A HTM-20N-B HTM-20N-C <Screw Type> HTM-20N-B HTM-20N-C <Flange Type> Actual product may have a tolerance slightly. HITROL CO., LTD. -
Page 6: Weather-Proof Version (Al.c)
HTM-20N Series Weather-proof Version (AL.C) HTM-20NH-A HTM-20NH-B HTM-20N-C <Screw Type> HTM-20NH-B HTM-20N-C <Flange Type> Actual product may have a tolerance slightly. HITROL CO., LTD. -
Page 7: Attachment And Precautions
HTM-20N Series Attachment The HTM-20N Series is installed on the top or the side of a container and silo to detect the & Precautions upper or the lower limit, respectively. The level switch can be installed on any material, so it is applicable to ferrous or nonferrous tanks and silos. -
Page 8: Technical Data
HTM-20N Series Technical Ambient Temp. (Housing) -20 ~ +60 ℃ HTM-20N Series Data Process Temperature MAX. 80 ℃ HTM-20N-A / HTM-20N-B 공정온도(Process temperat ure) MAX. 150 ℃ HTM-20NH-A / HTM-20NH-B 공정온도(Process temperature) MAX. 60 ℃ HTM-20N-C ⓑ ⓒ ⓐ amb. -
Page 9: Use
HTM-20N Series The level switch that prevents the vibration of the tuning fork is good for most of the materials, but the following need to be taken in consideration. Max. Ambient Temperature ■ Max. Pressure ■ Max. Particle Size ■... -
Page 10: Precautions For Installation
HTM-20N Series Connect the flanges or bolts with the same specifications. Precautions ■ Make sure to insert washers between bolts and nuts to prevent loosening. for Installation ■ Make sure to insert gaskets between flanges. (Select the gaskets in consideration of ■... -
Page 11: Safety And Environment
HTM-20N Series Safety and ■ Precautions for Use Environment - Make sure to connect the product and vessel using required tools for sure. - Keep the lock key safe and make sure that it is locked. - Do not apply high impact to the product. -
Page 12: Warranty And Contact
You can request A/S at our website or by contacting our headquarters. ■ Headquarters ․ Factory ․ Laboratory Contact Number ADRESS : HITROL CO., LTD 141, Palhakgol-gil, Jori-eup, Paju-si, Gyeonggi-do, Korea T E L : 031-950-9700 (Headquarters & A/S) F A X : 031-943-5600 (Headquarters & A/S) - Page 13 APPENDIX O M-20N User Manual Vibration Type Level Switch Doc. no. : Rev1.0 Issued Date : 2023.12.07...
- Page 14 1. Configuration of Module (M-20N) Configuration Function ■ Function setting S Key ■ Save the setting ■ Mode change M Key ■ Cancellation ■ High Set ▲ Key ■ Setting the value up ■ Low Set ▼ Key ■ Setting the value down ■...
- Page 15 2. Configuration of Setting Menu Contents Description [02] Low Value Set Set the Low value by viewing the current Voltage value [03] High Value Set Set the High value by viewing the current Voltage value [08] Relay Contact Type N.O or N.C (Default : N.O) [09] Relay Delay Time Set 0.5 ~ 10 sec.
- Page 16 3. M-20N LOCK Turn off/Setting Way Lock State ※ When power is applied, the initial screen shows Relay Contact Type, Lock status. ( When in the LOCK state, the key does not respond. ) ■ Key LOCK Turn off Press for approximately 1 second at the same time to release.
- Page 17 4. Setting and Operating LCD configuration ■ Voltage Value Display mode Cursor Segment Bar graph ■ The cursor moves sequentially whenever the button is pressed. ■ The order of movement is as follows. C H L A↔B ...
- Page 18 Setting Menu ■ Select the Press ■ In the Setting Menu, use button to select the user setting function. ■ Pressing button for 1 second will enter the function. Key Button Function Press shortly Increasing numerical value Press shortly Decreasing numerical value Press more than 1 sec Save and Leave Press more than 1 sec...
- Page 19 5. SETTING Way 5.1. EASY SETTING ■ When the Fluid is touched the Sensor When pressed at the same time for about 1 second, The LED turns on and off and the value is set. - Because the initial value is OFF, setting the current value to HIGH Changes to ON and the LED keeps blinking.
- Page 20 5.2. DETAIL SETTING - SETTING Condition : HIGH value ≥ LOW value - HIGH value < LOW value : LED RED is briefly turned on and off witho ■ LOW SETTING About 1 sec - Enter item 2 in Setting Mode. - The value displayed on the LCD is the Voltage value.
- Page 21 6.3. Fine Adjustment After EASY/DETAIL SETTING - Use when you want to adjustment values. 0.1% Up / Down : Press shortly 1% Up / Down : Press for 1 sec. 10% Up / Down : Press shortly ■ LOW value fine Adjustment About 1 sec - Enter item 11 in Setting Mode.
- Page 22 - Wire and supply the power to the device after checking the specifications. - Pay attention to prevent electric shock. - Please refer to the Instruction Manual of this product for more information. ◈ More product information can be acquired at our website. (www.hitrol.com)
Need help?
Do you have a question about the HTM-20N Series and is the answer not in the manual?
Questions and answers