Gima ABPM50 User Manual
Abpm pulse rate monitor
Hide thumbs
Also See for ABPM50:
- User manual (105 pages) ,
- User manual (925 pages) ,
- User manual (543 pages)
Table of Contents
Advertisement
Quick Links
PROFESSIONAL MEDICAL PRODUCTS
GIMA ABPM PULSE RATE MONITOR
User manual
ATTENTION: The operators must carefully read and completely understand the present
manual before using the product.
ABPM50 (Gima 35110)
CONTEC MEDICAL SYSTEMS CO., LTD
No.112 Qinhuang West Street, Economic & Technical
Development Zone, Qinhuangdao, Hebei Province,
PEOPLE'S REPUBLIC OF CHINA
Made in China
Shanghai International Holding Corp. GmbH (Europe)
Eiffestrasse 80, 20537 Hamburg Germany
Gima S.p.A.
Via Marconi, 1 - 20060 Gessate (MI) Italy
gima@gimaitaly.com - export@gimaitaly.com
www.gimaitaly.com
1060hPa
%
0%
700hPa
0123
55˚C
-20˚C
Advertisement
Table of Contents

Related Manuals for Gima ABPM50


Summary of Contents for Gima ABPM50
- Page 1 PROFESSIONAL MEDICAL PRODUCTS GIMA ABPM PULSE RATE MONITOR User manual ATTENTION: The operators must carefully read and completely understand the present manual before using the product. ABPM50 (Gima 35110) CONTEC MEDICAL SYSTEMS CO., LTD 0123 No.112 Qinhuang West Street, Economic & Technical Development Zone, Qinhuangdao, Hebei Province, PEOPLE’S REPUBLIC OF CHINA...
- Page 2 Foreword Please read the User Manual carefully before using this product. The User Manual which describes the operating procedures should be followed strictly. This manual detailed introduce the steps must be noted when using the product, operation which may result in abnormal, the risk may cause personal injury and product damage and other contents, refer to the chapters for details.
- Page 3 The warning items Before using this product, you should consider the safety and efficacy of the following described: Described each measurement results combined with clinical symptoms by qualified doctors. The reliability and operation of using this product whether meets the operation of this manual ...
- Page 4 Responsibility for our company Our company have the responsibility to provide qualified product which conform to company standard of this product. Our company will provide the circuit diagram, calibration method and other information at the request of the user to help the appropriate and qualified technicians to repair those parts designated by our company.
-
Page 5: Table Of Contents
CONTENTS Chapter1 Introduction ........................1 1.1 Safety Precautions ......................1 1.2 General Information ......................6 1.3 Button Functions ......................8 1.4 Interfaces ........................10 1.5 Accessories ........................11 Chapter2 Getting Started ........................ 15 2.1 Open the Package and Check ..................15 2.2 Battery Installation ...................... - Page 6 Chapter4 NIBP Measuring ......................35 4.1 General ........................... 35 4.2 Applying the Cuff and NIBP Measuring................. 38 4.3 Operation Hints ......................40 4.4 NIBP Error Messages and Solutions ................44 4.5 Maintenance and Cleaning ..................... 46 4.6 Transportation and Storage ..................... 49 4.7 Key and Symbols ......................
- Page 7 6.9 Edit IP Data ........................64 6.10 BP Trend Graph ......................66 6.11 Display of Statistics Information .................. 69 6.12 Patient Information Settings ..................70 6.13 Sleep Time Setting......................71 6.14 BP Threshold Setting ....................72 6.15 Histogram ........................73 6.16 Pie Chart ........................
-
Page 8: Chapter1 Introduction
Chapter1 Introduction Operators do not need professional training, but should use this product after fully understanding the requirements in this manual. To prevent users from suffering hurt or damnification due to improper use,please refer to "Safety Precautions" and use this product properly. For an overall introduction to the Blood Pressure Monitor, please refer to General Information. - Page 9 For a thrombasthemia patient, it is important to determine whether measurement of the blood pressure shall be done automatically. The determination should be based on the clinical evaluation. Contraindication No contraindications. Warning Do not use the device in the case of there are flammable anesthetic gasses mixing with the air or nitrous oxide.
- Page 10 Please use special cuff. Otherwise it is possible that measurement result is incorrect. Please do not keep the cuff in the over-inflated state for a long time. Otherwise it may cause risk. If liquid splashes on the device or accessories, especially when liquids may enter the pipe or device, stop using and contact the service department.
- Page 11 It is recommended that you check if there is any damage on the device or the accessories regularly, if you find any damage, stop using it, and contact the biomedical engineer of the hospital or our Customer Service immediately. Do not disassemble, repair and modify the device without permission.
- Page 12 using this product. Do not use a mobile phone near the blood pressure monitor. Excessive radiation fields generated by mobile phones can interfere with the normal use of the blood pressure monitor. The blood pressure monitor has slight electromagnetic radiation to the external environment, but does not affect the normal use of other equipment.
-
Page 13: General Information
screen or no display content, please contact our company. Note The software was developed in accordance with IEC60601-1. The possibility of hazards arising from errors in the software program has been minimized. All analog and digital equipment connected to this device must be certified to IEC ... - Page 14 no effect on the monitor. The equipment uses the gray silicone airway, in case of the effect to the equipment when defibrillation device was used on the patient. General instruction: The device is applied to Blood Pressure(BP) measure and monitor for adult(including pregnant women), pediatric, and neonatal.
-
Page 15: Button Functions
The cuff socket is located on the top of the device and the USB socket at the bottom of the device. The stored data can be transferred to computer with the USB interface, and then various operations can be performed by using the PC software. (Please refer to "Software Functions" part for detailed contents) Note In the common user mode, the monitor will periodically turn off backlight if there is no... - Page 16 The text in the middle bottom of the screen indicate the function of this key. Whatever menus the system is in, press the button and the system immediately executes a certain function. The text in the left bottom of the screen indicate the function of this key. Such as: The button is the prompt switch in the boot-strap interface, up key in the "SYSTEM MENU", and left key in the "TREND"...
-
Page 17: Interfaces
During measurement, three buttons are all disabled. The rectangular mark in the screen moving with the operation of buttons is called “cursor”. Operation can be performed in any position at which the cursor can stay. When the item is not selected, the cursor is yellow;... -
Page 18: Accessories
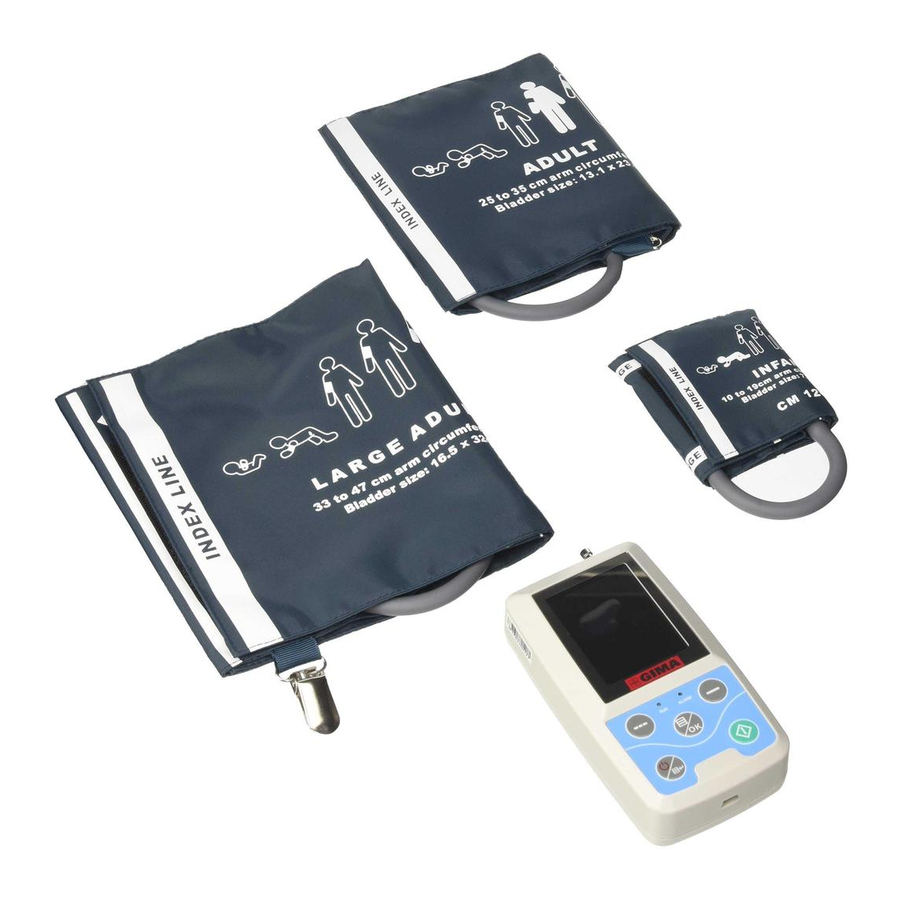
① Figure 1.4.1 The Top External airway Figure 1.4.2 Bottom At the bottom is the socket for USB:①The Socket for USB, connect the data line to upload data. 1.5 Accessories 1) A cuff for adult 2) An USB data line... - Page 19 3) BP extending tube 4) A pouch 5) User Manual 6) Software Note The monitor also can be equipped with pediatric and neonatal cuff, if necessary, please contact our company or its representatives. The width of the cuff should be 40% of the limb circumference(50% for the newborn) or 2/3 of the length of the upper arm.The length of the inflated part of the cuff should be sufficient to surround 50% to 80% of the limb.
- Page 20 Adult 2 33~47 cm 17 cm Disposable cuff of neonatal Size Limb circumference Width of the cuff Length of inflatable tube 3.3~5.6 cm 2.5 cm 4.2~7.1 cm 3.2 cm 1.5 m or 3 m 5.0~10.5 cm 4.3 cm 6.9~11.7 cm 5.1 cm Warning Please use the special accessories supplied by the manufacturer or replace the accessories...
- Page 21 extension tube away when replacing the cuff, install it on the new cuff. Pouch is convenient for patients to carry the monitor. It is not necessary to replace it when the backpack has a slight wear. Patients can according to the actual situation, contact our company to buy a new backpack when the original backpack can not carry the monitor.
-
Page 22: Chapter2 Getting Started
Chapter2 Getting Started 2.1 Open the Package and Check Open the package and take out the equipment and accessories carefully. Keep the package material for possible future transportation or storage. Check the components according to the packing list. Check for any mechanical damage. ... - Page 23 ② Install "AA" batteries according to polarities. ③ Slide to close the battery cover. Note Icon“ ”: the batteries power will exhaust, the device prompts “Low battery” at the same time. Replace with two new batteries (the same sort) at this time. Test while low power may cause data deviation and other problems.
-
Page 24: Power On The Instrument
If electrolyte of the batteries immodestly glues on the skin or the clothes,please immediately flush with plenty of clean water.Otherwise it may hurt the skin. Dispose of the exhausted batteries according to applicable local regulations about environmental.Otherwise it will cause environmental pollution. The monitor is internally powered equipment, can be connected to the public grid. -
Page 25: Connect Sensor
The device can be used normally after it is turned on ,without waiting for the device to be prepared. Note Check all the functions that possibly be used and make sure that the device is in good status. 2.4 Connect Sensor Note For information on correct connection of NIBP cuff, refer to Figure 2.4.1 Figure 2.4.1 Connection Method... -
Page 26: Chapter3 Function Interface
Chapter3 Function Interface 3.1 Main Interface Press to power on the instrument. The indicator will circularly flash once, which show the boot-strap is success, then end pressing, the system will enter into the main interface. In common user mode, if there is no key-press operation during the time which system sets, the device will turn off LCD and enter into standby mode, if there is no any operation in the standby mode, the device will automatically turn off;... -
Page 27: Measuring Interface
Current date and time is displayed in the middle top of the screen. Note All interfaces except the trend retain power icon, prompt switch, as well as a small font of the current time. The oldest record will be overwritten after the memory overflows. “Overflow" message ... -
Page 28: Measure Result Interface
3.3 Measure Result Interface The measure result includes: SYS: systolic blood pressure (mmHg/kPa) DIA: diastolic blood pressure (mmHg/kPa) PR: pulse rate (bpm) If there is an error during the measurement, an error message text will appear on the screen. If the PROMPT SOUND is set to be on, the sound would occur. - Page 29 Figure 3.4.1 System Menu 3.4.1 System Setup Enter "SYSTEM SET" item in the [SYSTEM MENU], the "SYSTEM SET" menu includes: "LANGUAGE" item: switch the current system language; "UNIT" item has two choice: mmHg, kPa; "MEASURE MODE" item has three options: adult, pediatric, neonatal; "ABPM SET"...
- Page 30 Note "BACKLIGHT TIME" in the "SYSTEM SET" is used by the common user, ambulatory blood pressure backlight time is a fixed value of 5s. To perform ambulatory blood pressure monitoring, first select "ABPM SET" item in [SYSTEM SET] menu, the pop-up menu is shown in the Figure3.4.2: Figure 3.4.2 ABPM Setup...
- Page 31 Options for "AWAKE INTERVAL(min)" and "ASLEEP INTERVAL(min)": 5,10,15, 20, 30, 40, 60, 90, 120, 180, 240; The step of each adjustment for "AWAKE TIME" and "ASLEEP TIME" is 30 minutes. The adjustment range: 00:00~23:30. Note The set measurement interval in "AWAKE INTERVAL" and "ASLEEP INTERVAL" is time interval when automatically start the measurement under the mode of ambulatory blood pressure, not including manual starting.
- Page 32 3.4.2 System Time Select "SYSTEM TIME" item in [SYSTEM MENU], the following menu will pop up: Figure 3.4.3 System Time Select "SAVE" after completing time setup, time change is successful and exit system time setup and return the previous menu. Select "CANCEL" to cancel the setting and return to the previous menu.
- Page 33 3.4.3 Data Delete Select "YES" in " DELETE DATA" menu of [SYSTEM MENU], after you press certain key, the following menu will pop up: Figure 3.4.4 Data Delete If press "CONFIRM", the common user data will be deleted, press "CANCEL", the operation will be canceled.
- Page 34 corresponding settings according to the following procedure: "SYS PROMPT" and "DIA PROMPT" can control closing or unsealing of the SYS and DIA prompt separately. The prompt is on or off according to the high and low limits which have been set up. When the measure result is higher than the high limit or lower than the low limit, and meanwhile, the "PROMPT SOUND"...
- Page 35 Parameter prompting limit: Diastolic Systolic pressure Systolic pressure Diastolic pressure User mode pressure high high limit low limit low limit limit Adult Pediatric Neonatal PROMPT SOUND switch: OFF; Measure unit: mmHg; Ordinary user backlight time: 120s; ABPM switch: END; Asleep time: 22:00; Asleep measurement interval: 30minutes;...
- Page 36 3.4.5 ABPM Menu 1.ABPM mode After the ambulatory blood pressure menu is operated correctly(refer to 3.4.1), select "ABPM" menu in [SYSTEM MENU] to enter its interface. BEGIN Switch the "ABPM ON-OFF" to " ", then a prompt message for ABPM of current user will pop up, such as: Figure 3.4.5 ABPM Prompt Menu...
- Page 37 Press button, clear the ambulatory blood pressure measure data, enter ambulatory blood pressure mode, and start the ambulatory blood pressure monitoring. Refer to Figure 3.4.6 for the ABPM interface. Press button, save ambulatory blood pressure measure data, enter ambulatory blood pressure mode, and start the ambulatory blood pressure monitoring.
- Page 38 Figure 3.4.6 ABPM Working Interface If PROMPT SOUND occurs, press SILENCE key to stop it and press it again to continue. In ABPM working interface, long press button, the exit ABPM hint interface will pop up. In this interface, press button to exit ABPM working environment, and enter the ordinary user working environment, the boot-strap interface will be displayed.
- Page 39 In the ABPM working interface, to turn off the device, exit the ABPM mode first, then long press the power switch to turn it off. 3.ABPM Data Review Select "ABPM DATA" item in "ABPM" menu to enter the data review interface. "BIG FONT"...
- Page 40 stored data. The date displayed at the bottom of trends are the data recording time of the first point and last point respectively for current trend. 3.4.6 PROMPT SOUND After selecting "ON", the loudspeaker turns on. The symbol will display in the main interface. After selecting "OFF", the loudspeaker turns off, will appear.
-
Page 41: Ordinary User Data Review
3.5 Ordinary User Data Review Ordinary User "BIG FONT" Data Review Press button to enter the ordinary user "BIG FONT" data review in boot-strap interface. Display content is similar to ambulatory blood pressure BIG FONT data review. Ordinary User “LIST” Data Review Press button to pop up the ordinary user data “LIST”... -
Page 42: Chapter4 Nibp Measuring
Chapter4 NIBP Measuring 4.1 General The Non-invasive Blood Pressure (NIBP) module measures the blood pressure using the oscillometric method .It is that: using the blade to block artery blood, checking the oscillometric wave during degassing for sure that it was not affected by the operator’s subjective factors or the disruption of the environmental noise. - Page 43 condition which the skin is damaged or expected to be damaged. For a thrombasthemia patient, it is important to determine whether measurement of the blood pressure shall be done automatically. The determination should be based on the clinical evaluation. 4.1.1 Accurate Measurement Way 1.Adopt a comfortable sitting position, use back and arms to support the body.
- Page 44 mode (refer to the measurement mode setting) and use specified cuff for pediatric or neonate. Using incorrect measurement mode may cause danger to the patient, because the adult pressure level is relative high and is not suitable for pediatric or neonatal patients. In neonatal mode, the initial inflation value of cuff is 9.3kPa (70mmHg).
-
Page 45: Applying The Cuff And Nibp Measuring
4.2 Applying the Cuff and NIBP Measuring Warning Before starting a measurement, verify that you have selected a setting appropriate for your patient. (adult, pediatric or neonate). Do not apply the cuff to a limb that has an intravenous infusion or catheter. This could cause tissue damage around the catheter when infusion is slowed or blocked during cuff inflation. - Page 46 The pressure by cuff may cause temporary weakness of some functions of the body. So do not use monitoring medical electrical equipment on corresponding arm. Do not move during measuring, because it will have a delayed effect on the patient's blood flow. The device needs 2 hours recovery time to reach its performance of intended use after taking out from the lowest storage temperature.
-
Page 47: Operation Hints
3.Connect the cuff to the airway tube. The cuff should be placed at the same level as the patient's heart. Otherwise amend the measurement results by the following methods If the cuff is placed higher than the heart level, add 0.75 mmHg (0.10 kPa) for each inch of difference. - Page 48 purport, ischemia and neuropathy in the limb wearing the cuff. When monitoring a patient, examine the extremities of the limb frequently for normal color, warmth and sensitivity. If any abnormality is observed, stop the blood pressure measurements. 2. To stop auto measuring: During auto measuring, press button at any time to stop auto measurement.
- Page 49 or inside the monitor, contact local Customer Service Center. Measurement Limitations The oscillometry method has some limitations depending on the patient's condition. This measure is based on the regular pulse wave generated by arterial pressure. In the case where the patient condition makes such a detection method difficult, the measured value becomes unreliable and the measuring time increases.
- Page 50 Pressure Changes Measurements will be unreliable and may not be possible if the patient's blood pressure is changing rapidly over the period of time during which the arterial pressure pulses are being analyzed to obtain the measurement. Severe Shock If the patient is in severe shock or hypothermia, measurements will be unreliable since reduced blood flow to the peripheries will cause reduced pulsation of the arteries.
-
Page 51: Nibp Error Messages And Solutions
The room temperature rise or fall sharply, or the environment of measurement often changes; Measuring in a moving vehicle; The position of cuff applied (higher or lower than the heart level); Continuous measurement for a long time; ... - Page 52 measuring process. Cuff pressure is over the scope, Check the cuff to make sure it is not Overpressure mmHg, Newborn: blocked or squeezed. 150mmHg. Check the connection of air tube to Movement or other factors may make sure it is not squeezed. Patient Saturated signal lead to too big signal amplitude.
-
Page 53: Maintenance And Cleaning
4.5 Maintenance and Cleaning *Please do obey the precautions and correct operating methods in this user manual. Otherwise, we will not responsible for any fault. Warning Remove the batteries before cleaning the device or peripheral equipment. The accessories and main unit must be separated for cleaning. - Page 54 The device should be inspected and calibrated periodically or obey the requirements of the hospital(the recommended period is 1 year). It is available to inspect in the state specified inspection institution or by professional personal. Please contact our company's after-sales personnel if you need to enter the static pressure detection mode for inspection.
- Page 55 To insert the rubber bag in the cuff, first place the bag on top of the cuff so that the rubber tubes line up with the large opening on the long side of the cuff. Now roll the bag lengthwise and insert it into the opening on the long side of the cuff.
-
Page 56: Transportation And Storage
environment, while the device shall not be placed where with high temperature, humidity, dusty or corrosive gases. Aged cuff may result in inaccurate measurement, please replace the cuff periodically according to the user manual. To avoid device damage, keep the device out the reach of children and pets. Avoid the device close to extreme high temperature such as fireplace, otherwise the device performance may be affected. -
Page 57: Key And Symbols
4.7 Key and Symbols Your device may not contain all the following symbols. Signal Description Signal Description Caution: read instructions (warnings) Follow instructions for use carefully Systolic pressure Diastolic pressure Mean blood pressure Pulse rate (bpm) Serial number Electromagnetic compatibility The degree of protection against IPXX Material code of manufacturer... - Page 58 Class II equipment Silence Close the prompt sound indication Open the prompt sound indication Lot number Expiration date This way up Fragile, handle with care Atmospheric pressure limit Keep in a cool, dry place Temperature limit Humidity limit Manufacturer Date of manufacture Batteries Power Pulse rate (bpm)
- Page 59 1.No finger inserted to SpO2 probe 1.No Pulse rate 2.No NIBP data to review 2.An indicator of signal inadequacy 3.An indicator of signal inadequacy Medical Device complies with WEEE disposal Directive 93/42/EEC Recyclable European Representative Latex free Product code Keep away from sunlight Imported by...
-
Page 60: Chapter5 Requirements Of Hardware
Chapter5 Requirements of Hardware Processor: Basic frequency 2.5G or more Operation System:Windows XP or higher EMS memory: 1GB and more Hard Disk: 250G or more Display:Resolution ratio 1024*768 or higher USB: 2 or more Resolution of printer: 600 DPI... -
Page 61: Chapter6 Software Functions
Chapter6 Software Functions 6.1 User Register Double-click the software icon, then the dialog box shown as below appears. Figure 6.1.1 User Register Enter the user name, click "Okay", then the "Configuration Set" dialog box shown as Figure 6.1.2 will appear. Click "Delete" to delete the configuration information of the user. "Delete all"... - Page 62 Figure 6.1.2 Configuration Set "Case path": select the default storage path for case, after getting the data from the device, the case file will be saved in this path. If you select "Always use default path", then the case file will be automatically saved in the installation path.
-
Page 63: Main Interface
6.2 Main Interface The device will enter to the main interface(shown as below) after setting the configuration information. Figure 6.2 Main Interface... -
Page 64: Wear
6.3 Wear After clicking the shortcut key , the following figure appears. Before using the device, please read "Matters need" carefully, and wear the device according the following figure. Figure 6.3 Wear... -
Page 65: Setting For Collection Plan
6.4 Setting for Collection Plan Click shortcut key , or click menu bar item, and the " Upload parameters " dialog box will appear: Figure 6.4 Set Collection Parameter As above figure, the doctor could set parameter according to the patient status and diagnosis... - Page 66 requirement, then the monitor could finish the collection according to the setting.Parameter explanation is as follows: Patient Name: the patient's name Patient ID: the patient's ID number.It is used for marking patient, and it is exclusive in order to avoid homonymy patient arisen state Current Time: Current system display time Time Periods: Awake Time: the patient is awake state...
-
Page 67: Data Download
6.5 Data Download Before you download the measurement data from device, please make sure that: 1. The device is correctly connected to the computer properly. 2. The device is turned on. 3. Disconnect the device from patient before connecting it to the computer. The downloaded patient data will be saved in case storage path set. -
Page 68: Open Data File
6.6 Open Data File Click "Open Data" to open the case interface shown as below: Figure 6.6 Case Selection In this interface, you can operate the drive and folder selection on top left part to load the specified disk and folder content, if case file exists in this folder, the basic information of these case files will be displayed in the form of list, contents including: patient name, patient ID, start time and file name. -
Page 69: Delete Data File
Click to select the case file to be opened, then click "Okay" to open and load the case file information. When there are many case data, select one inquiry item, enter the key information, then click "Search" to query. 6.7 Delete Data File If you feel some patient data are not necessary, you can delete them. -
Page 70: Data File Backup
Many files can be deleted at the same time. Push “Ctrl” and click the file you want to delete at the same time, click "Okay", to delete the case file selected. Click "Cancel" to cancel deleting. 6.8 Data File Backup The software has the function of case backup. -
Page 71: Edit Ip Data
backup files appears. After setting, click "Okay" to save. The destination directory interface is shown as below: Figure 6.8.2 Backup Path Settings 6.9 Edit IP Data After opening the case file, blood pressure data can be edited. Click the shortcut key... - Page 72 select "Bp data" from menu to enter the interface shown as below: Figure 6.9 Data Edit Interface All the BP readings are shown in the above dialog box. *=5/192(2.6 %): 192 represents the data sum, 5 represents the data amount deleted, 2.6 % is the percentage of data deleted in all collection data.
-
Page 73: Bp Trend Graph
Date: stands for collection date. BP(mmHg): systolic pressure/diastolic pressure, unit is mmHg. PR: pulse rate, unit is BPM MAP: mean pressure, unit is mmHg. PP: pressure difference between systolic pressure and diastolic pressure, unit is mmHg. (%): oxygen saturation, unit is %. TC: error code /measurement mode(refer to chapter 4) Comment: add comment information to the BP data. - Page 74 dotted line trend. The trend graph is shown as below. Figure 6.10.1 Color Filling Trend Ggraph...
- Page 75 Figure 6.10.2 Dotted Line Trend Graph You can switch the two trend graph types by "Graph Type" button in the bottom of the software interface. When you move the mouse on the trend area, the detail data information on this location will display in the top of the tread area, including the data serial number, collection time and collection date, high/low blood pressure value, pulse rate, comment, etc.
-
Page 76: Display Of Statistics Information
6.11 Display of Statistics Information Press the shortcut key or select "Report" from menu to enter its sub-menu shown as below. Figure 6.11 BP Statistics Information The upper half part of the figure shows the average of blood pressure data and the measurement number under "Awake"... -
Page 77: Patient Information Settings
under "Awake" and "Asleep" state, the unit is mmHg. 6.12 Patient Information Settings Select "Patient Data" from the menu to enter its sub-menu shown as below. Patient information including: patient information, current medications, diagnose information and physician information. Figure 6.12 Edit Patient’s Information Recent medication information of patient can be entered in "Current Medications"... -
Page 78: Sleep Time Setting
Blood pressure data description and diagnosis information can be entered in "Diagnose Information" column. Doctor name and doctor advice can be entered in "Physician Info" column. 6.13 Sleep Time Setting Awake and Asleep time can be set by manual mode, after setting, the software will calculate the data again under "Awake"... -
Page 79: Bp Threshold Setting
6.14 BP Threshold Setting The BP threshold can be changed by manual mode, after changing, the corresponding trend graph and analysis data will be automatically renewed. Select "Threshold" to enter its sub-menu shown as below. Figure 6.14 BP Threshold Setting The default recommended thresholds for calculating Blood Pressure Load are 140/90 for wake... -
Page 80: Histogram
periods and 120/80 for sleep periods. These are the default values when you select the Factory Defaults button. 6.15 Histogram Press the shortcut key , the following interface will appear. Figure 6.15 Histogram... -
Page 81: Pie Chart
"All", "Day" and "Night" can respectively display the analysis values in each period. 6.16 Pie Chart Press the shortcut key , the following interface will appear: Figure 6.16 Pie Chart The pie chart interface is divided into four regions, from left to right, the first region is value display area which displays the Maximum, Minimum and Average values among the measurement values, the second region is pie chart display area, the third is the setting area for pie chart color and values,... -
Page 82: Correlation Line
and the last is the time display area, it has three options: "All", "Day" and "Night", which can respectively display the analysis values in each period. 6.17 Correlation Line Press the shortcut key , the following interface will appear: Figure 6.17 Correlation Line The horizontal axis is the systolic pressure axis, the vertical axis is the diastolic pressure axis. -
Page 83: Print Report
for systolic pressure to diastolic pressure. The hollow circle is the BP value measured in the day, and the solid circle is the BP value measured at night. 6.18 Print Report After editing the BP data and diagnosis information, click "Report", the software will create a series of diagnosis reports, you can select all pages or some of them for printing. - Page 84 You can select a report configured for printing, or click "Edit Report" to edit the selected report. Figure 6.18.2 Edit Report...
-
Page 85: Help
Click "Add Report" to add a new report. If you don't need the current report, you can also click "Delete Report" to delete it. Click the shortcut key or select "Report" from menu to preview the report, then select "Print" to print the report. 6.19 Help Click the shortcut key to its sub-menu, which gives a brief description for each program... -
Page 86: Specification
Specification Name Ambulatory Blood Pressure Monitor The degree of protection IP22 against ingress of water Display 2.4'' color LCD Display Operating mode Continuous operating NIBP Specifications Measurement Method Oscillometric method Working modes Automatic adult 0~297 mmHg(0~39.6 kPa) Cuff pressure range pediatric 0~235 mmHg(0~31.3 kPa) neonatal... - Page 87 range adult 160mmHg(21.33 kPa) Inflation pediatric 120mmHg(16kPa) neonatal 70mmHg(9.33 kPa) SYS PROMPT: 40~270 mmHg(5.3~36.0 kPa) adult mode DIA PROMPT: 10~215 mmHg(1.3~28.7 kPa) SYS PROMPT: 40~200 mmHg(5.3~26.7 kPa) Prompt Range pediatric mode DIA PROMPT: 10~150 mmHg(1.3~20.0 kPa) SYS PROMPT: 40~135 mmHg(5.3~18.0 kPa) neonatal mode DIA PROMPT: 10~100 mmHg(1.3~13.3 kPa) adult mode...
- Page 88 Accuracy The BP value measured by the device is equivalent with the measurement value of Stethoscopy, perform clinical verification in accordance with the requirements in ISO 81060-2: 2013, whose Error error meets the followings: Maximum mean error: ±5 mmHg Maximum Standard deviation: 8 mmHg Operating temperature/ +5 ºC~40 ºC...
- Page 89 be used about 150 times. Rated Power ≤ 3.0 VA Dimensions 128(L)*69(W)*36 mm(H) Unit Weight 240 gram(without batteries) Internally powered equipment Safety classification Type BF defibrillation-proof applied par The service life of the device is five years or 10000 times of BP Service life measurement.
-
Page 90: Appendix
Appendix Guidance and manufacturer's declaration – electromagnetic emissions- for all EQUIPMENT and SYSTEMS Guidance and manufacturer's declaration – electromagnetic emission The device is intended for use in the electromagnetic environment specified below. The customer of the user of the device should assure that it is used in such and environment. Emission test Compliance Electromagnetic environment –... - Page 91 Guidance and manufacturer's declaration – electromagnetic immunity – for all EQUIPMENT and SYSTEMS Guidance and manufacturer's declaration – electromagnetic immunity The device is intended for use in the electromagnetic environment specified below. The customer or the user of device should assure that it is used in such an environment. IEC60601 test Compliance Electromagnetic...
- Page 92 Guidance and manufacturer's declaration – electromagnetic immunity – for EQUIPMENT and SYSTEMS that are not LIFE-SUPPORTING Guidance and manufacturer's declaration – electromagnetic immunity The device is intended for use in the electromagnetic environment specified below. The customer or the user of device should assure that it is used in such an environment. Immunit IEC60601 Compliance...
- Page 93 2.5 GHz 61000-4- 800 MHz to 2.5 GHz Where P is the maximum output power rating of the transmitter in watts (W) according to the transmitter manufacturer recommended separation distance in metres (m). Field strengths from fixed RF transmitters, as determined by an electromagnetic site survey, a should be less than the compliance level in each frequency range.b...
- Page 94 affected by absorption and reflection from structures, objects and people. Field strengths from fixed transmitters, such as base stations for radio (cellular/cordless) telephones and land mobile radios, amateur radio, AM and FM radio broadcast and TV broadcast cannot be predicted theoretically with accuracy. To assess the electromagnetic environment due to fixed RF transmitters, an electromagnetic site survey should be considered.
- Page 95 according to the maximum output power of the communications equipment. Rated maximum Separation distance according to frequency of transmitter (m) output power of 80 MHz to 800 MHz 800 MHz to 2.5 GHz transmitter (W) ...
- Page 96 Warning ●Active medical devices are subject to special EMC precautions and they must be installed and used in accordance with these guidelines. ●Electromagnetic fields can affect the performance of the device, so other equipment used near the equipment must meet the appropriate EMC requirements. Mobile phones, X-rays, or MRI devices are possible interference sources, as they emit high-intensity electromagnetic radiation.
- Page 97 ●In order to avoid the accumulation of electrostatic charge, it is recommended to store, maintain and use the equipment at a relative humidity of 30% or more. The floor should be covered with ESD dissipated carpets or similar materials. In the use of the components, non-synthetic clothing should be wore.
- Page 98 Disposal: The product must not be disposed of along with other domestic waste. The users must dispose of this equipment by bringing it to a specific recycling point for electric and electronic equipment GIMA WARRANTY TERMS The Gima 12-month standard B2B warranty applies...
Need help?
Do you have a question about the ABPM50 and is the answer not in the manual?
Questions and answers