Table of Contents
Advertisement
Quick Links
Advertisement
Table of Contents

Related Manuals for Copeland XWEB300D PRO


Summary of Contents for Copeland XWEB300D PRO
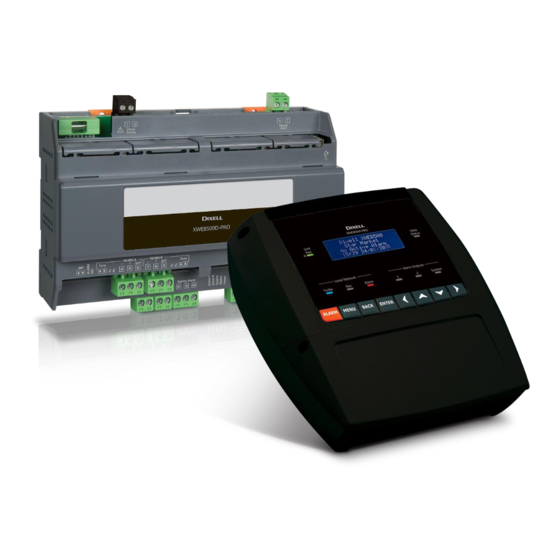
- Page 1 XWEB300D/500D/500B PRO (V.2.0)
-
Page 2: Table Of Contents
CONTENTS PRODUCT DISPOSAL (WEEE) ....................... 5 FOR WHOM THIS MANUAL IS INTENDED ..................... 5 PACKAGE CONTENTS ..........................6 TECHNICAL FEATURES .......................... 7 INSTALLATION ............................8 INSTALL XWEB300D / 500D......................... 9 5.1.1 LED ............................. 10 Installing XWEB500B ......................... 11 5.2.1 LED ............................. 12 CONNECT THE DEVICES ........................ - Page 3 Copeland Controls S.r.l. cannot be held liable for any malfunction or damage resulting from the use of unsupported devices. CAUTION Copeland Controls S.r.l. reserves the right to make changes to this manual without prior notice. The latest available version can be downloaded from the website. ATTENTION Immediately upon power supply failure no new data are recorded;...
- Page 4 CAUTION Copeland Controls S.r.l. reserves the right to vary the composition of its products, without informing the customer, guaranteeing in any case identical and unchanged function CAUTION The product is not suitable for environments subject to mechanical vibrations and does not withstand impact. It must be installed in a dry and clean environment.
-
Page 5: Product Disposal (Weee)
1. PRODUCT DISPOSAL (WEEE) With reference to DIRECTIVE 2012/19/EU OF THE EUROPEAN PARLIAMENT AND OF THE COUNCIL of 4 July 2012 on Waste Electrical and Electronic Equipment (WEEE), and the relevant national implementing regulations, we would like to inform users of EEE in private households that: ➢... -
Page 6: Package Contents
When using a connection through the modem, always make sure that the type of modem you are about to install is a Copeland Controls-approved model as they will not be held responsible for the poor operation of devices that are not expressly approved. -
Page 7: Technical Features
Stand-alone device Approvals CE, UL. The system consisting of this control EC. The system consisting of this control and and monitoring unit and Copeland Controls monitoring unit and Copeland Controls temperature gauges conforming to EN13485 temperature gauges conforming to EN13485 complies with EC Regulation No. -
Page 8: Installation
5. INSTALLATION For installation, the XWEB system must not be opened in any way (XWEB300D/500D). If the box is opened, the warranty lapses. It can be installed in various ways based on the model and type of user interface access that you wish to provide for the final user. -
Page 9: Install Xweb300D / 500D
INSTALL XWEB300D / 500D TERMINAL BLOCK Terminals Description Terminals Description (1) Alarm relay 1 (**) (9) XWEB power supply (2) Alarm relay 2 (**) (4) External GSM modem power supply (*) 33 [-]; 34 [+] (3) System alarm relay (11) USB for external peripherals 30-31 Normally Open 30-32 Normally Closed (10) Digital input (**) -
Page 10: Led
5.1.1 LED Colour Description Alarm Alarm on RS485 line Blue System in data recording Power Green System on Status Green Sending message/event queue System System alarm Alarm1 Status of relay output 1 (*) Alarm2 Status of relay output 2 (*) (*)= Only for XWEB500D CAUTION: the status of the System LED is linked to that of the corresponding relay 'System alarm (3)' CAUTION: for XWEB300D the 'system relay' as AUX assumes the following logic:... -
Page 11: Installing Xweb500B
INSTALLING XWEB500B Terminals Description Terminals Description (1) Alarm relay 1 (9) RS485 B (2) Alarm relay 2 (11) XWEB power supply (3) System alarm relay (8) 2 x USB for external peripherals 5-6 Normally open 5-7 Normally closed (4) Modem reset relay (10) COM for external modem (5) Digital input (7) RJ45 LAN network connector... -
Page 12: Led
Most Copeland Controls controllers are equipped with an RS485 serial output and can be connected without the need for any additional module or connection cable. To ascertain this possibility, check the controller's features in its manual. - Page 13 Some Copeland Controls devices, however, may not be so in direct form, but can be obtained via the small Copeland Controls XJRS485 or Copeland Controls XJ485 external converter. The controller output is converted from 'TTL' (five-wire) to '485' (two-wire). If you need to use the TTL/485 converter, pay attention in the: •...
-
Page 14: Xc400/600/800/900 And Xh200/300/400 Series Configuration
Incorrect connection On the same line, each controller must be programmed with its own unique serial address, via the Adr parameter. Refer to the installation manual of the instrument itself for the access and modification procedure. In order to obtain a simple description of the categories that they belong to, subdivide the address programming in a progressive manner. -
Page 15: Mobile Software Requirements (Smartphone/Tablet)
Opera SUPPORTED Microsoft Internet Explorer NOT SUPPORTED MOBILE SOFTWARE REQUIREMENTS (SMARTPHONE/TABLET) Browser Support Minimum Version Apple iOS Safari SUPPORTED 10.3+ Android Google Chrome SUPPORTED Android Mozilla Firefox SUPPORTED All newer computers are capable of meeting these requirements. However, it is advisable to seek the advice of an IT expert when evaluating computers to be purchased and/or already in your possession. -
Page 16: Cross-Cable Connectivity
CROSS-CABLE CONNECTIVITY Local access from the PC is the fastest way to manage the setup. A PC can be connected to XWEB via the network interface supplied with the 'RJ45 Ethernet connector'. The connection between the two is to be made by means of a crossed network cable (aka 'cross cable'). -
Page 17: Intranet Connectivity (Lan Connection) And Vpn
INTRANET CONNECTIVITY (LAN CONNECTION) AND VPN This type of connection will allow you to access XWEB from any PC connected to the local network. This type of connection must also be used to configure XWEB for connection from the Internet via VPN (Virtual Private Network). -
Page 18: Internet Connectivity On Public Ip
to XWEB from your PC by opening your browser and entering the IP address of XWEB in the address bar. The default address is: https://192.168.0.150 . Store the address in the list of favourites. INTERNET CONNECTIVITY ON PUBLIC IP This type of connection will allow you to access XWEB directly from any PC connected to the Internet without having to install - on your PC - any additional software. -
Page 19: Wifi Connectivity
WIFI CONNECTIVITY This type of connection will allow you to access XWEB directly from a device equipped with a wifi connection, or to have XWEB access an already configured wifi network. Prerequisite to these types of connectivity is the installation of the WIFI dongle in the XWEB USB port. CAUTION: only use dongles officially supported by this monitoring unit. -
Page 20: Emergency Procedure
7. EMERGENCY PROCEDURE This procedure allows XWEB to be restored to its factory settings; it is useful in cases where the IP address and/or web service port and/or access credentials (username/password) have been lost and/or there are generic errors. The procedure is applicable with XWEB software versions 5.0 and higher. With the instrument switched off, close the 'JMP' contacts using the jumper supplied with the XWEB product Connect a network cable between XWEB and PC... - Page 21 ADDRESS' on the page described in the previous section. Open the JMP contacts by removing the jumper Enter the credentials provided by Copeland Controls S.r.l. Technical Support who was given the XWEB MAC ADDRESS and DATA Press the 'Confirm' button: if the data entered is correct, the system will complete its operations and be restarted automatically.
-
Page 22: Operativity
8. OPERATIVITY For operational procedures, refer to the OPERATIONAL MANUAL available on the Copeland website. CONTACT: dixell.service@copeland.com 9. SYSTEM DATA Fill in the table below, make a photocopy and keep it close to XWEB. HostName ___________________________ [ example: myXWEB001 ] IP Address ___________________________ [ example: 192.168.0.123 ]... -
Page 23: Notes
11. NOTES ______________________________________________________________________________________ ______________________________________________________________________________________ ______________________________________________________________________________________ ______________________________________________________________________________________ ______________________________________________________________________________________ ______________________________________________________________________________________ ______________________________________________________________________________________ ______________________________________________________________________________________ ______________________________________________________________________________________ ______________________________________________________________________________________ ______________________________________________________________________________________ 1592028040 XWEB300D_500D_500B_PRO STP EN r1.1 16.06.2023.docx XWEB PRO 23/23...
Need help?
Do you have a question about the XWEB300D PRO and is the answer not in the manual?
Questions and answers