Table of Contents
Advertisement
Quick Links
Advertisement
Table of Contents

Subscribe to Our Youtube Channel
Related Manuals for Bartscher 400M


Summary of Contents for Bartscher 400M
- Page 1 400M 300435 Original-Gebrauchsanleitung V2/0118...
-
Page 2: Table Of Contents
Manual vacuum packing cycle with bags ..........59 5.4.8 Automatic vacuum packing cycle with containers ........59 6. Cleaning ......................... 61 7. Troubleshooting ....................62 8. Waste disposal ...................... 64 Bartscher GmbH phone: +49 5258 971-0 Franz-Kleine-Str. 28 fax: +49 5258 971-120 33154 Salzkotten... -
Page 3: Safety
Read this instruction manual before using and keep them available at all times! This instruction manual contains information about the installation, operation and maintenance of the device and should be consulted as an important source of information and reference guide. Awareness of the safety instructions and instructions for use in this manual will ensure the safe and correct use of the device. -
Page 4: Safety Instructions
CAUTION! This symbol highlights dangerous situations which could lead to light injuries, or damage, malfunction, and/or destruction of the device. NOTE! This symbol highlights recommendations and information aimed for effective and trouble-free device operation. 1.2 Safety instructions The device can be used by children 8 years and up, as well as by people with disabilities and those with limited experience/ knowledge as long as they are under supervision or have been instructed on proper use of the device and its possible dangers. - Page 5 Only a qualified technician and using original spare parts and accessories should carry out repairs and maintenance of the device. Do not attempt to repair the device yourself. Do not use any accessory or spare parts that have not been recommended by the manufacturer.
- Page 6 Do not immerse the device in water or use it when the plug or power cable is wet. If such a case occures while operating, put on the rubber gloves and pull out the plug immediately. Do not touch or remove the device when immersed in water until the plug is pulled out from the power supply socket.
- Page 7 Do not use lids or containers with cracks or other damages. We recommend using Bartscher bags for vacuum packing. If you do not use the above-mentioned bags, the smooth side of a bag for vaccum packing should be in contact with the sealing rail to perform multiple vacuum packing.
-
Page 8: Proper Use
1.3 Proper use The operational safety of the device is assured only in case of proper use, according to the operation manual. All technical activities like installation and maintenance must be performed by the qualified service personnel only. The vacuum packing machine is only intended for packing food products or other vacuum packed objects. -
Page 9: General Information
2. General information 2.1 Liability and Warrantees All the information and instructions in this manual take into account standard safety regulations, current levels of technical engineering as well as the expertise and experience we have developed over the years. The instruction manual was translated with all due care and attention. However, we do not accept liability for any translation errors. -
Page 10: Transport, Packaging And Storage
3. Transport, packaging and storage 3.1 Delivery check Please check the delivery upon completeness and transport damage immediately after receipt. In case of visible damage do not accept or accept the delivery with reservation only. Note the extent of damage on the carrier’s bill of delivery. Trigger off the complaint. Hidden damages should be reclaimed immediately after notice, as claims for damages can only be asserted within the effective period for complaints. -
Page 11: Technical Data
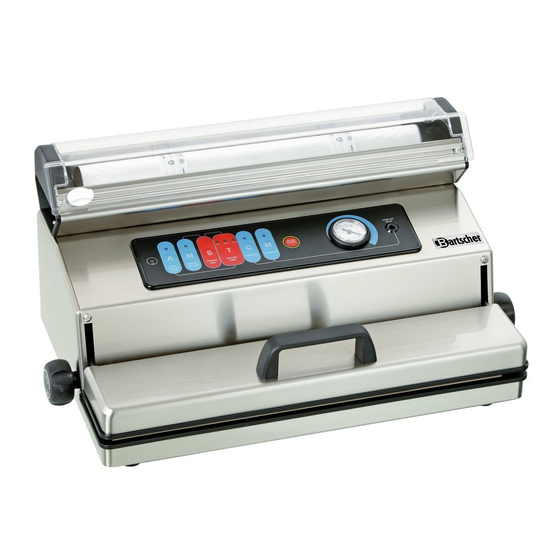
4. Technical data 4.1 Overview of parts ON/OFF (I/O) switch - Press the switch to (I) to turn the device on. Turn the device off by pressing (O) when not in use. Control panel - the various functions of the device can be adjusted by selecting the corresponding button. - Page 12 “Lock & Unlock System” device - used to hold the bag for automatic execution of the packaging cycle. Lock & Unlock System - equipped with a gas spring to adjust opening of the lid. Sealing gasket - Presses the bag on the sealing bar. Airtight gaskets - Guarantee vacuum tightness in the chamber when air is removed from the bags.
-
Page 13: Technical Specification
4.2 Technical specification Vacuum packaging machine 400M Name including roll holder 300435 Code-No.: Material: Chrome nickel steel 18/10 Vacuum pump: 1,9 m /h (approx. 31,5 l/min.) Seal bar: 1 seal seam, 400 mm long Maximum vacuum: -850 mbar Realization: ... -
Page 14: Installation And Operation
5. Installation and operation 5.1 Installation Positioning Unpack the device and remove all package materials according to the valid environment protection regulations. CAUTION! Never remove the nameplate and warning signs from the device. Put the device on an even, stable, dry and waterproof surface which is resistant to high temperature. -
Page 15: Advantages Of Vacuum Packaging
5.2 Advantages of vacuum packaging With vacuum packaging, air is removed from the film bags or from containers and sealed hermetically in order to stop or slow down food spoiling. Vacuum packaging prolongs preservation of food which lasts 3 to 5 times longer. The taste and vitamin supply remain intact. - Page 16 “ ” for food with and without vacuum packaging: Preservation times Preservation time Preservation time not vacuum packed vacuum packed Refrigerated food (5+/-2°C) 8 - 9 days Red meat 3 - 4 days White meat 2 - 3 days 6 - 9 days Whole fish 1 - 3 days 4 - 5 days...
-
Page 17: Guidelines For Vacuum Packaging
5.3 Guidelines for vacuum packaging Vacuum packaging for freezer A correct preservation will help the device to keep food fresh. Pack the food as fresh as possible. Delicate foods or those which you desire to keep their shape and appearance could be damaged if packed as fresh products. - Page 18 Defrosting vacuum packed food Food preserved vacuum packed such as meat, fish, fruit, vegetables and other foods can be defrosted on the bottom shelf of the refrigerator. Let the bread and cakes defrost at room temperature. For soups or other liquids, defrost the bag directly in warm water until the content is completely warm.
- Page 19 General safety instructions 1. Clean your hands, utensils and work surfaces used to cut and vacuum pack foods. 2. If possible, wear gloves to handle the food. 3. Use only fresh food for vacuum packaging. 4. Immediately preserve perishable foods vacuum packed in the refrigerator or freezer and do not leave them too long at room temperature.
- Page 20 Advice for preserving vacuum packed foods The vacuum packed preservation system is the way to preserve purchased and cooked food. Once you have used vacuum packing preservation, it will soon become essential in preparing food. Follow the instructions below concerning vacuum packaging and preservation to guarantee food quality: 1.
- Page 21 9. Some dry foods such as flour and cereals can contain insect larvae. If they are not preserved vacuum packed, the larvae could contaminate food during preservation. To prevent insects from hatching, vacuum package foods. 10. Food can be preserved at low temperatures since only a few microorganisms thrive without air.
-
Page 22: Operation
5.4 Operation 5.4.1 Control panel/Functions of keys and display (2A) “ON” indicator light - when the switch (1) is at (I), the indicator light is green. (2B) “A” key (Auto Vacuum & Seal) - The start key for the automatic vacuum packing cycle for bags including sealing. -
Page 23: Switching The Device On
5.4.3 Switching the device on Press the (1) button on the right side; on the front panel, the green “ON” (2A) indicator light and red (2F) closure time (MED) indicator switch on. 5.4.4 Settings Setting sealing time To set the sealing time, press the “T”... -
Page 24: Making Bags From Rolls
5.4.5 Making bags from rolls Insert a roll of suitable film in the roll holder (15) of the device. Use only rolls for vacuum packing (with ribbed or embossed side). Select the appropriate size for the bag in which the food will be preserved. Make sure that the bag is at least 8 cm longer than the food being preserved. - Page 25 c) Lower the lid (5) by pressing the handle downwards (6) (Fig. D1), then take it with the other hand and turn one of the two knobs (7) in the direction of the LOCK arrow (Fig. D2). The lid (5) must remain all the way down (Fig.
-
Page 26: Automatic Vacuum Packing Cycle With Bags
f) Make sure it is sealed properly. A correct sealing must be smooth, straight and without any creases, the seam must not show the pattern on the bottom layer (Fig. G). 5.4.6 Automatic vacuum packing cycle with bags (precut or see P. 5.4.4) To perform the automatic packaging cycle in bags including final sealing. - Page 27 d) If necessary, adjust the sealing time (see point 5.4.3 “Settings/Sealing time settings”) (Fig. J). e) Press the “A” button (2B) for the automatic cycle. The device performs a vacuum packing cycle in automatic mode. Wait for the red indicator light of the “T”...
-
Page 28: Manual Vacuum Packing Cycle With Bags
5.4.7 Manual vacuum packing cycle with bags - Repeat the operations from point a) to d) of section 5.4.5. - Start the manual vacuum packing cycle by pressing the “M” key (2D). Then press the “S” key (2E) to seal the bag manually before crushing its fragile or sensitive contents. - Page 29 NOTE! At the start of the vacuum phase, it could be necessary to press the lid of the container by hand in order to close it hermetically. d) Press the “C” button (2G). The device performs the vacuum packing cycle and switches off automatically when it is over.
-
Page 30: Cleaning
6. Cleaning WARNING! Before cleaning, disconnect the device from the power supply (unplug!). The device is not suited for direct washing via water jets. Protect the device from the water penetration. CAUTION! Do not use aggressive detergents, solvents or aromatic essence-based products! o Clean the device regularly. -
Page 31: Troubleshooting
o Use only a soft cloth and never use abrasive detergents which could scratch the surface. o After cleaning, use a soft and dry cloth to dry and polish the surface. 7. Troubleshooting In case of malfunction, disconnect the device from its power source. Before contacting the service or sales agent, verify - based on the table below - whether it is possible to eliminate disruption in operation. - Page 32 Possible cause and solution Problem Closure leakages could be caused by creases, crumbs, grease and humidity. Open the bag, clean the top part on the inside, remove debris from the sealings bar and perform The bag does not a second closure. hold the vacuum ...
-
Page 33: Waste Disposal
For that purpose disconnect device from mains supply and remove mains connection cable from the device. For the disposal of the device please consider and act according to the national and local rules and regulations. Bartscher GmbH phone: +49 5258 971-0 Franz-Kleine-Str. 28 fax: +49 5258 971-120...
Need help?
Do you have a question about the 400M and is the answer not in the manual?
Questions and answers