Vulcan-Hart GHCB40 Installation & Operation Manual
Heavy duty gas broilers
Hide thumbs
Also See for GHCB40:
- Replacement parts manual (37 pages) ,
- Specifications (2 pages) ,
- Installation & operation manual (56 pages)
Table of Contents
Advertisement
Quick Links
Download this manual
See also:
Service Manual
HEAVY DUTY GAS BROILERS
CERAMIC BROILERS
MODELS
GHCB40C
GHCB40
GHCB44
HCB2T
HCB2B
SUNGLOW BROILERS
MODELS
IR2T
IR2B
GHIR44
For additional information on Vulcan-Hart or to locate an authorized parts and
For additional information on Vulcan-Hart or to locate an authorized parts and
For additional information on Vulcan-Hart or to locate an authorized parts and
For additional information on Vulcan-Hart or to locate an authorized parts and
For additional information on Vulcan-Hart or to locate an authorized parts and
service provider in your area, visit our website at www.vulcanhart.com
service provider in your area, visit our website at www.vulcanhart.com
service provider in your area, visit our website at www.vulcanhart.com
service provider in your area, visit our website at www.vulcanhart.com
service provider in your area, visit our website at www.vulcanhart.com
VULCAN-HART
DIVISION OF ITW FOOD EQUIPMENT GROUP, LLC
WWW.VULCANHART.COM
MLS
ML-52212
ML-52211
ML-52213
ML-52203
ML-52208
MLS
ML-52207
ML-52201
ML-52210
TECHNICAL SERVICE AND PARTS ASSISTANCE
INSTALLATION &
OPERATION MANUAL
1-800-814-2028
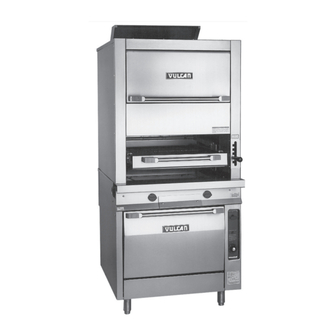
MODEL GHCB40
3600 NORTH POINT BLVD.
BALTIMORE, MD 21222
FORM 32801 (Sept. 2005)
Advertisement
Table of Contents

Related Manuals for Vulcan-Hart GHCB40


Summary of Contents for Vulcan-Hart GHCB40
- Page 1 ML-52201 GHIR44 ML-52210 For additional information on Vulcan-Hart or to locate an authorized parts and For additional information on Vulcan-Hart or to locate an authorized parts and For additional information on Vulcan-Hart or to locate an authorized parts and For additional information on Vulcan-Hart or to locate an authorized parts and For additional information on Vulcan-Hart or to locate an authorized parts and service provider in your area, visit our website at www.vulcanhart.com...
-
Page 2: Important For Your Safety
PROPERTY DAMAGE, INJURY OR DEATH. READ THE INSTALLATION, INSTRUCTIONS THOROUGHLY BEFORE INSTALLING OR SERVICING THIS EQUIPMENT. IN THE EVENT OF A POWER FAILURE, DO NOT ATTEMPT TO OPERATE THIS DEVICE. © VULCAN-HART, 2005 IMPORTANT FOR YOUR SAFETY IMPROPER INSTALLATION, ADJUSTMENT, OPERATING – 2 –... - Page 3 STOP BOLTS IMPORTANT STOP BOLTS MUST BE IN POSITION FOR SAFE OPERATION OF GRID. IF DAMAGED OR MISSING, REPLACE AT ONCE. DO NOT OPERATE GRID WITHOUT BOLTS. – 3 –...
-
Page 4: Installation
The manufacturer suggests that you thoroughly read this entire manual and carefully follow all of the instructions provided. Your Vulcan Sunglow or Ceramic Broiler is produced with quality workmanship and material. Proper installation, usage and maintenance of your broiler will result in many years of satisfactory performance. - Page 5 LOCATION The equipment area must be kept free and clear of combustible substances. This broiler is design certified for installation with the following minimum clearances from combustible and noncombustible adjacent wall construction: MODELS GHCB40 GHCB40C GHCB44 MODEL GHIR44 MODEL HCB2 MODEL The installation location must allow adequate clearances for servicing and proper operation.
- Page 6 Mississauga, Ontario, Canada L4W 5N6. BROILERS MOUNTED ON CASTERS Broilers mounted on casters must use a flexible connector (not supplied by Vulcan) that complies with the Standard for Connectors for Movable Gas Appliances, ANSI Z21.69 • CSA 6.16 and a quick- disconnect device that complies with the Standard for Quick-Disconnect Devices for Use With Gas Fuel, ANSI-Z21.41 •...
- Page 7 3. Remove drip pan and disassemble two 10-24 bolts, one to the left and one to the right of the inside drip pan area, behind the top section front frame (Fig. 2). Fig. 1 4. Carefully remove broiler top section from the bottom section. 5.
- Page 8 DRAFT HOOD INSTALLATION - GHCB40 OR GHCB44 All GHCB40's and GHCB44's come equipped with a hood flue diverter that is packaged and laying in the top broiler compartment. This flue diverter must be attached to the unit at the time of installation, following the steps below: 1.
- Page 9 Body side extensions are wrapped separately and packaged lying in the top broiler compartment of each GHCB40/44 Broiler. The use of these extensions is optional. The extensions are intended to help align the broil battery evenly, front to back, with other Vulcan Heavy Duty Ranges. To install, follow the steps below: 1.
- Page 10 Fire Brick Installation - GHCB40/44 All GHCB40/44's come equipped with 12 center fire bricks and 8 side bricks. The bricks must be placed in the broiler at the time of installation. The bricks are packaged in a cardboard box, which is placed in the top broiler compartment for shipping. To install the bricks, follow the steps below: 1.
- Page 11 As of January 1998, Vulcan-Hart appliances use Ward gas unions instead of Stockham gas unions. If you are installing a new battery range to an existing field appliance, the union on the existing field appliance must be checked against the union being used on the new range.
- Page 12 Questions or concerns regarding the installation procedures may be addressed by calling the Vulcan- Hart Service Department 1-800-814-2028. 3. Engage union nut on manifold pipe of broiler with the male fitting on the next broiler, and draw up union hand-tight. Be sure broilers butt both front and rear.
-
Page 13: Gas Connections
6" (1.49 mb) Water Column for natural gas supply and 10" (2.49 mb) Water Column for propane gas supply. No further adjustment should be required. Models GHCB40 and GHCB44 also require a pressure regulator (not supplied). The regulators must have: •... -
Page 14: Electrical Connections
LIGHTING INSTRUCTIONS - MODEL GHCB40 OVEN. LIGHTING INSTRUCTIONS - MODELS GHCB44 AND GHCB40 BROILERS 1. Remove au gratin oven bottom, baffle and burner box cover. 2. Remove oven bottom and baffles (Model GHCB40 only). 3. Remove manifold panel. 4. Turn gas supply ON. - Page 15 Carbonization of Ceramics If the ceramics take on a black sooty accumulation, the burners are receiving an insufficient amount of air. Open the air shutters further to provide more air. If carbonization occurs during initial adjustment, it will burn off as soon as proper adjustment is achieved. Burner Performance If, after a period of satisfactory operation, the burner flame characteristics should change or the length of burner flame should be reduced, either the air mixer opening or the gas valve orifice has become...
- Page 16 LIGHTING INSTRUCTIONS - MODELS HCB2 1. Remove burner box front cover and turn gas supply ON. 2. Place the ceramics, with the projections down, to the rear of broiler burners. The lugs on the burners will properly position themselves. The ceramics are sized at the factory. 3.
- Page 17 LIGHTING INSTRUCTIONS - MODELS IR2 AND IR44 (INFRARED) 1. Remove burner box cover. 2. Turn gas supply ON. 3. Turn pilot burner B valve (located in the lower left-hand compartment) (Fig. 18) ON and light pilots (one pilot per burner) with a taper (Fig. 19). 4.
- Page 18 Pilot Burner Adjustment Turn the pilot burner B valve ON. The valve is located in the lower compartment. Each burner is provided with a standing pilot burner. Adjust the pilot flame to approximately a " (19 mm) flame length. The adjusting valve is installed in the inlet of the pilot burner manifold, located behind the removable front panel above the grid area (Fig.
- Page 19 Main Burner Adjustment Orifices (1 per burner) are located in the front of each burner venturi, behind a removable front panel above the grid area. Each burner is controlled by either a "Hi-Lo" Valve (IR2), or a "Hi-Med-Lo" Valve (GHIR44) and an orifice (Fig. 21). Main Burner Valve Adjustment The "high"...
-
Page 20: Operation
GHCB44 and GHCB40 broilers). Glide the arm up or down to the desired location. Push the lever arm handle to the left (right on GHCB44 and GHCB40 broilers) and lock the arm into the proper slot. — Allows the operator to pull the grid clear of the heat zone, but does not allow the grid to be completely removed from the broiler. -
Page 21: Before First Use
MEDIUM. Model IR2 has two settings. The first position is HI and the second is LOW. Models GHCB40, GHCB44 and HCB2 settings are variable, using a manual throttle. — The grease pan must be checked frequently and emptied when it is about... -
Page 22: Using The Broiler
2. Flip the toggle switch to the OFF position. Complete Shutdown Perform Steps 1 and 2 of nightly shutdown instructions, then turn pilot B valve and main gas line valve OFF. Model GHCB40 To Start Broiler Turn the burner valve to the desired setting. To Start Oven 1. - Page 23 1. Turn burner gas valve OFF. 2. Turn main gas valve OFF and extinguish pilot. COOKING - GHCB40 OVEN ONLY Recommended temperatures and times are intended as a guide only. Adjustments must be made to compensate for variations in recipes, ingredients, installation and personal preference in product appearance.
- Page 24 CLEANING WARNING: DISCONNECT THE ELECTRICAL POWER TO THE MACHINE AND FOLLOW LOCKOUT / TAGOUT PROCEDURES. Daily Exterior Clean the exterior finish of the broiler with a mild soap solution or similar grease-dissolving material. DO NOT use Dawn Dish Detergent. Broiler and Oven Clean the broiler, oven sections and doors, especially if fruit pies or tomato sauce were baked or meats roasted, or if there have been any spillovers.
-
Page 25: Maintenance
WARNING: THE BROILER AND ITS PARTS ARE HOT. USE CARE WHEN OPERATING, CLEANING AND SERVICING THE BROILER. WARNING: DISCONNECT THE ELECTRICAL POWER TO THE MACHINE AND FOLLOW LOCKOUT / TAGOUT PROCEDURES. The efficient operation of this broiler depends upon a rather delicate balance between the volume of gas and the supply of air. - Page 26 NOTES –26 –...
- Page 27 NOTES –27 –...
- Page 28 – 28 – FORM 32801 (Sept. 2005) PRINTED IN U.S.A.
- Page 29 É.-U. IMPRIMÉ 2005) (Sept. F-32801 – –...
- Page 30 – –27 NOTES...
- Page 31 – –26 NOTES...
-
Page 32: Dépannage
L’APPAREIL L’ENTRETIEN NETTOYAGE EXERCER CHAUDS. – – électrique. d’alimentation suivants renseignements technique L'aide pour 814-2028 visiter autorisées, pièces près plus Vulcan-Hart renseignements obtenir RECHANGE PIÈCES allumé. infrarouge à (modèles magasin restaurant ouverte. POINTS VÉRIFIER DÉPANNAGE pour froid lorsqu’il d’évacuation modèles nettoyage périodique... - Page 33 débit grand plus maintenir poli. lignes sens dans d’acier laine d’une l’aide à vigoureusement lécher pourraient flammes vraiment n’est qu’il plus l’appareil causées sont recuit” inoxydable l’acier lorsque poli. à visibles taches laisser pourrait puisqu’elle d’acier laine d’une moyen à rebelles dépôts Enlever...
- Page 34 à ingrédients, cuisson temps températures GHCB40 FOUR à principal robinet à brûleur robinet (arrêt). à brûleur robinet nocturne à brûleur robinet grilloir démarrer HCB2 GHCB44 63,5 à...
- Page 35 à brûleur robinet complet à thermostat cadran à four brûleur bouton four démarrage réglage brûleur robinet grilloir démarrage GHCB40 conduite robinet étapes directives complet à bascule à l’Interrupteur (arrêt). à robinet soirs s’allume, rouge voyant (marche). bascule à...
- Page 36 à grille Mettre grilloir indique fermer. grilloir fonctionner faire l’interrupteur Pousser général. GHCB40). modèle DIRECTIVES section à veilleuse lorsque pousser diminuer. pour l’inverse faire contraire sens dans bouton augmenter Pour °F). à (150 thermostat température...
- Page 37 (à gauche bras poignée Pousser à vers haut GHCB40). GHCB44 grilloirs (à IR), HCB2 (Grilloirs index à poignée pousser grille saisir grille, position brûleur. sera produit plus élevée, Plus préparé.
- Page 38 fait. sera réglage qu’un dès d’air. assez reçoivent SEULEMENT) INFRAROUGE PL-41734 Augmenter grilloir. rester peut pression l’interrupteur d’air. l’entrée diminuer foncés, d’air; débit augmenter flamme sans uniforme autre Aucun (IR2). brûleur l’entrée à fourni d’air réglage placé d’air conduit nécessaire s’avérer peut 20).
- Page 39 PL-41733-1 BRÛLEUR ORIFICE BURNER L’ORIFICE BOUT panneau derrière placé à installé réglage veilleuse flamme Régler dans placé robinet – – Fig. 20). (Fig. grille veilleuse, brûleur robinet po). (3/4 permanent. veilleuse (marche). à veilleuse INTENSITÉS VALVE DEUX VEILLEUSE BRÛLEUR VALVE ADJUSTMENT BURNER RÉGLAGE...
- Page 40 Fig. PL-41732 attendre (arrêt), 19). (Fig. bougie d’une l’aide gauche) côté inférieur compartiment INFRAROUGE) – – PL-41731-1 VOYANT LIGHT BASCULE SWITCH INTERRUPTEUR à (Fig. robinet mettre à brûleur) (une veilleuses dans (placé veilleuse brûleur. (À IR44 MODÈLES Fig. INDICATOR À TOGGLE BRÛLEUR VALVE...
- Page 41 garantie. sous service appel souvent plus jours d’air mélangeur l’ouverture brûleur flamme caractéristiques terminé. sera adéquat carbonisation survient insuffisante. d’air quantité amovible avant panneau l’entrée dans installé pour veilleuse flamme (marche). à inférieur) compartiment PL-41730 flamme L’intensité l’injecteur. chaud. devient grilloir lorsque devient...
- Page 42 PL-56560 CALIBRATION SLOTS DÉGAGEMENT CLEARANCE FENTES SCREW DÉRIVATION ADJUSTMENT RÉGLAGE réglage ensuite Vérifier contraire sens dans s’éteindra dérivation réglage pendant hauteur. (1/8 3,175 diminuer, pour contraire inverse sens dans déclic. fasse principal brûleur d’une aiguilles inverse sens flamme régler minimum. réglée allumée.
- Page 43 Lorsque conduite. brûleur. boîte couvercle l’usine. à coupées sont céramiques languettes grilloir. brûleurs seulement). brûleur. boîte GHCB40 GHCB40. MODÈLE référer minimum. réglée faits. été n’auront BROCHE ENLEVER ELLE TERRE. À MISE DANS PRISE BROCHES. FLEXIBLE D’ALIMENTATION d’alimentation...
- Page 44 être doit distinct tubulure pression doit réglage marge à manière réglé être C.S.A. approuvé être spécifications conforme GHCB44 GHCB40 modèles nécessaire. 2,49 naturel dont usine réglé pression pour modèles sont propane naturel grilloir. codes, exigences saleté trace étranger grilloir.
- Page 45 Fig. raccordés soient grilloirs nivelage Poursuivre seront grilloirs aligner élever pour utilisé montés sont grilloirs aboutés. bien sont à serrer adjacent, l’appareil prise raccord-union Vulcan-Hart directives sujet question tous alignées, être puisse NOTA grilloir Mettre l’entretien toute Pour...
- Page 46 TUBULURE PL-41728 14). être à façon installées entre haut vers glisser façon même centrales grilloir centre vers près. plus Vulcan-Hart Ward raccord-union causer risque cela quoi différent, place d’un pourvue cuisinière gravé fabricant raccord Pour Ward. raccords-unions plus n’utilise...
- Page 47 Fig. POINTS PROTRUDING SAILLIE POINTS basse. plus position retient d’expédition câble suivantes compartiment haut dans moment grilloir réfractaires briques équipés GHCB40/44 12). support; rebords droite possèdent latérales briques soin avec placer Soulever support. brûleur sera fonte. brûleurs grille compartiment latérale,...
- Page 48 10-24 métal à enlevant côté chaque relient 10-24 déballer. suivre l’installation, Pour Vulcan. égale, façon grils L’utilisation GHCB40/44. séparément emballées sont pour rochet extensions utilisant aligner métal à cinq réinstallant côté extensions restants trous (Fig. grilloir métal à...
- Page 49 FUMÉE arrière rebord 10-24 couvrant l’appareil protection plastique suivantes étapes grilloir. supérieure compartiment inverseur d’un munis GHCB44 GHCB40 l’inverseur L’installation grilloir supérieur arrière dans fentes trous quatre Fig. PL-41721 Fig. PL-41719-1 FUMÉE FLUE CONDUIT HOTTE DIVERTER CONDUIT...
- Page 50 Fig. PL-56559 SUPERPOSITION STRAP STACKING COURROIE l’étape à reporter gauche à ovales, SUPERPOSITION finition panneau réassembler inférieure. Fig. PL-41718 (Fig. supérieure droite à gauche à – – superposition. Fig. à qu’illustré assembler droit. finition boulons deux à supérieure boulons deux derrière lèchefrite, droite...
- Page 51 NORMES D’INSTALLATION deux Trouver Enlever Grilloirs partie pour C’est hauteur Lire DÉMONTAGE conseillé Nota d’exploitation. l’appareil. s’avère S’il Fixer immobile. prendre plus, d’un mobile Vulcan) l’appareil GRILLOIRS normalisation, peut Norme Norme Codes Canada Norme Norme Codes L’installation CODES...
- Page 52 Plancher Côté droit Côté Arrière Plancher Côté droit Côté Arrière Plancher Côté droit Côté Arrière incombustible observant conçu été doit combustible substance EMPLACEMENT pour local à Installer grilloirs MODÈLES HCB2 MODÈLES GHIR44 MODÈLES GHCB44 GHCB40C GHCB40 MODÈLES combustible grilloir Aucune...
- Page 53 GÉNÉRALITÉS CONSERVER. À DOCUMENT INTENSE SERVICE FONCTIONNEMENT Vulcan-Hart. détaillant avec spécifications l’alimentation Grilloir avant four Dans GHCB40 Dans l’intérieur À GHCB44 Dans GHIR44 Modèles plaque spécifications l’installation, à procéder câbles bois planchettes jours dans transporteur transport.
- Page 54 – – BOULONS. SANS GRILLE FONCTIONNER FAIRE IMMÉDIATEMENT. REMPLACER MANQUANTS, ENDOMMAGÉS SONT S’ILS SÉCURITÉ. TOUTE FONCTIONNER PUISSE GRILLE POUR PLACE ÊTRE DOIVENT D’ARRÊT BOULONS IMPORTANT D’ARRÊT BOULONS...
- Page 55 COMPAGNIE PRINCIPAL D’ARRÊT ÉTEINDRE GAZ, IMPORTANT FOURNISSEUR CHEZ APPAREIL À SOINS PREMIERS MÊME CLIENT FONCTIONNANT PERSONNEL D’UN L’INTENTION SÉCURITÉ 2005 VULCAN-HART, FONCTIONNER PANNE INSTALLATION D’ENTRETIEN INSTRUCTIONS BLESSURES CAUSER PEUVENT L’ENTRETIEN L’INSTALLATION, APPAREIL. PROXIMITÉ LIQUIDE AUTRE RANGER L’ENTRETIEN. AVEC AVEC ROBINET D’ODEURS...
- Page 56 2005) (Sept. F-32801 21222 BALTIMORE, BLVD. POINT NORTH 3600 RECHANGE www.vulcanhart.com à détaillant repérer GHCB40 MODÈLE INTENSE SERVICE D’EMPLOI MODE D’INSTALLATION ALIMENTAIRE, ÉQUIPEMENT 814-2028 PIÈCES TECHNIQUE site notre visiter près, plus pour Vulcan-Hart concernant À MODE WWW.VULCANHART.COM GROUPE DIVISION VULCAN-HART AIDE autorisé...
Need help?
Do you have a question about the GHCB40 and is the answer not in the manual?
Questions and answers