Beyerdynamic MMX 300 - Gaming Headset Closed (2nd Generation) Manual
- Manual (68 pages) ,
- Product information (14 pages) ,
- Quick start manual (12 pages)
Advertisement
Applications
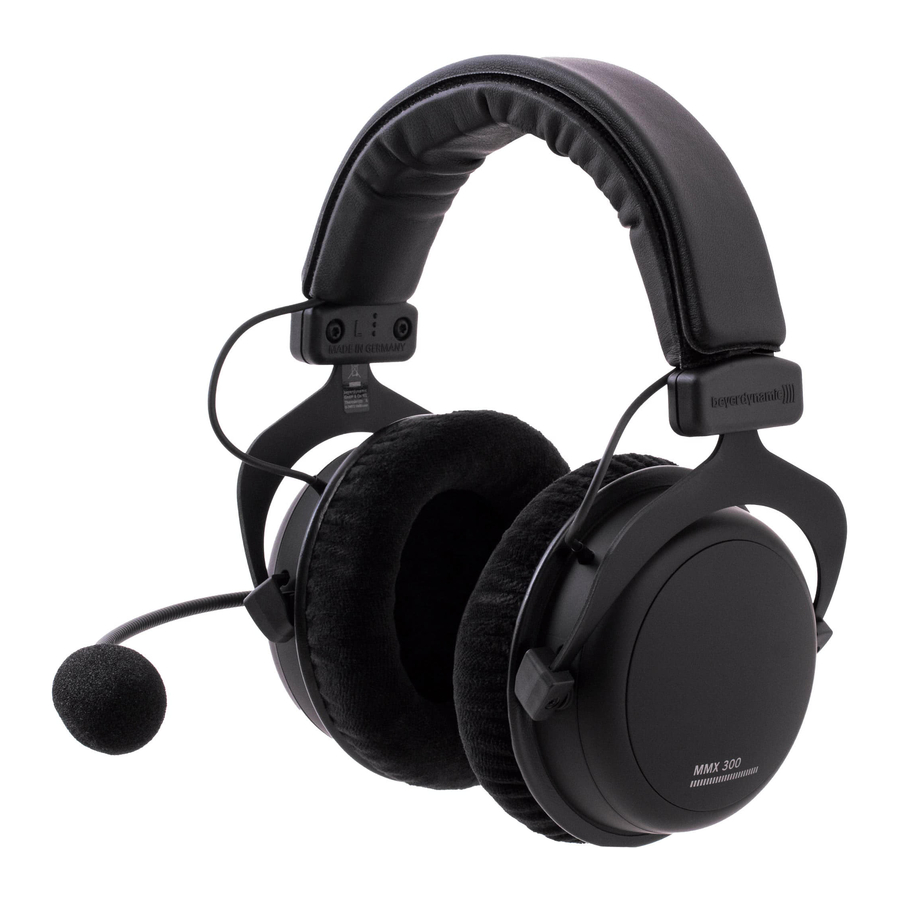
The MMX 300 is an ideal headset for all gaming, multimedia and Voice over IP applications. The technology of the MMX 300 is based on the reliable HS 400 aviation headset suitable for hi-fi applications. The noise-cancelling microphone with a crystal-clear sound ensures a clear and precise voice transmission even in noisy surroundings. The closed design guarantees absolute undisturbed enjoyment of game and sound combined with a high comfort due to soft, replaceable ear and headband pads.
Thanks to the cable remote control and supplied adapter cable the MMX 300 headset is suitable for use with a PC and gaming with a notebook or console which have a mini (3.5 mm) combination jack.
Setting up and Use of the Device
Put the headset on your head. The microphone is on the left side. Position the microphone to the front of the middle of the mouth. In order to avoid pop noise you should use the microphone with a pop shield.
Headband
For best comfort and noise attenuation, the headband can be adjusted to fit your head properly.
Wear the headset so that the headband runs over the top of your head and adjust the headband so that
- your ears are completely enclosed by the ear cushions,
- you feel a gentle pressure around your ears,
- both ends of the headband have the same length to ensure a proper fit
Microphone
- Turn the microphone holder (not the gooseneck!) to position the microphone as requested.

- The pop shield should enclose the microphone completely.
- Bend the flexible gooseneck so that the microphone is placed about 2 cm in front of the middle of your mouth.


In order to avoid overstretching and premature wear and tear never bend the gooseneck more than 90°.
Connection
The MMX 300 headset is supplied with two connecting cables.
Headset cable with a 4-pole jack connector to connect to tablets, smartphones and laptops.

Headset cable for gaming sessions with two 3-pole jack connectors to connect to a headphone output and microphone input of a PC, notebook or console, which have a mini (3.5 mm) combination jack. Due to the screwed-on adapter the headphone can also be connected to devices with a 1/4" jack.

Note:
A common source of error is that the 5-pole jack connector is not properly connected to the headset. If the headset does not work, please check first whether the cable is completely plugged into the headphone housing of the MMX 300. Please refer also to a figure.

There is a locking protection on the 5-pole jack connector of the connecting cable, which has to lock in place. When a malfunction occurs, simply pull out the plug again and push it firmly into the socket with a slight rotary motion so that all 5 poles of the connector have contact. Please refer also to figure below.

Remote control

- The remote control integrated in the cable is provided with a mute switch to mute the microphone, a volume control and a button for accepting calls, media control and temporary mute.
- Mute disabled:
Slide the mute switch upwards (red marking not visible). - Mute enabled:
Slide the mute switch downwards (red marking visible).
Maintenance
- As with any equipment which will be used in close proximity to sensitive areas of the body, it is essential that the ear pads and headband are kept clean. Use a damp cloth for cleaning using warm water only taking care not to allow any water drops into the transducers.
- For cleaning the pop shield remove it from the microphone and wash it under clear running water. If necessary you can use a mild cleansing agent (e.g. washing-up liquid). Make sure that the pop shield is completely dry before you replace it onto the microphone.
Changing the Headband Pad
- Open the Velcro and remove the padding from the headband. Take care not to damage the cable.
- Place the new opened headband pad on the underside of the headband. Make sure to lay the cable in the crease of the pad on the outer edge of the band. Tip: to do this, splay the headphones slightly, over both knees, for example.
- First close the middle Velcro fastening and the two outer ones.
How to replace the Ear Pads
- Should it become necessary, replace the ear pads.
- Pull the ear pads up and remove them from the earcups. The new ear pads can be attached easier, if you warm them beforehand.
![]()
- If other components have to be replaced, please contact your beyerdynamic dealer.

Service
Servicing must be carried out by qualified service personnel only. Dismantling the headset yourself will invalidate the guarantee.
Spare Parts
Accessories and replacement equipment can be found on the internet at: www.beyerdynamic.com
Technical Specifications
| Headphone | ||
| Transducer type | Dynamic | |
| Operating principle | Closed | |
| Frequency response | 5 - 35,000 Hz | |
| Nominal impedance | 32 Ω per system | |
| Nominal SPL | 96 dB | |
| T.H.D. | < 0.2% | |
| Power handling capacity | 100 mW | |
| Sound coupling to the ear | Circumaural | |
| Ambient noise attenuation | approx. 18 dBA | |
| Headband pressure | 3.5 N | |
| Weight with microphone / cable | 332 g | |
| Cable length and type | 1.2 m [3.9 ft] cable with remote control for the use with consoles | |
| 2.5 m [8.2 ft] cable with remote control for the use with a PC | ||
| Connection | 1* 3.5 mm jack for consoles 2* 3.5 mm jack for PC 1* 6.35 mm adapter | |
| Accessories | 2 x detachable cables (console & PC) 1 x transport case | |
| Microphone | ||
| Transducer type | Condenser (back electret) | |
| Operating principle | Pressure gradient | |
| Polar Pattern | Cardioid | |
| Power supply | AB powering | |
| Supply voltage | 1.5 - 9 V | |
| Current consumption | < 0.5 mA | |
| Nominal impedance | approx. 1.5 kΩ | |
| Open circuit voltage at f = 1 kHz | 20 mV / Pa | |
| Frequency response | 30 - 18,000 Hz | |
| T.H.D. | 0.2% at f = 1 kHz | |
| Max. SPL | 120 dB | |
| Microphone output | unbalanced | |
| Dimensions | ||
| Length mic boom | approx. 150 mm | |
| Capsule diameter | 13 mm | |
| Connection | Mini stereo jack plug (3.5 mm) | |
Safety Instructions

When connecting the headphones, make sure that you have turned the volume down to the minimum. Adjust the volume only after the headphones are in place.

We would like to point out that listening at high volumes over a long period of time may damage your hearing irreversibly.
Make sure that the set volume is not too high. Rule of thumb: The higher the volume, the shorter the time of listening. This also shows an example from working life: According to the Occupational Health and Safety Regulations of German trade associations, noise pollution e.g. in the workplace must not exceed 85 dB (room volume level) during a maximum permissible l istening time of 8 hours. If the volume level is increased by 3 dB respectively, the permissible listening time is cut in half, i.e. at 88 dB, the l istening time is 4 hours, at 91 dB 2 hours, etc.
Risk of injury!
When wearing wired headphones, avoid any sudden movements. You could seriously injure yourself, especially if you have any piercings or wear earrings or glasses, etc. that can get caught in the wire.
Microphone
Please make sure that you do not connect the microphone to microphone inputs supplying phantom power (12 - 48 V), as this will damage the microphone.

Documents / Resources
References
Download manual
Here you can download full pdf version of manual, it may contain additional safety instructions, warranty information, FCC rules, etc.
Download Beyerdynamic MMX 300 - Gaming Headset Closed (2nd Generation) Manual
Advertisement


Need help?
Do you have a question about the MMX 300 and is the answer not in the manual?
Questions and answers