FLORABEST FGW 84 A1 Operating Instructions Manual
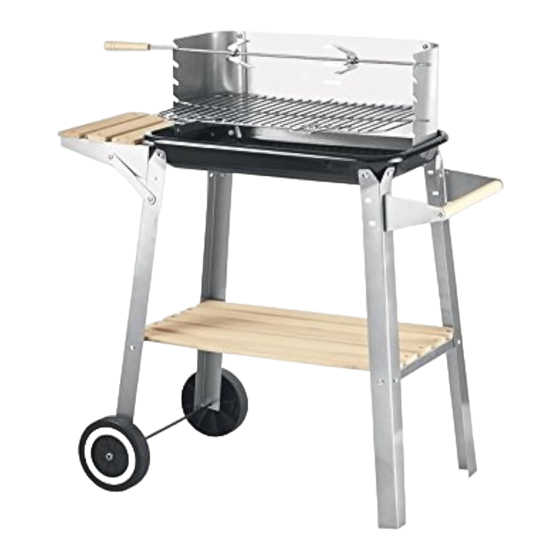
Trolley barbecue
Hide thumbs
Also See for FGW 84 A1:
- Operating instructions manual (88 pages) ,
- Assembly and operating instructions manual (86 pages) ,
- Operating instructions manual (52 pages)

Related Manuals for FLORABEST FGW 84 A1


Summary of Contents for FLORABEST FGW 84 A1
- Page 1 BARBECUE MOBILE FGW 84 A1 BARBECUE MOBILE GRILLWAGEN Mode d’emploi Bedienungsanleitung TROLLEY BARBECUE Operating instructions IAN 103293...
- Page 2 Avant de lire le mode d'emploi, ouvrez la page contenant les illustrations et familiarisez-vous ensuite avec toutes les fonctions de l'appareil. Klappen Sie vor dem Lesen die Seite mit den Abbildungen aus und machen Sie sich anschließend mit allen Funktionen des Gerätes vertraut. Before reading, unfold the page containing the illustrations and familiarise yourself with all functions of the device.
-
Page 4: Table Of Contents
Importateur ............12 FGW 84 A1... -
Page 5: Introduction
Les prétentions de toute nature pour dommages résultant d’un usage non conforme, de réparations non conformes, de modifi cations eff ectuées sans autorisation préalable ou de l’usage de pièces de rechange non autorisées sont exclues. La personne opérant l’appareil est seule à assumer le risque. FGW 84 A1... -
Page 6: Sécurité
8. N'utilisez jamais d'eau pour éteindre le charbon de bois. AVERTISSEMENT Risque d'étouff ement ! ► ATTENTION ! Risque d’empoisonnement par le monoxyde de carbone. Ne faites jamais fonctionner le barbecue dans des locaux fermés ; utilisez- le exclusivement en plein air ! FGW 84 A1... -
Page 7: Accessoires Fournis
5 x planches de tablette, longues 2 x roulettes 1 x essieu 2 x jambes à roulettes 2 x supports de tablette, long 2 x renforts 3 x planches de tablette, courtes Matériel de fi xation M5x10 M5x12 Ø4x10 Ø5.4 M4x10 FGW 84 A1... -
Page 8: Montage
Pour assurer votre sécurité, les têtes de vis doivent toujours être orientées vers l'extérieur, pour éviter des accidents. ATTENTION ► Attendez que le montage soit terminé pour serrer fermement toutes les vis, sinon il peut en résulter des tensions indésirables au niveau des matériaux. FGW 84 A1... -
Page 9: Etapes De Montage
à droite sur la cuve à charbon à l’aide des vis M5 x 12, rondelles Ø5.4, vis M5 x 10 et écrous M5. Le trou supérieur des jambes est utilisé à cette fi n. M5x10 Ø 4x10 M5x12 Ø 4x10 M5x10 FGW 84 A1... - Page 10 Ø5.4 et écrous M5 (uniquement en-haut). Vissez ensuite les éléments du pare-vent de l’intérieur à la cuve à charbon à l’aide des 2 3 4 rondelles Ø5.4, 2 vis M5x12, 3 vis M5x10 et écrous M5. M5x10 M5x10 M5x10 M5x10 M5x10 FGW 84 A1...
- Page 11 à roulettes et sécurisez les roulettes installées à l’aide des écrous nylstop M8. Etape 6 ♦ Fixez les trois planches de tablette sur les supports de tablette à l’aide des rondelles Ø5.4, vis M5x12 et écrous M5. FGW 84 A1...
- Page 12 . Maintenant, 2 3 4 vous pouvez détacher à nouveau les poignées de la grille pour qu’elles ne gênent pas pendant la cuisson. ♦ Pour fi nir le montage, serrez toutes les connexions à vis. FGW 84 A1...
-
Page 13: Mise En Service
L’état optimal des charbons ardents est maintenant atteint. ■ Répartissez le charbon de bois, à l’aide d’un instrument en métal adapté, de façon homogène dans la cuve à charbon. ■ Installez la grille : vous pouvez commencer à confectionner vos grillades. FGW 84 A1... -
Page 14: Nettoyage Et Entretien
Veiller à assurer une élimination écologique des matériaux d’emballage. Annexe Caractéristiques techniques Dimensions (état monté) env. 84 x 86 x 45 cm Grille env. 48 x 27 cm Poids env. 6,8 kg Combustible Charbon de bois Capacité de la cuve à charbon max. 1 kg FGW 84 A1... -
Page 15: Garantie
Tel.: 070 270 171 (0,15 EUR/Min.) E-Mail: kompernass@lidl.be IAN 103293 Heures de service de notre hotline : du lundi au vendredi de 8 h à 20 h (HEC) Importateur KOMPERNASS HANDELS GMBH BURGSTRASSE 21 44867 BOCHUM GERMANY www.kompernass.com FGW 84 A1... - Page 16 Importeur ............. . 24 FGW 84 A1...
-
Page 17: Einführung
Das Gerät ausschließlich bestimmungsgemäß verwenden. ► Die in dieser Bedienungsanleitung beschriebenen Vorgehensweisen einhalten. Ansprüche jeglicher Art wegen Schäden aus nicht bestimmungsgemäßer Verwen- dung, unsachgemäßen Reparaturen, unerlaubt vorgenommenen Veränderungen oder Verwendung nicht zugelassener Ersatzteile sind ausgeschlossen. Das Risiko trägt allein der Benutzer. FGW 84 A1... -
Page 18: Sicherheit
7. Lassen Sie den Grill vor der Reinigung vollständig abkühlen. 8. Verwenden Sie niemals Wasser zum Löschen der Holzkohle. WARNUNG Warnung vor Erstickung! ► ACHTUNG! Gefahr einer Kohlenmonoxidvergiftung. Grillgerät nicht in geschlossenen Räumen, sondern nur im Freien betreiben! FGW 84 A1... -
Page 19: Lieferumfang
2 x Griff halter, kurz 2 x Standstrebe 2 x Querstrebe 5 x Ablagebrett, lang 2 x Rad 1 x Achse 2 x Radstrebe 2 x Ablagehalter, lang 2 x Verstärkungsstrebe 3 x Ablagebrett, kurz Montagematerial M5x10 M5x12 Ø4x10 Ø5.4 M4x10 FGW 84 A1... -
Page 20: Montage
Warnung vor Verletzungen! ► Die Schraubenköpfe sollten zu Ihrer Sicherheit immer nach außen zeigen, um Verletzungen zu vermeiden. ACHTUNG ► Ziehen Sie erst nach Beendigung der Montage alle Schraubverbindungen fest an, sonst kommt es zu unerwünschten Materialspannungen. FGW 84 A1... -
Page 21: Montageschritte
Sie diesen mittels Ø4x10-Holzschrauben fest. ♦ Montieren Sie die Standstreben mit dem montierten Griff rechts an die Kohleschüssel mittels M5x12-Schrauben, Unterlegscheiben Ø5.4, M5x10-Schrauben und Muttern M5. Hierfür wird das obere Loch der Standstreben benötigt. M5x10 Ø 4x10 M5x12 Ø 4x10 M5x10 FGW 84 A1... - Page 22 2 M5x10-Schrauben, Unterlegscheiben Ø5.4 und Muttern M5 (nur oben). Danach verschrauben Sie die Windschutzteile von innen an der Kohleschüssel mittels 2 3 4 Unterlegscheiben Ø5.4, 2 M5x12-Schrauben, 3 M5x10-Schrauben und Muttern M5. M5x10 M5x10 M5x10 M5x10 M5x10 FGW 84 A1...
- Page 23 Führen Sie die Achse durch die unteren Bohrungen der Radstreben sichern Sie die aufgesetzten Räder mit den selbstsichernden Muttern M8. Schritt 6 ♦ Montieren Sie die drei Ablagebretter auf die Ablagehalter mittels Unterlegscheiben Ø5.4, M5x12-Schrauben und Muttern M5. FGW 84 A1...
- Page 24 Spießgarnitur in den Windschutz ein. Sie können nun die Handgriff e wieder vom Grillrost lösen, 2 3 4 damit diese beim Grillen nicht stören. ♦ Ziehen Sie zum Abschluss der Montage alle Schraubverbindungen fest an. FGW 84 A1...
-
Page 25: Inbetriebnahme
Nach ca. 20 Minuten zeigt sich auf der Holzkohle eine weiße Ascheschicht. Der optimale Glutzustand ist nun erreicht. ■ Verteilen Sie die Holzkohle, mit einem geeigneten Metallwerkzeug, gleich- mäßig in der Kohleschüssel. ■ Hängen Sie den Grillrost ein und beginnen Sie mit dem Grillen. FGW 84 A1... -
Page 26: Reinigung Und Pfl Ege
Führen Sie alle Verpackungsmaterialien einer umweltgerechten Entsorgung zu. Anhang Technische Daten Maße (montiert) ca. 84 x 86 x 45 cm Grillrost ca. 48 x 27 cm Gewicht ca. 6,8 kg Brennstoff Holzkohle Fassungsvermögen Kohleschüssel max. 1 kg FGW 84 A1... -
Page 27: Garantie
Tel.: 0842 665566 (0,08 CHF/Min., Mobilfunk max. 0,40 CHF/Min.) E-Mail: kompernass@lidl.ch IAN 103293 Erreichbarkeit Hotline: Montag bis Freitag von 8:00 Uhr – 20:00 Uhr (MEZ) Importeur KOMPERNASS HANDELS GMBH BURGSTRASSE 21 44867 BOCHUM DEUTSCHLAND / GERMANY www.kompernass.com FGW 84 A1... - Page 28 Importer ............. . . 36 FGW 84 A1...
- Page 29 Use the appliance exclusively for its intended purposes. ► Observe the procedures described in these operating instructions. The manufacturer assumes no responsibility for damage caused by improper use, inappropriate repairs, making unauthorised changes or for using unapproved replacement parts. The operator alone bears liability. FGW 84 A1...
- Page 30 7. Allow the grill to cool down completely before cleaning it. 8. NEVER use water to extinguish the glowing charcoal. WARNING Warning in regard to suff ocation! ► CAUTION! Danger of carbon monoxide poisoning. Never operate the grill in an enclosed space, but only outdoors! FGW 84 A1...
- Page 31 2 x Cross braces 5 x Storage slats, long 2 x Wheels 1 x Axle 2 x Wheel brace 2 x Storage holder, long 2 x Reinforcing braces 3 x Storage slats, short Assembly material M5x10 M5x12 Ø4x10 Ø5.4 M4x10 FGW 84 A1...
- Page 32 WARNING Warning about physical injuries! ► To avoid possible injury, the screw heads should always face outwards. IMPORTANT ► First tighten all screw connections down when the assembly is complete, this will help avoid undesirable material tensions. FGW 84 A1...
- Page 33 , with the assembled handle, to the right of the fi re bowl by means of M5 x 12 screws, washers Ø 5.4, M5x10 screws and nuts M5. For this, use the upper hole in the stand braces M5x10 Ø 4x10 M5x12 Ø 4x10 M5x10 FGW 84 A1...
- Page 34 Ø 5.4 and nuts M5 (only at the top). When done, screw the wind protector elements from inside onto the fi rebowl by means of 2 3 4 the washers Ø 5.4, 2 M5 x 12 screws, 3 M5 x 10 screws and nuts M5. M5x10 M5x10 M5x10 M5x10 M5x10 FGW 84 A1...
- Page 35 M8. Step 6 ♦ Assemble the three storage slats on the storage holder by means of the washers Ø 5.4, M5x12 screws and nuts M5. FGW 84 A1...
- Page 36 2 3 4 You can now remove the handles from the cooking grille so that they do not interfere when you are barbecuing. ♦ To fi nish the assembly, tighten all screw connections fi rmly. FGW 84 A1...
- Page 37 After about 20 minutes the charcoal will display a white coating of ash. The optimal burning temperature has now been reached. ■ Distribute the charcoal, using a suitable metallic implement, evenly in the fi rebowl. ■ Insert the grill grate and start the barbecue. FGW 84 A1...
- Page 38 Dispose of all packaging materials in an environmentally friendly manner. Appendix Technical data Dimensions (assembled) approx. 84 x 86 x 45 cm Grill grate approx. 48 x 27 cm Weight approx. 6.8 kg Fuel Charcoal Firebowl capacity max. 1 kg FGW 84 A1...
- Page 39 Repairs made after the lapse of the warranty period are subject to charge. Service Service Great Britain Tel.: 0871 5000 720 (£ 0.10/Min.) E-Mail: kompernass@lidl.co.uk IAN 103293 Hotline availability: Monday to Friday 08:00 - 20:00 (CET) Importer KOMPERNASS HANDELS GMBH BURGSTRASSE 21 44867 BOCHUM GERMANY www.kompernass.com FGW 84 A1...
- Page 40 KOMPERNASS HANDELS GMBH BURGSTRASSE 21 44867 BOCHUM DEUTSCHLAND / GERMANY www.kompernass.com Version des informations · Stand der Informationen Last Information Update: 11 / 2014 Ident.-No.: FGW84A1-092014-2 IAN 103293...
Need help?
Do you have a question about the FGW 84 A1 and is the answer not in the manual?
Questions and answers