Table of Contents
Advertisement
Instruction Manual for the STARBOOK-S Set
PREFACE
Thank you for your purchase of a Vixen STARBOOK-S Go-To controller and Motors Set. The
STAR BOOK-S features intuitive Go To operation with its LCD display for the Vixen GP series
equatorial mounts. We hope it will help increase your enjoyment of your observing session. You
should refer to the instruction manuals for your telescope together with this manual.
Read this instruction manual completely before use
- Always keep this instruction manual near your telescope to ensure quick answers to any
questions.
- This instruction manual describes necessary precautions for the safe use of the product by
preventing possible injuries to yourself and others, as well as damage to the equipment.
WARNING!
Never look directly at the sun with your naked eyes or though this product. Permanent and
irreversible eye damage may result.
- Never connect the cable of the STARBOOK-S with other equipment such as a PC. It may cause
a failure, heating or electrical shock.
- This equipment has been tested and found to comply with the limits for a Class B digital device,
pursuant of Part 15 of the FCC rules.
CAUTION
- Do not use the product while traveling or walking, as injuries may arise from stumbling, falling
or collision with objects.
- Keep plastic and vinyl packing materials away from children, these may cause danger from
swallowing or suffocation.
- Do not use the product in a wet environment.
1
Advertisement
Table of Contents

Related Manuals for Vixen Starbook-S


Summary of Contents for Vixen Starbook-S
- Page 1 Never look directly at the sun with your naked eyes or though this product. Permanent and irreversible eye damage may result. - Never connect the cable of the STARBOOK-S with other equipment such as a PC. It may cause a failure, heating or electrical shock.
-
Page 2: Table Of Contents
2 Align the Telescope Starting Automatic Slewing Choosing a Target from the Object Menu Completing Observing APPLICATION Chart Setting LCD Adjustment Backlighting Duration Adjustment Backlash Compensation Connecting to LAN Automatic Slewing to a Comet Setting Autoguider Upgrading your STARBOOK-S 53... -
Page 3: Before Use
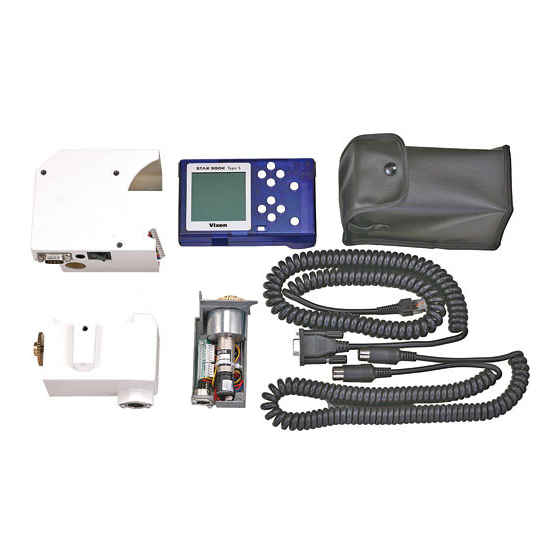
Checking Contents This STARBOOK-S Set contains the parts listed below. Make sure that your box contains all these parts. Your contents may differ from this list if you purchased a telescope package complete with the STARBOOK-S. Description STARBOOK –S Hand Controller R.A. - Page 4 STARBOOK-S Hand Controller 01. TN 2.6-inch monochrome LCD screen 02. Power switch The upper buttons(Right side on-screen soft-key legend): Enter, Cursor movement, Scroll 03. LEFT (Moves the cursor left -The screen scrolls toward right.) 04. UP (Moves the cursor up.-The screen scrolls down.) 05.
-
Page 5: Parts Descriptions
Parts descriptions: GPD2 Mount with STARBOOK-S shown here... -
Page 6: Legend On The Screen
Legend on the Screen 01. Mode Display: SCOPE Mode and CHART Mode 02. Date 03. Time 04. Battery Level: Varies according to a level of discharge. The battery levels are displayed individually for both the STAR BOOK-S and the Mount. Note: battery level indicator may show “Empty”... - Page 7 Celestial Data Base Controller Size Controller Weight TN 2.6-inch monochrome LCD screen (160x160 = 25600 pixels) with backlighting Shown on the STARBOOK-S in 0.1’ increment Max. 1200x (sidereal rate) 8-pole 8-wired modular jack 6-pole 6-wired modular jack 10BASE-T D-sub 9 PIN (unavailable)
-
Page 8: Flow Of Operation
3 AUTOMATIC SLEWING Home Position Slew the telescope to the home position. Alignment Choose two out of 39 registered reference stars in the STARBOOK-S’ database. Automatic Slewing Upon completion of alignment, automatic Go-To slewing and tracking are ready. FINISH OPERATION... -
Page 9: About Batteries
PREPARATION About Batteries The STARBOOK-S controller runs on four AA-size alkaline batteries (not supplied.) The batteries last about eight hours at a temperature of 20 degrees centigrade. The RA and DEC motors run on eight D-size alkaline batteries (not included) or an external power supply sold separately. -
Page 10: Installing The Ra Motor
Installing the RA Motor (1) Take off the vanity cap on the RA body of your mount as shown in the figure. (2) Remove the screw to fix the plastic RA motor cover by using the Phillips-head screwdriver. (3) Remove the plastic RA motor cover. (4)Turn the altitude adjustment screw so that the altitude of the mount goes down to approximately 10 degrees as shown in the figure. - Page 11 motor with the supplied bolt (long) through the hole just above the altitude adjustment screw by using the supplied 5mm Allen wrench. * Make sure that the gears are engaged properly after you install the RA motor. (7) Turn the altitude adjustment screw until the altitude of the mount goes up to the latitude of your observation site.
-
Page 12: Installing The Dec Motor
Installing the DEC Motor (1) Attach the spur gear to the DEC shaft facing the flat side of the spur gear outward. Orient the spur gear so that the setscrew is over the flat portion of the DEC shaft as shown in the figure. Put the spur gear into the dead end of the shaft and tighten the setscrew by using the supplied 1.5mm Allen wrench. -
Page 13: Connecting The Cables
Tighten the lock screws on the controller cable plug securely. (3) Connect the controller cable to the STARBOOK-S. Orient the controller cable plug so that it fits in the socket on the STARBOOK-S properly until it clicks. -
Page 14: Turning The Power On And Off
Turning the Power On and Off (1) There are two power switches; one on the RA motor and another on the STARBOOK-S hand controller. The power is supplied to both components independently so be sure to turn on both power switches. -
Page 15: Setting Language
Caution Remember to turn off the power switch on the RA motor as well as on the STARBOOK-S, otherwise, the batteries will be depleted. Turning one component off will not turn off the other. Setting Language The STARBOOK-S can be operated with your choice of language with English, German, French, Italy, Spanish and Japanese to choose from. -
Page 16: Setting Local Time
Enter the date and local time of your observing site by using the upper five buttons on the STARBOOK-S. This task is required only once the first time you use the STARBOOK-S. However, you will need to reset the date and time if you travel from your regular observing site to a different time zone, or if you reset your clocks for Daylight Saving time. - Page 17 If the location settings remain the same as last time, it will go back to the initial setting screen. (4) The STARBOOK-S will ask to reboot. Press Select to choose OK. To continue operation, turn on the power switch again.
-
Page 18: Saving The Settings
Once you save the settings, they will be stored in the memory of the STARBOOK-S and you can simply choose OK to advance the screen the next time you use it. -
Page 19: Automatic Slewing
AUTOMATIC SLEWING Automatic Slewing Start automatic slewing after you generally understand the basic operation of the telescope. Automatic slewing allows your telescope to search for celestial objects based on the position of each object stored in the memory of the STARBOOK-S. -
Page 20: Flow Of Automatic Slewing
Remember to use an eyepiece with the lowest possible magnification on the telescope. If possible, focus on a distant object before proceeding. Note: If you have advanced to CHART MODE or SCOPE MODE, turn off the STARBOOK-S and restart to reach the above mentioned screen again. -
Page 21: Align The Telescope
Tracking at sidereal rate starts at this time, but you should align the telescope to make the tracking more accurate. From among the celestial objects stored in the memory of the STARBOOK-S, at least two objects must be selected as reference points to allow accurate automatic slewing and precise tracking of celestial objects. - Page 22 GOTO command. Use this mode when you want to fine tune the pointing of the telescope. (3) SCOPE MODE appears on screen after initialization when the power on the STARBOOK-S is turned on. Change it to CHART MODE by pressing the Chart key. CHART should now appear at the upper left of the screen as shown below.
- Page 23 (4) Center the celestial object you wish to use as a reference point in the circle on the screen. Example: Center the chart on Arcturus in the constellation Bootes (the herdsman). (5) When the Zoom+ key is pressed once, the star chart is zoomed in by one step. It enables you to make finer adjustments.
- Page 24 Careful use of the Zoom+ and Zoom- keys will enable you to make comfortable fine adjustments. (11) Press the Align key on the STARBOOK-S after centering the reference star Arcturus in the field of view of the telescope. * If “Confirm GOTO” (see page 33) is selected, a dialog box will pop up to let you confirm the alignment.
- Page 25 (12) A one point alignment is completed. The reference star Arcturus comes to the center of the target on the screen of SCOPE MODE. Press the Chart key and change the screen to CHART MODE to make the second and additional alignments.
-
Page 26: Starting Automatic Slewing
Hint 11 Choosing a reference point near the zenith will make pointing accuracy worse. Due to the nature of equatorial mounts, you won’t be able to improve the pointing accuracy near the zenith even if you complete a pair alignment perfectly. Use a low power eyepiece to search for a celestial object in this case. - Page 27 (4) Continue zooming in further while centering M57 in the crosshairs with the keys. (5) Press the GOTO key. (6) As soon as the GOTO key is pressed, CHART MODE changes to SCOPE MODE and the telescope starts automatic slewing. Automatic slewing -------------- Completion of automatic slewing (7) Start viewing with a low power eyepiece.
-
Page 28: Choosing A Target From The
Choosing a Target from the Object Menu Use the Object Menu. When you are in CHART MODE to search for a celestial object, pressing the Object key will bring up the Object Menu list. Example 1: Search for Messier objects (Find a Messier object from the Messier catalog, which includes many well-known objects.) (1) Pressing the Chart key will change the screen to CHART MODE when you are in SCOPE MODE. - Page 29 Note 1: The STARBOOK-S Object Menu list will display only those celestial objects which are in the sky above the horizon at the current time and location. Note 2: The object label may appear twice next to the selected object.
-
Page 30: Completing Observing
Completing Observing (1)Turn off the power switch on the RA motor. Refer to Hint 14 and page 13. (2)Next, turn off the STARBOOK-S hand controller according to the following procedure. Press Menu to open the System Menu. (3)Move the cursor to Power Off with the keys and press Select enter. - Page 31 You can return the telescope to the initial set position automatically at the end of your observing session when you choose Home Position just before turning off the power to the mount and the STARBOOK-S hand controller. This helps you to restart quickly the next time you wish to observe.
-
Page 32: Chart Setting
Chart Setting For various system settings, press Menu to access them. The Menu key is available in both CHART MODE and SCOPE MODE. (1) Press Menu to display the System Menu on the screen. Choose Chart Setting with the keys and press Select to enter. (2) Chart Setting screen is displayed. - Page 33 C. Const. (Constellation) Name Choose Short in order to show abbreviated constellation names, and choose Long to show the constellation names by full Latin name. Choosing OFF will hide the constellation names. The default setting is OFF. D. Confirm GOTO When set to ON, a confirmation dialog for GOTO will be displayed on the screen before you proceed to SCOPE MODE for automatic slewing.
- Page 34 (3) The prominent bright star names and Messier object numbers are displayed on the screen. Saving the settings Save the settings in order for the current settings to apply the next time the STARBOOK-S is used. (1) Choose Save Setting with the keys and press Select to enter.
-
Page 35: Lcd Adjustment
Select to enter. There is also an LCD adjustment in the initial setting screen right after you turn the power of the STARBOOK-S to on. Refer to Hint 1 on page 14. Backlighting Duration Adjustment It is possible to turn off the screen backlight when a certain period of time has passed after keys are pressed. -
Page 36: Backlash Compensation
intervals. The backlight is turned off after the set time elapses. (3)After setting the backlighting duration, move the cursor to OK and press Select to enter. Using the Backlighting The backlight will turn off automatically after the set duration if no key has been pressed during that time. - Page 37 The values can be set between 0 and 100 both in R.A and DEC.. (3) Choose OK and press Select to enter. Save the settings in order for the current settings to apply the next time the STARBOOK-S is used.
-
Page 38: Pec
You can correct a drifting motion of the equatorial mount with manual operation of the buttons on the controller and memorize it in the STARBOOK-S. It will enable you to make more precise tracking by using the recorded motion*. - Page 39 When you start recording, the count starts at 600 (PEC: 600) and will count down. STARBOOK-S beeps intermittently for 10 seconds just before the completion of the recoding in full circle, until the count reaches 0. *The count may be skipped and the numbers 600 and 0 may not be displayed because of a timing of the indication.
- Page 40 Stop the PEC recording (1) Press MENUto display the System Menu. Move the cursor to PEC with the press SELECTto enter. (2) Choose PLAY STOP (or REC. STOP) in the PEC screen and press the Select key to return to the System Menu.
- Page 41 Press Menu to display the System Menu. Move the cursor to PEC with the Select to enter. Choose Reset in the PEC screen and press Select to delete. The recorded PEC data will be deleted when you simply turn the power on the STARBOOK-S to off.
-
Page 42: Connecting To Lan
*You cannot activate functions relating to the mount drive. Connecting to LAN The STARBOOK-S is designed to connect to a PC with a LAN cable so that the latest firmware or application programs can be downloaded through a website for upgrading. - Page 43 Using a PC to enter Orbital Elements for Comets You can connect the STARBOOK-S to a PC and register orbital elements for comets in it. The orbital elements for the comets can be obtained from astronomy magazines and from Internet web sites related to astronomy.
- Page 44 (5) Advance the screen on the STARBOOK-S to CHART MODE or SCOPE MODE. (6) Press Menu to display the System Menu. Move the cursor to About STARBOOK-S and press Select to enter. Write down the IP address & Subnet mask numbers.
- Page 45 (8) As you click on the “Table of the registered comets” by the left click, the screen changes to a registration form for inputting orbital elements.
- Page 46 If the STARBOOK-S screen is not in SCOPE MODE or CHART MODE, the message below is displayed. Change to the correct screen and re-enter the IP address.
- Page 47 Case 1: Inputting the orbital elements (on PC screen) (1) In the registration form for the orbital elements as displayed in (8) of “Procedures to comet registration”, click on the number on or over 11 by the left click to go into the orbital elements input screen.
- Page 48 Eccentricity Epoch = 2007.1.20.0 (3) Click on Update Data by the left click after you input all the parameters of the orbital elements. Now the comet can be displayed on the screen of the STARBOOK-S. : 2006P1 : McNaught : (for Japanese word) (Q) : 0.170729 AU...
- Page 49 When you delete the input data, choose the number of orbital elements you wish to erase and click on the OK button.
- Page 50 Case2: Inputting the orbital elements (using a downloadable file) With the installation of a file for orbital elements which can be obtained from Vixen’s web site, you can enter the comet orbital elements into the SARBOOK-S easily. (1) As you click on the “Table of the registered comets” by the left click, the screen changes to a registration form for inputting orbital elements.
- Page 51 (2) Click on the Browse button by the left click and designate the file previously downloaded.
- Page 53 (3) In the screen where the file is designated in (2) above, clicking on the file will advance to the screen below. Click on Submit Query by the left click to transfer. *If your download is unsuccessful, follow the directions on page 53 to change settings of the PC.
- Page 54 With the installation of the comet orbital elements, you can display the comet on the screen of the STARBOOK-S and slew to the comet automatically. You can set the comets so as to show or to hide them on the star chart.
- Page 55 Automatic slewing to the comets (Appointing the comet on the star chart.) (1)Complete the alignment of the telescope so that automatic slewing is ready to start. (2) Focus the telescope on a fixed star with the low magnification eyepiece. (3) In CHART MODE, center the comet on the crosshairs with the keys.
-
Page 56: Setting Autoguider
(4) Choose OK and press Select to enter. The target comet is now at the center of the star chart. Page 51 Setting Autoguider (1) Press Menu to display the System Menu. (2) Move the cursor to Autoguider with the (3) Move the cursor with the Value- keys. - Page 57 STARBOOK-S for the update. For data transfer make sure that you have a stable power supply for your PC. You may fail to reboot the STARBOOK-S if the power supply is turned off during the update. In that case, ask your local Vixen dealer for repair (It is chargeable on you). All your data stored in the STARBOOK-S may be initialized after repair.
- Page 58 Subnet mask numbers. Make a note of the version and build to compare with after the update. (7) Open the update program that you downloaded in (1). (e.g. Update32.exe) (8) You should be at the update program screen. Enter the STARBOOK-S IP address as you obtained at (6).
- Page 59 Click on OK. (10) Turn off the STARBOOK-S to reboot. Turn on the STARBOOK again. In the STARBOOK menu, go into About STARBOOK-S. Confirm that the version and build are changed. (11) When the update is done, turn off the STARBOOK-S and disconnect from PC.
- Page 60 (3) Click on OK on all screens and CLOSE. Wait for a couple of minutes before going to the next step so that the computer and controller can communicate. (4)Go to the procedure (6) in “How to Update your STARBOOK-S” and follow the directions thereafter.
- Page 61 The STARBOOK-S will have the IP Address automatically at the time of turning on the power supply when it is connected to a LAN using a DHCP server or a router. Connect the STARBOOK-S to the LAN using the DHCP or to the router.
Need help?
Do you have a question about the Starbook-S and is the answer not in the manual?
Questions and answers