Advertisement
Available languages
Available languages
Quick Links
INSTRUCTION
MANUAL
MANUEL D'INSTRUCTIONS
Rev00(A)
HNTVMC02
English
...................................................................................................................... 02-18
Français
...................................................................................................................... 19-35
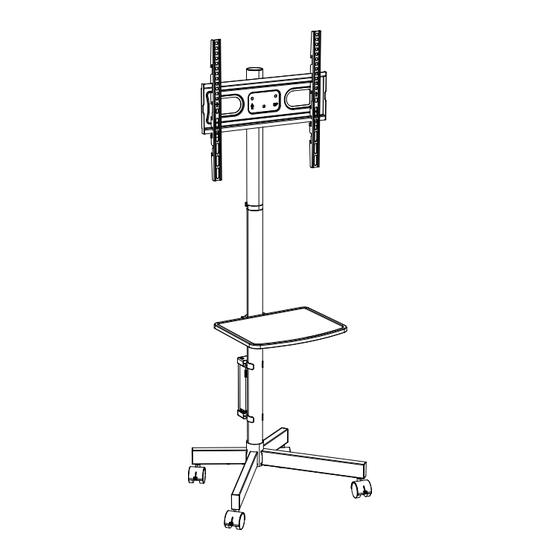
TV Cart
Chariot de Télévision
(US/CA) 1-800-556-0533
(UK) 44-808-196-3874
support@huanuo.com
www.huanuo.com
WWW.
Advertisement

Related Manuals for HUANUO HNTVMC02


Summary of Contents for HUANUO HNTVMC02
- Page 1 INSTRUCTION MANUAL MANUEL D'INSTRUCTIONS Rev00(A) HNTVMC02 English ........................02-18 Français ........................19-35 TV Cart Chariot de Télévision support@huanuo.com (US/CA) 1-800-556-0533 (UK) 44-808-196-3874 www.huanuo.com WWW.
- Page 2 If your TV VESA is greater than 400 x 400mm / 15.7 x 15.7″ or less than VESA 100 x 100mm / 3.9 x 3.9″, this TV cart is NOT compatible. If this TV cart is NOT compatible, please contact customer service at support@huanuo.com to find a compatible product.
- Page 3 Weight Restrictions TV Plate Maximum Weight Capacity: 88 lbs (40kg) Shelf Maximum Weight Capacity: 22 lbs (10kg) If your TV weighs more, this TV cart is not compatible. WARNING Do not exceed weight capacity. Exceeding weight capacity may cause instability, leading to possible injury and/or property damage.
- Page 4 Tool Needed (NOT lncluded) Phillips Screwdriver Supplied Parts and Hardware TV Bracket TV Bolt TV Bolt M4 x 12mm M4 x 30mm [TV1(01)] x 4 [TV1(02)] x 4 TV Bolt TV Bolt M6 x 16mm M6 x 35mm [TV2] x 4 [TV3] x 4 TV Bolt TV Bolt...
- Page 5 Supplied Parts and Hardware Caster Wrench [J] x 1 Bolt Washer Bolt Small Allen Key Lower Pole M8 x 25mm D8 x 16 x 1.5mm M6 x 12mm 5/32″ (4mm) [A1] x 1 [A2] x 1 [B] x 6 [H] x 1 Middle Pole Pole Connector Washer...
- Page 6 PLEASE NOTE: When using the spacers, it is important to note that they can be used in multi-layers (meaning stacked). If you have any difficulty understanding how to install the TV bolts or spacers, please contact customer service at support@huanuo.com. Arrow UP Ensure the TV brackets [01] are EQUALLY CENTERED on your TV and securely fastened in place.
- Page 7 Option A (For Flat Back TV) Add spacers if needed to fit the bolt length and TV back. TV1(01)/TV2/TV4 TV8/TV9 (If needed) Alternate Spacer Setups Option B (For Curved Back TV) Spacers must be tall enough so that the curve on the back of the TV will not interfere with the mounting plate.
- Page 8 Option C (For TV with A “Bump”) The TV brackets must be flush on the bump and leveled by spacers on the gap. TV1(02)/TV3/TV5 TV8/TV9/TV10 Alternate Spacer Setups TV1(01)/TV2/TV4 Alternate Spacer Setups TV8/TV9 (If needed) Option D For cable interference or inset holes, use spacers [TV8], [TV9] or [TV10] to create extra space between the TV and TV brackets.
- Page 9 Step 2 Install the Base The two short square tubes [04] should be on the side with screw holes. 3/16″ (5mm) 10mm Brake On Brake Off NOTE: After installation, lock the casters to avoid movement during assembly.
- Page 10 Step 3 Install the Lower Pole [06] and Middle Pole [07] The holes of the tube connector [02] should be aligned with the holes on the lower pole [06]. 3/16″ (5mm) 5/32″ (4mm)
- Page 11 Connect the two parts of pole connector [08]. 5/32″ (4mm) NOTE: The grooves of the pole connector [08] should be aligned with the grooves of the lower pole [06] and middle pole [07].
- Page 12 Step 4 Secure the TV Plate [10] to the Upper Pole [09] Slide 3 washers [D] to the 3 preassembled bolts on the TV plate [10]. Loosen Tighten Directly adjust the angle between the upper pole [09] and TV plate [10]. If it is difficult to adjust, slightly loosen the pre-assembled nuts [S1].
- Page 13 Step 5 Connect the Upper Pole to the Middle Pole Connect the two parts of pole connector [08]. NOTE: The grooves of the pole connector [08] should be aligned with the grooves of the upper pole [09] and middle pole [07]. 5/32″...
- Page 14 Step 6 Secure the Cable Clips [11] to the Joint of the Poles 5/32″ (4mm)
- Page 15 Step 7 Hang the TV on the TV Plate The TV brackets have three height options. Choose the best height position for your TV before moving on to attach your TV to the TV Plate. Phillips Screwdriver (Not lncluded) Place the safety locks [G] on the hooks facing upward at the lower part of the TV brackets.
- Page 16 Step 8 Attach the Shelf to the Pole 5/32″ (4mm)
- Page 17 Step 9 Tilt Adjustment Loosen Tighten Directly adjust the TV to your desired tilting angle. If it is difficult to adjust, slightly loosen the tilting nuts [S1]. Then retighten it. Step 10 Level the TV Level Tighten Loosen If needed, the TV can be levelled. Slightly loosen the nuts [E], then level your TV. Retighten the nuts to secure the TV in place.
- Page 18 If the TV cart is not level on the floor, you can adjust the casters by turning the preassembled nuts on the casters Lower for stability. Raise Step 11 Cable Management NOTE: If your TV cable is USB, you can use the USB port of the power strip;...
- Page 19 Si vous avez besoin de pièces de rechange, veuillez contacter notre ligne d'assistance technique au 1-800-556-0533 (US/CA) / 44-808-196-3874 (UK) ou le service client à support@huanuo.com. • Toutes les pièces et le matériel inclus ne seront pas utilisés.
- Page 20 Restrictions de poids Capacité de poids maximum du plaque de télévision : 88 livres (40 kg) Capacité de poids maximum de l'Étagère :22 livres (10 kg) Si votre téléviseur pèse plus, ce chariot TV n'est pas compatible. ATTENTION Ne dépassez pas la capacité de charge. Tout dépassement de la capacité de poids peut provoquer une instabilité, entraînant des risques de blessures et/ou de dommages matériels.
- Page 21 Outil nécessaires (NON inclus) Tournevis cruciform Pièces et matériel fournis Support TV Boulon de télévision Boulon de télévision M4 x 12mm M4 x 30mm [TV1(01)] x 4 [TV1(02)] x 4 Boulon de télévision Boulon de télévision M6 x 16mm M6 x 35mm [TV2] x 4 [TV3] x 4 Boulon de télévision...
- Page 22 Pièces et matériel fournis Contents · Inhalt· Contenu · Contenido · Contenuti · コンテンツ Roue Clé [J] x 1 Boulon Rondelle Boulon Petite clé Allen Poteau inférieur M8 x 25mm D8 x 16 x 1.5mm M6 x 12mm 5/32 po (4mm) [A1] x 1 [A2] x 1 [B] x 6...
- Page 23 être utilisées sur plusieurs couches (c'est-à-dire empilées). Si vous avez des difficultés à comprendre comment installer les vis ou les entretoises du téléviseur, veuillez contacter le service client à support@huanuo.com. Flèche VERS LE HAUT Vérifiez que les supports TV [01] sont CENTRÉS À LA MÊME DISTANCE sur votre téléviseur et solidement fixés en place.
- Page 24 Option A (pour un téléviseur à dos plat) Ajouter des entretoises si nécessaire pour s'adapter à la longueur du boulon et à l'arrière du téléviseur. TV1(01)/TV2/TV4 TV8/TV9 (Au besoin) Autres dispositions des entretoises Option B (pour un téléviseur à dos arrondi) Les entretoises doivent être suffisamment grandes afin que l'arrière incurvé...
- Page 25 Option C (Pour un téléviseur avec une surépaisseur) Les supports de la TV doivent affleurer sur la bosse et être réhaussées par des entretoises au niveau du creux. TV1(02)/TV3/TV5 TV8/TV9/TV10 TV1(01)/TV2/TV4 Autres dispositions des entretoises Alternate Spacer Setups TV8/TV9 (Au besoin) Option D Pour les interférences de câble ou les trous encastrés, utilisez des entretoises [TV8], [TV9] ou [TV10] pour créer un espace supplémentaire entre le téléviseur...
- Page 26 Étape 2 Installation de la base Les deux petits tubes carrés [04] doivent être du côté des trous de vis. 3/16 po (5mm) 10mm Frein ACTIVÉ Frein DÉSACTIVÉ REMARQUE : Après l'installation, verrouillez les roulettes pour éviter tout mouvement lors du montage.
- Page 27 Étape 3 Installer le poteau inférieur [06] et le poteau central [07] Les trous du connecteur de tube [01] doivent être alignés avec les trous du poteau inférieur [06]. 3/16 po (5mm) 5/32 po (4mm)
- Page 28 Connectez les deux parties du connecteur de pôle [08]. 5/32 po (4mm) REMARQUE : Les rainures du connecteur de pôle [08] doivent être aligné avec les rainures du pôle inférieur [06] et pôle médian [07].
- Page 29 Étape 4 Fixez la plaque TV [10] au pôle supérieur [09] Faites glisser 3 rondelles [D] sur les 3 boulons préassemblés sur la plaque du téléviseur [10]. Desserrez Serrer Ajustez directement l'angle entre le pôle supérieur [09] et la plaque TV [10]. Si le réglage est difficile, desserrez légèrement les écrous prémontés [S1].
- Page 30 Étape 5 Connectez le pôle supérieur au pôle central Connectez les deux parties du connecteur de pôle [08]. REMARQUE : Les rainures du connecteur de pôle [08] doivent être alignées avec les rainures du Poteau supérieur [09] et du pôle médian [07]. 5/32 po (4mm)
- Page 31 Étape 6 Fixez les serre-câbles [11] à l'articulation des pôles 5/32 po (4mm)
- Page 32 Étape 7 Accrochez le téléviseur sur la plaque TV Les supports TV ont trois options de hauteur. Choisissez la meilleure position en hauteur pour votre téléviseur avant de fixer votre téléviseur à la plaque TV. Tournevis cruciforme (Non inclus) Placez les verrous de sécurité [G] sur les crochets vers le haut à partie inférieure des supports TV.
- Page 33 Étape 8 Fixer l'étagère au poteau 5/32 po (4mm)
- Page 34 Étape 9 Réglage de l'inclinaison Desserrez Serrer Ajustez directement le téléviseur à l'angle d'inclinaison souhaité. Si le réglage est difficile, desserrez légèrement les écrous de basculement [S1]. Resserrez-le ensuite. Étape 10 Mettez le téléviseur à niveau Niveau Serrer Desserrez Si nécessaire, le Téléviseur peut être mis à niveau. Desserrez légèrement les écrous [E], puis mettez votre téléviseur à...
- Page 35 Si le chariot du Téléviseur n'est pas au niveau du sol, vous pouvez ajuster les roulettes en tournant les écrous Inférieur pré-assemblés sur les roulettes pour assurer la stabilité. Augmenter Étape 11 Gestion des câbles REMARQUE : Si votre câble TV est USB, vous pouvez utiliser le port USB de la multiprise ;...
- Page 36 (US/CA) 1-800-556-0533 (UK) 44-808-196-3874 support@huanuo.com WWW. www.huanuo.com 860-00899-00 Rev00...
Need help?
Do you have a question about the HNTVMC02 and is the answer not in the manual?
Questions and answers
Is it possible to tilt the TV downward? I see how you can tilt it up, but not down?
Yes, the HUANUO HNTVMC02 TV mount can tilt downward. It allows direct adjustment of the TV to the desired tilting angle, and the tilt angle can be adjusted by loosening the tilting nuts and retightening them once the angle is set. The maximum tilt angle is 15 degrees.
This answer is automatically generated
I cannot secure the shelf Please tell me how to assemble it. I follow the instructions but the shelf is not secure. It is tilting. There's nothing to secure the bolts
To assemble the HUANUO HNTVMC02 shelf securely and ensure it is not tilting, follow these steps:
1. Attach the Shelf to the Pole: Use the provided hardware to mount the shelf onto the pole securely.
2. Tilt Adjustment: If needed, adjust the TV to the desired tilt angle. If adjustment is difficult, slightly loosen the tilting nuts [S1], set the angle, and then retighten them.
3. Level the TV: If the TV is not level, slightly loosen the nuts [E], adjust the TV to a level position, and then retighten the nuts to secure it.
These steps ensure the shelf is properly attached and that the TV remains stable and level.
This answer is automatically generated