Table of Contents
Advertisement
Quick Links
HDBT IN
HDMI IN
HDMI OUT
1
2
TX
TCP/IP
RESET
GPIO
RS-232
L -
R -
L+
R+
HDBT OUT
AUDIO OUT
OPTICAL OUT
HEX70HDUK-KIT
User Manual
1
2
NO C NC
NO C NC
RELAY 1
RELAY 2
USB DEVICES
RX
PoC
IR CTRL
IR IN
IR OUT
ON OFF
0
1
EDID
UPGRADE
24V
5A
24V
5A
HDBT
HDMI
AUTO
INPUT / AUTO
DISPLAY
INPUT / AUTO
PoC
ON OFF
IR IN
IR OUT
AUTO
HDMI
DP
USB-C HDMI RX
HDMI IN
DISPLAY PORT IN
USB-C IN
RevA1_HEX70HDUK-KIT_Manual_151122
TX
RX
RS-232
UPGRADE
1
2
USB DEVICES
CHARGING
1 - USB HOST - 2
Advertisement
Table of Contents

Related Manuals for Bluestream HEX70HDUK-KIT


Summary of Contents for Bluestream HEX70HDUK-KIT
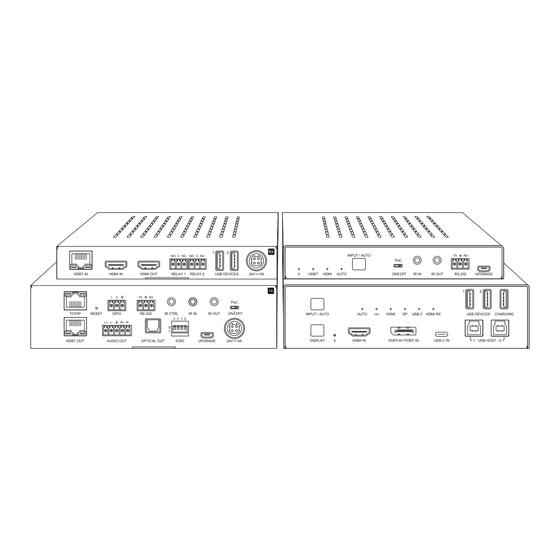
- Page 1 IR OUT ON OFF INPUT / AUTO AUTO HDMI USB-C HDMI RX USB DEVICES CHARGING 1 - USB HOST - 2 HDBT OUT AUDIO OUT OPTICAL OUT EDID UPGRADE DISPLAY HDMI IN DISPLAY PORT IN USB-C IN HEX70HDUK-KIT User Manual RevA1_HEX70HDUK-KIT_Manual_151122...
-
Page 2: Table Of Contents
HEX70HDUK-KIT USER MANUAL Contents Introduction Thank you for purchasing this product. Features For optimum performance and safety, please read these instructions care- TX Panel Description fully before connecting, operating or adjusting this product. Please keep this RX Panel Description manual for future reference. -
Page 3: Introduction
HEX70HDUK-KIT USER MANUAL Introduction The HEX70HDUK-KIT extender set is an industry leading HDMI2.0 4K 60Hz 4:4:4 (18Gbps) HDCP2.2 HDBaseT™ multi-format solution utilising CSC technology to deliver HDMI, USB-C and DisplayPort™ up to lengths of 40m (70m at 1080p) over a single CAT cable. -
Page 4: Tx Panel Description
HEX70HDUK-KIT USER MANUAL TX Panel Description TCP/IP RESET GPIO RS-232 IR CTRL IR IN IR OUT ON OFF HDBT OUT AUDIO OUT OPTICAL OUT EDID UPGRADE NO C NC NO C NC HDBT IN HDMI IN HDMI OUT RELAY 1... - Page 5 HEX70HDUK-KIT USER MANUAL Transmitter Mounting into the HEX70HDUK-TT The HEX70HDUK transmitter can be mounted in the optional HEX70HDUK-TT table top mounting solution. The HEX70HDUK transmitter is fixed into positon with the video connectors pointing upwards (to the lid of the TT), There are two internal brackets that are attached to the Transmitter before sliding into the chassis of the TT.
-
Page 6: Usb Hosts And Usb-C Functionality
Auto-switching is enabled by default on both Transmitter and Receiver. When enabled, if a source is disconnected, the HEX70HDUK-KIT will go back to the previously active input, and if the previously active input isn’t available it will find the next active input starting from input 1 to input 4. -
Page 7: Automatic System On/Off Control
HEX70HDUK-KIT USER MANUAL Automatic System On/Off Control The HEX70HDUK is designed to help automate basic control of AV equipment within a room without the need for a 3rd party control system. It can control devices via RS-232 and from the relay outputs. The key function is to turn the system on when a new video signal is sensed, and turn it off when that signal is lost. -
Page 8: Infrared (Ir) Control
HEX70HDUK-KIT USER MANUAL Infrared (IR) Control The Blustream range of extender products include source switching control via IR. IMPORTANT: Blustream Infrared products are all 5V and NOT compatible with alternative manufacturers Infrared solutions. When using third party 12V IR control solutions please use the Blustream IRCAB cable for IR conversion. -
Page 9: Understanding The Hdbaset™ Status Led's
HEX70HDUK-KIT USER MANUAL Terminating CAT Cable for use with HDBaseT™ It is important that the interconnecting CAT cable between Blustream HDBaseT™ products is terminated using the correct RJ45 pin configuration. The link CAT cable MUST be a ‘straight’ (pin-to-pin) CAT cable, and it is advised that this is wired to the T568B wiring standard as this format is less prone to EMI (Electro-Magnetic Interference). -
Page 10: Schematic
HEX70HDUK-KIT USER MANUAL Schematic www.blustream.com.au | www.blustream-us.com | www.blustream.co.uk... -
Page 11: Web Gui Control
USER MANUAL Web-GUI Control The following pages will break down the operation of the HEX70HDUK-KIT web-GUI. Connect the TCP/IP RJ45 socket to the local network, or directly to the unit, in order to access the products web-GUI. By default the Transmitter is set to DHCP, however if a DHCP server (eg: network router) is not installed, the IP address... - Page 12 HEX70HDUK-KIT USER MANUAL Login Page The Login page allows a User or Admin to login and access additional functionality. This page shows the current firmware versions for the web-GUI, TX and RX (circled red in the below screenshot): Please note: the Admin / User will be automatically logged out after 10 minutes of inactivity. The web-GUI will revert back to the above Guest Control page, or Login screen (if the Guest User has been removed).
- Page 13 HEX70HDUK-KIT USER MANUAL RS-232 Control Page The RS-232 Control page allows a sink device connected to the Receiver to be controlled remotely. The display on, input select, and display off processes can be automated via RS-232. When the ‘RS-232 On’ switch is enabled (switched to On), the ‘Display On’ and ‘Display Input Select’ commands (insert relevant serial command into the text field adjacent - labelled NULL) are automatically sent from the 3-pin Phoenix connector on the Receiver when the Transmitter (or HDMI input on the Receiver) senses a new video signal.
- Page 14 Configuration Page The Configuration Page allows for the configuration settings for Inputs, Outputs, Relay, GPIO and Line Level Volume controls of the HEX70HDUK-KIT. Select the configuration for the Input, Outputs, Relay, GPIO and Volume at the top of the page:...
- Page 15 HEX70HDUK-KIT USER MANUAL Configuration Page - Output The Output Configuration Page allows for the naming of the output of the Receiver, and for the Optical (S/PDIF) or Analogue audio breakout connections to be enabled or disabled. Enter a name for the output as required. The output name will appear on the main Control page once updated.
- Page 16 HEX70HDUK-KIT USER MANUAL Configuration Page - Relay... continued Both relays are enabled by default. To disable an individual relay, adjust the Enable/Disable switch. When disabled, it is not possible to send a TCP/IP or serial command to the Transmitter, or control from the web-GUI.
- Page 17 HEX70HDUK-KIT USER MANUAL Configuration Page - Volume The Volume control section allows a sink device connected to the Receiver to have volume and mute controlled remotely from the HEX70HDUK web-GUI or API via TCP/IP or serial. Specific RS-232 commands can be inserted to be sent from the HEX70HDUK receiver for Vol+, Vol- and Mute.
- Page 18 HEX70HDUK-KIT USER MANUAL CEC Page - Input / Output The CEC Page allows for pre-defined CEC commands to Inputs or Outputs of the HEX70HDUK. Choose between Input or Output sections at the top of the page. On the CEC Input Page, the HDMI TX or RX input must be specified to send the CEC command to before clicking the relevant button.
- Page 19 HEX70HDUK-KIT USER MANUAL Network Page The Network page gives access to the TCP/IP network port settings of the HEX70HDUK-TX TCP/IP port. Choose from DHCP (default) or Static IP (set to 192.168.0.200 where no DHCP router is present ), as well as specify a dedicated fixed IP Address, Subnet Mask, and Gateway.
- Page 20 HEX70HDUK-KIT USER MANUAL Admin Page The Admin page allows the administrator to configure login credentials. The Admin login and password can be amemnded at the top of the page. The current password will need to be entered as well as the new password, confirmed by entering a second time to change the Admin credentials.
-
Page 21: Ir Commands
HEX70HDUK-KIT USER MANUAL IR Commands NEC Customer Code = 1898 Advanced features are not available via IR commands COMMAND 0000 0069 0000 002a 0150 00a8 0015 0015 0015 0015 0015 0015 0015 003f 0015 003f 0015 0015 0015 0015 0015 003f 0015 0015 0015 0015 0015 0015... - Page 22 HEX70HDUK-KIT USER MANUAL RS-232 Configuration and Telnet Commands The Blustream HDBaseT™ kit can be controlled via serial and TCP/IP. The RS-232 port is used for configuration and control of the product, as well as pass through of RS-232 commands to the Blustream HDBaseT™...
- Page 23 HEX70HDUK-KIT USER MANUAL RS-232 Configuration and Telnet Commands COMMAND ACTION COMMAND ACTION Set Analogue Audio Out On or Off Print Help Information ANALOGUE ON/OFF Set Transmitter Switching To aa TX SWITCH aa aa = AUTO: Auto Switching ON - Auto Mode...
- Page 24 HEX70HDUK-KIT USER MANUAL RS-232 Configuration and Telnet Commands COMMAND ACTION COMMAND ACTION Send Input xx CEC And RS232 Vol Down Command Set Relay xx ENABLE/DISABLE IN xx VOLDOWN xx = 01 : TX HDMI Input xx = 00 : All Relays...
- Page 25 HEX70HDUK-KIT USER MANUAL COMMAND ACTION COMMAND ACTION Set RS232 Baud Rate To z Set The Input Source And Trigger Level Cor- RS232BAUD z z = 1 2400, 2 4800, 3 9600, 4 19200, 5 38400, 6 57600 responding To GPIO Mode 2 (default), 7 115200”...
-
Page 26: Specifications
HEX70HDUK-KIT USER MANUAL Specifications HEX70HDUK-TX Transmitter • Video Input Connectors: 1 x HDMI Type A, 19-pin, female; 1 x USB Type C; 1 x DisplayPort™ • Video Output Connectors: 1 x HDBaseT™ RJ45 connector • USB Connectors: 2 x USB3.0, female (Host), 2 x USB3.0, female (device), 1x USB2.0, female (charging) •... - Page 27 HEX70HDUK-KIT USER MANUAL Certifications FCC Notice This equipment has been tested and found to comply with the limits for a Class B digital device, pursuant to part 15 of the FCC Rules. These limits are designed to provide reasonable protection against harmful interference in a residential installation.
Need help?
Do you have a question about the HEX70HDUK-KIT and is the answer not in the manual?
Questions and answers