Advertisement
1 Getting Started | Démarrage | Inicio
1
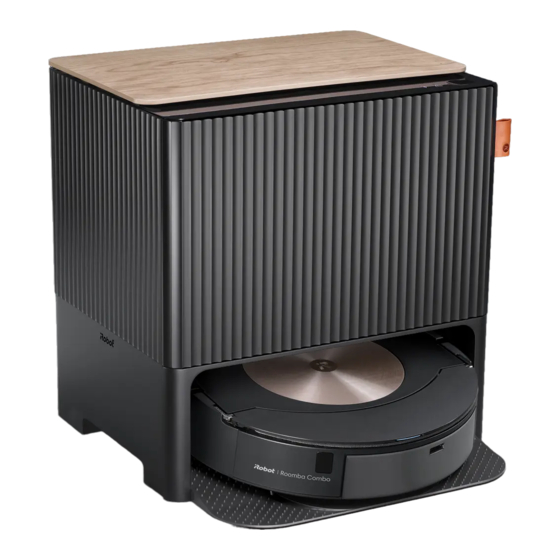
Get ready
EN
To start, you'll need your robot, charging station, and
power cord. Set other accessories aside for later.
Préparation
FR
Pour commencer, vous aurez besoin de votre robot,
de votre station de recharge et de votre cordon
d'alimentation. Mettez les autres accessoires de
côté pour plus tard.
Prepárate
ES
Para empezar, necesitarás el robot, la estación de
carga y el cable de alimentación. Aparta los demás
accesorios para usarlos después.
Read enclosed safety information guide first before using your robot. | Lisez les consignes de sécurité du guide avant d'utiliser
votre robot. | Antes de utilizar el robot, primero lee la guía adjunta de información de seguridad.
2
1.5ft / 0.5m
4ft / 1.5m
4ft / 1.5m
Position the charging station
Place charging station on hard-surface flooring, near
an outlet in an area with good Wi-Fi coverage. Choose
a permanent place where it won't get bumped.
Positionner la station de recharge
Placez la station de recharge sur le plancher à surface
dure près d'une prise, dans une zone où le signal Wi-Fi
est puissant. Choisissez un endroit permanent où il ne
sera pas frappé.
Posiciona la estación de carga
Coloca la estación de carga sobre un piso de
superficie dura y cerca de una toma de corriente en
un área con buena cobertura Wi-Fi. Elige un lugar fijo
donde no se pueda golpear por accidente.
3
Plug in the charging station
Plug the power cord into the charging station, then into
the wall. Wrap the cord back so it won't get in the way
of the robot as it comes and goes.
Brancher la station de recharge
Branchez le cordon d'alimentation dans la station de
recharge, puis dans le mur. Enroulez le cordon pour
qu'il ne gêne pas le robot dans ses déplacements.
Enchufa la estación de carga
Enchufa el cable de alimentación a la estación de
carga y, luego, a la pared. Enrolla el cable en la parte
posterior para que no se interponga en el camino del
robot mientras se desplace.
Advertisement
Table of Contents

Related Manuals for iRobot Roomba Combo j9+


Summary of Contents for iRobot Roomba Combo j9+
- Page 1 1 Getting Started | Démarrage | Inicio 1.5ft / 0.5m 4ft / 1.5m 4ft / 1.5m Get ready Position the charging station Plug in the charging station To start, you’ll need your robot, charging station, and Place charging station on hard-surface flooring, near Plug the power cord into the charging station, then into power cord.
- Page 2 Scan the code with the camera on your mobile device homesupport.irobot.com/s/ the metal charging contacts. After a few minutes, a (or find the iRobot Home app in your app store). Follow comboj9plusownersguide sound will let you know it’s awake. the quick steps to complete setup and update your robot with the latest software.
- Page 3 2 Prepare Mop | Préparation au lavage | Preparación del trapeado Complete a mapping run through the app before starting a mopping job. Attach a mopping pad Wake up Roomba Remove the tank ® Fold the pad in half and slide onto pad plate rails. Pull the handle on Refill Tank to remove from Place robot on charging station with metal charging Unfold and press pad firmly onto pad plate.
- Page 4 “Nuevo ciclo” en la aplicación o el compatible. Encontrarás una lista de soluciones de completamente cerrada. botón CLEAN en el acople de llenado automático. limpieza compatibles en la app iRobot Home. WC#4824409 vA...
- Page 5 Safety Information Important Safety Information This owner’s guide includes information for Regulatory Model(s): Robot: RCA-Y1 | Dock: ADK-Y1 | Battery: ABL-F | Robot Radio Module: AXG-Y1 | Dock Radio Module: ESP32-C3-MINI-1 SAVE THESE INSTRUCTIONS WARNING: When using an electrical appliance, basic precautions should always be followed, including the following: READ ALL INSTRUCTIONS WARNING: To reduce the risk of injury or damage, read and follow the safety precautions when setting...
- Page 6 CAUTION WARNING: Indicates a hazardous situation that, if not avoided, could result in death or serious injury. CAUTION: Indicates a hazardous situation that, if not avoided, could • Do not use this device to pick up sharp objects, glass, or anything that is result in minor or moderate injury.
-
Page 7: Cleaning Solution
• Do not put any object into openings. Do not use with any opening • For best results, only use the iRobot Lithium Ion Battery that comes with blocked; keep free of dust, lint, hair, and anything that may reduce air the robot. - Page 8 For battery recycling go to call2recycle.org or call 1-800-822-8837 • Only charge the battery that came with your robot. Other types of batteries may burst causing injury. Always contact iRobot Customer Care for the correct replacement of your battery. NOTICE •...
- Page 9 About Your Roomba Combo™ Robot Vacuum & Mop Top View Dust Bin Faceplate Tank Cap Mopping Pad Plate Filter Water Tank Clean Button Camera Refill Port Wall Follow Sensor Bottom View End Caps Caster Wheel Multi-Surface Floor Tracking Brushes Sensor Cliff Sensors Cliff Sensor Brush Frame...
- Page 10 Debris Bag Drawer Refill Nozzle Visual Docking Target Pad Storage IR Window Wheel Well Switches Bag Storage Charging Contacts Debris Evacuation Port Bottom View Back View Debris Evacuation Tube Cord Attachment Carrying Handles Cord Wrap For more information, visit global.irobot.com...
- Page 11 Your robot comes with a partial charge, but we recommend that you charge the robot for 3 hours prior to starting the first cleaning job. Download the iRobot Home App and Connect to Wi-Fi® • Follow step-by-step instructions to set up your Roomba Combo™.
- Page 12 If you place your robot on the Clean Base by hand, it will not empty the dust bin or fill the water tank automatically. In this case, use the iRobot Home Your robot is able to recognize and avoid objects. However, App or hold the New Job Button down for 2-5 seconds.
- Page 13 Mopping Note: After completing your mopping and vacuum cleaning job, make sure to empty • Your robot is able to both vacuum and mop at the same time. the robot bin water tank and replace the mopping pad. • Your Clean Base will refill the water tank on your robot. When the Refill Tank is empty, the Error LED Indicator will turn solid red.
- Page 14 A full list of compatible cleaning solutions can be found on answers. Press bin release button to Fill tank with water or irobot.com/s/roomba-combo-cleanser or by visiting the app. Please do remove bin. compatible cleaning solution. not use other cleaning solutions or bleach-based products.
-
Page 15: Troubleshooting
Bag missing Bag improperly installed BATTERY SAFETY & SHIPPING Refill Tank empty For best results, only use the iRobot Lithium Ion Battery that comes with your robot. Water leak Evac. clogged WARNING: Lithium ion batteries and products that contain lithium ion Evac. -
Page 16: Care And Maintenance
& maintenance. Wash using the warm cycle, then air Thoroughly wash the pad with There are additional instructional videos in the iRobot Home App. If you dry. Do not put in dryer. Do not wash warm water. - Page 17 Washing the Bin Cleaning the Filter Cleaning the Front Caster Wheel Important: Do not wash the filter. Remove the bin. Remove the filter by Pull firmly on the front wheel module to Remove the filter before washing the bin. grasping both ends and pulling out. remove it from the robot.
- Page 18 Reinstall the brushes in the robot. Match the and hexagonal pegs on the opposite side shape of the brush pegs with the shape of the of the brushes. Replace end caps. brush icons in the cleaning head module. For more information, visit global.irobot.com...
-
Page 19: Charging Contacts
Cleaning the Full Bin Sensors Cleaning the Charging Contacts, Sensors, Camera Window and Pad Shelf Remove and empty Wipe components with a clean, Important: Do not spray cleaning the bin. dry cloth. solution or water onto the sensors or sensor openings. CHARGING CONTACTS SENSORS Wipe the inner... - Page 20 Docking Target Note: iRobot manufactures various replacement parts and assemblies. If you think you need a replacement part, please contact iRobot Customer Care for more information. Install a new bag, sliding the Reinstall the Debris Bag Drawer * Replacement frequency may vary. Parts should be replaced if visible wear appears.
- Page 21 Washing the Refill Tank Cleaning the Charging Contacts, IR Window, and Visual Docking Target Use pull tab to open door. Remove Inspect the components to make sure that they are the Refill Tank clear of debris. Wipe with a clean, dry cloth. Important: Do not spray cleaning solution or water onto the sensors or sensor openings.
-
Page 22: Irobot Customer Care
Get hints and tips to improve your product performance questions, and information about accessories. This information can also be found in the iRobot HOME App. If you need further assistance, call the US Get answers to questions Customer Care team at (877) 855-8593. -
Page 23: Regulatory Information
Standard RSS-102 for mobile device RF exposure limits, set forth for an uncontrolled environment and is safe for the intended operation as described • Changes or modifications not expressly approved by iRobot Corporation in this manual. Per ISED requirements, maintain a distance of more than 8 could void the user’s authority to operate the equipment. - Page 24 ©2023 iRobot Corporation, 8 Crosby Drive, Bedford, MA 01730 USA. All rights reserved. iRobot is a registered trademark of iRobot Corporation. Roomba Combo, Clean Base and Dirt Detect are trademarks of iRobot Corporation. Wi-Fi and the Wi-Fi logo are registered trademarks of Wi-Fi Alliance.
- Page 25 ©2023 iRobot Corporation, 8 Crosby Drive, Bedford, MA 01730 EE. UU. Todos los derechos reservados. iRobot es una marca comercial registrada de iRobot Corporation. Roomba Combo, Clean Base y Dirt Detect son marcas comerciales de iRobot Corporation. Wi-Fi y el logotipo de Wi-Fi son marcas comerciales registradas de Wi-Fi Alliance.
Need help?
Do you have a question about the Roomba Combo j9+ and is the answer not in the manual?
Questions and answers
I have a nonfuncting Romba . I need to delete the existing information in the app so I can set up the 9J max. how do I do that?
To delete existing information in the iRobot Home App to set up the Roomba Combo j9+, perform a factory reset of the robot and remove it from your account. This clears previous settings and allows a fresh setup.
This answer is automatically generated
My Roomba j9+ is dead. Purchased 2/19/2025. It went on a run, came back to base and said the vacuum bag was full. It was not. Later there was no light on the Roomba. Have cleaned everything thoroughly. Installed new battery and vacuum bag. Electrical outlet is hot. It still will not work. The only thing I have not done is to clean out the "tube" under the charging station. Please reply ASAP.