Advertisement
Scan QR or visit link to
view installation video:
delivr.com/2vgv8
IMPORTANT:
Before you begin, familiarize yourself
with all of the parts and fully read the
instructions.
CUSTOMER SERVICE:
Toll-free customer help line available
weekdays between 7:00 am and 6:00 pm
Central Time at 800-463-0660.
PARTS:
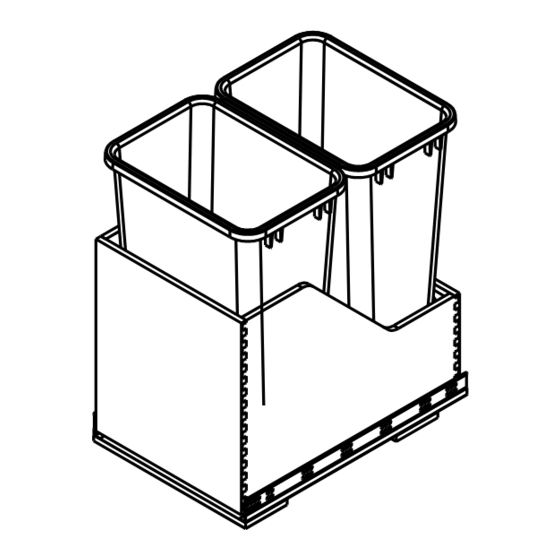
Pre-Assembled Organizer and Base Unit
4 #8 X1 Coarse-Thread Wood Screws
TOOLS NEEDED:
Screw Gun* or Phillips Screwdriver
Measuring Tape or Ruler
*NOTE: If screw gun has a clutch, set to
lowest setting so as not to over tighten
and/or strip screws.
CAN-WBM
Installation Instructions (All Unit Sizes)
Wood Bottom-Mount Soft-close Trashcan Pullout
1. Separate the Organizer from the Base
Press the clips under the trash organizer to release pre-
installed slides, separating the organizer from the base.
3. Secure the Base to the Cabinet
Secure the base unit by screwing through the plywood runners with 4 coarse-thread wood screws.
#8 X 1" screws provided.
2. Position the Base in the Cabinet
Place the base unit inside the cabinet. Position it left
to right, ensuring proper clearance for hinge or door
protrusion.
a. Face Frame Applications: Pull the wooden runner
to the front of the cabinet until it is tight against the
back of the face frame.*
b. Frameless Applications: Position the wooden runner
with a 3/4" setback from the front of the cabinet.
* For narrow door applications, unit may have to be placed inside
and positioned with slides directly behind face frame.
Advertisement
Table of Contents

Related Manuals for HARDWARE RESOURCES CAN-WBM


Summary of Contents for HARDWARE RESOURCES CAN-WBM
- Page 1 CAN-WBM Installation Instructions (All Unit Sizes) Wood Bottom-Mount Soft-close Trashcan Pullout 1. Separate the Organizer from the Base 2. Position the Base in the Cabinet Press the clips under the trash organizer to release pre- Place the base unit inside the cabinet. Position it left Scan QR or visit link to installed slides, separating the organizer from the base.
- Page 2 Pre-Assembled Organizer and Base Unit 4 #8 X1 Coarse-Thread Wood Screws TOOLS NEEDED: Screw Gun* or Phillips Screwdriver Measuring Tape or Ruler *NOTE: If screw gun has a clutch, set to lowest setting so as not to over tighten and/or strip screws. CAN-WBM 08-22...
Need help?
Do you have a question about the CAN-WBM and is the answer not in the manual?
Questions and answers