Table of Contents
Advertisement
Quick Links
Advertisement
Table of Contents

Related Manuals for La Crosse Technology 328-1415


Summary of Contents for La Crosse Technology 328-1415
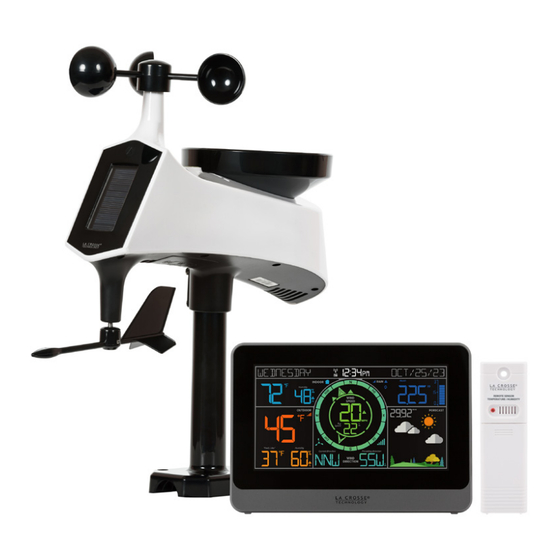
- Page 1 Wireless Professional Color Weather Station SET UP GUIDE MODEL: 328-1415...
-
Page 2: Table Of Contents
Table of Contents BASICS FORECAST WIND Initial Setup Viewing Forecast Data Viewing Wind Data Station Settings Seasonal Foliage Wind Speed Records Buttons Moon Phase Reset Records Atomic Time Pressure Number LCD Display Brightness Auto-Dim Settings RAIN TEMP. AND HUMIDITY SENSORS Viewing Rain Data Viewing Temperature Search for Sensors... -
Page 3: Initial Setup
Initial Setup Thermo-Hygro Sensor Bottom of Cyclone Sensor Back of Weather Station (TX141TH-Bv4) (TX145WSDR) (328-1415) Power Jack Power Up Thermo-Hygro Sensor: Install 2 fresh “AA” batteries according to polarity and replace battery cover. The red LED light will flash when transmitting. -
Page 4: Station Settings
BASICS Station Settings 30 seconds after powering the station on, it will automatically enter the settings menu. To manually set your time, date, and other settings, hold the button until the display changes to enter the Settings Menu. Use the buttons on the Press the button to... -
Page 5: Buttons
BASICS Buttons 1. LIGHT 2. RAIN Press to adjust backlight. Hold to enter Press and release to toggle through Rain Auto-Dim settings. History. Hold to search for Cyclone Sensor. 3. ATOMIC 4. PLUS/MINUS +/- Hold to search for Atomic Time Signal. Press to adjust values. -
Page 6: Atomic Time
BASICS Atomic Time • Your station will automatically search for the Atomic Time Signal at UTC 7:00, 8:00, 9:00, 10:00, and 11:00. • Hold the ATOMIC button to manually start or stop a search for the WWVB Atomic Time Signal. •... -
Page 7: Viewing Forecast Data
FORECAST Viewing Forecast Data Forecast Icons • The forecast icons use the station’s internal barometer to predict conditions to come within the next 12 hours. • For the most accurate forecasts, allow 7-10 days for station calibration. • The Snow Icon will show when outdoor temperatures are below 32°F (0°C) and precipitation is predicted. -
Page 8: Pressure Number
FORECAST FORECAST Pressure Number Your Relative Pressure reading will come from your station’s internal barometer. Allow up to 10 days for automatic calibration or set the pressure number manually within the station’s Settings Menu (see page 04). WIND RAIN RAIN Humidity Viewing Wind Data WIND... -
Page 9: Wind Speed Records
WIND Wind Speed History Viewing Wind Speed History Records Press and release the WIND button to toggle through your top wind speed records with time and date stamps. While viewing your MONTH record, use the + (PLUS) button to further toggle through your current and past 11 monthly top wind speed records. -
Page 10: Rain
RAIN Viewing Rain Data 1. RECEPTION ICON Indicates the station is RAIN receiving data from the RAIN Humidity sensor. WIND WIND 2. RAIN ALERT SPEED SPEED Appears if a 24-Hr Rainfall OUTDOOR FORECAST FORECAST alert is set and active. Speed Speed AUTO-SCROLL ICON When active, station will... -
Page 11: Rain Cylinder Graph
RAIN Rain Graph • The Rain Graph has 10 segments which change based on rainfall totals. • The scale values automatically adjust when over 1-inch (25.4 mm) of rain is measured. Note: If over 70 Inches (999 mm) is measured, the graph will appear full. -
Page 12: Viewing Temperature
TEMPERATURE & HUMIDITY Viewing Temperature & Humidity Data 5. INDOOR HUMIDITY ALERTS Appear if a high ( ) or low ( ) alert is set & active. 6. OUTDOOR TEMPERATURE Current outdoor temperature 7. RECEPTION ICON Indicates the station is receiving data from the sensor 8. -
Page 13: Feels Like" Temperature
TEMPERATURE & HUMIDITY Temperature & Humidity Records Viewing Temperature & Humidity Records Press and release the TEMP. button to toggle through indoor/outdoor records with time and date stamps. OUTDOOR Records Viewing Order Outdoor High Temperature Indoor High Temperature Outdoor Low Temperature Indoor Low Temperature Outdoor High Humidity Indoor High Humidity... -
Page 14: Temperature Decimals
TEMPERATURE & HUMIDITY Temperature Decimals INDOOR Press and release the DECIMAL ON/OFF button on the side of the station to turn the temperature decimals ON OUTDOOR or OFF. This can also be set within the station’s Settings Menu covered on page 04. “Feels Like”... -
Page 15: Wind
ALERTS Triggered Alerts • When an alert value is reached, the station will beep 5 times each minute until out of the alert range. Press any button to stop the alert sound. Active alerts are indicated by the and high or low •... -
Page 16: Placement & Mounting
SENSORS Sensor Placement & Mounting For Accurate Outdoor Temperature/Humidity Measurements • Insert a mounting screw through the hole at the top to securely mount the sensor. It can also hang from the back using a nail. • Mount the sensor vertically in a protected well-shaded area. Keeping it out of direct weather elements such as sunlight, rain, snow, etc. - Page 17 SENSORS Cyclone Sensor Mounting Basic Installation Fence posts, poles, decks, and mailboxes are common mounting options due to their convenience. Many users prefer these types of locations as the data they provide is accurate from their ground level. However, because the wind in these spots is often affected by obstructions, the readings may differ when compared to local reporting stations.
- Page 18 SENSORS Cyclone Sensor Mounting Flexible Installation Hand Screw Install the Hand Screw to the bracket, then Secure This configuration allows you to attach the sensor the Cyclone Sensor to the Mast by tightening the to angled locations and easily make adjustments screws on the side.
-
Page 19: Cyclone Sensor Cleaning
SENSORS Cleaning the Cyclone Sensor Remove the Rain Funnel by firmly twisting Clear any leaves, insects, or other debris to the funnel counter-clockwise and lifting up. allow the Rain Tipper to rock freely. Check and clear the Drainage Holes located on the underside of the sensor. -
Page 20: Stay In Touch
Mon-Fri 8am-6pm CST Warranty and Patents La Crosse Technology, Ltd. provides a 1-year limited time warranty (from date of purchase) on this product relating to manufacturing defects in materials & workmanship. La Crosse Technology, Ltd, 2830 S. 26th St., La Crosse, WI 54601 For Full Warranty Details, Visit: www.lacrossetechnology.com/pages/warranty... -
Page 21: Specifications
APPENDIX Specifictions Weather Station (328-1415) Temperature Range: 32ºF to 122ºF (0ºC to 50ºC) Humidity Range: 10% - 99% RH Relative Pressure Range: 23.62 to 32.48 inHg (800 to 1100 hPa) Power Requirements: 5-volt power adapter (included) GPU280500150WAOO The plug on the power adapter is intended to serve as the disconnect device, the socket-outlet shall be installed near the equipment and shall be easily accessible. - Page 22 Cyclone Sensor (TX145WSDR) Wind Speed Range: 0 to 111 mph (0 to 178 kph) Rainfall Range: 0 to 393.6 Inches (0 to 9999 mm) Transmission Range: 400 feet (121 meters) open air Power Requirements: 3 “AA” Batteries (not included) Update Interval: Every 31 Seconds Dimensions: 13.80”...
-
Page 23: Coin Cell Battery
APPENDIX Coin Cell Battery Replace the Coin Cell Battery WARNING This product contains a coin cell battery. Use a screwdriver to turn the battery cover to the left to If swallowed, it could cause severe injury or death in just 2 remove it. -
Page 24: Double Warranty Offer
FCC Statement This equipment has been tested and found to comply with the limits for a Class B digital device, pursuant to part 15 of the FCC Rules. These limits are designed to provide reasonable protection against harmful interference in a residential installation. This equipment generates, uses and can radiate radio frequency energy and, if not installed and used in accordance with the instructions, may cause harmful interference to radio communications.
Need help?
Do you have a question about the 328-1415 and is the answer not in the manual?
Questions and answers
There is no bracket to set the indoor screen on.
The provided information does not specify whether the La Crosse Technology 328-1415 comes with a bracket for the indoor screen. Therefore, it cannot be determined.
This answer is automatically generated