
Subscribe to Our Youtube Channel
Related Manuals for La Crosse Technology 327-1414Wv2


Summary of Contents for La Crosse Technology 327-1414Wv2
- Page 1 Wind Speed Weather Station For online video support: http://bit.ly/LaxTechTalk Instructional Manual Model: 327-1414Wv2 DC:020817 Protected under U.S. Patents: 5,978,738 | 6,076,044 | RE43903...
-
Page 2: Table Of Contents
• Then press and release the TIME SET button to manually start or stop a WWVB atomic time signal search. • The Atomic Time Icon will flash while searching and remain solid on screen when connected. • For information about WWVB, visit: http://bit.ly/AtomicTime Page | 1 327-1414Wv2 www.lacrossetechnology.com/support/... -
Page 3: Setup
3. Insert three “AAA” batteries into the weather station (optional). 4. After 15 minutes, position the sensor outside (Page 11). Twist battery cover left to remove from sensor. Twist Left 327-1414Wv2 Page | 2 www.lacrossetechnology.com/support/... -
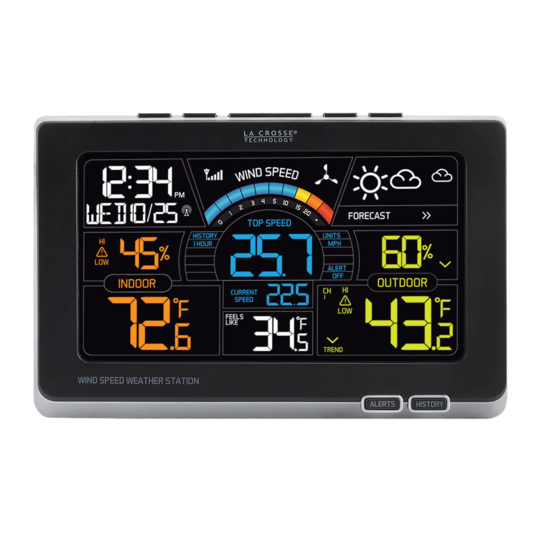
Page 4: Lcd Features
LCD Features AM | PM Sensor Reception Atomic Time Wind MIN |MAX Forecast Relative Humidity Channel Indicator Fahrenheit | Celsius Trend Arrows HI | LOW Alerts Low Battery Buttons HEAT/DEW TIME SET DOWN Page | 3 327-1414Wv2 www.lacrossetechnology.com/support/... -
Page 5: Settings Menu
Pacific Alaska Hawaiian 7. Set Minutes 5. Choose 12 or 24 hour time 6. Set Hours 8. Set Year 9. Set Month 10. Set Date 11. Select MPH or KMH 12. Select Fahrenheit | Celsius 327-1414Wv2 Page | 4 www.lacrossetechnology.com/support/... -
Page 6: Color Wind Speed Graph
• 24-hour: Past 24 hour period, from last record. • Week: Past 7-day period, from last record. • Month: Defined by Calendar Month i.e. January 1 - January 31. • Year: Defined by Calendar Year i.e. January 1 - December 31. Page | 5 327-1414Wv2 www.lacrossetechnology.com/support/... -
Page 7: Current Wind Speed
DOWN ARROW button to select channel. Outdoor HI Humidity Outdoor LOW Humidity Wind Speed High Alert Outdoor LOW Temp Outdoor HI Temp Indoor HI Humidity Indoor LOW Temp Indoor LOW Humidity Indoor HI Temp 327-1414Wv2 Page | 6 www.lacrossetechnology.com/support/... -
Page 8: Alert Sounds: Disarm | Arm Alerts
• Between 51 °F and 69°F, the feels like temperature will be the same as the outdoor temperature. • Feels like temperature is calculated on all three channels if additional sensors are used. MAX | MIN Temperature Page | 7 327-1414Wv2 www.lacrossetechnology.com/support/... -
Page 9: Forecast Information
• Press the LIGHT button on the top of the weather station to adjust the backlight (HI-LOW-OFF) when using the power cord. When using battery power only: • Press the LIGHT button for a 10 second backlight. 327-1414Wv2 Page | 8 www.lacrossetechnology.com/support/... -
Page 10: Change Batteries
5. Once the outdoor data is showing up, wait another 15 minutes for the sensor and station to establish a strong connection. 6. After the sensor(s) have been connected for at least 15 minutes, feel free to mount them back outside. Page | 9 327-1414Wv2 www.lacrossetechnology.com/support/... -
Page 11: Connect Add-On Sensors To Station
View Channels (when add on sensors in use) • Press the DOWN ARROW button to toggle between remote sensor channels when multiple sensors are used. • Channels are indicated with CH 1, CH 2 or CH 3, in the outdoor temperature area. 327-1414Wv2 Page | 10 www.lacrossetechnology.com/support/... -
Page 12: Position Add-On Sensors
1. Insert your own mounting pole into the sensor. 2. Tighten screws 3. Mounting bracket would not be used. Note: Do not attempt to insert a pole into the hollow back of the mounting bracket. Page | 11 327-1414Wv2 www.lacrossetechnology.com/support/... -
Page 13: Position Weather Station
• Ensure the batteries are installed with correct polarity (+ and -). • Remove batteries from equipment which is not to be used for an extended period of time. • Promptly remove expired batteries. 327-1414Wv2 Page | 12 www.lacrossetechnology.com/support/... -
Page 14: Follow Us On Social Media
Follow Us on Social Media Latest video content http://bit.ly/LaxTech_YouTube For personalized interaction http://bit.ly/LaxTech_Facebook Join the conversation http://bit.ly/LaxTech__Twitter Pin and share http://bit.ly/LaxTech_Pinterest Page | 13 327-1414Wv2 www.lacrossetechnology.com/support/... -
Page 15: Specifications
• Wind Station: 5.48” H x 8.34” L x 1.03” W (139.19 x 211.84 x 26.12 mm) Dimensions • TX141W Sensor: 18.57” H x 7.10” W x 7.10” D (471.68 x 180.34 x 180.34 mm) 327-1414Wv2 Page | 14 www.lacrossetechnology.com/support/... -
Page 16: Warranty And Support
Warranty and Support La Crosse Technology, Ltd. provides a 1-year limited time warranty (from date of purchase) on this product relating to manufacturing defects in materials & workmanship. Before returning a product, please contact our friendly customer support or visit our online help:...
Need help?
Do you have a question about the 327-1414Wv2 and is the answer not in the manual?
Questions and answers