Table of Contents
Advertisement
Quick Links
Installation, Operation and Maintenance
AdaptiR™
Helical Rotary Liquid Chillers
Models: RTHD
175-450 ton units (60 Hz) with AFD option
150-425 ton units (50 Hz) with AFD option
Only qualified personnel should install and service the equipment. The installation, starting up, and servicing of
heating, ventilating, and air-conditioning equipment can be hazardous and requires specific knowledge and training.
Improperly installed, adjusted or altered equipment by an unqualified person could result in death or serious injury.
When working on the equipment, observe all precautions in the literature and on the tags, stickers, and labels that
are attached to the equipment.
April. 2022
SAFETY WARNING
RTHD-SVX04K-EN
Confidential and proprietary Trane information
573163230200
Advertisement
Table of Contents

Related Manuals for Trane AdaptiR RTHD


Summary of Contents for Trane AdaptiR RTHD
- Page 1 Improperly installed, adjusted or altered equipment by an unqualified person could result in death or serious injury. When working on the equipment, observe all precautions in the literature and on the tags, stickers, and labels that are attached to the equipment. RTHD-SVX04K-EN April. 2022 Confidential and proprietary Trane information...
-
Page 2: Warnings, Cautions And Notices
CFCs such as HCFCs and HFCs. Responsible Refrigerant Practices! Trane believes that responsible refrigerant practices are important to the environment, our cus- tomers, and the air conditioning industry. All technicians who handle refrigerants must be certi- fied. The Federal Clean Air Act (Section 608) sets forth the requirements for handling, reclaiming, recovering and recycling of certain refrigerants and the equipment that is used in these service procedures. - Page 3 Warnings, Cautions and Notices D WARNING Personal Protective Equipment (PPE) Required! Installing/servicing this unit could result in exposure to electrical, mechanical and chemical haz- ards. • Before installing/servicing this unit, technicians MUST put on all Personal Protective Equip- ment (PPE) recommended for the work being undertaken. ALWAYS refer to appropriate MSDS sheets and OSHA guidelines for proper PPE.
-
Page 4: Table Of Contents
Contents Warnings, Cautions and Notices ................2 General Information ....................11 Unit Identification - Nameplates ................11 Figure 1. Typical Unit Nameplate ..................11 Unit Nameplates ......................11 Unit Inspection ......................12 Inspection Checklist ....................12 Loose Parts Inventory ....................12 Unit Description ......................12 Model Number Coding System ................ - Page 5 Contents Table 9. Unit Weight(Unit with small panel,lb(kg)) ............32 Table 10. Unit Weight with filter(Big frame panel, lb(kg)) ..........33 Table 11. Unit Weight with filter(Small frame panel, lb(kg)) ......... 34 Table 12. Center of Gravity(in(mm)) ................35 Table 13. Center of Gravity with Filter(in(mm)) .............. 36 Lifting Procedure .......................
- Page 6 Contents Waterbox Removal and Installation ..............57 Introduction ......................57 Discussion ......................... 57 Procedure ........................57 Figure 17. Water Box Rigging and Lifting – Vertical Lift Only ........58 Reassembly ....................... 58 Table 18. AdaptiR™ with AFD option Torque ............... 58 Parts Ordering Information ..................59 Table 19.
- Page 7 Contents Table 23. Wire Selection Chart for Starter Panels ............71 Figure 31. Electrical Installation ..................71 Module Connections for Interconnecting Wiring ..........72 Interconnecting Wiring (Field Wiring Required) ............. 73 Chilled Water Pump Control ..................73 Chilled Water Flow Interlock ..................73 Condenser Water Pump Control ................
- Page 8 Contents Operator Interface Controls ................... 88 Symbio800 Overview ....................88 Figure 38. Front View of Symbio800 ................. 88 Figure 39. wiring locations and connection ports ............89 Tracer TU ........................89 Figure 40. Tracer TU ......................90 Controls Interface .....................90 TD7 Display ........................ 90 Tracer TU ........................
- Page 9 Contents Viewing the Settings Screen .................. 101 Viewing and Changing Display Preferences ............101 Figure 55. Display ReferenceScreen ................102 Figure 56. Data Format Page ................... 102 Figure 57. Language Page ....................103 Figure 58. Date and Time screen ..................103 Cleaning the Display ....................
- Page 10 Contents Maintenance Procedures ..................120 Cleaning the Condenser ..................120 Mechanical Cleaning Procedure ................120 Chemical Cleaning Procedure ................120 Cleaning the Evaporator ..................120 Compressor Oil .......................121 Table 36. POE Oil Properties ..................121 Oil Sump Level Check ..................... 121 Figure 70. Determining Oil Level in Sump ..............122 Removing Compressor Oil ..................
-
Page 11: General Information
General Information Unit Identification - Nameplates When the unit arrives, compare all nameplate data with ordering, submittal, and shipping infor- mation. A typical unit nameplate is shown in Figure Figure 1. Typical Unit Nameplate Unit Nameplates The AdaptiR™ with AFD option “unit” nameplate is applied to the exterior surface of the start- er/ control panel. -
Page 12: Unit Inspection
Take photos of the damage, if possible. The owner must provide reasonable evidence that the damage did not occur after delivery. • Notify the Trane sales representative and arrange for repair. Do not repair the unit, however, until damage is inspected by the transportation representative. Loose Parts Inventory Check all items against the shipping list. -
Page 13: Unit Model Number
General Information Unit Model Number Table 1. Model Number Name Code M/N Digit M/N Code Description MODL Basic product line RTHD RTHD Water-Cooled Series R - Dev Sequence D DCTL Manufacturing Plant Taicang plant, China Bangkok plant, Thailand COMP Compressor B1 compressor B2 compressor C1 compressor... - Page 14 General Information Table 1. Model Number Name Code M/N Digit M/N Code Description EVAP 14-15 Evaporator B1 evaporator B2 evaporator C1 evaporator C2 evaporator D1 evaporator D2 evaporator D3 evaporator D4 evaporator D5 evaporator D5 evaporator E1 evaporator F1 evaporator F2 evaporator G1 evaporator G2 evaporator...
- Page 15 General Information Table 1. Model Number Name Code M/N Digit M/N Code Description CDTM Condenser tube type CUFN Enhanced fin - copper SMBR Smooth bore - copper SBCN Smooth bore - 90/10 Cu/Ni CDWP Condenser passes 2 Pass CDWC Condenser water connection Left hand condenser connection Right hand condenser connection CDCT...
- Page 16 General Information Table 1. Model Number Name Code M/N Digit M/N Code Description SRTY Starter Type YDEL Wye-delta closed transition starter SSST Solid State starter AFD1 Variable frequency starter AFD1 AFD2 Variable frequency starter AFD2 with filter AFD3 Standard variable frequency starter AFD3 AFD4 Standard variable frequency starter AFD4 with filter VRLA...
-
Page 17: Unit Model Number (Located On Compressor Nameplate)
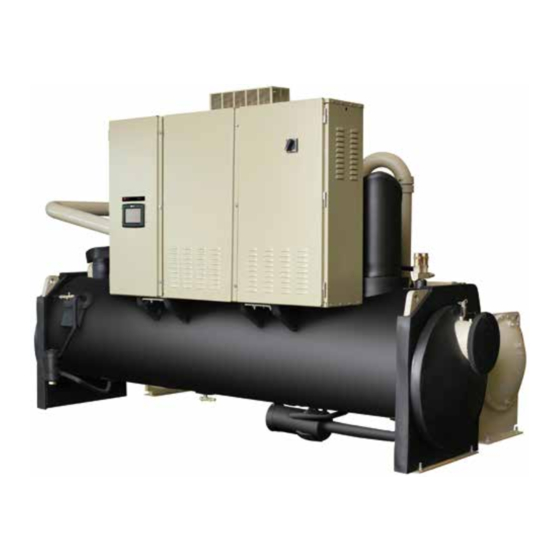
General Information Table 1. Model Number Name Code M/N Digit M/N Code Description RMTP Refrigerant Monitor Input NIST None INST 100 ppm / 4-20 ma INSA 1000 ppm / 4-20 ma INSB 100 ppm / 2-10 Vdc INSC 1000 ppm / 2-10 Vdc HWCT Hot water control NIST... - Page 18 General Information Figure 2. Component Location for AdaptiR™ with AFD option Unit Line Weight Oil Seperator Starter/Control Panel Relief Valve Cable Guider Evaporator Condenser Water Outlet Liquid Level Sensor Condenser Water Inlet Gas Pump Unit Nameplate Oil Sump Figure 3. Component Location for AdaptiR™...
- Page 19 General Information Figure 4. Component Location for AdaptiR™ with AFD/Variable Volume Ratio Unit Oil Separator Relief Valve Starter/Control Panel (with ASME refrigerant isolation option only) Relief Valve EXVS Evaporator Evaporator Water Inlet Condenser Water Outlet Liquid Level Sensor TD7 Interface Strainer Condenser Water Inlet Thermosiphon BPHE...
-
Page 20: Installation Overview
Installation Overview For convenience, Table 3 summarizes responsibilities that are typically associated with the Adap- tiR™ with AFD option chiller installation process. Table 3. Installation Responsibility Chart for AdaptiR™ with AFD option Units Trane-supplied, Trane-supplied, Field-supplied, Requirement Trane-installed Field-installed Field-installed •... - Page 21 General Information • Supply and install condenser water control valve(s) per Trane Engineering Bulletin -Water Cooled Series R® Condenser Water Contol. • Supply and install flow switches or equivalent devices in both the chilled water and condens- er water piping. Interlock each switch with the proper pump starter and Symbio800, to ensure that the unit can only operate when water flow is established.
- Page 22 General Information Table 4. General Data Unit Designator (corresponds to digits 6, 7, 14, 15, 21, 22 of unit model number) D1D1E1 D1F1F2 D1G1G1 D2D2E2 D2F2F3 D2G2G1 E3G3G3 E3H3G3 General Refrigerant Type HFC-134a HFC-134a HFC-134a HFC-134a HFC-134a HFC-134a HFC-134a HFC-134a Refrigerant Charge (lb (kg)) (215)
- Page 23 General Information Table 5. General Data Unit Designator (corresponds to digits 6, 7, 14, 15, 21, 22 of unit model number) D3D2E2 D3F2F3 D3G2G1 D3G3G3 E3D2E2 E3F2F3 E3G2G1 General Refrigerant Type HFC-134a HFC-134a HFC-134a HFC-134a HFC-134a HFC-134a HFC-134a Refrigerant Charge (lb (kg)) (215) (283)
- Page 24 General Information Table 6. General Data Unit Designator (corresponds to digits 6, 7, 14, 15, 21, 22 of unit model number) C1C2D2 C1D6E5 C1D5E4 C1D3E3 C1E1F1 C2D4E4 C2D3E3 General Refrigerant Type HFC-134a HFC-134a HFC-134a HFC-134a HFC-134a HFC-134a HFC-134a Refrigerant Charge (lb (kg)) (222) (222)
- Page 25 General Information Table 7. General Data Unit Designator (corresponds to digits 6, 7, 14, 15, 21, 22 of unit model number) C2E1F1 C2F2F3 B1B1B1 B1C1D1 B2B2B2 B2C2D2 D4H1G4 D4H2G5 D4H3G6 General Refrigerant Type HFC-134a HFC-134a HFC-134a HFC-134a HFC-134a HFC-134a HFC-134a HFC-134a HFC-134a Refrigerant Charge...
-
Page 26: Installation Mechanical
Table 11 for unit operating weights. Once in place, level the chiller within 1/4” (6.35 mm) over its length and width. The Trane Company is not responsible for equipment problems resulting from an improperly designed or constructed foundation. Vibration Eliminators •... - Page 27 Note: Required vertical clearance above the unit is 36” (914.4 mm). There should be no piping or conduit located over the compressor motor. If the room configuration requires a variance to the clearance dimensions, contact your Trane sales office representative.
- Page 28 Installation Mechanical Figure 7. Recommended Operating and Service Clearances (with filter) 72"(1828.8mm) Service Clearance COND EVAP COMP CONTROLS STARTER Tube Removal Clearance (Either End) 41"(1041mm) Radius 499mm(19.65'') Service Clearance BBB,CDE,DDE,EDE:2743mm(108") Service Clearance Swing 105° (Opposite Tube Removal) BCD,CEF ,DFF:3200mm(126") 36"(914mm) Radius 720mm(28.35'') CFF ,CGG,DGG,DHG:3302mm(130") Radius 739mm(29.09'')
-
Page 29: Ventilation
Installation Mechanical Ventilation The unit produces heat even though the compressor is cooled by the refrigerant. Make provi- sions to remove heat generated by unit operation from the equipment room. Ventilation must be adequate to maintain an ambient temperature lower than 104°F (40°C). Vent the evaporator, condenser and compressor pressure relief valves in accordance with all local and national codes. - Page 30 Installation Mechanical Figure 8. Unit Weights and Dimensions for Rigging (without filter) =C.G. Figure 9. Unit Weights and Dimensions for Rigging (with filter) =C.G. RTHD-SVX04K-EN...
- Page 31 Installation Mechanical Table 8. Unit Weight(Unit with big panel,lb(kg)) Location (points) Unit Designator* B1B1B1 B2B2B2 B1C1D1 B2C2D2 C1C2D2 3360 2641 3252 2125 (1524) (1198) (1475) (964) D1D1E1 3726 2912 4224 2714 (1690) (1321) (1916) (1231) D2D2E2 3746 2939 4242 2765 (1699) (1333) (1924)
- Page 32 Installation Mechanical Table 9. Unit Weight(Unit with small panel,lb(kg)) Location (points) Unit Designator* B1B1B1 2652 1856 1792 2937 (1203) (842) (813) (1332) B2B2B2 2670 1876 1812 2956 (1211) (851) (822) (1341) B1C1D1 3230 2103 1616 2654 (1465) (954) (733) (1204) B2C2D2 2712 1889...
- Page 33 Installation Mechanical Table 10. Unit Weight with filter(Big frame panel, lb(kg)) Location (points) Unit Designator* B1B1B1 B2B2B2 B1C1D1 B2C2D2 C1C2D2 3366 3247 3501 2130 (1527) (1473) (1588) (966) D1D1E1 3757 2972 3525 2736 (1704) (1348) (1599) (1241) D2D2E2 3774 3023 3552 2787 (1712)
- Page 34 Installation Mechanical Table 11. Unit Weight with filter(Small frame panel, lb(kg)) Location (points) Unit Designator* B1B1B1 2661 2161 2097 2948 (1207) (980) (951) (1337) B2B2B2 2679 2178 2116 2967 (1215) (988) (960) (1346) B1C1D1 3309 2518 1892 2721 (1501) (1142) (858) (1234) B2C2D2...
- Page 35 Installation Mechanical Table 12. Center of Gravity(in(mm)) Unit Designator* B1B1B1 21.48 57.22 36.70 (546) (1453) (932) B2B2B2 21.53 57.20 36.54 (547) (1453) (928) B1C1D1 21.06 57.35 34.80 (535) (1457) (884) B2C2D2 21.15 57.43 34.64 (537) (1459) (880) D1D1E1 24.72 59.18 41.33 (628) (1503)
- Page 36 Installation Mechanical Table 13. Center of Gravity with Filter(in(mm)) Unit Designator* B1B1B1 24.52 56.72 35.96 (623) (1441) (913) B2B2B2 24.56 56.70 35.82 (624) (1440) (910) B1C1D1 23.97 56.71 34.21 (609) (1440) (869) B2C2D2 24.02 56.80 34.06 (610) (1443) (865) D1D1E1 28.63 58.83 40.23...
-
Page 37: Lifting Procedure
Installation Mechanical Lifting Procedure In the process of shipping and maintaince, if the control panel need to be disassembly, the rec- ommended lifting method as follows: Figure 10. Recommended Lifting Method LIFTING POINT 45°MIN D CAUTION Equipment Damage! Never use a forklift to move the unit. The skid is not designed to support the unit at any one point and using a forklift to move the equipment may cause unit damage. - Page 38 Installation Mechanical Table 14. Rigging Unit Dimension (mm (in)) Designator* E3G2G1/E3G3G3/E3H3G3 3658 3353 1592 (144.02) (132.01) (62.69) (0.79) (26.02) (24.02) E3F2F3 3658 3353 1588 (144.02) (132.01) (62.53) (1.14) (24.21) (24.02) E3D2E2 3048 2743 1502 (120.00) (107.99) (59.12) (4.57) (24.09) (24.02) D3G2G1 3658 3353...
- Page 39 Installation Mechanical NOTICE: 1. Lifting cables (chains) will not be the same length. Adjust to keep unit level while lifting. 2. Attach anti-rolling cable (chain) as shown without tension. Not as a lifting cable, but to pre- vent unit from rolling. 3.
-
Page 40: Alternate Moving Method
Isolation Pads The elastomeric pads shipped (as standard) are adequate for most installations. For additional details on isolation practices, refer to Trane Engineering Bulletin -Series R® Chiller Sound Rat- ings and Installation Guide., or consult an acoustical engineer for sound-sensitive installations. - Page 41 Installation Mechanical Figure 12. Isolator Pad Placement Model B1B1B1 HA-1400 HA-700 HA-1400 HA-1000 HA-700 HA-700 HA-700 HA-700 B2B2B2 HA-1400 HA-700 HA-1400 HA-1000 HA-700 HA-700 HA-700 HA-700 B1C1D1 HA-1400 HA-1000 HA-1400 HA-700 HA-700 HA-700 HA-1000 HA-700 B2C2D2 HA-1400 HA-1000 HA-1400 HA-700 HA-700 HA-700 HA-1000...
-
Page 42: Unit Leveling
Installation Mechanical Unit Leveling Note: The electrical panel side of the unit is designated as the “front” of the unit. 1. Check unit level end-to-end by placing a level on the top surface of the evaporator shell. 2. If there is insufficient surface available on the top of the evaporator shell, attach a magnetic level to the bottom of the shell to level the unit. -
Page 43: Dimensions
Installation Mechanical Dimensions Cond. Compressor Evap. Control Panel Space for Remove Pipe Reversed Remove Pipe Space Layout EVAP 3 pass in Evap. EVAP COND 2(or 4) pass in Evap. RTHD-SVX04K-EN... - Page 44 Installation Mechanical Size(mm) Evapo- Model rator B1B1B1 3414 1785 2253/2053 3475 2743 2730 2734 2477 B1C1D1 3878 1785 2253/2053 3475 3200 3194 3198 2977 B2B2B2 3414 1785 2253/2053 3475 2743 2730 2734 2477 B2C2D2 3878 1785 2253/2053 3475 3200 3194 3198 2977 C1C2D2...
- Page 45 Installation Mechanical Table 15. Evaporator and Condenser Data Nom. Compress Conn. or Frame Cond Shell Nominal Connector Size Code Evap Shell Evap. Code Cond. size (NPS)* (NPS)* (Digit 6,7 Code (Digits Shell (Digits 21,22 Shell of Model 14, 15 of Diameter Diameter No.)
-
Page 46: Water Pressure Drop Data
Installation Mechanical Water Pressure Drop Data Evaporator Pressure Drop Evaporator Pressure Drop G Frame - 3 Pass G Frame - 4 Pass 1000 1500 2000 2500 3000 1000 1500 2000 Flow (GPM) Flow (GPM) Evaporator Pressure Drop Evaporator Pressure Drop F Frame - 2 Pass F Frame - 3 Pass 1000... - Page 47 Installation Mechanical Evaporator Pressure Drop Evaporator Pressure Drop D Frame - 2 Pass D Frame - 3 Pass D4 & D5 D4 & D5 1000 1500 2000 2500 1000 1200 1400 Flow (GPM) Flow (GPM) Evaporator Pressure Drop Evaporator Pressure Drop C Frame - 2 Pass C Frame - 3 Pass 1000...
- Page 48 Installation Mechanical Evaporator Pressure Drop Evaporator Pressure Drop H Frame - 4 Pass H Frame - 3 Pass 1000 1200 1400 1000 1200 1400 Flow (GPM) Flow (GPM) Condenser Pressure Drop Condenser Pressure Drop G Frame - 2 Pass F Frame - 2 Pass F1 &...
- Page 49 Installation Mechanical Condenser Pressure Drop Condenser Pressure Drop D Frame - 4 Pass B Frame - 2 Pass R² = 1 1000 1000 Flow (GPM) Flow (GPM) Condenser Pressure Drop E Frame - 4 Pass R² = 1 1000 1200 Flow (GPM) RTHD-SVX04K-EN...
-
Page 50: Making Grooved Pipe Connections
Installation Mechanical Making Grooved Pipe Connections D CAUTION Equipment Damage! To prevent damage to water piping, do not overtighten connections. To prevent equipment damage, bypass the unit if using an acidic flushing agent. Note: Make sure that all piping is flushed and cleaned prior to starting the unit. Vents and Drains Install pipe plugs in evaporator and condenser water box drain and vent connections before fill- ing the water systems. -
Page 51: Condenser Piping Components
Installation Mechanical Condenser Piping Components “Piping components” include all devices and controls used to provide proper water system oper- ation and unit operating safety. These components and their general locations are given below. Entering condenser water piping • Air vents (to bleed air from system) •... -
Page 52: Condenser Water Regulating Valve Adjustment
It is recommended that the services of a qualified water treatment specialist be engaged to determine what water treatment, if any, is required. The Trane Company assumes no responsibility for equipment failures which result from un- treated or improperly treated water, or saline or brackish water. -
Page 53: Water Pressure Relief Valves
Relief Relief Valve Valve ® Refer to Trane Engineering Bulletin RTHD with Standard AFD Option Water- Cooled Series R Chillers Sound Ratings and Installation Guide for sound-sensitive applications. Water Pressure Relief Valves D CAUTION Shell Damage! Install a pressure relief valve in both evaporator and condenser water systems. Failure to do so may result in shell damage. -
Page 54: Refrigerant Pressure Relief Valve Venting
Installation Mechanical Refrigerant Pressure Relief Valve Venting D WARNING Hazardous Gases! Consult local regulations for any special relief line requirements. Refrigerant vented into a confined equipment room could displace available oxygen to breathe, causing possible asphyx- iation or other serious health risks. Failure to follow these recommendations could result in death or serious injury. - Page 55 Installation Mechanical Table 16. Pressure Relief Valve Data Valve Location Discharge Number Rated Capacity Field Connection Factory Setpoint of Valves per Relief Valve Pipe Size (in NPT) Shell Side (psi) (lb/min.) Connection(in) Evap - B1 48.0 1-5/16-12 Evap - B2 48.0 1-5/16-12 Evap - C1...
-
Page 56: Thermal Insulation
75% Relative humidity Operation outside of normal design conditions as defined above may require additional insula- tion; contact Trane for further review. Note: Liquid line filter, refrigerant charging valves, water temperature sensors, drain and vent connections when insulated must remain accessible for service. -
Page 57: Waterbox Removal And Installation
Waterbox Removal and Installation Introduction The purpose of this bulletin is to communicate waterbox weights, recommended connection devices, and connection and lifting arrangements for AdaptiR™ with AFD option water cooled chillers. Important Only qualified technicians should perform the installation and servicing of equipment referred to this bulletin. -
Page 58: Reassembly
Waterbox Removal and Installation 1. Determine the type and size of chiller being serviced. Refer to Trane Nameplate located on chiller control panel. 2. Select the proper lift connection device from Table 19. The rated lifting capacity of the select- ed lift connection device must meet or exceed the published weight of the waterbox. -
Page 59: Parts Ordering Information
Waterbox Removal and Installation Unit Bolt Size Evaporator Condenser (mm) RTHD M12x1.75 88 Nm 88 Nm (65 ft-lbs) (65 ft-lbs) Parts Ordering Information This Bulletin is informational only and does not authorize any parts or labor. Use the Table 19 for part ordering information. -
Page 60: Filter
Filter Filter Panel Lifting Filter use single point lifting or two points lifting, Figure 19 shows the single point lifting exam- ple. The angle from the top two diagonal bolts of the filter panel to the lifting cables should be 60°... -
Page 61: Filter Shipment
Filter Figure 21. Double Filter Lifting 1446 mm Filter Shipment Filter is shipped separately fixed on wooden box. Wirings for filter shipping will be in same pack- age of filter. And installation guide file enclosed the box. Filter Installation on Site Mechanical Assembly Step 1. - Page 62 Filter Figure 22. Filter Assembly Process Cable Guider Clamp Cable Guider U Support L Bracket BOLT MOUNTING DIRECTION Cable Guider CLAMP RTHD-SVX04K-EN...
-
Page 63: Electrical Wiring Connection
Filter Electrical Wiring Connection TL300/TL330 has low harmonic option design with passive filter. Chiller can reach to 5% THDi with filter option under full load condition. There is a filter panel design to cover 1~2 filters and other related control parts. Because filter panel has large size, it is separated sipping and field installed. -
Page 64: Two Filters Power Connection (Standard Afd Chiller)
Filter Figure 24. Power Cable Routing With Single Filter Panel CONT RO L PA NEL FI LT ER PA NEL FI LT ER CIR CUI T BREAKER Magnetic cores 1L1 Two Filters Power Connection (Standard AFD chiller) For TL300 size 200KW~315KW, it has two filters. Power cable harness between Filter panel and control panel (See Figure 25):... -
Page 65: Two Filters Power Connection (Vvi Chiller)
Filter Two Filters Power Connection (VVI chiller) For TL330 size 250KW~315KW, it has two filters. Power cable harness between control panel and filter panel (See Figure 26): Figure 26. Power Cable Routing With Double Filter Panel CONTROL PANEL FILTER PANEL FILTER CIRCUIT BREAKER Magnetic cores 1L1... -
Page 66: Filter Control Harness Connection (Standard Afd Chiller)
Filter Filter Control Harness Connection (Standard AFD chiller) Filter control harness from control panel to filter panel includes four wires with conduit (see ble 21 Figure 27 for single filter, see Table 22 Figure 28 for double filter): Table 21. Control wiring from control panel to filter panel (single filter) Cable P/N Drive Size Filter Size... - Page 67 Filter Table 22. Control wiring from control panel to filter panel (Double filters) Cable P/N Drive Size Filter Size Label From 573165760100 1X4-1 2U4-TS 1X4-2 2U5-TS’ 1X4-3 2K1-A1 27AA 1X4-4 2K1-A2 Figure 28. Control cable routing with double filters CONTROL PANEL FILTER PANEL 27AA FILTER...
-
Page 68: Filter Panel Construction
Filter Filter Panel Construction Below picture show different panel constructions based on different power size: Figure 29. Filter Panel for 110KW~220KW Drive Filter Panel Maintenance It is recommended to check the functionally at least in a 2 year interval. 2. Check the fan(s) inside filter panle is (are) at the normal operation. 3. -
Page 69: Installation Electrical
Installation Electrical We ship some unit with the fan chamber installed on the side of the panel to ensure can put the unit in the standard container. We install the protect sheet metal on the air outlet to ensure no other things drop into the panel. -
Page 70: General Recommendations
Model AdaptiR™ with AFD option chillers are designed according to NEC Article 310-15; there- fore, all power supply wiring must be sized and selected accordingly by the project engineer. For a complete discussion on the use of conductors, see Trane Engineering Bulletin EB-MSCR-40. Refer to Trane Engineering Bulletin CTV-EB-93 for power wire sizing. - Page 71 Installation Electrical Table 23. Wire Selection Chart for Starter Panels Min. Wire Supply Leads for All Starters (0 - 2000 Volts) Size Copper 1 Conduit 1 Conduit 1 Conduit 2 Conduit 2 Conduit 3 Conduit 4 Conduit (75°C) 3 Wire 6 Wire 9 Wire 6 Wire...
-
Page 72: Module Connections For Interconnecting Wiring
Installation Electrical The hole locations and shafts lengths have already been cut. And the shaft already installed. D WARNING Hazardous Voltage! Disconnect all electric power, including remote disconnects and discharge all motor start/run capacitors before servicing. Follow proper lockout/tagout procedures to ensure the power can- not be inadvertently energized. -
Page 73: Interconnecting Wiring (Field Wiring Required)
Installation Electrical Interconnecting Wiring (Field Wiring Required) Important: Do not turn chiller on or off using the chilled water pump interlocks. When making field connections, refer to the appropriate field layout, wiring, schematics and con- trols diagrams that ship with the unit. The diagrams in this manual are typical only and may not match the unit. -
Page 74: Condenser Water Flow Interlock
Installation Electrical Condenser Water Flow Interlock The Symbio800 shall accept an isolated contact closure input from a customer installed proof- of-flow device such as a flow switch and customer provided pump starter auxiliary contact for interlocking with condenser water flow. The input shall be filtered to allow momentary openings and closings of the switch due to turbulent water flow, etc. - Page 75 Installation Electrical Note: Previous CWS can either be Front Panel, BAS, or External Reset Ratio calculation: The Reset Ratio on the User Interface is displayed as a percentage. To use it in the above equa- tion it must be converted to its decimal form. Reset Ratio percent / 100 = Reset Ratio decimal Example of converting Reset Ratio: If the Reset Ratio displayed on the User Interface is 50% then use (50/100) = .5 in the equation...
-
Page 76: Emergency Stop
Installation Electrical Table 25. Programable Relays LLID Name LLID Software Output Name Default Relay Designa- tion Operating Status Relay 0 Status Relay 4, J2-1,2,3 Head Pressure Relief Request Programmable Relays Relay 1 Status Relay 3, J2-4,5,6 Chiller Limit Mode Relay Relay 2 Status Relay 2, J2-7,8,9 Chiller Alarm Relay... -
Page 77: Base Loading Control Setpoint
% Load = 7.5 * (Vdc Input) + 25 Summit Interface - Optional Symbio800 provides an optional interface between the chiller and a Trane Summit BAS. A Com- munications interface LLID shall be used to provide “gateway” functionality between the Chiller and Summit. -
Page 78: Operating Principles Mechanical
Passitive Filter (option) Refrigeration (Cooling) Cycle The refrigeration cycle of the Series R chiller is conceptually similar to that of other Trane chiller products. It makes use of a shell-and-tube evaporator design with refrigerant evaporating on the shell side and water flowing inside tubes having enhanced surfaces. - Page 79 Operating Principles Mechanical referenced in the discussion following. A schematic of the system showing the RTHD refrigerant flow loop as well as the lubricant flow loop is shown in Figure 33 Figure 36. The RTHD vari- able volume ratio refrigerant flow loop and lubricant flow loop are shown in Figure 34 Figure Figure 32.
- Page 80 Operating Principles Mechanical Figure 33. RTHD Refrigerant Flow Diagram dual discharge lines only on C, D & E frame compressors dual discharge lines compressor only on C, D & E frame compressors evaporator condenser gas pump Figure 34. RTHD Variable Volume Ratio Refrigerant Flow Diagram Dual Discharge Lines Only On C,D &...
-
Page 81: Compressor Description
Operating Principles Mechanical Compressor Description Figure 35. Compressor Description Male Rotor Female Rotor Bearings Suction Unload Solenoid Load Motor Solenoid Housing Rotor Housing Piston Bearing Discharge Housing Housing Check Valve Motor Stator Slide Valve Discharge Unloader Plenum Piston Oil Reclaim Port Discharge Check Valve... -
Page 82: Compressor Motor
Operating Principles Mechanical The compressor used by the Series R chiller consists of three distinct sections: the motor, the rotors and the bearing housing. Refer to Figure Compressor Motor A two-pole, hermetic, squirrel-cage induction motor directly drives the compressor rotors. The motor is cooled by suction vapor drawn from the evaporator and entering the end of the motor housing (Figure... -
Page 83: Slide Valve Movement
Operating Principles Mechanical Slide Valve Movement Movement of the slide valve piston (Figure 35) determines slide valve position which, in turn, regulates compressor capacity. Compressed vapor flowing in to and out of the cylinder governs piston movement, and is controlled by the load and unload solenoid valves. The solenoid valves (both normally closed) receive “load”... - Page 84 Operating Principles Mechanical Figure 36. RTHD Oil Flow Diagram RTHD Oil System restrictor Compressor Discharge Oil Return Filter Master Oil Line Temperature Oil Pressure Solenoid Sensor Condenser Transducer Pressure Transducer Compressor Manual Service To Bearings Valve Injection to Rotors Oil Filter Oil Separators Optional Oil Cooler...
-
Page 85: Oil Flow Protection
Operating Principles Mechanical Figure 37. RTHD Variable Volume Ratio Oil Flow Diagram RTHD VVI Oil System Compressor Discharge Temperature Oil Line Sensor Solenoid Valve Oil Pressure Condenser Transducer Pressure Transducer Compressor To Bearings Manual Service Oil Filter Injection To Valve Rotors Oil Separators Vent to... -
Page 86: Oil Filter
Operating Principles Mechanical To ensure the required system differential pressure is adequate to move oil to the compressor, the Symbio800 attempts to both control a minimum system differential pressure as well as mon- itor it. Based on readings from pressure transducers in both the evaporator and condenser , the EXV is modulated to maintain evaporator pressure at a minimum of 25 psid below the condenser pressure. -
Page 87: Oil Cooler
Operating Principles Mechanical Detail information pls. see Figure Oil Cooler The oil cooler is a brazed plate heat exchanger located near the oil filter. It is designed to transfer approximately one ton of heat from the oil to the suction side of the system. Subcooled liquid is the cooling source. -
Page 88: Operator Interface Controls
Operator Interface Controls Symbio800 Overview This section covers information pertaining to the Symbio™ 800 controller hardware. The Symbio™ 800 controller is a factory-installed, application specific and programmable con- troller designed to control chillers and large packaged HVAC equipment. A 7 inch user interface features a touchsensitive color screen that provides facility managers at-a-glance operating sta- tus, performance monitoring, scheduling changes, and operating adjustments. -
Page 89: Tracer Tu
Tracer TU serves as a common interface to all Trane chillers, and will customize itself based on the properties of the chiller with which it is communicating. Thus, the service technician learns only one service interface. -
Page 90: Controls Interface
Operator Interface Controls • Microsoft .NET Framework 4.0 or later Note: ® • Tracer TU is designed and validated for this minimum laptop configuration. Any variation from this configuration may have different results. Therefore, support for Tracer TU is lim- ited to only those laptops with the configuration previously specified. -
Page 91: Main Display Area/Home Screen
Operator Interface Controls Figure 41. TD7 Main Display Area/Home Screen All screens appear within the main display area (shown as location in Figure 42). Home screen: Chiller status information The home screen (Figure 42) provides the most frequently needed chiller status information on “touch targets”... -
Page 92: Viewing Chiller Operating Modes
Operator Interface Controls Viewing Chiller Operating Modes On the Reports screen, touch Chiller Operating Modes to view the current operating status of the chiller in terms of the top-level operating mode and submodes. Note: You can also access the Chiller Operating Modes screen from the chiller status button in the upper left corner of the screen. - Page 93 Operator Interface Controls Table 27. Operating Modes Chiller Modes Description Start Inhibited Waiting for Oil The chiller will wait up to 2 minutes in this mode for oil level to appear in the oil tank. Condenser Water Pump Pre-Run The chiller will wait up to 30 minutes (user adjustable) in this mode for to allow the condens- Timemin:sec er water loop to equalize in temperature Restart Inhibit min:sec...
-
Page 94: Alarms
Operator Interface Controls Table 27. Operating Modes Chiller Modes Description Diagnostic Shutdown – Manual Reset Chiller is in the process of being stopped by a Latching Diagnostic shutdown – Manual Reset is required to clear Diagnostic Shutdown – Auto Reset Chiller is in the process of being stopped by a Diagnostic shutdown –... -
Page 95: Viewing The Reports Screen
Operator Interface Controls Viewing the Reports Screen Touch the Reports button in the main menu area (Figure 4) to view the Reports screen. The Re- ports screen contains the following buttons: • Custom Report1 • Custom Report2 • Custom Report3 •... - Page 96 Operator Interface Controls Figure 46. Edit Custom Report screen Figure 47. Report Evaporator Screen Table 28. Report Evaporator Screen Items Description Resolution Units Active Chilled Water Setpoint °F / °C Evaporator Entering Water Temperature °F / °C Evaporator Leaving Water Temperature °F / °C Evaporator Water Flow Status Flow, No Flow...
- Page 97 Operator Interface Controls Figure 48. Report Condenser Screen Table 29. Report Condenser Screen Items Description Resolution Units Condenser Entering Water Temperature F / C Condenser Leaving Water Temperature F / C Condenser Water Flow Status Flow, No Flow Text Condenser Water Pump Override Auto, On Text Condenser Approach Temperature...
-
Page 98: Equipment Settings
Operator Interface Controls Figure 50. Report Motor Screen Table 31. Report Motor Screen Items Description Resolution Units Active Current Limit Setpoint %RLA Average Motor Current %RLA %RLA Starter Motor Current L1 %RLA %RLA Starter Motor Current L2 %RLA %RLA Starter Motor Current L3 %RLA %RLA Starter Motor Current L1 Starter Motor Current L1... -
Page 99: Viewing And Changing Equipment Settings
Operator Interface Controls topic. This section provides detailed information about these screens. Figure 51. Setting Screen Viewing and Changing Equipment Settings Each button in the Equipment Settings column on the Settings screen takes you to a menu screen that contains a group of buttons. Each button displays the name of a setting and its cur- rent value(Figure 52). - Page 100 Operator Interface Controls Figure 53. Chilled Water Setpoint Screen Figure 54. Changed Chilled Water Setpoint Screen Keypad features: • When you enter a new number, the value in the New value field is deleted and replaced with the new entry. •...
-
Page 101: Display Settings
Operator Interface Controls Current Limit Control Softload Time XXXX Capacity Control Softload Time XXXX Local Atmospheric Pressure XXX.X psi/kPa Power Up Start Delay Variable Vi Switchover Deadband X.XXX Feature Settings External Chilled/Hot Water SetpointEnableEnable/Disable Text External Current Limit SetpointEnableEnable/Disable Text LCI-C Diagnostic EncodingEnable/Disable Text Chilled Water Reset(Constant, Outdoor, Return, Disable), Disable... - Page 102 Operator Interface Controls Figure 55. Display ReferenceScreen Each of the buttons shows the name of a display preference and its format (current value). Touch any of these buttons to view a screen where you can change the format . The button representing the format currently used is shaded (see the “MMDDYYYY”...
- Page 103 Operator Interface Controls Units System Use the Display Units screen to choose from the following display units: • • Inch-Pounds (default) Pressure Units Use the Pressure Units screen to choose from the following pressure units: • kPaA (default if “SI” is chosen for display units) •...
-
Page 104: Cleaning The Display
Operator Interface Controls The current date and time for the display is expressed as the current value. The current value appears below the center line on the screen. Above the center line, the following date and time attributes appear: • Month •... -
Page 105: Logging In
Operator Interface Controls To disable security, you must be logged in: 1. From the Settings screen, touch the Security button. The Security screen appears (Figure 60). Note: If you are logged out, the Log in screen appears. 2. Touch the Disable button. The button becomes shaded. Touch Save. -
Page 106: Logging Out
Operator Interface Controls • The PIN is a four-digit number, which was configured for your system with the Tracer TU service tool. • As you enter the number, the PIN remains hidden by asterisks. Note: If you enter an invalid PIN, an error message appears on the Log in screen. 3. -
Page 107: Tracer Tu
Tracer TU TracerTU (non-Trane personnel, contact your localTrane office for a help) adds a level of so- phistication that improves service technician effectiveness and minimizes chiller downtime. TheTracer AdaptiView control’s operator interface is intended to serve only typical daily tasks. -
Page 108: Unit Start-Up
Unit Start-up Power Up The Power up chart shows the respective TD7 screens during a power up of the main processor. This process takes from 30 to 50 seconds depending on the number of installed Options. On all power ups, the software model will always transition through the ‘Stopped’ Software state in- dependent of the last mode. -
Page 109: Power Up To Starting
Unit Start-up Power Up to Starting The Power up to starting diagram shows the timing from a power up event to energizing the compressor. The shortest allowable time would be under the following conditions: 3. No motor restart inhibit 4. Evaporator and Condenser Water flowing 5. -
Page 110: Limit Conditions
Unit Start-up Figure 68. Stopped to Starting AdaptiR™ with AFD option Sequence of Operation Stopped to Starting Limit Conditions Symbio800 will automatically limit certain operating parameters during startup and run modes to maintain optimum chiller performance and prevent nuisance diagnostic trips. These limit condi- tions are noted in Table Table 33. -
Page 111: Seasonal Unit Start-Up Procedure
Unit Start-up Seasonal Unit Start-Up Procedure 1. Close all valves and re-install the drain plugs in the evaporator and condenser heads. 2. Service the auxiliary equipment according to the start-up/maintenance instructions provided by the respective equipment manufacturers. 3. Vent and fill the cooling tower, if used, as well as the condenser and piping. At this point, all air must be removed from the system (including each pass). - Page 112 Unit Start-up Series R Start-up Test Log Job Name Job Location Model # Serial # start date: Sales Order # ship date: Job elevation (ft. above sea level) STARTER DATA: START-UP ONLY Manufacturer Chiller appearance at arrival: Type: Compressor shipping bolts removed? Y N Vendor ID #/Model #: Oil separator shipping bolts removed? Y N Volts...
- Page 113 Unit Start-up Installation Checklist for Model RTHD Series R Trane Service Company S.O. No.: Serial No: Job/Project Name: RECEIVING Verify that the unit nameplate data corresponds to the ordering information. Inspect the unit for shipping damage and any shortages of materials. Report any damage or shortage to the carrier.
- Page 114 Unit Start-up Installation Checklist for Model RTHD Series R PRE-START CHECK-OUT visually check all drive wiring and connection in the drive to make sure they are tight and free of any shipping damage. Inspect all other wiring connection. Connections should be clean and tight. Check power wiring connection of drive line side (R,S,T) and load side (U,V,W) to make sure correct phase sequencing.
-
Page 115: Unit Shutdown
Unit Shutdown Normal Shutdown to Stopped The Normal Shutdown diagram shows the Transition from Running through a Normal (friendly) Shutdown. The Dashed lines on the top attempt to show the final mode if you enter the stop via various inputs. Figure 69. -
Page 116: Periodic Maintenance
Periodic Maintenance Overview This section describes preventative maintenance procedures and intervals for the Series R unit. Use a periodic maintenance program to ensure optimal performance and efficiency of the Series R units. An important aspect of the chiller maintenance program is the regular completion of the “Series R Operating Log”;... -
Page 117: Annual Maintenance
Periodic Maintenance Table 35. Operating Conditions at Minimum Load Description Condition Evaporator approach *less than 7°F (non-glycol applications) Condensing approach *less than 7°F Subcooling 2-3°F EXV percent open 10-20 % open *≈1.0°F for new unit. Annual Maintenance Shut down the chiller once each year to check the following: D WARNING Hazardous Voltage! Disconnect all electric power, including remote disconnects before servicing. - Page 118 Periodic Maintenance Chiller Log Run Time Main Tab 15 min 30 min 1 hr Chiller Mode Evap Ent/Lvg Water Temp Cond Ent/Lvg Water Temp Active Chilled Water Setpoint (F) Active Current Limit Setpoint (%RLA) Software Type Software Version Reports Tab Evaporator Evap Entering Water Temperature (F) Evap Leaving Water Temperature (F)
- Page 119 Periodic Maintenance Settings Settings Tab Chiller Front Panel Chilled Water Setpt (F) Front Panel Current Limit Setpt (RLA) Differential to Start (F) Differential to Stop (F) Setpoint Source Feature Settings Chilled Water Reset Return Reset Ratio Return Start Reset Return Maximum Reset Outdoor Reset Ratio Outdoor Start Reset Outdoor Maximum Reset...
-
Page 120: Maintenance Procedures
It is recommended that the services of a qualified water treatment specialist be engaged to determine what water treatment, if any, is required. The Trane Company assumes no responsibility for equipment failures which result from un- treated or improperly treated water, saline or brackish water. -
Page 121: Compressor Oil
To prevent oil sump heater burnout, open the unit main power disconnect switch before re- moving oil from the compressor. Trane Polyolester Oil is the approved oil for the AdaptiR™ with AFD option units. Polyolester oil is extremely hygroscopic meaning it readily attracts moisture. The oil can not be stored in plastic containers due to the hygroscopic properties. -
Page 122: Removing Compressor Oil
Maintenance Procedures Figure 70. Determining Oil Level in Sump 3/8" or 1/2" Hose Sightglass 3. Attach a 3/8” or 1/2” hose with a sightglass in the middle to the oil sump drain valve and the condenser service valve at the top of the condenser. Using high pressure rated clear hose with appropriate fittings can help speed up the process. -
Page 123: Oil Charging Procedure
Maintenance Procedures Oil Charging Procedure It is critical to fill the oil lines feeding the compressor when charging a system with oil. The di- agnostic “Loss of oil at the compressor stopped” will be generated if the oil lines are not full on start-up. -
Page 124: Replacing The Gas Pump/Thermosyphon Oil Filter
Maintenance Procedures the ball valve and the oil filter (or the ball valve and oil cooler, if so equipped). 3. Use a strap wrench to break loose the nut that secures the oil filter element to the filter mani- fold. 4. -
Page 125: Refrigerant Charging
Maintenance Procedures leak is present or moisture is still in the system. Note: If oil is in the system, this test is more difficult. The oil is aromatic and will give off vapors that will raise the pressure of the system. Refrigerant Charging Once the system is deemed leak and moisture free, use the 5/8”... -
Page 126: Diagnostics
Diagnostics The following diagnostic Table contains all the diagnostics possible. Not all data is available un- less Trace TU is installed. Hex Code: 3 digit hexadecimal code used on all past products to uniquely identify diagnostics. Diagnostic Name and Source: Name of diagnostic and its source. Note that this is the exact text used in the User Interface and/or Service Tool displays. - Page 127 Diagnostics Table 37. Diagnostics Table Diagnostic Name Severity Persistence Criteria Reset Code and Source Level Starter Fault Type I Immediate Latch This is a specific starter test where 1M(1K1) is closed first and a Local check is made to ensure that there are no currents detected by the CT’s.
- Page 128 Diagnostics Table 37. Diagnostics Table Diagnostic Name Severity Persistence Criteria Reset Code and Source Level MP: Reset Has Oc- Info NonLatch The main processor has successfully come out of a reset and built Remote curred its application. A reset may have been due to a power up, in- stalling new software or configuration.
- Page 129 Diagnostics Table 37. Diagnostics Table Diagnostic Name Severity Persistence Criteria Reset Code and Source Level BAS Failed to Estab- Special NonLatch The BAS was setup as “installed” and the BAS did not commu- Remote lish Communication nicate with the MP within 15 minutes after power-up. Refer to Section on Setpoint Arbitration to determine how setpoints and operating modes may be effected.
- Page 130 The occurrence of this software error mes- sage suggests an internal software state chart misalignment has occurred. The events that led up to this failure, if known, should be recorded and transmitted to Trane Controls Engineering – (SW rev 6 and higher) Comm Loss: Slide...
- Page 131 Diagnostics Table 37. Diagnostics Table Diagnostic Name Severity Persistence Criteria Reset Code and Source Level Comm Loss:Outdoor Info and Spe- Latch Continual loss of communication between the MP and the Func- Remote Air Temperature cial Action tional ID has occurred for a 30 second period. Note that if this diagnostic occurs, Chiller shall remove any OA Chilled Water Reset, if it was in effect and if Tracer OA was unavailable.
- Page 132 Diagnostics Table 37. Diagnostics Table Diagnostic Name Severity Persistence Criteria Reset Code and Source Level Comm Loss: Ext Info and Spe- Latch Continual loss of communication between the MP and the Func- Remote Base Loading Set- cial Action tional ID has occurred for a 30 second period. The external base point load setpoint input is removed from the arbitration to establish the Base LoadingSetpoint.
- Page 133 Diagnostics Table 37. Diagnostics Table Diagnostic Name Severity Persistence Criteria Reset Code and Source Level AFD Bus Under Volt- Immediate Non-latching The bus voltage dropped below the Low Bus Cutout threshold and Local Shutdown there is not enough voltage to safely operate the load. AFD Comm Loss: Immediate Latching...
- Page 134 Diagnostics RTHD-SVX04K-EN...
-
Page 135: Wiring Schematics
Wiring Schematics Typical field connection diagrams, electrical schematics and connections diagramsfor the Adap- tiR™ with AFD units are shown in this section. Note: The drawings in this section are provided for reference only. Thesediagrams may not re- flect the actual wiring of your unit. For specific electricalconnection and schematic infor- mation, always refer to the wiring diagramsthat were shipped with the unit. - Page 136 1. 2311-3279 RTHD-SVX04K-EN...
- Page 137 RTHD-SVX04K-EN...
- Page 138 A 120 VOLT 1 mA CIRCUIT OR A 220 VOLT 2 mA CIRCUIT. TRANE TRACER SUMMIT RECOMMENDED WIRE: TRANE ICS SHIELDED TWISTED PAIR COMMUNICATION CABLE 14-18 CHILLED / CONDENSER WATER PUMP STARTER AUXILIARY CONTACTS TO BE AWG, 600V CABLE, 30 VOLT CIRCUIT. THE SUM TOTAL LENGTH OF WIRED IN SERIES WITH FLOW SWITCHES.
- Page 139 600, 700, 800, 1000, 1200, 1600, 2000. Maximum Fuse or Circuit Breaker Size = The standard size that is closest to the calculated value without exceeding it. SHEET TRANE AIR CONDITIONING SYSTEMS (CHINA) CO., LTD TOTAL FIELD LAYOUT DIAGRAM DESIGN...
- Page 140 3. 2311-3277 除图样注明外, 未注制造公差按以下规定: UNLESS OTHERWISE SPECIFIED ALL DIMENSIONS ARE IN MILLIMETERS. TOLENRANCE: X.= ` 粗糙度 X.X= ` 1A12 FINISH X.XX= ` 1A13 角度 = ° 孔直径 = 1A14 ANGLES HOLE DIA 4B26 4B24 第三视角 THIRD ANGLE PROJECTION 4Y20 4Y21 DRIVE KEYPAD 变频器操控器...
- Page 141 特 灵 空 调 系 统 (中国) 有 限 公 司 特 灵 空 调 系 统 (中国) 有 限 公 司 SHEET SHEET TRANE AIR CONDITIONING SYSTEMS (CHINA) CO., LTD TRANE AIR CONDITIONING SYSTEMS (CHINA) CO., LTD 共 张...
- Page 142 除图样注明外, 除图样注明外, DETAIL VIEW 未注制造公差按以下规定: 未注制造公差按以下规定: UNLESS OTHERWISE SPECIFIED ALL UNLESS OTHERWISE SPECIFIED ALL 1A12 1A15 DIMENSIONS ARE IN MILLIMETERS. DIMENSIONS ARE IN MILLIMETERS. 1A16 TOLENRANCE: TOLENRANCE: 1A13 X.= ` X.= ` 1A14 1A17 粗糙度 粗糙度 X.X= ` X.X= ` FINISH FINISH X.XX= `...
- Page 143 见详图 B SEE DETAIL 'B' 冷凝器 CONDENSER 4E1, 4E2 第 张 特 灵 空 调 系 统 (中国) 有 限 公 司 SHEET TRANE AIR CONDITIONING SYSTEMS (CHINA) CO., LTD 共 张 TOTAL COMPONENT LOCATION 设 计 工 艺 叶亚进...
- Page 144 For more information, please visit trane.com or tranetechnologies.com. Trane has a policy of continuous product and product data improvement and reserves the right to change design and specifications without notice. We are committed to using environmentally conscious print practices.
Need help?
Do you have a question about the AdaptiR RTHD and is the answer not in the manual?
Questions and answers