Table of Contents
Advertisement
Installation, Operation,
and Maintenance
Series R
Helical Rotary Liquid Chillers
With heat recovery option
Models: RTHD
175-450 ton units (60 Hz)
125-410 ton units (50 Hz)
Only qualified personnel should install and service the equipment. The installation, starting up, and servicing of
heating, ventilating, and air-conditioning equipment can be hazardous and requires specific knowledge and training.
Improperly installed, adjusted or altered equipment by an unqualified person could result in death or serious injury.
When working on the equipment, observe all precautions in the literature and on the tags, stickers, and labels that
are attached to the equipment.
Feb. 2018
SAFETY WARNING
J99000002020
RTHD-SVX02H-EN
Advertisement
Table of Contents

Related Manuals for Trane RTHD series


Summary of Contents for Trane RTHD series
- Page 1 Installation, Operation, and Maintenance Series R Helical Rotary Liquid Chillers With heat recovery option Models: RTHD 175-450 ton units (60 Hz) 125-410 ton units (50 Hz) J99000002020 SAFETY WARNING Only qualified personnel should install and service the equipment. The installation, starting up, and servicing of heating, ventilating, and air-conditioning equipment can be hazardous and requires specific knowledge and training.
-
Page 2: Warnings, Cautions And Notices
Hydrogen, Chlorine, Fluorine and Carbon (HCFCs). Not Contains Refrigerant! all refrigerants containing these compounds have the same potential impact to the environment. Trane advo- System contains oil and refrigerant under high pres- cates the responsible handling of all refrigerants-includ- sure. Recover refrigerant to relieve pressure before ing industry replacements for CFCs such as HCFCs and opening the system. -
Page 3: Table Of Contents
Contents Warnings, Cautions and Notices ......2 Figure 8. Recommended Operating and Ser- vice Clearances ..........26 General Information ..........7 Ventilation ............27 Unit Identification - Nameplates ....7 Water Drainage ..........27 Figure 1. Typical Unit Nameplate ....7 Access Restrictions ........27 Unit Nameplates ..........7 Moving and Rigging ........27 Unit Inspection .......... - Page 4 Contents Connections - BCL ........... 46 Procedure .............62 Figure 24. Condenser and Evaporator Water Figure 30. Water Box Rigging and Lifting – Ver- Connections - CEM .......... 47 tical Lift Only ............ 63 Figure 25. Condenser and Evaporator Water Reassembly ..........63 Connections - CFM/DFM .........
-
Page 5: Rthd-Svx02H-En
Contents Summit Interface - Optional ......73 Viewing Chiller Operating Modes ....82 Figure 44. Chiller Operating Modes screen ..82 Operating Principles Mechanical ....74 Table 24. Operating Modes ......83 General ............74 Alarms ............85 Refrigeration (Cooling) Cycle ......74 Viewing the Alarms Screen ......85 Cycle Description ..........74 Figure 45. - Page 6 Contents Figure 63. Security screen ....... 91 Figure 72. Determining Oil Level in Sump ... 106 Logging In ............92 Removing Compressor Oil ......106 Figure 64. Log In Screen ........92 Oil Charging Procedure .......106 Logging Out ...........92 Replacing the Main Oil Filter (Hot Filter) ..107 Figure 65.
-
Page 7: General Information
» Lists correct operating charges of HFC-134a and • Notify the Trane sales representative and arrange for refrigerant oil repair. Do not repair the unit, however, until damage is inspected by the transportation representative. -
Page 8: Unit Description
General Information Unit Description Model Number Coding System The model numbers for the unit and the compressor are The RTHD units are single compressor, helical-rotary composed of numbers and letters that represent features type, water-cooled liquid chillers designed for installation of the equipment. - Page 9 General Information Table 1. Model Number Name Code M/N Digit M/N Code Description EVAP 14-15 Evaporator B1 evaporator B2 evaporator C1 evaporator C2 evaporator D1 evaporator D2 evaporator D3 evaporator D4 evaporator D5 evaporator D5 evaporator E1 evaporator F1 evaporator F2 evaporator G1 evaporator G2 evaporator...
- Page 10 General Information Table 1. Model Number Name Code M/N Digit M/N Code Description CDTM Condenser tube type CUFN Enhanced fin - copper SMBR Smooth bore - copper SBCN Smooth bore - 90/10 Cu/Ni CDWP Condenser passes 2 Pass CDWC Condenser water connection Left hand condenser connection Right hand condenser connection CDCT...
- Page 11 General Information Table 1. Model Number Name Code M/N Digit M/N Code Description PCON Power line connection type TERM Terminal block connection for incoming line(s) DISC Mech disconnect switch Circuit breaker CBHI High interrupt circuit breaker GFCB Ground fault circuit breaker GFHI Ground fault high interrupt circuit breaker Enclosure type...
-
Page 12: Model Number (Located On Compressor Nameplate)
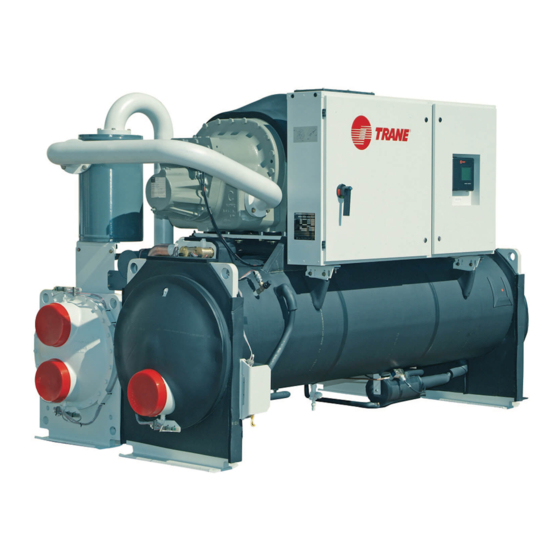
General Information Table 1. Model Number Name Code M/N Digit M/N Code Description Heat Recovery NONE NONE Partial Heat recovery Total Heat recovery Model Number (located on compressor nameplate) Table 2. Compressor Model Number Selection Category M/N Digit M/N Code Description of Selection Compressor Series CHHC... - Page 13 General Information Figure 3. Component Location for Typical RTHD Unit (Back View) Compressor Oil Separators Oil Filter (Cold) Hot Oil Filter is Discharge Line hidden from view. Unit Nameplate Relief Valves (On side of starter/control pane EXVs Evaporator Water Inlet Condenser Service Valves Oil Sump...
- Page 14 General Information Figure 4. Component Location for Typical RTHD Total Heat Reclaim Unit TD7 Interface Starter/Control Panel Oil Separator Relief Valves Evaporator Oil Sump Liquid Level Sensor Gas Pump Evaporator Water Outlet RTHD-SVX02H-EN...
- Page 15 General Information Figure 5. Component Location for Typical RTHD Total Heat Reclaim Unit (Back View) Oil Separator Compressor Unit Nameplate Oil Filter (Cold) (On side of starter/ Hot Oil Filter is hidden control pane from view. Discharge Line Relief Valves EXVs Evaporator Standard/Total...
- Page 16 General Information Figure 6. Component Location for Typical RTHD Partial Heat Reclaim Unit TD7 Interface Starter/Control Panel Oil Separator Relief Valves Evaporator Oil Sump Liquid Level Sensor Gas Pump Evaporator Water Outlet RTHD-SVX02H-EN...
-
Page 17: Installation Overview
General Information Figure 7. Component Location for Typical RTHD Partial Heat Reclaim Unit (Back View) Oil Separator Compressor Oil Filter (Cold) Unit Nameplate Hot Oil Filter is hidden (On side of starter/ from view. control pane Discharge Line Relief Valves EXVs Evaporator Standard/Partial... - Page 18 • Supply and install condenser water control valve(s) ry-ordered, field-installed options, for installation, as per Trane Engineering Bulletin -Water Cooled Series required. Loose parts are located in the starter/con- R® Condenser Water Contol. trol panel.
- Page 19 General Information technician. • Supply and install the wire terminal lugs to the start- • Where specified, supply and insulate the evaporator and any other portion of the unit, as required, to pre- • Supply and install field wiring to the line-side lugs of vent sweating under normal operating conditions.
- Page 20 General Information Table 5. General Data Unit Designator (corresponds to digits 6, 7, 14, 15, 21, 22 of unit model number) D2G2G1 D3D2E2 D3F2F3 D3G2G1 E3D2E2 E3F2F3 E3G2G1 General Refrigerant Type HFC-134a HFC-134a HFC-134a HFC-134a HFC-134a HFC-134a HFC-134a Refrigerant Charge (lb (kg)) (318) (215)
- Page 21 General Information Table 6. General Data Unit Designator (corresponds to digits 6, 7, 14, 15, 21, 22 of unit model number) C1C2D2 C1D6E5 C1D5E4 C1D3E3 C1E1F1 C2D4E4 C2D3E3 General Refrigerant Type HFC-134a HFC-134a HFC-134a HFC-134a HFC-134a HFC-134a HFC-134a Refrigerant Charge (lb (kg)) (222) (222)
- Page 22 General Information Table 7. General Data Unit Designator (corresponds to digits 6, 7, 14, 15, 21, 22 of unit model number) C2E1F1 C2F2F3 B1B1B1 B1C1D1 B2B2B2 B2C2D2 General Refrigerant Type HFC-134a HFC-134a HFC-134a HFC-134a HFC-134a HFC-134a Refrigerant Charge (lb (kg)) (238) (318) (186)
- Page 23 General Information Table 8. General Data Unit Designator (corresponds to digits 6, 7, 14, 15, 21, 22 of unit model number) B1C1H1 B2C2H2 C1E1J1 C2F2J3 D1F1J2 D2G2K1 D3G2K1 E3G2K1 General Refrigerant Type HFC-134a HFC-134a HFC-134a HFC-134a HFC-134a HFC-134a HFC-134a HFC-134a Refrigerant Charge (lb (kg)) (257)
- Page 24 General Information Table 9. General Data Unit Designator (corresponds to digits 6, 7, 14, 15, 21, 22 of unit model number) B1C1L1 B2C2L2 C1E1M1 C2F2M3 D1F1M2 D2G2N1 D3G2N1 E3G2N1 General Refrigerant Type HFC-134a HFC-134a HFC-134a HFC-134a HFC-134a HFC-134a HFC-134a HFC-134a Refrigerant Charge (lb (kg)) (222)
-
Page 25: Installation Mechanical
Table 10 for unit operating weights. Once in place, level the chiller within 1/4” (6.35 mm) over its length and width. The Trane Company is not responsible for equipment problems resulting from an improperly designed or con- structed foundation. RTHD-SVX02H-EN... - Page 26 Installation Mechanical Figure 8. Recommended Operating and Service Clearances 3'-0" (914 mm) Servic e Cl earance 3'-0" (914 mm) Servic e Cl earance (Opposi te Tube Removal) 36. 5" (927 mm) 26.4" (671 mm) 3'-0" (91 4 mm) Radius Radius Se rvice Clearance Swing 3 '-0"...
-
Page 27: Ventilation
Installation Mechanical Note: Maximum clearances are given. Depending on Access Restrictions the unit configuration, some units may require less clearance than others in the same category. Door clearances for the RTHD units are given in Figure . Refer to the unit submittals for specific “per unit” Ventilation dimensional information. - Page 28 Installation Mechanical Figure 9. Unit Weights and Dimensions for Rigging = C.G. RTHD-SVX02H-EN...
- Page 29 Installation Mechanical Table 10. Unit Weight (lb(kg)) Location (points) Location (points) Unit Designator* Unit Designator* E3G2G1 5158 4304 4226 5300 Total Heat Reclaim (2340) (1952) (1917) (2404) B1C1H1 3430 2429 2255 3062 E3F2F3 4781 3582 3750 4851 (1556) (1102) (1023) (1389) (2169) (1625)
- Page 30 Installation Mechanical Table 11. Center of Gravity(in(mm)) Unit Designator* Unit Designator* E3G3G3 30.8 63.81 37.62 Total Heat Reclaim (782.32) (1621) (956) B1C1H1 E3G2G1 30.8 63.55 38.70 (666) (1481) (824) (782.32) (1614) (983) B2C2H2 E3F2F3 27.64 63.46 38.33 (671) (1483) (819) (702.06) (1612) (974)
-
Page 31: Rigging
Installation Mechanical Lifting Procedure 1. When the unit is at its final location, remove the shipping bolts that secure the unit to the wood base D CAUTION mounts. Equipment Damage! 2. Rig the unit properly and lift from above or jack Never use a forklift to move the unit. - Page 32 Installation Mechanical Unit Dimension (mm (in)) Designator* C2E1F1 3658 3353 1613 (144.02) (132.01) (63.50) (5.08) (24.57) (24.02) C2D3E3 3048 2743 1517 (120.00) (107.99) (59.72) (8.86) (24.33) (24.02) C2D4E4 3048 2743 1523 (120.00) (107.99) (59.96) (8.62) (22.99) (24.02) C1E1F1 3658 3353 1613 (144.02) (132.01)
-
Page 33: Alternate Moving Method
Failure to do for most installations. For additional details on isolation so may result in death or serious injury should a lifting practices, refer to Trane Engineering Bulletin -Series R® cable fail. Chiller Sound Ratings and Installation Guide., or consult 5. -
Page 34: Placement Neoprene Isolator Installation (Optional)
Installation Mechanical Placement Neoprene Isolator Installation 8.3. Lower the unit on to the isolators and secure the isolator to the unit with a nut. Maximum isolator (optional) deflection should be approximately 1/4” . 8. Install the optional neoprene isolators at each mount- 8.4. -
Page 35: Unit Leveling
Installation Mechanical Figure 12. Oil Separator with Shipping Bracket and Compressor Shipping Spacer Compressor Housing Oil Separator M20 bolt Shipping Bracket Remove 4 Shipping Spacers (only 3 on B family) Unit Leveling Water Piping Note: The electrical panel side of the unit is designated Piping Connections as the “front”... - Page 36 Installation Mechanical Figure 13. Condenser and Evaporator Water Connections -BBB 72.80 [1849 mm] 9.44 [240 mm] 28.59 [726 mm] 70.30 [1786 mm] 24.48 [622 mm] EVAPORATOR 13.84 [351 mm] COND EVAP 107.66 [2734 mm] 9.50 [241 mm] 9.44 [240 mm] 12.47 [317 mm] Standard 3 Pass 13.35 [339 mm]...
- Page 37 Installation Mechanical Figure 14. Condenser and Evaporator Water Connections -BCD/CCD 72.80 [1849 mm] 9.44 [240 mm] 28.59 [726 mm] 24.48 [622 mm] 70.80 [1798 mm] EVAPORATOR 13.84 [351 mm] EVAP COND 9.50 [241 mm] 12.47[317 mm] 125.91 [3198 mm] 13.35 [339 mm] 9.44 [240 mm] Standard 3 Pass 11.50 [292 mm]...
- Page 38 Installation Mechanical Figure 15. Condenser and Evaporator Water Connections - CEF 76.24 [1937 mm] 73.44 [1865 mm] 10.20 [260 mm] 30.13 [765 mm] 27.22[692 mm] EVAPORATOR COND EVAP 14.88 [378 mm] 5.29 [134 mm] 12.73 [323 mm] 14.50 [368 mm] 125.91 [3198 mm] 12.49 [317 mm] 10.20 [260mm]...
- Page 39 Installation Mechanical Figure 16. Condenser and Evaporator Water Connections - CDE/DDE/EDE 10.20[260mm] 76.27 [1937 mm] 30.13 [765 mm] 73.44 [1865 mm] 27.20 [691 mm] EVAPORATOR 14.88 [378 mm] EVAP COND 107.66 [2734 mm] 10.20 [260 mm] 12.72 [323 mm] 5.29 [134 mm] Standard 3 Pass 14.50 [368 mm] 12.49 [317 mm]...
- Page 40 Installation Mechanical Figure 17. Condenser and Evaporator Water Connections – CFF/DFF/EFF 76.23 [1936 mm] 10.67 [271 mm] 10.67 [271 mm] 73.52 [1867 mm] 27.22 [692 mm] EVAPORATOR COND EVAP 12.73 [323 mm] 3.59 [91 mm] 10.91 [277 mm] 27.91 [709 mm] 125.91 [3198 mm] 12.49 [317 mm] 16.20 [411 mm]...
- Page 41 Installation Mechanical Figure 18. Condenser and Evaporator Water Connections - CGG/DGG/EGG 80.02 [2033 mm] 12.20 [310 mm] 77.29 [1963 mm] 29.09 [739 mm] EVAPORATOR 22.50 [571 mm] 33.89 [861 mm] EVAP COND 1.18 [30 mm] 11.39 [289 mm] 9.35 [238 mm] 14.61 [371mm] 125.91 [3198 mm] 18.63 [473 mm]...
- Page 42 Installation Mechanical Figure 19. Condenser and Evaporator Water Connections - BCH RTHD-SVX02H-EN...
- Page 43 Installation Mechanical Figure 20. Condenser and Evaporator Water Connections - CEJ RTHD-SVX02H-EN...
- Page 44 Installation Mechanical Figure 21. Condenser and Evaporator Water Connections - CFJ/DFJ RTHD-SVX02H-EN...
- Page 45 Installation Mechanical Figure 22. Condenser and Evaporator Water Connections - DGK/EGK RTHD-SVX02H-EN...
-
Page 46: Connections - Bcl
Installation Mechanical Figure 23. Condenser and Evaporator Water Connections - BCL RTHD-SVX02H-EN... -
Page 47: Figure 24. Condenser And Evaporator Water Connections - Cem
Installation Mechanical Figure 24. Condenser and Evaporator Water Connections - CEM RTHD-SVX02H-EN... -
Page 48: Figure 25. Condenser And Evaporator Water Connections - Cfm/Dfm
Installation Mechanical Figure 25. Condenser and Evaporator Water Connections - CFM/DFM RTHD-SVX02H-EN... -
Page 49: Figure 26. Condenser And Evaporator Water Connections - Dgn/Egn
Installation Mechanical Figure 26. Condenser and Evaporator Water Connections - DGN/EGN RTHD-SVX02H-EN... -
Page 50: Table 13. Evaporator And Condenser Data
Installation Mechanical Table 13. Evaporator and Condenser Data Nom. Conn. Nominal Connector Size Compress size (NPS)* (NPS)* or Frame Evap Shell Evap. Cond Shell Standard Heat Code (Digit Code (Dig- Shell Code Cond. Shell Condenser Reclaim 6,7 of Model its 14, 15 of Diameter (Digits 21,22 of Diameter... -
Page 51: Water Pressure Drop Data
Installation Mechanical Water Pressure Drop Data Evaporator Pressure Drop Evaporator Pressure Drop G Frame - 3 Pass F Frame - 3 Pass 1000 1500 2000 2500 3000 1000 1500 2000 Flow (GPM) Flow (GPM) Evaporator Pressure Drop Evaporator Pressure Drop G Frame - 4 Pass E Frame - 2 Pass 1000... - Page 52 Installation Mechanical Evaporator Pressure Drop Evaporator Pressure Drop D Frame - 2 Pass C Frame - 3 Pass D4 & D5 1000 1500 2000 2500 1000 Flow (GPM) Flow (GPM) Evaporator Pressure Drop Evaporator Pressure Drop D Frame - 3 Pass B Frame - 3 Pass D4 &...
- Page 53 Installation Mechanical Condenser Pressure Drop Condenser Pressure Drop G Frame - 2 Pass D Frame - 2 Pass 1000 1500 2000 2500 3000 1000 Flow (GPM) Flow (GPM) Condenser Pressure Drop Condenser Pressure Drop F Frame - 2 Pass B Frame - 2 Pass F1 &...
- Page 54 Installation Mechanical Condenser Pressure Drop Condenser Pressure Drop E Frame - 4 Pass J Frame - 2 Pass R² = 1 1000 1500 2000 1000 1200 Flow (GPM) Flow (GPM) Condenser Pressure Drop Condenser Pressure Drop K Frame - 2 Pass M Frame - 2 Pass 1000 1500...
-
Page 55: Making Grooved Pipe Connections
Installation Mechanical • Thermometers Condenser Pressure Drop • Cleanout tees L Frame - 2 Pass • Pipe strainer Leaving Chilled Water Piping Heat Reclaim L1 Condenser L1 • Air vents (to bleed air from system) Heat Reclaim L1 • Water pressure gauges with shutoff valves •... -
Page 56: Condenser Water Regulating Valve
Installation Mechanical • Thermometers 10.0 in .1 volt increments (or finer), Default 10 Vdc) • Cleanout tees • Actuator Stroke Time (Min to Max Range Time) (Adj: 1 to 1000 seconds, in 1 second increments, Default • Balancing valve 30s) •... -
Page 57: Full Heat Recovery Condenser Water Tem- Perature Requirements And Control
1. Operation control of the pump: the operation of the what water treatment, if any, is required. The Trane pump must correspond with the pump start-stop Company assumes no responsibility for equipment fail- signal of the UC800 controller of the unit. -
Page 58: Water Pressure Relief Valves
Relief Relief Valve Valve ® Refer to Trane Engineering Bulletin - Series R Chillers Sound Ratings and Installation Guide for sound-sensitive applications. Water Pressure Relief Valves Flow switches must stop or prevent compressor oper- ation if either system water flow drops off below the required minimum shown on the pressure drop curves. -
Page 59: Refrigerant Pressure Relief Valve Venting
Installation Mechanical Refrigerant Pressure Relief Valve Venting All relief valve venting is the responsibility of the install- ing contractor. All RTHD units use evaporator, compressor, and con- D WARNING denser pressure relief valves (Figure 28) that must be Hazardous Gases! vented to the outside of the building. -
Page 60: Table 14. Pressure Relief Valve Data
Installation Mechanical Table 14. Pressure Relief Valve Data Valve Location Discharge Number Rated Capacity Field Connection Factory Setpoint of Valves per Relief Valve Pipe Size (in NPT) Shell Side (psi) (lba/min.) Connection(in) Evap - B1 48.0 1-5/16-12 Evap - B2 48.0 1-5/16-12 Evap - C1... -
Page 61: Thermal Insulation
75% Relative humidity Operation outside of normal design conditions as de- fined above may require additional insulation; contact Trane for further review. Note: Liquid line filter, refrigerant charging valves, wa- ter temperature sensors, drain and vent connec- tions when insulated must remain accessible for service. -
Page 62: Waterbox Removal And Installation
Proper lifting technique will vary based on information for Trane RTHD water cooled chillers mechanical room layout. built in Taicang China only. For Trane chillers built • It is the responsibility of the person(s) performing outside China, refer to literature provided by the the work to be properly trained in the safe practice of applicable manufacturing location. -
Page 63: Reassembly
Waterbox Removal and Installation Reassembly Figure 30. Water Box Rigging and Lifting – Vertical Lift Only Once service is complete the waterbox should be reinstalled on the shell following all previous procedures in reverse. Use new o-rings or gaskets on all joints after thoroughly cleaning each joint. -
Page 64: Questions
If bases of hoist is not properly seated against waterbox side loading on the bolt may occur which could lead to bolt failure. Questions Contact the Product Technical Service department in Taicang, China with questions regarding this Service Bul- letin. They can be reached at baojjw@trane.com. RTHD-SVX02H-EN... -
Page 65: Installation Electrical
Trane Engineering Bulletin EB-MSCR-40. energized. Verify with an appropriate voltmeter that all capacitors have discharged. Failure to disconnect Refer to Trane Engineering Bulletin CTV-EB-93 for power power and discharge capacitors before servicing could wire sizing. result in death or serious injury. - Page 66 Installation Electrical Figure 32. Electrical Installation 7”x10” (178x254mm) Opening for incoming line voltage (8) 1/2” Conduit knockouts for use with 30 volt wiring CLASS II LINE VOLTAGE 30 VAC MAX LOW VOLTAGE AREA LINE VOLTAGE (6) 1/2” Conduit and TD 7 SECTION AND STARTER (4) 1-1/4”...
- Page 67 Installation Electrical Figure 33. Handle on Door D WARNING Hazardous Voltage! Disconnect all electric power, including remote dis- connects and discharge all motor start/run capacitors before servicing. Follow proper lockout/tagout pro- cedures to ensure the power cannot be inadvertently energized. Verify with an appropriate voltmeter that all capacitors have discharged.
- Page 68 Installation Electrical As the chiller is evacuated below atmospheric pressure, D WARNING the dielectric strength (resistance to arcing) of the gas- Electrical Shock! eous atmosphere is significantly reduced. Because the Contacting any of the motor terminals, even with the SCRs are connected “inside the delta, ” three of the motor motor off can cause a severe, potentially fatal, shock.
-
Page 69: Routing
Installation Electrical Figure 35. Solid State Starter Panel Power Wire Routing RTHD-SVX02H-EN... -
Page 70: Module Connections For Interconnecting Wir- Ing
Installation Electrical Module Connections for Intercon- Chilled Water Flow Interlock necting Wiring UC800 has an input that will accept a contact closure from a proof-of-flow device such as a flow switch. The flow switch is to be wired in series with the chilled water All connectors can be unplugged or the wires can be pump starter’s auxiliary contacts. -
Page 71: Heat Recovery Pump Control
Installation Electrical Flow Overdue” shall be generated which terminates the type of reset to be selected. prestart mode and de-energizes the condenser water • RESET RATIO Setpoints. pump relay This diagnostic is automatically reset if flow For outdoor air temp. reset, both positive and nega- is established at any later time. -
Page 72: Emergency Stop
Installation Electrical Programmable Relays (Alarm and Status) - function, and they are provided (generally with a Quad Relay Output LLID) as part of the Alarm Relay Output Optional Option. UC800 provides a flexible alarm or chiller status indica- The events/states that can be assigned to the program- tion to a remote location through a hard wired interface mable relays are listed in the following table. -
Page 73: Soft Loading
UC800 provides an optional interface between the chiller • Current Limit Control Softload Time: This Setting con- and a Trane Summit BAS. A Communications interface trols the time constant of the Filtered Current Limit LLID shall be used to provide “gateway” functionality Setpoint. -
Page 74: Operating Principles Mechanical
The refrigeration cycle of the Series R chiller is concep- metered amount of refrigerant liquid enters a distribu- tually similar to that of other Trane chiller products. It tion system in the evaporator shell and is then distribut- makes use of a shell-and-tube evaporator design with re- ed to the tubes in the evaporator tube bundle. - Page 75 Operating Principles Mechanical the lubricant and refrigerant are effectively divided using The RTHD chiller maximizes the evaporator heat transfer an oil separator. The oil-free refrigerant vapor enters the performance while minimizing refrigerant charge re- condenser at State Pt. 2. The lubrication and oil manage- quirements.
-
Page 76: Compressor Description
Operating Principles Mechanical Compressor Description Figure 38. Compressor Description Male Rotor Female Rotor Bearings Suction Unload Solenoid Load Motor Solenoid Housing Rotor Housing Piston Bearing Discharge Housing Housing Check Valve Motor Stator Slide Valve Discharge Unloader Plenum Piston Oil Reclaim Port Discharge Check Valve... -
Page 77: Compressor Motor
Operating Principles Mechanical The compressor used by the Series R chiller consists The solenoid valves (both normally closed) receive of three distinct sections: the motor, the rotors and the “load” and “unload” signals from the UC800, based on bearing housing. Refer to Figure system cooling requirements. -
Page 78: Oil Flow Protection
Operating Principles Mechanical Figure 39. Oil Flow Diagram RTHD Oil System restrictor Compressor Discharge Oil Return Filter Master Oil Line Temperature Oil Pressure Solenoid Sensor Condenser Transducer Pressure Transducer Compressor Manual Service To Bearings Valve Injection to Rotors Oil Filter Oil Separators Optional Oil Cooler... -
Page 79: Oil Filter
Operating Principles Mechanical Oil Cooler ate diagnostics and would enforce a compressor “cool down” period. The oil cooler is a brazed plate heat exchanger located To ensure proper lubrication and minimize refrigerant near the oil filter. It is designed to transfer approximate- condensation in the oil sump, heaters are mounted on ly one ton of heat from the oil to the suction side of the the bottom of the oil sump. -
Page 80: Operator Interface Controls
Operator Interface Controls UC800 Overview Wiring and Port Descriptions Figure 40 illustrates the UC800 controller ports, LEDs, Power Supply rotary switches, and wiring terminals.The numbered list following Figure 40 corresponds to the numbered call- The UC800 (1A22) receives 24 Vac (210 mA) power from outs in the illustration. -
Page 81: Communication Interfaces
Operator Interface Controls Communication Interfaces Table 22. LED Behavior UC800 Status There are four connections on the UC800 that support Powered. If the Marquee LED is green solid, the UC800 is pow- the communication interfaces listed. Refer to Figure ered and no problems exist. for the locations of each of these ports. -
Page 82: Main Display Area/Home Screen
Operator Interface Controls Figure 42. TD7 Main Display Area/Home Screen Viewing Chiller Operating Modes All screens appear within the main display area (shown On the Reports screen, touch Chiller Operating Modes to as location in Figure 43). view the current operating status of the chiller in terms of the top-level operating mode and submodes. - Page 83 Operator Interface Controls Table 24. Operating Modes Chiller Modes Description MP Resetting Stopped The chiller is not running and cannot run without intervention. Further information is provided by the sub-mode: Local Stop Chiller is stopped by TD7 Stop button command– cannot be remotely overridden. immediate Stop Chiller is stopped by the TD7 Panic Stop (by pressing Stop button twice in succession) –...
- Page 84 Operator Interface Controls Table 24. Operating Modes Chiller Modes Description Heat Recovery Water Pump PreRun Time In this mode, the chiller will wait for a period of time (the user can adjust) to meet the tem- 2 min:sec perature requirements of the heat recovery water circuit. Heat Recovery Active The heat recovery is running.
-
Page 85: Alarms
Operator Interface Controls Alarms • Custom Report3 • Evaporator You can use the display to view alarms and to reset • Condenser them. Alarms are communicated to the display immedi- ately upon detection. • Compressor • Motor Viewing the Alarms Screen •... - Page 86 Operator Interface Controls Save. Figure 49. Report Condenser Screen Figure 47. Edit Custom Report screen Table 26. Report Condenser Screen Items Figure 48. Report Evaporator Screen Description Resolution Units Condenser Entering Water Tem- °F / °C perature Condenser Leaving Water Tem- °F / °C perature Condenser Water Flow Status...
-
Page 87: Equipment Settings
Operator Interface Controls Equipment Settings Figure 50. Report Compressor Screen You can use the TD7 display to monitor and change a variety of equipment settings. Viewing the Settings Screen Touch the Settings button in the main menu area (see Figure 43) to view the Settings screen. -
Page 88: (Chiller Settings Shown)
Operator Interface Controls Figure 53. Example equipment settings screen (Chiller Figure 55. Changed Chilled Water Setpoint Screen Settings shown) Figure 56. Heat Reclaim Setpoint Screen To change an equipment setting, follow this procedure: 1. Touch one of the button in the Equipment Settings column on the Settings screen, such as Chiller Set- tings. -
Page 89: Display Settings
Operator Interface Controls Display Settings Table 29. Settings Screen Items Description Resolution Units You can use the Tracer AdaptiView display to change the Chiller Settings format of the information that appears on the display, Active Chilled Water Setpoint ± XXX.X °F / °C and to clean the touch screen. - Page 90 Operator Interface Controls Figure 58. Data Format Page units) • PSIG Number Format • 1000000.0 • 1000000,0 Figure 59. Language Page To change the format: 1. Touch the button that shows that format you prefer. 2. Touch Save to confirm your selection and to return to the Display Preferences screen.
-
Page 91: Cleaning The Display
Operator Interface Controls Disabling/Enabling Security • Year • Hour The Tracer AdaptiView display gives you the ability to • Minute disable or enable the security feature that allows a user • AM/PM to log in and log out. To change the date or time: To disable security, you must be logged in: 1. -
Page 92: Logging In
Operator Interface Controls Logging In Logging Out There are two levels of security: To log out: • Security Level 1 allows users to change a limited 1. Touch the Log out button. A confirmation screen ap- group of secure settings. The default security PIN is pears (Figure 65). -
Page 93: Tracertu
TracerTU TracerTU (non-Trane personnel, contact your localTrane connected to theTracer AdaptiView control panel with office for software) adds a level of sophistication that a USB cable.Your laptop must meet the following hard- improves service technician effectiveness and minimizes ware and software requirements: chiller downtime.TheTracer AdaptiView control’s opera-... -
Page 94: Unit Start-Up
Unit Start-up Power Up el will always transition through the ‘Stopped’ Software state independent of the last mode. If the last mode be- fore power down was ‘Auto’, the transition from ‘Stopped’ The Power up chart shows the respective TD7 screens to ‘Starting’... -
Page 95: Power Up To Starting
Unit Start-up Power Up to Starting 2. Evaporator and Condenser Water flowing 3. Power up Start Delay setpoint set to 0 minutes The Power up to starting diagram shows the timing from 4. Adjustable Stop to Start Timer set to 5 seconds a power up event to energizing the compressor. -
Page 96: Limit Conditions
Unit Start-up Limit Conditions Seasonal Unit Start-Up Procedure UC800 will automatically limit certain operating parame- 1. Close all valves and re-install the drain plugs in the ters during startup and run modes to maintain optimum evaporator and condenser heads. chiller performance and prevent nuisance diagnostic 2. - Page 97 Unit Start-up Series R Start-up Test Log Job Name Job Location Model # Serial # start date: Sales Order # ship date: Job elevation (ft. above sea level) STARTER DATA: START-UP ONLY Manufacturer Chiller appearance at arrival: Type: Compressor shipping bolts removed? Y N Vendor ID #/Model #: Oil separator shipping bolts removed? Y N Volts...
- Page 98 Unit Start-up Installation Checklist for Model RTHD Series R Trane Service Company S.O. No.: Serial No: Job/Project Name: RECEIVING Verify that the unit nameplate data corresponds to the ordering information. Inspect the unit for shipping damage and any shortages of materials. Report any damage or shortage to the carrier.
- Page 99 Unit Start-up Installation Checklist for Model RTHD Series R PRE-START CHECK-OUT Inspect all other wiring connection. Connections should be clean and tight. Energize crankcase heaters. Heaters need to be energized 24 hours before start-up. Confirm that all service and isolation valves are open. Refer to RTHD-SVX02A-EN for RTHD units, RTHC-SB-1B for RTHC units and RTHB-IOM-1 for the RTHB units.
-
Page 100: Unit Shutdown
Unit Shutdown Normal Shutdown to Stopped The Normal Shutdown diagram shows the Transition from Running through a Normal (friendly) Shutdown. The Dashed lines on the top attempt to show the final mode if you enter the stop via various inputs. Figure 71. -
Page 101: Periodic Maintenance
Periodic Maintenance Overview Table 31. Operating Conditions at Full Load Description Condition This section describes preventative maintenance proce- Evaporator pressure 40-55 psig Condensing pressure 85-120 psig dures and intervals for the Series R unit. Use a periodic Discharge superheat 17°F maintenance program to ensure optimal performance Subcooling 5-10°F... -
Page 102: Scheduling Other Maintenance
Periodic Maintenance damage. Clean out any inline strainers. • Clean and repaint any areas that show signs of corro- sion. • Test vent piping of all relief valves for presence of refrigerant to detect improperly sealed relief valves. Replace any leaking relief valve. •... - Page 103 Periodic Maintenance Chiller Log Run Time Main Tab 15 min 30 min 1 hr Chiller Mode Evap Ent/Lvg Water Temp Cond Ent/Lvg Water Temp Active Chilled Water Setpoint (F) Average Line Current (%RLA) Active Current Limit Setpoint (%RLA) Software Type Software Version Reports Tab Evaporator...
- Page 104 Periodic Maintenance Settings Settings Tab Chiller Front Panel Chilled Water Setpt (F) Front Panel Current Limit Setpt (RLA) Differential to Start (F) Differential to Stop (F) Setpoint Source Feature Settings Chilled Water Reset Return Reset Ratio Return Start Reset Return Maximum Reset Outdoor Reset Ratio Outdoor Start Reset Outdoor Maximum Reset...
-
Page 105: Maintenance Procedures
If the annual condenser tube inspection indicates that Trane Polyolester Oil is the approved oil for the RTHD the tubes are fouled, 2 cleaning methods can be used to units. Polyolester oil is extremely hygroscopic meaning rid the tubes of contaminants.The methods are: it readily attracts moisture. -
Page 106: Removing Compressor Oil
Maintenance Procedures D CAUTION Oil Loss! Never operate the compressor with the sightglass ser- vice valves opened. Severe oil loss will occur. Close the valves after checking the oil level. The sump is above the condenser and it is possible to drain the oil. Figure 72. -
Page 107: Replacing The Main Oil Filter (Hot Filter)
Maintenance Procedures when charging a system with oil. The diagnostic “Loss of Normal pressure drops between the service valves of the oil at the compressor stopped” will be generated if the lubrication circuit are shown by the lower curve. The up- oil lines are not full on start-up. -
Page 108: Refrigerant Charge
Maintenance Procedures Freeze Protection evaporator to the oil sump to avoid losses in the main oil lines. Figure 73. Oil Filter Replacement Chart (E,D, C and B For unit operation in a low temperature environment, Frame Compressors) adequate protection measures must be taken against freezing. - Page 109 Maintenance Procedures RTHD-SVX02H-EN...
- Page 110 Maintenance Procedures RTHD-SVX02H-EN...
-
Page 111: Diagnostics
Diagnostics The following diagnostic Table contains all the diagnos- Persistence: Defines whether or not the diagnostic and tics possible. Not all data is available unless Trace TU is its effects are to be manually reset (Latched), or can be installed. either manually or automatically reset (Nonlatched). - Page 112 Diagnostics Table 35. Diagnostics Table Diagnostic Name Severity Persistence Criteria Reset Code and Source Level Comm Loss: Info Latch Continual loss of communication between the MP and the Func- Remote Condenser Leaving tional ID has occurred for a 30 second period. Water Temperature Comm Loss: Normal...
- Page 113 Diagnostics Table 35. Diagnostics Table Diagnostic Name Severity Persistence Criteria Reset Code and Source Level Comm Loss: Oil Re- Normal Latch Continual loss of communication between the MP and the Func- Remote turn Gas Pump Drain tional ID has occurred for a 30 second period. Comm Loss: Oil Re- Normal Latch...
- Page 114 Diagnostics Table 35. Diagnostics Table Diagnostic Name Severity Persistence Criteria Reset Code and Source Level Evaporator Normal Latch Bad Sensor or LLID Remote Leaving Water Temperature Sensor Evaporator Liquid Normal Latch Bad Sensor or LLID Remote Level Sensor Evaporator Refriger- Normal Latch Bad Sensor or LLID...
- Page 115 Diagnostics Table 35. Diagnostics Table Diagnostic Name Severity Persistence Criteria Reset Code and Source Level Loss of Oil at Com- Immediate Latch Oil Loss Level Sensor detects a lack of oil in the oil tank feeding Local pressor (Stopped) and Special the compressor for 90 seconds after EXV preposition is complet- Action ed.
- Page 116 Diagnostics Table 35. Diagnostics Table Diagnostic Name Severity Persistence Criteria Reset Code and Source Level MP Application Mem- Immediate Latch App software inside the MP failed its own checksum test. Possible Remote ory CRC Error causes: application software in the MP is not complete - software download to the MP was not completed successfully - or MP hard- ware problem.
- Page 117 Diagnostics Table 35. Diagnostics Table Diagnostic Name Severity Persistence Criteria Reset Code and Source Level Power Loss Immediate NonLatch The compressor had previously established currents while running Remote and then all three phases of current were lost. Design: Less than 10% RLA, trip in 2.64 seconds.
- Page 118 Diagnostics Table 35. Diagnostics Table Diagnostic Name Severity Persistence Criteria Reset Code and Source Level Transition Complete Immediate Latch The Transition Complete input is open with the compressor motor Local Input Opened running after a successful completion of transition. This is active only for all electromechanical starters Transition Complete Immediate...
-
Page 119: Wiring Schematics
Wiring Schematics Typical field connection diagrams, electrical schematics and connections diagramsfor the RTHD are shown in this section. Note: The drawings in this section are provided for reference only. Thesediagrams may not reflect the actual wiring of your unit. For specific electrical- connection and schematic information, always refer to the wiring diagramsthat were shipped with the unit. - Page 120 RTHD-SVX02H-EN...
- Page 121 23094870 23094870 FIELD WIRING FIELD WIRING 3-12-03 3-12-03 RTHD RTHD RTHD-SVX02H-EN...
- Page 122 RTHD-SVX02H-EN...
- Page 123 RTHD-SVX02H-EN...
- Page 124 RTHD-SVX02H-EN...
- Page 125 RTHD-SVX02H-EN...
- Page 126 RTHD-SVX02H-EN...
- Page 127 RTHD-SVX02H-EN...
- Page 128 RTHD-SVX02H-EN...
- Page 129 RTHD-SVX02H-EN...
- Page 130 RTHD-SVX02H-EN...
- Page 131 RTHD-SVX02H-EN...
- Page 132 RTHD-SVX02H-EN...
- Page 133 RTHD-SVX02H-EN...
- Page 134 RTHD-SVX02H-EN...
- Page 135 RTHD-SVX02H-EN...
- Page 136 RTHD-SVX02H-EN...
- Page 137 RTHD-SVX02H-EN...
- Page 138 RTHD-SVX02H-EN...
- Page 139 RTHD-SVX02H-EN...
- Page 140 RTHD-SVX02H-EN...
- Page 141 RTHD-SVX02H-EN...
- Page 142 RTHD-SVX02H-EN...
- Page 143 SHEET DIMENSIONS ARE IN INCHES. TOLERANCE: THIS DRAWING IS PROPRIETARY AND SHALL NOT BE COPIED OR ITS CONTENTS DISCLOSED TO OUTSIDE PARTIES WITHOUT THE WRITTEN = COMPONENT LOCATION CONSENT OF TRANE = FINISH RTHD 03-MAR-2003 DRAWN BY: TRANE DATE: = ...
- Page 144 热回收机型 Heat Recovery Model HEAT RECOVERY OIL TANK CONDENSER EVAPORATOR RTHD-SVX02H-EN...
- Page 145 CONTROL PNAEL SEE DETAIL "A" RTHD-SVX02H-EN...
- Page 146 标准机型 RTHD-SVX02H-EN...
- Page 147 A DIVISION OF AMERICAN STANDARD INC. ALL RIGHTS RESERVED RTHD-SVX02H-EN...
- Page 148 热回收机型 Heat Recovery Model DETAIL "A" HEAT RECOVERY OIL TANK CONDENSER EVAPORATOR RTHD-SVX02H-EN...
- Page 149 CONTROL PNAEL SEE DETAIL "A" RTHD-SVX02H-EN...
- Page 150 HVAC systems, comprehensive building services, and parts. For more information, visit www.Trane.com. Trane has a policy of continuous product and product data improvement and reserves the right to change design and specifications without notice. © 2018 Trane All rights reserved RTHD-SVX02H-EN Feb.
Need help?
Do you have a question about the RTHD series and is the answer not in the manual?
Questions and answers