Advertisement
Available languages
Available languages
Quick Links
Before you begin - Read these instructions completely and carefully.
IMPORTANT – OBSERVE ALL GOVERNING CODES AND ORDINANCES.
Note to Installer – Be sure to leave these instructions with the Consumer.
Note to Consumer – Keep these instructions with your Owner's Manual for future reference.
RAVTRANS1CO will fit an existing First Company VTAC plenum with a 21 3/8" wide by 43 3/4 inch tall plenum
STOP!
Critical Closet Dimensions apply. Please review these required clearances & read the entire manual before
proceeding, to ensure that this kit will work for your application!
A. Closet: Top View
4" MIN
EXISTING SLEEVE
Tools Needed:
•
Phillips Screwdriver
•
5/16" Nut Driver
4" MIN
31" MIN FROM
SLEEVE EDGES
(V12 Series...with
Make up Air)
27" MIN FROM
SLEEVE EDGES
(V10/V11 non
MUA install)
27" MIN
* Warning - some 1st company access panels may not meet minimum opening requirements listed here, and may require reframing.
A duct adapter may also need to be constructed to adapt the round ducting to the existing rectangular ducting.
Installation Instructions
for your new
RAVTRANS1CO
Transition Plenum
For replacing an existing First Company VTAC that
has a 21 3/8" wide by 43 3/4" tall plenum with a new
Ultimate V10, V11, or V12 VTAC.
B. V10 or V11Series Unit: Top View
C. V12 Series Unit: Top View
* Refer to Notes
for side install
openings
•
Reciprocating Saw (front install only)
•
Circular Saw or Table Saw
NOTE: For
side installation
a service
opening of 27" is
recommended.
NOTE: For
side installation
a service
opening of 31" is
recommended.
49-5000845 Rev. 0 10-23
Advertisement

Related Manuals for GE RAVTRANS1CO


Summary of Contents for GE RAVTRANS1CO
- Page 1 Note to Installer – Be sure to leave these instructions with the Consumer. Note to Consumer – Keep these instructions with your Owner’s Manual for future reference. RAVTRANS1CO will fit an existing First Company VTAC plenum with a 21 3/8” wide by 43 3/4 inch tall plenum STOP! Critical Closet Dimensions apply.
-
Page 2: Installation Instructions
Installation Instructions Self-driller screws Parts Included: (8#12.5 - 6 total) • Transition Plenum Screws (10#-16*12.5MM 24 total) • 6 self-driller screws (8#12.5mm) • 24 screws (10#16*12.5mm) • PVC elbow and tube for drain • Diverter baffle plates (3) • Diverter baffle support legs (4) •... - Page 3 Installation Instructions STEP 1: Prepare Installation area by removing the existing First Company VTAC unit. WARNING service panel and lock the area to prevent power from being switched on accidentally. STEP 2 : • • Sealant Screws STEP 3 : If your First Company Plenum has the lower triangular gussets, cut out the triangular gussets: Cut edge of sleeve gusset...
- Page 4 Installation Instructions STEP 4: 9” Deep Plenum 13” Deep Plenum for 21” or deeper plenums Note: STEP 5: Measure the depth of the rear (Panels A and B only, when installed individually) Screw plenum measurement 49-5000845 Rev. 0 10-23...
- Page 5 Installation Instructions STEP 6: Extra support leg for deeper STEP 7: plate selected): Screws, 2 on each side Screw - one on each side outdoor grille. Ensure A or B the inner edge attaches correctly to the plenum adapter (see next step).
- Page 6 Installation Instructions STEP 8: plenum: Note the existing plenum gasket. Secure the front of Note - if installing a make- up air equipped VTAC, provided sheet metal the upper square block screws by removing the 2 screws securing it. STEP 9: Secure the plenum adapter: •...
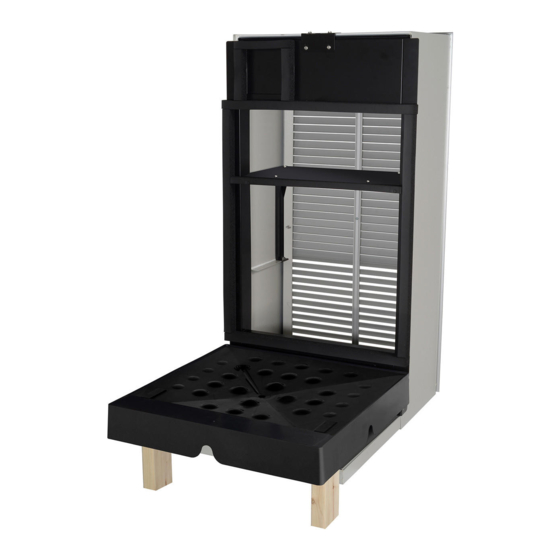
- Page 7 Installation Instructions STEP 10: Measure and cut 2x4 legs for RAVDPLAT installation. The legs must be cut to install a level installation of the platform. • measure from the bottom of the platform and add 3 inches for the length of the legs •...
- Page 8 Installation Instructions STEP 12: Install RAVDPLAT, ensure levelness. At this point, it is recommended to test the drainage by pouring a cup of water onto the drain platform to ensure it functions properly without any leaks. STEP 13: Install your new Ultimate V10, V11, or V12 VTAC per the instructions included with the unit. Printed in the United States 49-5000845 Rev.
- Page 9 Note à l’installateur – Assurez-vous de laisser ces instructions au consommateur. Note au consommateur - Conservez ces instructions avec votre manuel d’utilisation pour consultation ultérieure. Le RAVTRANS1CO s’adaptera à un plénum CTM d’origine existant avec un plénum de 21 3/8 po de large par 43 3/4 po de hauteur ARRÊTEZ!
-
Page 10: Instructions D'installation
Instructions d’installation Vis autoperceuses (no Pièces incluses : 8*12,5 mm, 6 total) • Plénum de transition • 6 vis autoperceuses (no 8 12,5 mm) 24 au total) • 24 vis (no 10-16* 12,5 mm) • Coude en PVC et tuyau pour drain •... - Page 11 Instructions d’installation ÉTAPE 1 : Préparez la zone d’installation en retirant l’unité CTM d’origine existante. WARNING Risque de choc électrique pouvant causer une blessure ou la mort. Avant de procéder à une réparation ou un courant. ÉTAPE 2 : • •...
- Page 12 Instructions d’installation ÉTAPE 4 : po pour plénum de 9 pour plénum de 13 po po de profond de profond profondeur de 21 po ou plus Remarque : ÉTAPE 5 : d’une seule pièce. Mesurez la profondeur de la bride (Panneaux A et B uniquement, déterminer la profondeur souhaitée du lorsqu’ils sont installés...
- Page 13 Instructions d’installation ÉTAPE 6 : Pied de support supplémentaire pour installations plus profondes uniquement ÉTAPE 7 : Vis - Une de chaque côté Assurez-vous que l’arrière A or B Assurez-vous que le bord à l’adaptateur de plénum (voir l’étape suivante). Le non- respect de cette consigne peut entraîner une recirculation de l’air chaud sur le condenseur...
- Page 14 Instructions d’installation ÉTAPE 8 : Remarque - L’adaptateur doit s’insérer à Fixez l’avant de la plaque Remarque - Si vous installez un CTM équipé d’un air vis à tôle fournies d’appoint, enlevez le bloc carré supérieur près de la plaque en ÉTAPE 9 : Fixez l’adaptateur de plénum : •...
- Page 15 Instructions d’installation ÉTAPE 10 : de niveau. • longueur des pieds. • Les pieds doivent être coupés pour installer une plateforme de niveau. • nécessaire des pieds. ÉTAPE 11 : Une vidange secondaire est disponible dans la plateforme, et peut être laissée ouverte ou plombée vers l’extérieur. Le tuyau de vidange primaire doit être orienté...
- Page 16 Instructions d’installation ÉTAPE 12 : À ce stade, il est recommandé de tester la vidange en versant une tasse d’eau sur la plateforme de vidange pour s’assurer qu’elle fonctionne correctement sans fuites. ÉTAPE 13 : 49-5000845 Rev. 0 10-23...
- Page 17 Nota para el Consumidor – Guarde estas instrucciones con su Manual del Propietario para referencia futura. El RAVTRANS1CO calzará en un plénum de un VTAC de la compañía anterior usando un plénum de 21 3/8” de ancho por 43 3/4 de alto.
-
Page 18: Instrucciones De Instalación
Instrucciones de Instalación Tornillos, Autoperforantes Piezas Incluidas : (nº8 *12.5MM 6 en total) Tornillos (nº10-16*12.5MM • Plénum de Transición 24 en total) • 6 tornillos autoperforantes (nº8 12.5mm) • 24 tornillos (nº10-16*12.5mm) • Codo y tubería de drenaje de PVC •... - Page 19 Instrucciones de Instalación PASO 1 : Prepare el área de instalación retirando la unidad VTCA existente de la compañía anterior. WARNING Existe riesgo de descargas eléctricas que pueden ocasionar lesiones o la muerte. Antes de comenzar con la accidental. PASO 2 : •...
- Page 20 Instrucciones de Instalación PASO 4 : siguientes profundidades: para un Plénum de para un Plénum de 9” de Profundidad 13” de Profundidad o plénums más profundos Nota: PASO 5 : Mida la profundidad de la brida trasera hasta la junta del plénum para (Paneles A y B únicamente, cuando se determinar la profundidad deseada instalen de forma individual)
- Page 21 Instrucciones de Instalación PASO 6 : Pata de soporte adicional para piezas únicamente PASO 7 : Tornillos, 2 a cada lado Tornillo – uno a cada lado Asegúrese de que la parte esté nivelada con la rejilla A or B exterior.
- Page 22 Instrucciones de Instalación PASO 8 : Instale el adaptador del plénum. Comience desde la parte inferior e inserte el adaptador hasta que quede nivelado con el plénum presente de la compañía anterior: Note - el adaptador se deberá poder calzar dentro de la junta del plénum existente.
- Page 23 Instrucciones de Instalación PASO 10 : Mida y corte patas de 2x4 para la instalación del RAVDPLAT. Las patas se deberán cortar para realizar una instalación nivelada de la plataforma. • Con el RAVDPLAT en su posición y nivelado, mida desde la parte inferior de la plataforma y agregue 3 pulgadas sobre la longitud de las patas.
- Page 24 Instrucciones de Instalación PASO 12 : Instale el RAVDPLAT, controle su nivelación. En este punto, se recomienda controlar el drenaje vertiendo una taza de agua en la plataforma de forma correcta y sin pérdidas. PASO 13 : Instale su Ultimate V10, V11, o V12 VTAC nuevo de acuerdo con las instrucciones incluidas con la unidad. Impreso en Estados Unidos 49-5000845 Rev.
Need help?
Do you have a question about the RAVTRANS1CO and is the answer not in the manual?
Questions and answers