Advertisement
User Manual
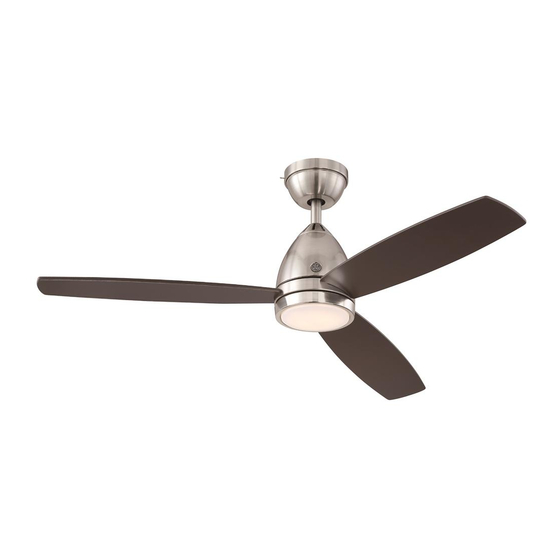
1.32 m (52 in.)
Savanna III LED Ceiling Fan
MODEL: 21243
ITM./ART.1162881
120V 60Hz, MADE IN CHINA
Customer Assistance
1-866-885-4649
Contact a qualified electrician or call the Customer Care Service Team at 1-866-885-4649
Note: Installation videos for GE fans with SkyPlug technology
can be viewed and downloaded on www.gelightingandfans.com
Customer Service hours of operation are 9:00AM-5:00PM EST -Monday-Friday
Advertisement
Table of Contents

Subscribe to Our Youtube Channel
Related Manuals for GE Savanna III


Summary of Contents for GE Savanna III
- Page 1 Customer Assistance 1-866-885-4649 Contact a qualified electrician or call the Customer Care Service Team at 1-866-885-4649 Customer Service hours of operation are 9:00AM-5:00PM EST -Monday-Friday Note: Installation videos for GE fans with SkyPlug technology can be viewed and downloaded on www.gelightingandfans.com...
-
Page 2: Safety Rules
Safety Rules READ AND SAVE THESE INSTRUCTIONS WARNING: To reduce the risk of 1. To reduce the risk of electric shock, ensure electricity has fire, electric shock or personal been turned off at the circuit breaker or fuse box before injury, mount fan to outlet box beginning. -
Page 3: Safety Tips
SAFETY TIPS 1. Before working on a circuit , go to the main service Downrod panel and remove the fuse or turn off the breaker that controls that circuit . 2. Tape a sign to the panel warning others to leave the circuit alone while you work. - Page 4 Tools Needed (Not Supplied) Required Flathead Screwdriver Philips Screwdriver Safety Glasses (1# screwhead recommended) Step Ladder Wire Stripper Soft Cloth...
-
Page 5: Hardware Included
Hardware Included Carefully unpack and identify each part to make sure you have everything ready for installation. Lay out each part on a clean area such as a table or floor. Check to make sure you have the following: Hardware Bag Blade Balancing Kit... -
Page 6: Package Contents
Package Contents Carefully unpack and identify each part to make sure you have everything ready for installation. Lay out each part on a clean area such as a table or floor. Check to make sure you have the following: SkyReceptacle Light kit pan... - Page 7 Fan Installation Drawing Review important safety instructions before installation. Outlet Box (not provided) Wood Screw Ground Wire from Housing Neutral White Wire Black Wire Rubber Washer SkyReceptacle Outlet Box Screw Flat Washer SkyPlug Canopy Mounting Screw Push Lever Canopy Canopy Trim Ring Downrod Coupling Cover 3-Pin Connector-Male...
- Page 8 SkyReceptacle Typical Wire Configurations TYPICAL WIRE CONFIGURATIONS: Black(Live) White WIRING DIAGRAM #1: Typical Wiring Green Configuration for 1 Wall Switch Black(Live 1) WIRING DIAGRAM #2: White Typical Wiring Configuration Green for 2 Wall Switches Red(Live 2) Black(Live) Wire Nut White White WIRING DIAGRAM #3: Green...
- Page 9 SkyReceptacle Installation 0-1.5mm Gap 0-1.5mm 4mm rubber washer 1.5-3mm Gap 1.5-3mm 7mm rubber washer >3mm Gap 4mm rubber washer >3mm 7mm rubber washer Important: Install SkyReceptacle with rubber washers to avoid a gap or uneven surface, and to ensure proper placement of receptacle on the ceiling.
- Page 10 SkyReceptacle Installation 1/2"/12.7mm Terminal’s Bottom view Outlet Box on Sky Receptacle (not Supplied) Receptacle Insert wires into terminal, tighten screw to secure wires.
- Page 11 SkyReceptacle Installation Rubber Washer ( Install cover plate if supplied ) not provided on all models Using the rubber washer when installing receptacle ensures proper placement of the receptacle on the ceiling...
-
Page 12: Fan Installation
Fan Installation Slide down trim ring from canopy. Remove rubber inserts from canopy and discard. - Page 13 Fan Installation Receptacles Slots Bracket with Push Lever Receptacles Slots Initial "+" formation while lifting fan and inserting plug into receptacle Press up on the push lever while lifting the fan. For correct alignment , make sure the bracket with plug and push lever is placed between the receptacle bracket metal slots ( in a "+ "...
- Page 14 Fan Installation Once installed, tighten all 4 screws. Reinstall trim ring, being careful not to depress the push lever. Adjust fan housing so ball is properly seated in bracket .
- Page 15 Fan Installation Install fan blades. Install LED light kit. Install light kit pan. Install shade-turn to secure.
-
Page 16: Fan Operation
Fan Operation Reverse Switch Summer Winter... - Page 19 Remote Control Pairing Instructions REMOTE CONTROL PAIRING INSTRUCTIONS: Important Note : By default , every fan has been pre-programmed at the factory and should be fully functional once installation is completed. There is no need to perform the pairing process. Make sure all wiring connections have been properly made and are secure.
- Page 20 Blade Wobble Balancing Not OK < Y 3mm / ⅛in. Y 3mm / ⅛in. > Not OK...
-
Page 21: Product Maintenance
Maintenance * WARNING: Make sure the power is PRODUCT MAINTENANCE turned off at the electrical panel box * Suggestions to help you maintain your fan * before you attempt any repairs * Because of the fan’s natural movement , some connections *NOTE: To avoid personal injury or may become loose. -
Page 22: Troubleshooting
Troubleshooting CAUTION: Switch off power supply before carrying out any of these checks. 1. Fan will not start: -Check main and branch circuit fuses or breakers. -Check to make sure the wall switch is in the on position. -Check remote control operation. 2.Fan will not operate: - The SkyPlug on the fan canopy should be fully inserted into the receptacle.
Need help?
Do you have a question about the Savanna III and is the answer not in the manual?
Questions and answers