
Related Manuals for DARCHE 270 FREESTANDING LED AWNING


Summary of Contents for DARCHE 270 FREESTANDING LED AWNING
- Page 1 2 7 0 F R E E S T A N D I N G L E D A W N I N G I N S T R U C T I O N M A N U A L T050801740 D A R C H E .
- Page 2 BEFORE INSTALLATION AND USE PLEASE READ THE INSTRUCTIONS AND WARNINGS CAREFULLY Should you have any questions or require assistance, please contact your DARCHE® retailer or call our customer service line: 1300 367 695 Familiarise yourself with the product. We recommend that you unpack and set up your Awning at home before use.
- Page 3 This includes nuts and bolts attaching the Awning to the vehicle as well as those on all mechanical components of the Awning. DARCHE TAKES NO RESPONSIBILITY FOR THE FITMENT OF THE AWNING TO ANY VEHICLE OR ROOF RACK. Darche Outdoor Gear - The wholesaler / manufacturer shall not be liable for special, indirect incidental or consequential damages.
- Page 4 I N S T R U C T I O N M A N U A L HARDWARE IDENTIFICATION CHART Bracket Base Plate U Bolt Qty. 3 Qty. 6 Bracket Corner Plate M8 Nyloc Nut Qty. 6 Qty. 6 Bracket Face Plate M8 Washer Qty.
- Page 5 OF APPLICATION. (SOLD SEPERATLY) Darche’s Extended Bracket (325mm long) now available as a mounting option on platform style roof racks. (sold separately). Visit www.darche.com.au for specs and availability. D A R C H E . C O M . A U...
- Page 6 4x4 Accessories fitter to mount the Eclipse Awning to do not exceed 500mm. your vehicle. Fasteners and fixing connections should Darche takes no responsibility for the fitment of be checked regularly on both the awning and roof rack the Eclipse Awning to any vehicle or roof rack.
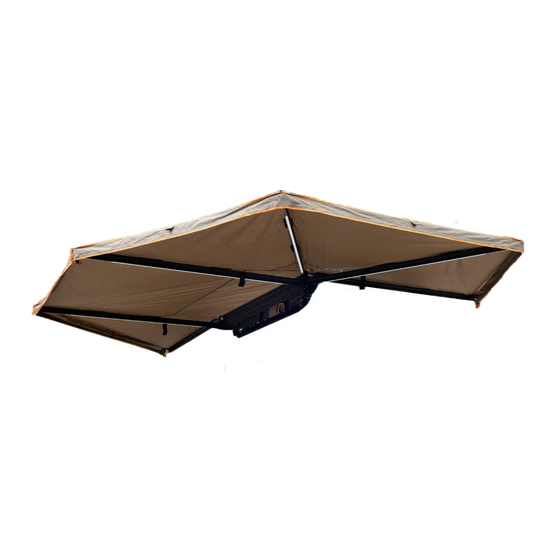
- Page 7 STEP 4. STEP 3. Swing out rear arms to 90°. Then swing out the front Attach front arm to roof rack using supplied tension arm fully. strap - Tension gently. STEP 5. TIP: Swing out rear arms fully toward rear of vehicle and You are now set up for freestanding mode.
- Page 8 I N S T R U C T I O N M A N U A L LIGHTING SET-UP STEP 1. STEP 2. Plug each barrel jack into ports in each of the arms with Plug the USB jack into a suitable external power source. integrated LED strips.
- Page 9 STEP 3. STEP 4. Fold away legs and stow away using attached straps. Release front and rear tension straps. STEP 5. STEP 6. Fold the rear side of awning back 90° from the awning Fold the front side of awning back 90° from the awning body ensuring the top rafters sit directly on top of the body ensuring the top rafters sit directly on top of the bottom rafters.
- Page 10 CARE & STORAGE INSTRUCTIONS FREESTANDING ABILITY 1. Darche recommends that all leg poles and guys ropes be used at all times when the awning is deployed. However, the awning may be used without leg poles in winds of up to 30km/hr.
- Page 11 Do not leave up for extended periods and do not leave unattended. To avoid the chance of personal injury and or property damage, DARCHE® recommends this Awning should not be erected or used in extreme weather conditions. Your vehicle should not be moved while the Awning is deployed.
- Page 12 M A N U A L Designed and tested in Australia for Australian conditions. A brand by Charles Parsons. Telephone 1300 367 695 l Email: info@DARCHE.com.au 75 Heyington Avenue, Thomastown VIC 3074, Australia. DARCHE: LEADERS IN OUTDOOR DESIGN. PROUDLY AUSTRALIAN.
Need help?
Do you have a question about the 270 FREESTANDING LED AWNING and is the answer not in the manual?
Questions and answers