Advertisement
Quick Links
Advertisement

Subscribe to Our Youtube Channel
Related Manuals for Pulse fitness 870C-AAA


Summary of Contents for Pulse fitness 870C-AAA
- Page 1 Multi-Functional Trainer Rack...
- Page 2 - feel faint, dizzy or exhausted stop exercising immediately. Ensure equipment is checked regularly for signs of damage and wear. Do not use equipment if faulty or damaged until repaired using only genuine Pulse Fitness parts fitted by an authorised person.
-
Page 3: Table Of Contents
Contents ·Chapter 1: Safety Instruction ·Chapter 2: Exploded Drawing ·Chapter 3: Exploded Drawing Chart ·Chapter 4: Hardware Kit and Tool Kit ·Chapter 5: Packing List ·Chapter 6: Installation instructions ·Chapter 7: Muscle Targeted Illustration ·Chapter 8: General fitness tips... - Page 4 Safety Instructions Safety tips: this safety manual contains important safety information. Please read it carefully before use. It is recommended to keep this manual for future reference! ● Product: Assembly size: 219*139*225cm; Workout area: 300*250cm, Net weight: 428KGS ● It is the responsibility of user to have full understanding of all warnings and precautions for this product, and follow the instructions strictly.
- Page 5 devices. (7) Those with malignant tumors. (8) People with thrombosis, severe dynamic lipoma, acute static lipoma and other blood circulation disorders or various skin infections. (9) Persons with perceptual impairment due to high peripheral circulatory disorders caused by diabetes, etc. (10) Skin trauma.
- Page 6 (6) Don’t use the product, after meals, or you are tired, or you just finish workout and your physical strength is not fully recovered yet. Otherwise, risk of health damage might occur. (7) It’s suggested to use this product in gym rooms or other venues with surveillance cameras. (8) Don’t use the product during meals or performing other activities.
- Page 7 Warning (1) Stop using the machine immediately if damaged parts are found; It can be used only when replacement and repair is completed. (2) Mind the cable condition; The worn cables might cause injuries easily; Hence, they shall be taken regular maintenance for good conditions.
-
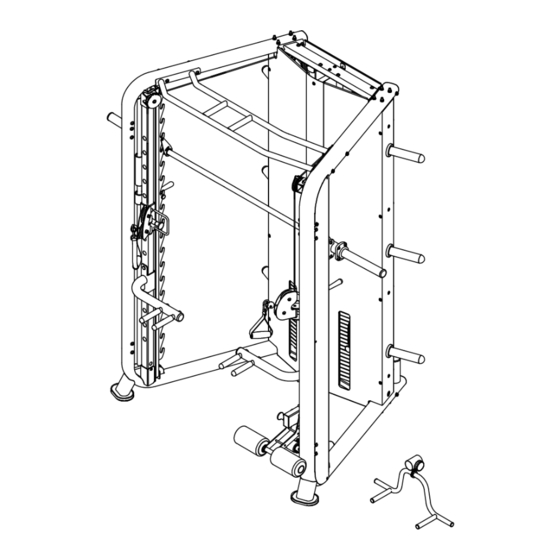
Page 8: Chapter 2: Exploded Drawing
Exploded Drawing... -
Page 12: Chapter 3: Exploded Drawing Chart
Exploded Drawing Chart Description Specification Description Specification Upper frame Pulley plate Base frame Landmine Left upper elbow frame Fixed plate for cover Right upper elbow frame Rear cover Smith adjustable rail Front R-cover Right base frame Left front cover Left base frame Right front cover Adjustable upright post Left side cover... - Page 13 Description Specification Description Specification Square hollow sleeve 60×60×t1.5-50×50 101 Hex lock nut Rubber bumper Φ48×Φ70×21 102 Flat washer Φ8 Rubber bumper Φ30×Φ50×20 103 Flat washer Φ10 Cross recessed countersunk full Rubber bumper Φ20×Φ50×25 M5×15 tooth bolt Hex large flat head half tooth Weight bar adaptor Φ48×Φ26.5×200 M12×95×20...
-
Page 14: Chapter 4: Hardware Kit And Tool Kit
Hardware Kit and Tool Kit L101-BC01 L101-BC02 L101-BC03 L101-BC04... - Page 15 L101-BC06 Description Specification Description Specification Hex large flat head full Fisheye washer M5×Φ18×3.5 M10×15 tooth bolt Hex large flat head half Fisheye washer M10×Φ30×6 M8×55×20 tooth bolt Hex large flat head full Hex nut M8×25 tooth bolt Hex large flat head full Hex lock nut M6×8 tooth bolt...
-
Page 16: Chapter 5: Packing List
Packing List 1.Upper frame 2. Base frame 3. Left upper 4. Right upper 5. Smith 6. Right 7.Left base 8. Adjustable elbow frame elbow frame adjustable rail base frame upright post 9. Pull-up bar 10. Right rear 11.Left rear 12. Front 15. -
Page 17: Chapter 6: Installation Instructions
Installation Instructions Step 1 ● Attach the base frame (2), the right base frame (6) and the left base frame (7) together, fix using hex large flat head full tooth bolt (114), hex large flat head half tooth bolt (106), flat washer (103) and hex lock nut (100). - Page 18 Step 3 ● Attach one end of the left upper elbow frame (3) to the front vertical frame (12), fix using hex large flat head full tooth bolt (114), flat washer (103), hex countersunk head full tooth bolt (120) and fisheye washer (96) as picture shown.
- Page 19 Step 5 ● Attach the pulleys (50) into the left cable slider (16), fix using hex large flat head half tooth bolt (112), flat washer (103) and hex lock nut (100). ● Pull the pull pin (74) from the left cable slider (16) manually, then insert one adjustable upright post (8), and release the pull pin (74).
- Page 20 Step 7 ● Following the preferred hole position, insert the long bar (48) into the adjustable upright post (8), fix using hex countersunk head full tooth bolt (121) and fisheye washer (96). The long bar can be arranged into both left right adjustable upright posts (8).
- Page 21 Step 9 ● Attach the weight plate post (22) to both ends of the Smith weight bar (61), fix using hex large flat head full tooth bolt (116). ● As figure B shown, loosen hex large flat head full tooth bolt (119) from the two Smith hooks (13), adjust proper distance between the hooks and ensure secured hanging, then tighten the hex large flat...
- Page 22 Step 11 ● Following the routing diagram as picture shown, feed the cable (58) from pulley B to pulley I (For easy assembly, an auxiliary lead (X) is placed in the left/right base frame in advance. During cable feeding, the lead can be wrapped around the end of the cable to pull it out from the base frame.
- Page 23 Step 12 ● As picture shown, attach the right side cover (42) to the right rear vertical frame (10), using cross recessed countersunk head full tooth bolt (122) and fisheye washer (95). ● Insert the weight bar (91) into the right rear vertical frame (10), fix using hex large flat head full tooth bolt (116) and flat washer (103).
- Page 24 Step 14 ● Fix the two rear covers (37) using cross recessed countersunk head full tooth bolt (104) and hex nut (97). Then attach the accessory rack (137) onto the rear covers (37), fix using cross recessed large flat head full tooth bolt (134) and hex lock nut (135).
- Page 25 Step 16 Accessories assembly: ● 16-1: As picture shown, insert the left dip bar (26) into the adjustable upright post (8), rotate 90 degrees to fix it. Follow above steps for the right dip bar (25) assembly. ● 16-2: As picture shown, put the foam inner cover (77), leg press foam roll (75) and foam outer cover (76) to the leg press (29), fix using hex large flat head full tooth bolt (118).
- Page 26 Muscle Targeted Illustrations...
-
Page 28: Chapter 8: General Fitness Tips
General Fitness Tips Warm up Take 5-10 minutes warm-up before exercise. Breathe Do not hold your breath during exercise. Usually, when preparing to restore the movement, inhale through the nose and exhale forcefully through the mouth. The breathing and movement should be coordinated. If the breathing is too rapid, the exercise should be stopped immediately. - Page 29 Stretching exercises No matter what exercise you take, it's a good to stretch first. Warm muscles tend to stretch more easily, so walk for 5 to 10 minutes to warm up first. Then stop and do the stretch as follows—do 5 reps of 10 seconds or more on each leg;...
- Page 31 All information, descriptions and illustrations are given solely as a guide. Actual product specifications may differ due to manufacturing requirements. Pulse Fitness reserve the right to make changes to its products and services, where it considers necessary. Copyright 2023 Pulse Fitness. All rights reserved. Pulse Fitness is part of the Pulse Global company.
Need help?
Do you have a question about the 870C-AAA and is the answer not in the manual?
Questions and answers