Advertisement
Quick Links
Advertisement

Related Manuals for Pulse fitness CLASSIC STRENGTH


Summary of Contents for Pulse fitness CLASSIC STRENGTH
- Page 1 CLASSIC STRENGTH Maintenance Manual...
- Page 3 NOT suitable for Medical/Therapeutic purposes. Ensure equipment is checked regularly for signs of damage and wear. Do not use equipment if faulty or damaged, repair using only genuine PULSE FITNESS parts fitted by an authorised person. SERIOUS INJURY MAY OCCUR IF THESE PROCEDURES ARE NOT FOLLOWED.
- Page 4 Important Safety Information INTRODUCTION It is the sole responsibility of the purchaser of PULSE FITNESS products to read this manual (in its entirety), any warning labels and to instruct all individuals, whether they are the end user or supervising personnel, on proper usage of the PULSE FITNESS Strength range.
- Page 5 (7) Ensure that any person(s) making adjustments or performing maintenance or repair of any kind is qualified to do so. PULSE FITNESS are able to provide service and maintenance training upon request. (8) Before any use, examine all accessories approved for use with the PULSE FITNESS equipment for damage or wear.
- Page 6 Do not reach into, or underneath, the equipment or tip it on its side during operation. Never insert objects into any opening in these products. If an object should drop inside carefully retrieve it. If the item cannot be reached contact PULSE FITNESS Global Service immediately at: +44 (0)1260 294600 or email: global.service@pulsefitness.com.
-
Page 7: Installation
Installation Location Select a suitable location for the PULSE FITNESS Strength range equipment before moving it. The site you choose should meet the following requirements: • A stable, solid, flat, level and clean surface. Note: The Strength range is not suitable for outdoor use. - Page 8 It is the facilities responsibility to adhere to local and regional building codes. Pulse Fitness take no responsibility for the installation of equipment.
- Page 9 Anchor Procedure 1. Place unit into position to be mounted. 2. Each foot must get at least one fastener. 3. Wearing protective glasses, drill down into the flooring to the required depth as perpendicular as possible ensuring that the foot thickness is being accounted for. [ l ..
- Page 10 Strength Cable Wear Guide Replace cable at first sign of the following: FRACTURES: Casing can crack or fracture under strains during use. Any crack in the casing merits cable replacement even if no wire rope is exposed . ..__ o -------"•'--------'-'- n ___._ ( J) Be especially observant for fractures near the components on the cable assembly- IE.
- Page 11 Olympic Plate Guide When on a piece of plate loaded equipment or using a barbell follow these guidelines: SERIOUS INJURY CAN OCCUR ON THIS EQUIPMENT. YOU MUST FOLLOW THIS PRECAUTION TO AVOID INJURY! Use only weight plates with 2" (5cm) bore for training weight. Do not use dumbbells or other means to increase weight resistance.
- Page 12 t o r a g c R a c k s o f O l y m p i m p l \ \ a r a i n i n g C o e i g Q \ y m p i c W ati c \-\ o r n...
-
Page 13: Product Registration
PULSE FITNESS warrants to the original purchaser only of new equipment purchased directly from PULSE FITNESS or from authorised distributors or resellers, for its own use not for resale, that all Strength machines shall be free from defects in materials and workmanship in accordance with the following schedule effective from the original date of delivery. -
Page 14: Product Labels
(3) Contact Pulse Fitness Global Services Team Warning Labels PULSE FITNESS products come equipped with a number of standard warning labels. T he illustration shows a sample of the safety labelling on the Strength range equipment. (1) MAINTAIN LABELS AND NAME PLATES - Do not remove labels for any reason. They contain important information. - Page 15 TRAKK TRAKK TRAKK TRAKK TRAKK TRAKK TRAKK...
-
Page 16: Machine Overview
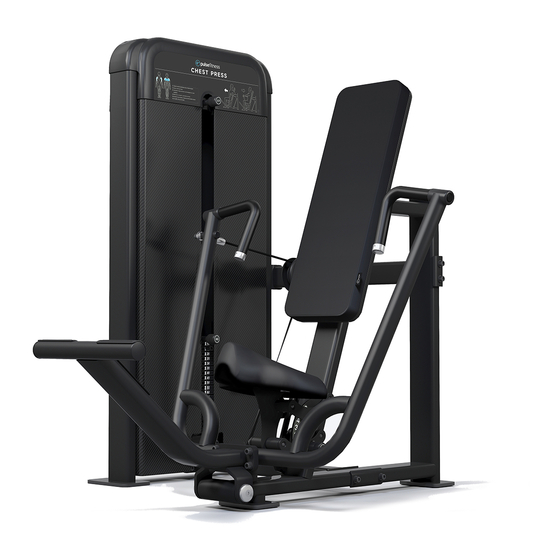
Machine Overview Weight Stack-- Tower Upholstery Seat Pad Main Frame... -
Page 17: General Maintenance Information
Gym Wipes are large, durable pre-moistened wipes to use on the equipment before and after workouts. Use Gym Wipes on the equipment for at least 2 minutes for general disinfection purposes. Contact PULSE FITNESS Global Service Team to order these cleaners +44 (0)1260 294600 or emai I: global .service@pulsefitness.com. Compatible Cleaners DO NOT use water based solutions (on the following): Clean the display console, all exterior surfaces and the frame with a mild, non-abrasive silicon based household cleaner. - Page 18 Afterward, a warm final wash should be made. Check to make sure the unit is properly levelled. Clean all exterior surfaces with an approved or compatible cleaner (see PULSE FITNESS Approved Cleaners) and a micro fibre cloth. WARNING: Failure to carry out maintenance on the equipment as per this manual could result �...
-
Page 20: Maintenance Schedule
Maintenance Schedule Daily Maintenance 1. Clean the frame with a silicone polish and a lint free cloth. DO NOT USE WATER BASED SOLUTIONS. 2. Clean upholstery and grips with a mild soapy solution, handlebars and upholstery where applicable. FAILURE TO REMOVE SWEAT A MINIMUM OF ONCE A DAY WILL PERMANENTLY DRY OUT AND CRACK UPHOLSTERY. - Page 21 Maintenance Schedule Daily Maintenance 4. Visually inspect belt for any cuts or frays. DAMAGED BELTS ARE DANGEROUS. 5. Ensure belt clamp pivots freely. (Machine Specific). 6. Check that all nuts and bolts are securely fastened.
- Page 22 Maintenance Schedule Monthly Maintenance 1. Check spring loaded 2. Clean acrylic panels with plungers function correctly. anti-static cleaner. � 3. Check all upholstery for 4. Check belt tension by tears and grazes. moving belt back and forth. 6. Clean and lubricate all hardened shafts with a silicon oil impregnated cloth to leave thin film of lubricant.
- Page 23 Maintenance Schedule 6 Monthly Maintenance 2. Lift half of weight stack and secure with wooden blocks. Wipe guide bars with silicon oil 1. Wipe guide bars with a impregnated cloth. silicon oil impregnated cloth. THIS IS A TWO PERSON JOB. 3.
- Page 24 Maintenance Tensioning Belt From Weight Stack 1. Undo the two screws in the top weight tower moulding and 2. Lift back panel of pegs. remove. '------' � 4. Slacken the cap screws on 3. Pull out weight stack pin. the belt clamp with a long arm 6mm allen key.
- Page 25 Maintenance Tensioning Belt From Weight Stack 8. Replace top weight tower 7.Hookbackpanel backonto moulding and screw back into supports. position.
- Page 26 Maintenance Removing & Fitting New Belt 1. Undo the two screws in the top weight tower moulding and 2. Lift back panel of pegs. remove. '-.__... "' 4. Slacken the cap screws on the belt clamp with a long arm 3.
- Page 27 Maintenance Removing & Fitting New Belt Swivel 7. Tighten both cap screws as tight as possible using a long arm allen key while still pulling on loose end of belt. 6. Remove belt from machine SAFETY NOTE: Torque tighten to 17 N.m through pulleys.
- Page 28 Maintenance Removing & Fitting New Belt 9. Tighten both cap screws as tight as possible using a long arm allen key while still pulling 10. Replace weight stack pin. on loose end of belt. 11. Replace top weight tower 10. Hook back panel back moulding and screw back into onto supports.
- Page 29 Maintenance Replacing Worn Handgrips 1. Undo grub screw on end cap. 2. Slice grip in half from end to end and remove. 3. Remove any old glue or grip 4. Generously smear glue on from handle with a sharp knife. the inside of new grip.
- Page 30 Maintenance Replacing A Plunger 2. Remove plunger assembly. NOTE: Plunger shown is an example only. Refer to exploded diagrams for correct 1. Unscrew the threaded boss part numbers. at the bottom of the plunger. 3. Insert new plunger ensuring that the pin passes through both holes.
- Page 31 Maintenance Replacing Upholstery 1. Unscrew the four button 2. Remove old upholstery. head screws. 4. Replace old upholstery with new and securely fasten. NOTE: There may be some 3. Loosely fit the new and pad adjustment in the pad. ensure it is correctly aligned ..
- Page 32 Failure to carry out maintenance on the equipment in this manual could result in serious injury and void your warranty. Please ensure all publications supplied with PULSE FITNESS equipment are read and understood. Replacement of defective components should be carried out IMMEDIATELY and/or keep the defective equipment out of use until repaired.
- Page 33 Company Addresses Global Corporate Headquarters Address: Pulse Fitness Ltd., Radnor Park, Greenfield Road, Congleton, Cheshire, CW12 4T W, England, United Kingdom Sales/Marketing: Tel: +44 (0)1260 294600 Fax: +44 (0)1260 299282 Email: info@pulsefitness.com Service: Tel: +44 (0)1260 294600 Email: global.service@pulsefitness.com Corporate Website:...
- Page 35 135-2004-2...
Need help?
Do you have a question about the CLASSIC STRENGTH and is the answer not in the manual?
Questions and answers