Table of Contents
Advertisement
Quick Links
Advertisement
Table of Contents

Related Manuals for UTStarcom XV6700


Summary of Contents for UTStarcom XV6700
- Page 1 User Manual...
-
Page 2: Please Read Before Proceeding
Please Read Before Proceeding Trademarks Microsoft, MS-DOS, Windows, Windows NT, Windows Server, Windows Mobile, ActiveSync, Excel, Internet Explorer, MSN, Outlook, PowerPoint, and Word are either registered trademarks or trademarks of Microsoft Corporation in the United States and/or other countries. All trademarks are the properties of their respective owners. THIS DEVICE IS NOT CHARGED WHEN YOU TAKE IT OUT OF THE BOX. -
Page 3: Important Safety Precautions
Important Safety Precautions Please read the following safety precautions. ELECTRICAL SAFETY This product is intended for use when supplied with power from the battery. Other usage may be dangerous and will invalidate the warranty for this product. SAFETY IN AIRCRAFTS Due to the possible interference caused by this product to an aircraft's navigation system and its communications network, using this product on board an airplane is against the law in most countries. -
Page 4: Safety Information For Fcc Rf Exposure
Safety Information For FCC RF Exposure WARNING! READ THIS INFORMATION BEFORE USING CAUTIONS In August 1996 the Federal Communications Commission (FCC) of the United States with its action in Report and Order FCC 96-326 adopted an updated safety standard for human exposure to radio frequency electromagnetic energy emitted by FCC regulated transmitters. -
Page 5: Table Of Contents
Contents Chapter 1 Getting Started Getting to Know your XV6700 and its Accessories ...10 Battery Information ...16 Starting Up ...18 The Today Screen ...21 Using the Start Menu ...23 Chapter 2 Entering and Searching Information Introduction ...28 Using the Keyboard ...29 Using Letter Recognizer ...29... - Page 6 Using the Phone ...42 Making a Call ...43 Receiving a Call ...45 In-Call Options ...46 Additional Dialing Information ...47 Chapter 4 Synchronizing Your XV6700 Using ActiveSync ...50 Synchronizing Information ...51 Synchronizing via Infrared and Bluetooth ...55 Synchronizing Music, Video, and Pictures ...56 Setting Up E-mail Security ...57...
- Page 7 Chapter 6 Getting Connected Connecting to the Internet ...76 Internet Explorer Mobile ...78 Using Bluetooth ...81 Using Comm Manager ...84 Using Terminal Services Client ...87 Chapter 7 Exchanging Messages and Using Outlook E-mail and Text Messages ...90 Using MMS Messengs ...99 Pocket MSN Messenger ...104 Calendar ...106 Contacts ...107...
- Page 8 Chapter 9 Using Other Applications Word Mobile ...138 Excel Mobile ...140 Viewing Slide Shows with PowerPoint Mobile ...142 Using Voice Speed Dial ...143 Appendix A.1 Regulatory Notices ...148 A.2 PC Requirement to Run ActiveSync 4.x ...154 A.3 Specifications ...155 A.4 Index ...157 Preface...
- Page 9 Chapter 1 Getting Started 1.1 Getting to Know your XV6700 and its Accessories 1.2 Battery Information 1.3 Starting Up 1.4 The Today Screen 1.5 Using the Start Menu...
-
Page 10: Getting To Know Your Xv6700 And Its Accessories
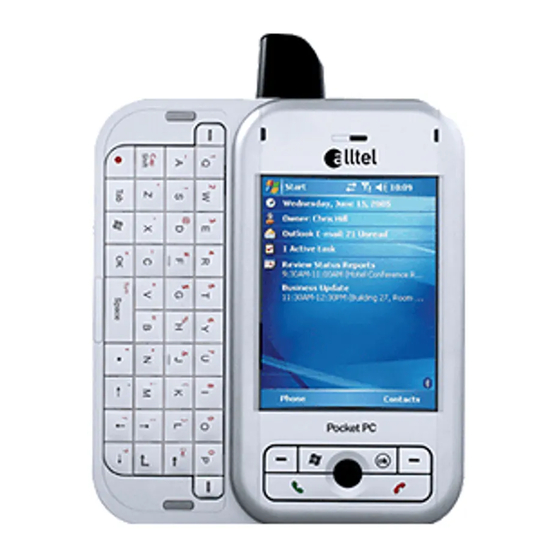
1.1 Getting to Know your XV6700 and its Accessories Front, top, and left-side view Getting Started... - Page 11 POWER/Backlight Press to turn on/off your Xv6700. Press and hold turn on/off its Button backlight. MiniSD Card Slot Lets you insert a storage card (miniSD card) for storing data. Antenna Bi-color LED on the left side: Blue for Bluetooth system notification of...
- Page 12 Back, bottom, and right view Getting Started...
- Page 13 ( for macro mode ( External Antenna You can connect your XV6700 to an external antenna to utilize the Connector superior reception quality (if available). Position your XV6700 until this mirror reflects the image you want to Self-Portrait Mirror capture.
- Page 14 Plug into Earphone Jack to listen to audio files. Allows you to recharge your XV6700 and a second battery (if you have purchased one), as well as using ActiveSync to synchronize data between your XV6700 and the PC.
-
Page 15: The Qwerty Keyboard
• Press the arrow keys • To choose a word that is being predicted by the XV6700, press the down arrow to select, then Return key to finish the selection and add a space. QWERTY keyboard, which is similar to a standard first, then... -
Page 16: Battery Information
Battery performance depends on many factors, including your wireless service provider’s network configuration, signal strength, the temperature of the environment in which you operate your XV6700, the features and/or settings you select and use, items attached to your XV6700’s connecting ports, and your voice, data, and other program usage patterns. -
Page 17: Low Battery
Inserting the battery itself into the battery port on the cradle and plugging the cradle into the AC Adapter. • Connecting your XV6700 to the USB cradle, which is connected to the AC Adapter. Low battery When the low-battery warning appears, do the following: Immediately save your current data. -
Page 18: Starting Up
Notes Pressing POWER turns off your XV6700 temporarily and switches the device to sleep mode. However, you can still receive messages and calls while your XV6700 is in sleep mode. To turn off your wireless service to the device, turn Flight Mode On. See Chapter 3 for instructions. -
Page 19: Manage Screen Settings
The device touch screen has three orientation modes: Portrait, Landscape (right-handed), and Landscape (left-handed). Portrait mode allows you to get a better view or a better operation of certain programs on your XV6700, while Landscape mode may be optimal for viewing longer text files. - Page 20 Portrait mode • To smooth the edges of screen fonts for many programs, on the ClearType tab, select the Enable ClearType check box. • To increase the readability or to see more content on the screen, on the Text Size tab, adjust the text size by moving the slider.
-
Page 21: The Today Screen
1.4 The Today Screen The Today screen displays important information, such as upcoming appointments and status indicators. You can tap a section on the screen to open the associated program. • To access the Today screen, tap Start > Today. •... -
Page 22: Icon Description
Indicators The following are some of the status icons that you may see on your XV6700. Icon Description Indicates the battery is fully charged. Indicates the battery is very low. Battery charging. Sound on. Sound off. Ringer in vibration mode. -
Page 23: Using The Start Menu
Start > Settings > Personal tab > Menus. Tap to start a recently-used program. Tap to view and select more programs that are installed in your XV6700. Tap to change device settings. Tap to see a Help topic for the current screen. -
Page 24: Program Indicators
Games Lets you play two pre-installed games: Bubble Breaker and Solitaire. Help Enables you to see Help topics for a program on your XV6700. Internet Explorer Internet Explorer browses Web and WAP sites, and downloads new programs and files from the Internet. - Page 25 Sends and receives instant messages with your MSN Messenger contacts. PowerPoint Mobile Lets you view and edit PowerPoint slides and presentations. Search Enables you to search contacts, data, and other information on your XV6700. Tasks Keeps track of your tasks. Text Messages Retry Helps you resend the failed SMS messages.
- Page 26 Getting Started...
-
Page 27: Chapter 2 Entering And Searching Information
Chapter 2 Entering and Searching Information 2.1 Introduction 2.2 Using the Keyboard 2.3 Using Letter Recognizer 2.4 Using Block Recognizer 2.5 Using Transcriber 2.6 Using Phone Pad 2.7 Drawing and Writing on the Screen 2.8 Recording a Note 2.9 Searching Information... -
Page 28: Introduction
When you start a program or select a field that requires text or numbers, Input Panel automatically becomes available. Input Panel provides access to the various input methods available on your XV6700, including Block Recognizer, Keyboard, Letter Recognizer, Phone Pad, and Transcriber. By default, the Input Panel icon appears on the menu bar to indicate which input method is currently selected. -
Page 29: Using The Keyboard
2.2 Using the Keyboard To enter text, symbols, and numbers, you can either type using the the standard on-screen keyboard. For use of the QWERTY keyboard, see the instruction in Chapter 1. Use the standard on-screen keyboard The on-screen keyboard is available when text entry is possible. You can enter text by tapping keys on the keyboard that are displayed on the screen. -
Page 30: Using Block Recognizer
When Transcriber is turned on, it interprets stylus movement anywhere on the screen as handwriting input. For more information about using Transcriber, see Help on your XV6700. To start Transcriber Start a program that accepts user input, such as Word Mobile. - Page 31 To write using Transcriber In a program, position the cursor where you want text to appear. Use the stylus to write anywhere on the screen. The handwriting will be converted to text shortly after you lift the stylus from the screen. To enter punctuation and symbols Transcriber comes with an on-screen keyboard that provides an easy way to add punctuation or a special symbol to existing text.
-
Page 32: Transcriber Gestures
Transcriber Gestures Use quick strokes of the stylus to edit your text or to insert returns, spaces, or tabs. Insert a paragraph return at the cursor. The horizontal portion of the gesture must be at least two times longer than the vertical portion. -
Page 33: The Transcriber Toolbar
The Transcriber toolbar The Transcriber toolbar, which appears at the bottom of the screen when Transcriber is open, provides easy access to several tools, Enter, Space, and Backspace buttons, and Left and Right arrow buttons. Open the Options dialog box, where you can set options such as writing direction, text entry, and shorthand. -
Page 34: Using Phone Pad
Start a program that accepts user input, such as Word Mobile. Tap the Input Selector arrow, then tap Phone Pad. Phone Pad can be started at any time, except when your XV6700 is in Camera mode or displaying the Today screen. Use T9 input mode By default, the device Phone Pad is in T9 mode. -
Page 35: Use Numeric Input Mode
• To enter a number, do any of the following: • Tap and hold on the desired number key on the keypad. • Select the numeric mode, and tap the number. • To insert a space or tab, tap • To scroll through the wordlist, tap •... -
Page 36: Drawing And Writing On The Screen
2.7 Drawing and Writing on the Screen With your XV6700, you can draw directly on the screen, or write on the screen and save notes in your own handwriting. To do this, you must set the input mode in Notes to Writing. - Page 37 To write a note Tap Start > Programs > Notes. In the note list, tap New. Write your text on the screen. When finished, tap OK to return to the note list. Notes To select handwritten text, tap and hold next to the writing. As soon as dots appear, and before they form a complete circle, quickly drag across the writing.
-
Page 38: Recording A Note
If you do not see the Recording toolbar, tap Menu > View Recording Toolbar. Tap the record icon ( Hold your XV6700’s microphone near your mouth or other source of sound. Tap the stop icon ( If you are adding a recording to a note, tap OK to return to the note list when finished. -
Page 39: Searching Information
2.9 Searching Information You can search for files and other items stored on your XV6700 in the My Documents folder or on a storage card. You can search by file name or by words located in the item. For example, you can search in e-mail messages, notes, appointments, contacts, and tasks, as well as in online Help. - Page 40 Entering and Searching Information...
- Page 41 Chapter 3 Using Phone Features 3.1 Using the Phone 3.2 Making a Call 3.3 Receiving a Call 3.4 In-Call Options 3.5 Additional Dialing Information...
-
Page 42: Using The Phone
Turning off the power doesn’t turn off the phone. You must enable flight mode in order to turn off the phone. You can turn on flight mode and still keep your XV6700 turned on and use other functions. • Tap the Signal icon, and tap Turn on flight mode to turn the phone off. -
Page 43: Making A Call
The Vibrate icon ( bar to indicate that Vibrate mode is enabled. 3.2 Making a Call With your XV6700, you can make a call from Phone, Contacts, Call History, and Speed Dial. Make a call from Phone •... -
Page 44: Make A Call From Contacts
Make a call from Contacts • Tap Start > Contacts. • Tap the desired contact, and press TALK twice (once to send the number to the Phone keypad, and once to dial the number). • You can also tap the desired contact in the contacts list, and tap the phone number that you want to call. -
Page 45: Receiving A Call
To reject the call, tap Ignore, or press END on your XV6700. To end a call Once an incoming or outgoing call is in progress, you can press END on your XV6700 or tap End to hang up. Using Phone Features... -
Page 46: In-Call Options
Tap Answer to take the second call and put the first one on hold. To end the second call and return to the first call, tap End or press END on your XV6700. To switch between two calls •... -
Page 47: Additional Dialing Information
To mute a call You can turn off the microphone during a call, so that you can hear the caller but the caller cannot hear you. • During a call, tap Mute. • When the microphone is turned off, the mute icon ( Unmute to turn on the microphone again 3.5 Additional Dialing Information Make an emergency call... - Page 48 Using Phone Features...
-
Page 49: And Setting Up E-Mail Security
Chapter 4 Synchronizing Your XV6700 and Setting Up E-mail Security 4.1 Using ActiveSync 4.2 Synchronizing Information 4.3 Synchronizing via Infrared and Bluetooth 4.4 Synchronizing Music, Video, and Pictures 4.5 Setting Up E-mail Security... -
Page 50: Using Activesync
Microsoft Exchange Server, if your company or service provider is running Microsoft Exchange Server with Exchange ActiveSync. When you synchronize, ActiveSync compares the information on your XV6700 with the information on your PC and/or Exchange Server and updates all locations with the most recent information. -
Page 51: Synchronizing Information
XV6700 from your PC. 4.2 Synchronizing Information When you connect your XV6700 to the PC using a USB cable, an infrared connection, or a Bluetooth connection, ActiveSync will immediately synchronize. While the device is connected, ActiveSync synchronizes every time you make a change on either the PC or the device. - Page 52 You can set up your XV6700 to synchronize with more than one PC or with a combination of one or more PCs and Exchange Server. When synchronizing with multiple computers, the items that you synchronize will appear on all of the computers with which they are synchronized.
- Page 53 Settings. To synchronize directly with Exchange Server You can set up synchronization with Exchange Server on your XV6700, if it is available to you through your company or wireless service provider. However, you should first ask your administrator for the following information and then carry on with the steps: Exchange Server name, your user name, password, and domain name.
-
Page 54: Schedule Synchronization With Exchange Server
The Direct Push technology (Push E-Mail feature) enables you to receive new e-mails on your XV6700 as soon as they arrive in your Inbox on the Exchange Server. With this feature, items such as contacts, calendar and tasks are also immediately updated onto your XV6700 when these items have been changed or new entries have been added on the Exchange Server. -
Page 55: Synchronizing Via Infrared And Bluetooth
4.3 Synchronizing via Infrared and Bluetooth You can connect your XV6700 to the PC to synchronize using the local wireless technologies, such as infrared (IR) and Bluetooth. These technologies have almost similar but slightly differing requirements. -
Page 56: Synchronizing Music, Video, And Pictures
Install Windows Media Player Version 10 on the PC. • Connect your XV6700 to the PC with a USB cable. If the device is currently connected using Bluetooth or infrared, you must end that connection before media can be synchronized. -
Page 57: Setting Up E-Mail Security
For information about using Windows Media Player on the device, see Chapter 8. 4.5 Setting Up E-mail Security Windows Mobile on your XV6700 protects your Outlook e-mails through Secure/ Multipurpose Internet Mail Extension (S/MIME), which allows you to digitally sign your messages as well as encrypt them. - Page 58 You can select certificates to sign or encrypt e-mail messages individually if you do not choose to sign or encrypt all outgoing e-mail. For information about signing and encrypting individual messages, see “Individually sign and encrypt a message” in Chapter 7. Synchronizing Your XV6700 and Setting Up E-mail Security...
-
Page 59: Chapter 5 Managing Your Xv6700
Chapter 5 Managing Your XV6700 5.1 Personalizing Your XV6700 5.2 Adding and Removing Programs 5.3 Managing Memory 5.4 Backing Up Files 5.5 Protecting Your XV6700 5.6 Resetting Your XV6700... -
Page 60: Personalizing Your Xv6700
Today screen settings The Today screen shows your upcoming appointments, active tasks, and information about e-mail messages. You can customize the Today screen on your XV6700. To customize the Today screen Tap Start > Settings > Personal tab > Today. -
Page 61: Customize The Start Menu
PC, click Explore. In the Mobile Device window, double-click My Windows Mobile- Based Device > Windows > Start Menu, then create the folders and shortcuts that you want. You will see the added items after you synchronize. Managing Your XV6700... - Page 62 Select the correct time zone and change the date or time. Note During synchronization, the time on your XV6700 is updated with the time on your PC. To set an alarm Tap Start > Settings > System tab > Clock & Alarms > Alarms tab.
-
Page 63: Personal And System Settings
To customize settings further, tap the appropriate tabs and select the desired options. Personal and system settings Your XV6700 may come with programs already assigned to hardware buttons. You can customize these buttons to open the programs you use most, or to perform certain shortcuts such as changing the screen orientation, opening the Today screen, or opening Input Panel. - Page 64 To find the operating system version number and detailed device information • Tap Start > Settings > System tab > About. The Version tab displays the operating system information and important device information, including the type of processor and the amount of memory that is installed. Managing Your XV6700...
- Page 65 If you synchronize multiple devices with the same PC, each device must have a unique name. To make the battery last longer The device battery power lasts based on the battery type and how you use your XV6700. Try the following to help preserve battery life: •...
-
Page 66: Phone Settings
To use custom .wav, .mid, or .wma files as ring tones, use ActiveSync on your PC to copy the file to the /Windows/Rings folder on your XV6700. Then, select the sound from the Ring tone list. For more information about copying files to your XV6700, see ActiveSync Help on your PC. -
Page 67: Adding And Removing Programs
Before you purchase additional programs for your XV6700, you should note the name of your XV6700, the version of Windows Mobile software running on it, and the type of processor. This information will help you select a program that is compatible with your XV6700. -
Page 68: Managing Memory
You will need to copy this program to your XV6700. If you cannot find any installation instructions for the program, use ActiveSync to copy the program file to the Program Files folder on your XV6700. - Page 69 If you have previously inserted more than one storage card, tap the list box and then the storage card whose information you want to see. To free up program memory Try the following to free memory on your XV6700: • Close programs you are not currently using.
-
Page 70: Backing Up Files
Connect your XV6700 to your PC. In ActiveSync, click Explore to open the Mobile Device window for your XV6700. In the Mobile Device window, go to the file that you want to copy on your XV6700 or PC. Managing Your XV6700... -
Page 71: Protecting Your Xv6700
Do one of the following: • To copy the file to your XV6700, right-click the file and click Copy. Right-click the desired folder under Mobile Device, and click Paste. • To copy the file to your PC, right-click the file and click Copy. Right-click the desired folder on your PC, and click Paste. - Page 72 If you forget your password, you must follow the instructions in your owner’s manual to clear memory before you can access your XV6700. To change your password Tap Start > Settings > Personal tab > Password. You will be prompted to enter your current password.
-
Page 73: Resetting Your Xv6700
Only Windows Mobile software and other pre-installed programs will remain. To perform a soft reset • Use the stylus to lightly press and hold the RESET button on the bottom of your XV6700. The device restarts, then displays the Today screen. Reset button Warning! Always turn off your device before performing a soft reset or installing/replacing the battery. - Page 74 Managing Your XV6700...
- Page 75 Chapter 6 Getting Connected 6.1 Connecting to the Internet 6.2 Internet Explorer Mobile 6.3 Using Bluetooth 6.4 Using Comm Manager 6.5 Using Terminal Services Client...
-
Page 76: Connecting To The Internet
6.1 Connecting to the Internet Your XV6700 is equipped with powerful networking functions that enable you to connect to the Internet. You can set up connections to the Internet or to a corporate network to browse the Internet, and exchange e-mail or instant messages. Your XV6700 has two groups of connection settings: Verizon Wireless and My Work Network. - Page 77 When the connection settings are completed, tap Start > Programs > Internet Explorer. To reset or modify the network card settings on your XV6700 Tap Start > Settings > Connections tab > Network Cards. In the My network card connects to list, select the appropriate item: •...
-
Page 78: Internet Explorer Mobile
To go to your Home page, tap Menu > Home. To transfer favorites from your PC You can transfer the favorites you have stored on your PC to your XV6700 by synchronizing the Internet Explorer favorites on your PC with your XV6700. - Page 79 Tap and hold the picture, then tap Save Image. Do one of the following: • To save the picture in My Pictures on your XV6700, tap Yes. • To save the picture in another location, such as a storage card, tap Save As.
- Page 80 You may want to delete these files to free storage space. Tap Menu > Tools > Options > Memory tab. Tap Delete Files. All pages stored on your XV6700, including offline favorites content, will be deleted.
-
Page 81: Using Bluetooth
10 meters can detect your XV6700. Note By default, Bluetooth is turned off. If you turn it on, and then turn off your XV6700, Bluetooth also turns off. When you turn on your XV6700 again, Bluetooth automatically turns on. -
Page 82: Bluetooth Partnerships
Tap OK. Bluetooth partnerships A Bluetooth partnership is a relationship that you create between your XV6700 and another Bluetooth-enabled device in order to exchange information in a secure manner. Creating a partnership between two devices involves entering the same personal identification number (PIN) on both devices. -
Page 83: Beam Information Using Bluetooth
Tap the device name to which you want to send the beam. The item is beamed to the device you selected. Note If the device you want to beam to does not appear in the box, make sure that it is turned on, discoverable, and within close range (10 meters) of your XV6700. Getting Connected... -
Page 84: Using Comm Manager
6.4 Using Comm Manager Comm Manager acts like a central switcher that lets you enable or disable phone features as well as manage your data connections easily. To open Comm Manager • Tap Start > Programs > Comm Manager. Simply tap the corresponding button to enable or disable a feature. Tap to toggle between enabling or disabling the phone. - Page 85 On the Settings tab of the Wireless LAN Settings screen, move the Power Save Mode slider to a position that optimizes performance with the least power consumption. Select the Auto turn off WLAN if not connected check box to allow your XV6700 to turn off the WLAN function automatically when no signal is detected.
- Page 86 You can check the current wireless connection status from the following three screens of your XV6700: • Today screen. If your XV6700 detects a WLAN network connection, the WLAN connection icon appears at the top of the Today screen. •...
-
Page 87: Using Terminal Services Client
Terminal Services Client allows you to log on to a PC running Terminal Services or Remote Desktop, and use all the resources available on that PC. For example, instead of running Word Mobile on your XV6700, you can run the PC version of Word and access the *.doc files available on that PC. - Page 88 Notes Do not use the Start menu on your XV6700. If a network administrator has configured Terminal Services Client on your XV6700 to reconnect to disconnected sessions, and you previously disconnected from a Terminal Server without ending the session, the Terminal Services Client reconnects to that session.
-
Page 89: Chapter 7 Exchanging Messages And Using Outlook
Exchanging Messages and Using Outlook 7.1 E-mail and Text Messages Chapter 7 7.2 Using MMS Messengs 7.3 Pocket MSN Messenger 7.4 Calendar 7.5 Contacts 7.6 Tasks 7.7 Notes... -
Page 90: E-Mail And Text Messages
“To change which information is synchronized” in Chapter 4. Whenever you want to manually send or receive Outlook e-mail on your XV6700, just connect your XV6700 to your computer, LAN, or over-the-air connection, then tap Sync on the ActiveSync screen or tap Menu >... - Page 91 Set up a POP3/IMAP4 e-mail account You need to set up an e-mail account that you have with an Internet service provider (ISP) or an account that you access using a VPN server connection (typically a work account) before you can send and receive mail. Tap Start >...
- Page 92 Setting User name Password Domain Account type Account name Incoming mail server Outgoing mail server Require SSL connection Outgoing mail requires authentication Use separate settings Outgoing server settings: User name Password Domain Require SSL for outgoing mail You can set up several e-mail accounts in addition to your Outlook Email account. Exchanging Messages and Using Outlook Description Enter the user name assigned to you by your ISP or network...
-
Page 93: Send And Receive Messages
Send and receive messages To compose and send a message In the message list, tap Menu > Switch Accounts to select an account. Tap New. Enter the e-mail address or text message address of one or more recipients, separating them with a semicolon. To access addresses and phone numbers from Contacts, tap To. Enter your message. - Page 94 You can customize ActiveSync so that your e-mail address will be excluded from the recipient list. In ActiveSync on your XV6700, tap Menu > Options. Select the E-mail information type and tap Settings. Tap Advanced.
-
Page 95: Download Messages
If you have an Outlook E-mail account, do the following on your device: Tap Start > Programs > Microsoft ActiveSync. Tap Tools > Options. Tap E-mail > Settings, then select Include File Attachments. If you have an IMAP4 E-mail account with an Internet service provider (ISP) or an account that you access using a VPN server connection (typically a work account), do the following: Tap Start >... - Page 96 Tap Menu > Switch Accounts to select the account you want to use. Tap Menu > Send/Receive. The messages on your XV6700 and e-mail server are synchronized: new messages are downloaded to the device Inbox folder, messages in the device Outbox folder are sent, and messages that have been deleted from the server are removed from the device Inbox folder.
-
Page 97: Verify The Digital Signature On A Signed Message You Receive
Select the Encrypt message and Sign message check boxes, and tap OK. Verify the digital signature on a signed message you receive To To verify a digital signature in the message that you receive, do the following: Open the Outlook e-mail message that has been digitally signed. At the top of the message, tap View Signature Status. -
Page 98: Manage Folders
Therefore, messages are available to you anytime you connect to your e-mail server, whether it is from your XV6700 or PC. This synchronization of folders occurs whenever you connect to your e-mail server, create new folders, or rename/ delete folders when connected. -
Page 99: Using Mms Messengs
Creating and sharing MMS messages with your friends and family is easy with your XV6700. You can even use the built-in camera to capture photos and video clips while composing a new MMS message, and send them along with your message: Set up MMS Before you can use MMS, you have to configure the required settings on your XV6700. -
Page 100: Manage Mms Messages
Manage MMS messages After configuring the required settings, you can start to compose and manage your MMS messages. To compose and send an MMS message You can compose MMS messages in a combination of various slides, where each slide can consist of a photo, audio or video clip, and/or text. - Page 101 Note The following icons act as shortcuts to some of the operations on the MMS Message screen: • to preview your message. • to go to the previous slide. • to go to the next slide. To create an MMS message from a template •...
- Page 102 • to play the audio clip. • to pause. • to stop. • to insert it into your MMS message you are composing. • to discard it. • To record a new audio clip and add it to your MMS message, tap the recording control mode for a new audio clip.
-
Page 103: Change Mms Settings
Change MMS settings You can set options to keep track of your messages, retrieve messages immediately, accept or reject messages, and request a delivery or read receipt. You can also specify a resolution for images you send, message delivery attempts, and set up a server to access messages. To configure MMS settings Tap Start >... -
Page 104: Pocket Msn Messenger
• Block contacts from seeing your status or sending you messages. Before you can use MSN Messenger, your XV6700 must be connected to the Internet. For information about setting up an Internet connection, see “Connecting to the Internet” in Chapter 6, “Getting Connected.”... - Page 105 To add or delete contacts • To add a contact, tap Menu > Add a Contact, then follow the instructions on the screen. • To delete a contact, tap and hold the contact’s name, then tap Delete Contact from the shortcut menu.
-
Page 106: Calendar
Today screen. If you use Outlook on your PC, you can synchronize appointments between your XV6700 and PC. You can also set Calendar to remind you of appointments with a sound or flashing light, for example. -
Page 107: Contacts
From the contact list, you can quickly communicate with people. Tap a contact in the list for a summary of contact information. From there, you can call or send a message. If you use Outlook on your PC, you can synchronize contacts between your XV6700 and To create a contact Tap Start >... - Page 108 To see a list of contacts employed by a specific company, tap Menu > View By > Company. Then tap the company name. To find a contact on your XV6700 There are several ways to find a contact when your contact list is long.
- Page 109 Exchange Server. By having direct online access to it from your XV6700, it is quick and easy for you to plan a meeting and e-mail a meeting request immediately to anyone in your organization.
-
Page 110: Tasks
Notes Your XV6700 must be set up with a data connection. You can search on the following information as long as that information is included in your organization’s GAL: First name, Last name, E-mail name, Display name, E-mail address, or Office location. - Page 111 You can easily create a short, to-do-type task. Simply tap the Tap here to add a new task box, enter a subject, and press ENTER. If the task entry box is not available, tap Menu > Options and select the Show Tasks entry bar check box. To change the priority of a task Before you can sort tasks by priority, you need to specify a priority level for each task.
-
Page 112: Notes
To locate a task When your list of tasks is long, you can display a subset of the tasks or sort the list to quickly find a specific task. Tap Start > Programs > Tasks. In the task list, do one of the following: •... - Page 113 In the Default mode box, tap one of the following: • Writing if you want to draw or enter handwritten text in a note. • Typing if you want to create a typed note. Tap OK. To create a note Tap Start >...
- Page 114 Exchanging Messages and Using Outlook...
-
Page 115: Chapter 8 Experiencing Multimedia
Chapter 8 Experiencing Multimedia 8.1 Using Camera and Camcorder 8.2 Using Pictures & Videos 8.3 Using Windows Media Player... -
Page 116: Using Camera And Camcorder
8.1 Using Camera and Camcorder Taking photos and recording video clips along with audio is easy with your XV6700’s built-in camera. To switch to any of the Camera modes • Tap Start > Programs > Camera; or • Tap Start > Programs > Pictures & Videos > Camera icon;... -
Page 117: Use Shortcuts In Camera Mode
Burst / Sport JPEG Use shortcuts in Camera mode While in Camera mode, you can use the following buttons and icons on your XV6700 as a shortcut when performing operations. The ENTER button Press ENTER to take a picture when you are capturing still image. Press ENTER to start recording an incoming video stream;... - Page 118 The NAVIGATION control • Press NAVIGATION up or down to increase or decrease the zoom level. • Press NAVIGATION left or right to change the capture mode. The CAMERA button Press and hold the CAMERA button on the device for two seconds to switch to Camera mode.
- Page 119 • Ambience indicator. The ambience icon ( current ambience. • Zoom-Ratio indicator. Tapping the up/down arrow ( to zoom in and zoom out. • Mode Switching button. Tapping the left/right arrow ( to switch the capture mode. • Self-Time indicator. The timer icon ( while capturing images or videos.
-
Page 120: Use Still Image Capture Modes
(with audio if desired). To stop recording, press CAMERA or ENTER again. Your XV6700 displays the first frame of the captured video clip by default on the Review screen. Before you capture a video clip, you can specify the recording limit in terms of time and file size on the Camera Settings screen so that the recording stops automatically when the clip size reaches that limit. -
Page 121: Use Zooming
In all capture modes, use NAVIGATION on your XV6700, or tap the triangular Up arrow next to the Zoom Ratio indicator, to zoom in a still image or an incoming video stream. -
Page 122: Experiencing Multimedia
Capture mode Capture size setting Scaled (1600 x 1280) 1.3M (1280 x 1024) Photo Large (640 x 480) Medium (320 x 240) Small (160 x 120) Large (320 x 240) Video and Medium (176 x 144) MMS Video Small (128 x 96) Large (640 x 480) Contacts Picture Medium (320 x 240) - Page 123 Use the Camera Settings screen While capturing a still image or video clip using any capture mode, tap the tool icon ( ) to access the Camera Settings screen. The Camera Settings screen allows you to configure the capture settings. You can configure the following settings on the Camera Settings screen.
-
Page 124: Use The Tools Menu
• Keep backlight on while in backlight remains turned on while you view the incoming video stream, overriding your XV6700 backlight settings. • Review after capture. Select this check box to display the captured image immediately after you take a picture. - Page 125 • Apply “Date and time stamp” while capturing automatically compose the current date and time in the captured images. • Flicker adjustment. To eliminate flicker image, select the proper frequency (50Hz or 60Hz) of the country where the device is being used. •...
-
Page 126: Using Pictures & Videos
• Copy the pictures from your PC or a storage card to the My Pictures folder on your XV6700. For more information about copying files from your PC to your XV6700, see ActiveSync Help on your PC. To view pictures Tap Start >... - Page 127 If you store a large number of pictures or video clips on your XV6700, you may find it helpful to sort them to quickly find a specific picture or clip. You can sort by name, date, and size.
- Page 128 To edit a picture You can rotate, crop, and adjust the brightness and color contrast of your pictures. Tap Start > Programs > Pictures & Videos. Tap the picture you want to edit. Tap Menu > Edit, and do any of the following: •...
- Page 129 To assign pictures to contacts You can assign a picture to a contact so that you can easily identify the contact at any point of time. Tap Start > Programs > Pictures & Videos. Select the picture you want to assign to a contact. Tap Menu >...
-
Page 130: Using Windows Media Player
You can use Microsoft Windows Media Player 10 Mobile for Pocket PC to play digital audio and video files that are stored on your XV6700 or on a network, such as on a Web site. Using Windows Media Player, you can play both audio and video files. These are the following file formats that are supported by this version of Windows Media Player. -
Page 131: About The Screens And Menus
About the screens and menus Windows Media Player has three primary screens: • Playback screen. The default screen that displays the playback controls (such as Play, Pause, Next, Previous, and Volume), the album art window, and the video window. You can change the appearance of this screen by choosing a different skin. -
Page 132: Now Playing Screen Menu
Adds new items to the library by searching your XV6700 or storage Update Library card. Lets you find and play files that are stored on your XV6700 or storage Open File card but that are not in the library. Open URL Lets you play a file on a network, such as the Internet. -
Page 133: About Licenses And Protected Files
Note To play a file that is stored on your XV6700 but is not in a library, on the Library screen, tap Menu > Open File. Tap and hold the item that you want to play (such as a file or a folder), then tap Play. - Page 134 Use the latest version of the desktop Player (Windows Media Player 10 or later) to synchronize digital media files to your XV6700 (instead of dragging a file from a folder on your PC to a folder on your XV6700, for example). Using the desktop Player ensures that licenses are copied with protected files.
-
Page 135: Accessibility For People With Disabilities
Accessibility for people with disabilities Microsoft is committed to making its products and services easier for everyone to use. Many accessibility features have been built into Microsoft products, including features for individuals who have difficulty typing or using a mouse, who are blind or have low vision, or who are deaf or hard-of-hearing. - Page 136 Experiencing Multimedia...
- Page 137 Chapter 9 Using Other Applications 9.1 Word Mobile 9.2 Excel Mobile 9.3 Viewing Slide Shows with PowerPoint Mobile 9.4 Using Voice Speed Dial...
-
Page 138: Word Mobile
Word Mobile is a streamlined version of Microsoft Word. Word documents created on your PC can be opened and edited on your XV6700. You can also create and edit documents and templates in Word Mobile and save them as *.doc, *.rtf, *.txt, and *.dot files. - Page 139 text, the indentations and alignment may be displayed and saved incorrectly. • Password-protected files. Word Mobile does not support opening password-protected documents. You must first remove the password protection in Word on the PC if you want to view the document on the device. •...
-
Page 140: Excel Mobile
Unsupported features in Excel Mobile Excel Mobile does not fully support some features such as formulas and cell comments. Some data and formatting may be lost when you save the workbook on your XV6700. Note the following Excel Mobile formatting considerations: •... - Page 141 • Zoom settings. Are not retained. Excel supports a per worksheet zoom setting, while the Excel Mobile zoom setting is applied to the entire workbook. • Worksheet names. Names that reference worksheets within the same workbook are displayed accurately, but names that refer to other workbooks, arrays, for example, ={1;2;3;4}, array formulas, or intersection ranges are removed from the name list.
-
Page 142: Viewing Slide Shows With Powerpoint Mobile
9.3 Viewing Slide Shows with PowerPoint Mobile With PowerPoint Mobile, you can open and view slide show presentations created on your PC in *.ppt and *.pps format with PowerPoint ‘97 and later. Many presentation elements built into the slide shows such as slide transitions and animations will play back on the device. -
Page 143: Using Voice Speed Dial
Notes If you have zoomed in to see a slide in more detail, you cannot navigate to another slide until you zoom out. Tapping Next or Previous may play an animation on a slide rather than navigate to another slide. Simply tap the current slide to go to the next one. - Page 144 Select the phone number that you want to create a voice tag, then tap the record button Select the desired phone number Tap the record button to start recording. When completed, a voice tag icon ( When you create a voice tag for the item, you can do one of the following: •...
-
Page 145: Create A Voice Tag For A Program
Voice Recorder button. Make a call or launch programs using a voice tag Press the Voice Recorder button on your XV6700. After a “beep” sound, say the recorded voice tag that you have assigned to the phone number you want to call or the program you want to launch. - Page 146 Using Other Applications...
-
Page 147: Appendix
Appendix A.1 Regulatory Notices A.2 PC Requirement to Run ActiveSync 4.x A.3 Specifications A.4 Index... -
Page 148: Regulatory Notices
Regulatory Agency IDs For regulatory identification purposes, your product is assigned a model number of PA10A. To ensure continued reliable and safe operation of your XV6700, use only the accessories listed below with your PA10A. The “x” portion of the above model number(s) could be any alphanumeric character (or blank) denoting external cosmetic changes. - Page 149 to radio communications. However, there is no guarantee that interference will not occur in a particular installation. If this equipment does cause harmful interference to radio or television reception, which can be determined by turning the equipment off and on, the user is encouraged to try to correct the interference by one or more of the following measures: •...
- Page 150 values are then added together. A sum of 5 is considered acceptable for normal use. A sum of 6 is considered for best use. In the above example, if a hearing aid meets the M2 level rating and the wireless phone meets the M3 level rating, the sum of the two values equal M5.
-
Page 151: Important Health And Safety Information
Important Health and Safety Information Retain and follow all product safety and operating instructions. Observe all warnings in the operating instructions on the product. To reduce the risk of bodily injury, electric shock, fire, and damage to the equipment, observe the following precautions. General Precautions •... -
Page 152: Safety Precautions For Power Supply Unit
• Avoid unstable mounting Do not place the product with an unstable base. • Use product with approved equipment This product should be used only with personal computers and options identified as suitable for use with your equipment. • Adjust the volume Turn down the volume before using headphones or other audio devices. -
Page 153: Sar Information
SAR Information SAR: 1.098 W/kg @1g (USA) THIS MODEL DEVICE MEETS THE GOVERN-MENT’S REQUIREMENTS FOR EXPOSURE TO RADIO WAVES. Your wireless mobile CDMA phone is a radio transmitter and receiver. It is designed and manufactured not to exceed the emission limits for exposure to radio frequency (RF) energy set by the Federal Communications Commission of the U.S. -
Page 154: Pc Requirement To Run Activesync 4.X
Normal condition only to ensure the radiative performance and safety of the interference. As with other mobile radio transmitting equipment, users are advised that for satisfactory operation of the equipment and for the safety of personnel, it is recommended that no part of the human body be allowed to come too close to the antenna during operation of the equipment. -
Page 155: Specifications
A.3 Specifications System Information Processor Memory Operating System Display LCD Type Resolution Alignment Support CDMA Module(Dual Band) Functionality Mode External Antenna Camera Module Type Resolution Physical Dimensions Weight Intel PXA270 416Mhz - ROM : M-System 128MB NAND Flash - RAM : 64/ 128MB SDRAM Microsoft Windows Mobile Pocket PC Phone Edition Magneto 2.8”... -
Page 156: Controls And Lights
Expansion Slot MiniSD card Controls and Lights - 5-way navigation key: - Three program buttons: Voice Recorder, Internet Explorer, Camera - Two phone functions : Call, End - Volume control slider Buttons - Power On/Off - OK button - Start button - Reset switch Keyboard QWERTY type, 39 keys + 2 SOFT KEYs... -
Page 157: Index
A.4 Index Accessibility 135 ActiveSync 50 Installing ActiveSync 51 Adding and Removing Programs 67 Appointment 60 Scheduling an appointment 106 Audio 126 Backing Up Files 70 Battery 16 Installing and charging battery 16 Block Recognizer 30 Bluetooth 81 Beam information using Bluetooth 83 Creating Bluetooth partnership 82 Synchronizing via Bluetooth 55 Turn on/off Bluetooth 81... - Page 158 Flight mode 42 Handwriting 36 In-Call Options 46 Indicators 22 Infrared (IR) 11 Synchronizing via Infrared 55 Input Panel 28 Input Selector 28 Internet Explorer Mobile 78 Cookies and security settings 80 Favorite 79 History list 80 Home page 78 Temporary Internet files 80 Keyboard 29 On-screen keyboard 29...
- Page 159 Password 71 Personalizing your device 60 Date/Time/Language/Regional options Personal and system settings 63 Phone settings 66 Phone Pad 34 Multi-Tap input mode 35 Numeric input mode 35 Options 35 T9 input mode 34 Pictures & Videos 126 Sorting picture and video files 127 Picture Theme template 119 PowerPoint Mobile 142 Viewing slide shows 142...
- Page 160 Menus 131 Now Playing screen 132 Playback screen 131 Supported files 130 Word Mobile 138 Zoom 121 Appendix...
Need help?
Do you have a question about the XV6700 and is the answer not in the manual?
Questions and answers