
Related Manuals for Rothenberger Rogroover


Summary of Contents for Rothenberger Rogroover
- Page 1 ROGROOVER 1 - 12“ DE Bedienungsanleitung ES Instrucciones de uso EN Instructions for use CZ Návod k používání www.rothenberger.com...
- Page 2 Tel. + 34 94 / 6 21 01 00 • Fax + 34 94 / 6 21 01 31 erklären in alleiniger Verantwortung, dass dieses Produkt: declare on our sole responsibility that the product: Produkt-Bezeichnung: ROGROOVER 1" - 12" (No. 1500001351, 1500001352, 1500001353) Product-Designation: Produkt-Beschreibung: Elektro-hydraulische Rollnutgerät für Stahlrohre...
- Page 3 Intro DEUTSCH Seite 2 Bedienungsanleitung bitte lesen und aufbewahren! Nicht wegwerfen! Bei Schäden durch Bedienungsfehler erlischt die Garantie! Technische Änderungen vorbehalten! ENGLISH Page 15 Please read and retain these directions for use. Do not throw them away! The warranty does not cover damage caused by incorrect use of the equipment! Subject to technical modifications! ESPAÑOL - País de origen Página 27...
-
Page 4: Table Of Contents
Contents Page Safety Notes ........................16 Safety instructions ......................16 Special safety instructions ....................18 Technical Data ........................18 Function of the Unit ......................19 Overview .......................... 19 Description ........................19 Preparation of the machine and the working area ............. 19 Tube assembly ......................... -
Page 5: Safety Notes
Safety Notes Safety instructions 1. Use the correct voltage. • Use the voltage indicated on the equipment nameplate or in the manual. If the supply volt- age is different from the voltage indicated overheating, smoke or fire could result. 2. Verify that the switch is in the OFF position before inserting the plug in the electric power sup- ply socket. - Page 6 11. Wear close-fitting clothing. • Do not wear ties, garments with open sleeves, loose garments, accessories such as neck- laces, etc., which could get caught in rotating parts. • When working outside it is recommended to use rubber gloves and shoes with studs. Slip- pery gloves and footwear can lead to injuries.
-
Page 7: Special Safety Instructions
• This could otherwise lead to accidents or injury Special safety instructions About the grooving machine • The grooving machine has been manufactured for making grooves in tubes and pipes.In or- der to handle the machine follow the instructions in this manual. Any other uses increase the risk of injury occurring. -
Page 8: Function Of The Unit
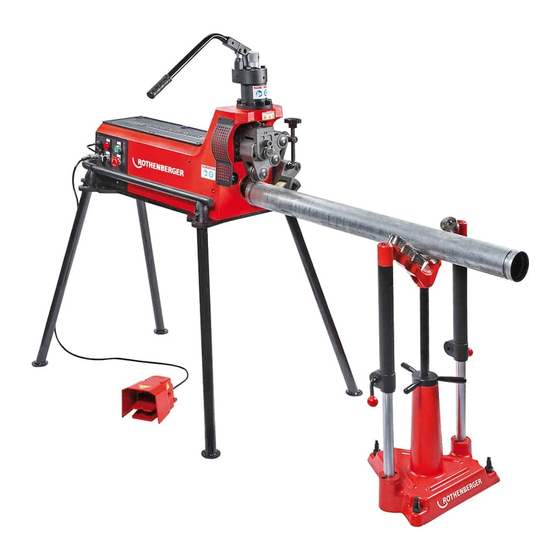
Function of the Unit Overview Adjusting nut Handle body Hydraulic cylinder Shut-off valve Roller slide Handle Drive shaft Guard Body of head Pipe stabilising roller Motor cover Mounting base Control panel (electric) Description This machine makes circular grooves at the end of steel tubes in order to facilitate the assembly of circular couplings. -
Page 9: Tube Assembly
Attach an expansion bolt in the ground below the machine and, using an adjustable hook, attach the table to the ground bolt. Attach the tube support to the ground using three bolts. Examine the upper roller and the lathe screw to ensure that the size is correct. Ensure that the machine shaft and the tube support are perfectly aligned. -
Page 10: Operation Of The Grooving Machine
Start up the machine, close the cylinder shut-off valve and start pumping. Do not pump con- tinuously, but allow the pipe to complete three rotations for each pumping action. When the adjusting nut touches the hydraulic cylinder stop pumping and do not stop the machine until the pipe has rotated three times. -
Page 11: Changing The Roller Assembly
Position the tube in such a way that it is levelled and makes contact with the lathe screw edge. Exert downstream pressure on the pump han- dle to move the upper roller until making con- tact with the tube. Turn the wheel to move the stabiliser roller ... - Page 12 Select a roller and a drive shaft of the same size. Lower the upper roller until it almost touches the drive shaft at the point where its diameter is at its greatest. Loosen the two screws (8) of the head. It is not ...
-
Page 13: Warnings And Advice For Knurling
Warnings and advice for knurling You must be familiar with the machine structure, its functions and the propulsion and lubrication systems by reading the manual prior to starting operation. Before switching on the machine add oil as indicated in the manu- al. - Page 14 Symptom Possible Reason Solution The groove zigzags Cut the tube square The tube has not been cut square The groove is not parallel to the surface of the tube end The groove diameter is not The tube is elliptic Use a circular tube uniform throughout the entire circumference of the tube...
-
Page 15: Customer Service
Customer service The ROTHENBERGER service locations are available to help you (see listing in catalog or on- line) and replacement parts and service are also available through these same service locations. Order your accessories and spare parts from your specialist retailer or using our service-after-...
Need help?
Do you have a question about the Rogroover and is the answer not in the manual?
Questions and answers