Table of Contents
Advertisement
Advertisement
Table of Contents

Related Manuals for UNEEKOR EYE MINI


Summary of Contents for UNEEKOR EYE MINI
- Page 1 USER MANUAL Important: Read before us-...
- Page 2 We received your feedback and engineered the most innovative, versatile, and accurate portable launch monitor. Whether going to the range or taking your simulation room to the next level, the EYE MINI is here to help you analyze and improve every aspect of your golf game.
-
Page 4: Table Of Contents
Table of Contents What’s Included License Registration EYE MINI Overview Get Familiar Getting Set-Up Aligning Your EYE MINI Applying Club Stickers Safety Notice Appendix Data External Links EYE MINI USER MANUAL... -
Page 5: What's Included
What’s Included Tweezers Ethernet Cable Power Cable Rubber Stopper Club Stickers EYE MINI Alignment Rod Carrying Case with Shoulder Strap EYE MINI USER MANUAL... -
Page 6: License Registration
License Registration The EYE MINI requires periodic connection via internet to validate the license. If the EYE MINI is disconnected from the internet for a period of longer than 90 days, all connection will be prohibited until device is connected to internet and license is validated. -
Page 7: Eye Mini Overview
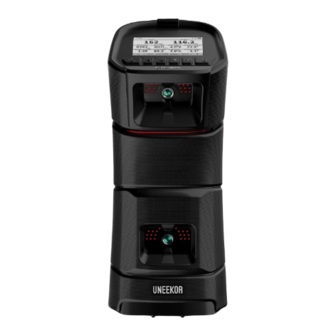
Page 6 Diagram - v1 - EYE-MINI Manual Diagrams 10’ L x 13’ W x 10’ H Dimensions Marked Balls 6.5” L x 6.6” W x 15.75” Compatible Accessories Weight Club stickers, Swing Optix, Balance Optix 7lbs 15oz EYE MINI USER MANUAL... - Page 8 EYE MINI Overview Front E-Ink Screen Power Button Displays calibration, Turns the options, and Device On/Off shot data Two High- Speed Cameras & Infrared Sensors EYE MINI USER MANUAL...
- Page 9 EYE MINI Overview Rear Handle Power Port Ethernet Port Utilized to connect to network via ethernet cable or connect to PC USB-C Port For Uneekor use only EYE MINI USER MANUAL...
- Page 10 Increases device On/Off brightness for better viewing *Tap to wake up from sleep mode Back Button OK Button Return to Used to previous screen select options Up/Down Keys Used to navigate between settings and shot data EYE MINI USER MANUAL...
- Page 11 EYE MINI Overview Ways to Use There are various ways to use the EYE MINI: (1) PC, (2) iPad, (3) E-Ink Display. 1. PC For when you are at home and looking to make the most of your indoor golf simulator bay.
-
Page 12: Get Familiar
Begin by pressing the power button to turn on the EYE MINI. After powering on the EYE MINI, it will take you to the “Searching…” screen. This is the screen you will see when the sensor is looking for a golf ball in the hitting zone when you are ready to hit. - Page 13 Calibrating/ aligning your EYE MINI to Target Alignment (pg 24) the target is done here and can also Please ensure EYE MINI is aligned parallel to be completed by going to MENU then your target line. Additiional alignment details Target Alignment. Select “Align” at the using the EYE MINI alignment rod available on bottom of the display, then start.
- Page 14 Get Familiar Status About Gives you the status of the Battery Device: you will find your EYE MINI Serial life, WiFi, WiFi IP Address, Ethernet, Number, Region, Wi-Fi SSID, and Wi-Fi Ethernet IP Address. Password. License section: you can see your account...
-
Page 15: Getting Set-Up
Ethernet- Direct to PC To connect your EYE MINI with PC, connect the ethernet cable from the PC to the back of the EYE Page 14 Diagram 1 - EYE-MINI Manual Diagrams MINI. Ensure the Ethernet option under settings on the EYE MINI is set to “STATIC” and WiFi is set to “Station.”... - Page 16 To connect the EYE MINI this way, please connect the ethernet cable provided from the back of the EYE MINI to the LAN port on your router or network switch. Under settings change ethernet type to “Dynamic”.
- Page 17 For any assistance using the Uneekor Launcher, please reference the guide below. Installation Guide 3. Open the Uneekor Launcher on your PC and go to the “Install” tab on left-hand side and select EYE MINI, then continue. Follow the step-by-step instructions on the Launcher Window to set up your EYE MINI.
- Page 18 This option is to be selected when connecting your EYE MINI directly to the PC. Ensure you have the ethernet setting on the EYE MINI set to “Static” and the WiFi setting set to “Station (Client).” If not set to the proper Ethernet and WiFi setting, then the launcher will not be able to find your EYE MINI.
- Page 19 Getting Set-Up Step 2 Click “Select” on your EYE MINI device. If you do not see your EYE MINI on the list, please check the internet is connected properly and you have selected the correct internet connection method during Step 1.
- Page 20 View software, third party connector, and Refine/Refine+ if purchased. For any third party software please follow their install instructions. For any help with third party software installation, please contact the according companies support team. E6: https://e6golf.com/support/ GSPro: https://gsprogolf.com/ or support@gsprogolf.com TGC 2019: https://csc.protee-united.com/hc/en-us EYE MINI USER MANUAL...
- Page 21 WiFi network. Once connected to the WiFi, you may move EYE MINI to your desired hitting loction. **Do not connect your PC to the EYE MINI WiFi signal - this is only used to connect an iPad.** EYE MINI USER MANUAL...
- Page 22 You will need to register your EYE MINI using the Uneekor Launcher with your PC prior to using an iPad. On the main screen of the EYE MINI, select “MENU”. On the left-hand side of the MENU screen, you’ll see a QR Code. If you do not see the QR code, go to settings and chage the WiFi setting to Access Point (AP).
- Page 23 View App 1. Once EYE MINI is connected to an iPad and has been registered on the Uneekor Launcher with your My.Uneekor account, download the View application from the App Store. 2. Open the View app on your iPad. Select your EYE MINI device and press connect.
-
Page 24: Aligning Your Eye Mini
Aligning Your E YE MINI CAUTION Ensure EYE MINI is placed on a level surface. If placed on an angle, the ball will fly at the angle it is tilted to. Ensure EYE MINI is placed on even height surface as hitting area. - Page 25 (see images for reference) Included in your EYE MINI kit is an alignment rod that attaches to the base of EYE MINI. Once the alignment rod is attached, you can also extned the two ends for a longer visual line.
-
Page 26: Applying Club Stickers
Applying Club Stickers *Club stickers are not required to use the EYE MINI. Applying club stickers allow EYE MINI to read the club face and interpret club data. The EYE MINI utilizes a single club sticker. To apply club stickers, please follow bellow. - Page 27 Wood/ Hybrid: For woods and hybrids that have 5 grooces, the club sticker is placed 1 inch in from the toe and 3rd groove. *If the club sticker is not applied, club data will not be provided EYE MINI USER MANUAL...
-
Page 28: Safety Notice
20-degree Fahrenheit and no warmer than 110-degrees Fahrenheit. DO NOT leave your EYE MINI outside unattended. DO NOT leave your EYE MINI in the trunk of your vehicle in cold or hot temperatures for extended periods of time. EYE MINI USER MANUAL... - Page 29 If sticker seal on the bottom is tampered with, warranty will be nullified. 4. DO NOT use this device in environments where high humidity, smoke, or dust is present. 5. DO NOT look directly into the infrared cameras when the device is turned on. EYE MINI USER MANUAL...
- Page 30 Support For any issues please contact support Email: Support @Uneekor.com To schedule an appointment with support, visit our website Support | Uneekor EYE MINI USER MANUAL...
-
Page 31: Appendix
Pace at which ball is traveling when it leaves the club face after impact Back/Side Spin Rotations of the ball either left, right, or backwards Side Angle Degree angle, left or right, of ball when leaving club face left or right EYE MINI USER MANUAL... - Page 32 Appendix Side Distance Distance of ball, left or right relative to starting point of shot Launch Angle Vertical angle of ball after leaving club face Carry Distance Total distance ball traveled in the air EYE MINI USER MANUAL...
- Page 33 The in to out, or out to in movement of the club head’s geometric center at the center at the time of impact. Club Path is the direction (right or left) the club head is moving at impact and is measured relative to the target line EYE MINI USER MANUAL...
- Page 34 Appendix Launcher Guide My.Uneekor.com Uneekor Support Launcher download link EYE MINI USER MANUAL...
- Page 35 MASTER YOUR PASSION UNEEKOR, INC. 15770 LAGUNA CANYON RD SUITE 100 IRVINE, CA 92618 TEL: 1-(888) 262-6498 SALES@UNEEKOR.COM SUPPORT@UNEEKOR.COM...
Need help?
Do you have a question about the EYE MINI and is the answer not in the manual?
Questions and answers