Table of Contents
Advertisement
Available languages
Available languages
Quick Links
Warning notices: Before using this product, please read this manual carefully and keep it for future reference.
The design and specifications are subject to change without prior notice for product improvement. Consult
with your dealer or manufacturer for details.
The diagram above is just for reference. Please take the appearance of the actual product as the standard.
ELECTRIC RANGE
USER MANUAL
MER30B12AWWC
Advertisement
Chapters
Table of Contents

Related Manuals for Midea MER30B12AWWC


Summary of Contents for Midea MER30B12AWWC
- Page 1 ELECTRIC RANGE USER MANUAL MER30B12AWWC Warning notices: Before using this product, please read this manual carefully and keep it for future reference. The design and specifications are subject to change without prior notice for product improvement. Consult with your dealer or manufacturer for details.
-
Page 2: Table Of Contents
THANK YOU LETTER THANK YOU LETTER Thank you for choosing Midea! Before using your new Midea product, please read this manual thoroughly to ensure that you know how to operate the features and functions that your new appliance offers in a safe way. -
Page 3: Safety Instructions
SAFETY INSTRUCTIONS SAFETY DEFINITIONS • Warnings and safety instructions in this manual do not cover all possible conditions and situations that may occur. It is your responsibility to use common sense, caution, and care when installing, maintaining, and operating your oven. Known hazards and their severity are identified in this manual with the following symbols: WARNING... - Page 4 WARNING TIP OVER HAZARD A child or adult can tip the range and be killed. Verify the anti-tip device has been properly installed and engaged per installation instructions. Ensure the anti-tip device is re- engaged when the range is moved. Anti-Tip Bracket Do not operate the range without the anti-tip device in place and engaged.
- Page 5 allowed by this manual. • Be sure your appliance is properly installed and grounded by a qualified service provider. • DO NOT operate this appliance if it has been damaged or is not working properly. Contact a qualified service provider for repairs. •...
- Page 6 WARNING GENERAL USAGE • Do not store any flammable materials or temperature sensitive items inside oven, in storage drawer, or on top or near cooktop heating elements of the appliance. • Never use your appliance for warming or heating the room.
- Page 7 FIRE HAZARD Never leave the range unattended • Turn off controls when not cooking • WARNING Failure to follow these instructions • can result in death or fire When range is in use, the entire • cooktop may become hot! The surface cooking area will glow red when an •...
- Page 8 • Only certain types of glass, glass/ceramic, ceramic, earthenware, or other glazed utensils are suitable for range-top service without breaking due to the sudden change in temperature. • To reduce the risk of burns, ignition of flammable materials, and spillage due to unintentional contact with the utensil, the handle of a utensil should be positioned so that it is turned inward, and does not extend over the front of the counter top or over...
- Page 9 • Hot oil is capable of causing severe burns. Never move cooking utensils containing hot grease. Wait until it has cooled before disposing of grease. • Use high heat settings only when necessary. To avoid splattering, heat oil slowly on medium-low settings. •...
- Page 10 may be hot even though they are dark in color. Interior surfaces of an oven become hot enough to cause burns. During and after use, do not touch, or let clothing or other flammable materials contact heating elements or interior surfaces of oven until they have had sufficient time to cool.
-
Page 11: Specification
SPECIFICATION MODEL MER30B12AWWC 120/240V~ 60Hz - 9.65kW POWER SUPPLY 120/208V~ 60Hz - 7.238kW PRODUCT DIMENSIONS A. 25.63” (65.1 cm) depth. Back of range to front of cooktop 46.4” (117.9 cm) max. depth. Back of range to the top with the door opened C. -
Page 12: Product Overview
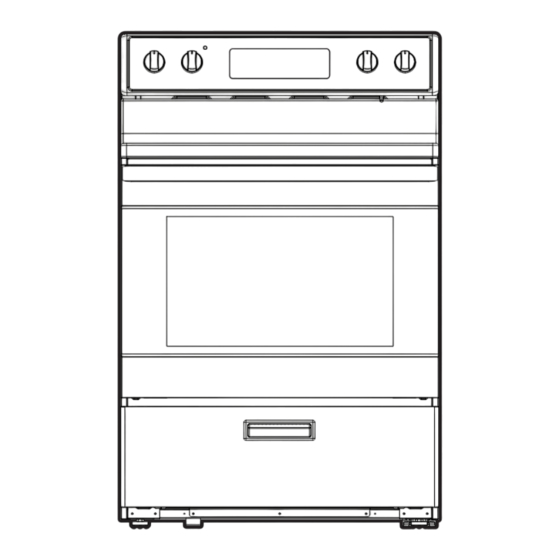
PRODUCT OVERVIEW Range Parts Diagram RANGE PARTS DIAGRAM: A. Cooktop Knob B. Control Panel C. Cooktop Knob D. Ceramic Glass Surface E. Oven Light F. Oven Racks G. Gasket H. Oven Door with Handle I. Storage Drawer J. Broiler K. Oven Vent L. - Page 13 CHOKING HAZARD WARNING SMALL PARTS. NOT FOR CHILDREN UNDER 3 YEARS OLD. EN-12...
-
Page 14: Product Installation
PRODUCT INSTALLATION Safety Informatlon FOR YOUR SAFETY AND THE SAFETY OF OTHERS, PLEASE READ ALL SAFETY INSTRUCTIONS BEFORE INSTALLING THIS APPLIANCE. There are important safety messages in this manual for this appliance. Failure to follow instructions may result in potential safety hazards to you or to the product, which may cause bodily injury. - Page 15 When product is first unpacked, verify that all these components are present. If anything is missing, check the packaging materials carefully for missing items. If items cannot be located, contact Midea customer service at 1-888-365-2230 or visit midea.com/ca/support for assistance.
- Page 16 Tools Needed: To complete the installation, have the following tools readily available: Cut Resistant Gloves, Drop Cloth or Tape Measure Safety Glasses or Goggles, Cardboard (optional (to confirm and Steel-Toed Shoes - to protect floor) installation space) (for your safety and protection) Phillips Screwdriver Nut Driver...
- Page 17 Remove Old Appliance WARNING FIRE,EXPLOSION HAZARD • Installation and service must be performed by a qualified installer or service agency. CAUTION LACERATION, FOREIGN OBJECT, CRUSH HAZARD • When installing, moving, or servicing any appliance, wear proper protective equipment, including cut resistant gloves, steel-toed shoes, and safety glasses.
- Page 18 Before starting the installation process, confirm the installation space meets the following dimensions and clearances. Do not locate the range where it may be subject to strong drafts - seal any openings in the wall, floor, or cabinets in the installation space. Provide adequate clearances between the range and adjacent combustible surfaces.
- Page 19 WARNING Allow 30" minimum clearance between surface units and bottom of un- protected wood or metal cabinet, or allow a 24" (61.0 cm) minimum when bottom of wood or metal cabinet is protected by no less than 1/4" (0.64 cm) thick flame retardant millboard covered with not less than No 28 MSG sheet metal [0.015"...
- Page 20 ELECTRICAL SUPPLY CONNECTION: WARNING ELECTRICAL SHOCK HAZARD • Installation must be electrically grounded in accordance with local codes or, in the absence of local codes, with the National Electrical Code, NFPA 70 or the Canadian Electric Code, CSA C22.1-02. • Do not use an extension cord with this product. •...
- Page 21 C. For power cord installations only (see the next step if using conduit), assem ble the strain relief in the hole. Insert the power cord through the strain relief and tighten. Allow enough slack to easily attach the cord terminals to the terminal block.
- Page 22 The Strain relief MUST be installed before reinstalling the terminal block cover. E. Replace wire cover on range back and replace the screws removed earlier. Make sure that no wires are pinched between cover and range back. Replace the terminal block cover if it was removed. Conduit BEFORE: POWER CORD AND CONDUIT Terminal...
- Page 23 4-Prong Power Cord Directions IMPORTANT: The neutral wire of the supply circuit must be connected to the neutral terminal located in the lower center of the terminal block. The power leads must be connected to the lower left and the lower right terminals of the terminal block.
- Page 24 B. Insert the center (white/neutral) wire tip through the bottom center terminal block opening. On certain models, the wire will need to be inserted through the ground strap opening and then into the bottom center block opening. Insert the two side bare wire tips into the low er left and the lower right terminal block openings.
- Page 25 B. Insert the center (white/neutral) wire tip through the bottom center terminal block opening. On certain models, the wire will need to be inserted through the ground strap opening and then into the bottom center block opening. Insert the two side bare wire tips into the low er left and the lower right terminal block openings.
- Page 26 The anti-tip kit is provided with the range. If the anti-tip bracket is missing, damaged, or needs replaced, a replacement kit will be provided free-of-charge by contacting Midea customer service at 1-888-365-2230 or by visiting midea.com/ca/support. If range is ever moved to a different location, the anti-tip brackets must also be moved and installed with the range.
- Page 27 HOW TO INSTALL ANTI-TIP BRACKET 1. Remove the anti-tip bracket from where it is taped on Oven Rack inside the Oven. 2. Determine which mounting method to use: floor or wall. If you have a stone or masonry floor, you can use the wall mounting method.
- Page 28 Check to make sure the back leg of the range has engaged properly into the anti-tip bracket. If visual inspection is not possible: - Slide range forward - Confirm anti-tip bracket is securely attached to floor or wall in correct position according to installation instructions.
- Page 29 REINSTALLING DOOR: 1. Holding door from the sides, align door so that hinges slip back into openings. 2. Rotate door until ~2-3 inches from being fully closed, allow door to drop into notches on hinges. 3. Rotate door out until fully open. 4.
- Page 30 LEVEL RANGE HOW TO LEVEL THE RANGE: 1. To level your range, place a level straight across (left to right), on one of the racks inside your oven. If the range is uneven, adjust the leveling legs until the Ievel is balanced. (Leveling legs are on the bottom of the range and can be adjusted by turning the feet clockwise or counter clockwise.
-
Page 31: Operation Instructions
OPERATION INSTRUCTIONS Review Of Controls: CONTROL PANEL DIAGRAM FRONT LEFT REAR RIGHT BURNER BURNER REAR LEFT OVEN SETTINGS FRONT RIGHT BURNER BURNER CONTROL KNOB • The control knobs can be set to anywhere between “HI” to “LOW”. • Push in and turn to activate. When the unit is powered for the first time or in case of a power outage, the control will display “12:00”... - Page 32 3. Familiarize yourself with the controls and features described in this manual. 4. Confirm that surface elements and oven operate as intended. Contact Midea customer service at 1-888-365-2230 or by visiting midea.com/ca/support immediately if appliance is not working as expected.
- Page 33 CLEAR/OFF The CLEAR/OFF pad stops any function except the Control Lock. OVEN LIGHT Press the “OVEN LIGHT” pad to turn the lights on or off. When the “Bake” or "Broil" start, the Oven Light will light up automatically. START The “START” Pad begins the oven function. If the “START” pad is not pressed within 30 seconds after pressing a function pad, the display will begin to flash for 30 seconds, then 5 reminder tones will sound, and “PUSH"...
- Page 34 HOW TO CHANGE THE OVEN TEMPERATURE SCALE TO CELSIUS: 1. To change the oven temperature scale to Celsius (C), press the “BAKE” pad and hold for 3 seconds. 2. Next, the letter “C” will appear on the display for a few seconds. 3.
- Page 35 REMOVING/INSERTING RACKS: CAUTION BURN HAZARD • Always place oven racks in the desired location while oven is cool. If rack must be moved while oven is hot, do not let pot holder contact hot oven surfaces. Oven Racks: Flat Rack: Versatile and low profile, each range is supplied with one or more flat oven racks.
- Page 36 Rack Positions: For best performance, adjust rack so food is placed at the center of the oven. For most foods this will be rack position #3 OVEN FUNCTION RACK POSITION BAKING Large Roast/Turkey Use Rack 1 Meat/Poultry Use Rack 2 Cake/Cookies Use Rack 3 Batch Baking...
- Page 37 For best results when baking layer cakes on 2 racks in the middle section of the oven, use racks 3 and 5. For an even bake, stagger the cake pans on the bottom rack so that it is not positioned directly below the cake pans on the top rack. Place the cake pans on the racks as shown in the illustration below.
- Page 38 BAKE Designed for general baking recipes, BAKE applies heat from both above and below to achieve exceptional baking performance. Works best for small- and medium-sized foods that require only one rack position at the center of the oven, such as casseroles, frozen dinners, single-layer cakes, and individual racks of cookies.
- Page 39 HOW TO SET THE COOK TIME FUNCTION 1. When you’re cooking with “Bake, If a set c ooking time is desired, press the “COOK TIME” button. 2. Use the “+ or –” pad to enter the desired cooking time. 3. Once you have set your cooking time, press the “C OOK IME ”...
- Page 40 FOOD POISONING HAZARD WARNING DO NOT LET FOOD SIT IN THE OVEN MORE THAN ONE HOUR BEFORE OR AFTER COOKING. DOING SO CAN RESULT IN FOOD POISONING OR SICKNESS. COOKTOP OPERATION WARNING WARNING FIRE HAZARD • DO NOT USE WATER ON GREASE FIRES. Smother fire or flame with a close-fitting lid or metal tray.
- Page 41 Types of Cooking Elements: All Midea ranges are provided with 4 cooking elements (capable of raising foods to safe cooking temperatures). As the cooking elements operate, they will automatically cycle on and off - even at the highest setting - to maintain power levels.
- Page 42 Cookware STORAGE DRAWER WARNING WHEN THE OVEN IS IN USE, THE DRAWER MAY BECOME HOT. DO NOT STORE PLASTICS, CLOTH, OR OTHER ITEMS THAT COULD MELT OR BURN IN THE DRAWER. OVEN VENT WARNING THE OVEN VENT RELEASES HOT AIR AND MOISTURE FROM THE OVEN, IT SHOULD NOT BE BLOCKED OR COVERED.
- Page 43 Cooktop Indicators: All Midea ranges are provided with separate indicators alerting the user that the cooktop is in use and that the cooktop surface is hot. Surface-On Indicator: Some models will indicate that a cooktop element is on using a single light on the control panel.
- Page 44 NOTE When the Hot Surface Indicator turns off, the glass surface may still feel slightly hot to the touch. Avoid touching or placing anything on the cooktop until it has completely cooled. The Hot Surface Indicator may illuminate when the cooktop heats up during long baking cycles. This is normal. Controlling the Cooking Elements: To turn a cooking element on, push in on the control knob and turn in either direction.
- Page 45 • Do not leave the door open any longer than necessary. • If in operation, the convection fan will automatically shut off any time door is opened. • If oven is left in operation for extended periods, it will automatically shut off. Bake modes shut off after 12 hours, Broil will shut off after 12 hour.
-
Page 46: Cleaning And Maintenance
CLEANING AND MAINTENANCE WARNING Tip-Over Hazard • If range is moved for cleaning, servicing, or any other reason, confirm the anti-ti device is engaged per the installation instructions. • A child or adult can tip the range and be killed. •... - Page 47 Moderate soiling: • Commercially available glass cooktop cleaners may be used. Follow instructions on product packaging. Heavily burned on residue: • Clean using commercially available glass cooktop cleaner. Follow instructions on product packaging. • Use a razor blade scraper designed for cleaning glass surfaces. Ensure razor is clean and new to minimize risk of scratching cooktop.
- Page 48 NOTICE TO PREVENT COSMETIC DAMAGE Do not use scouring pads, abrasive cleaners, strong liquid chemicals, steel wool, or oven cleaners, as these may damage the control panel finish. For best results, it is recommended to clean the user interface and control panel after each use.
- Page 49 Oven Lights: CAUTION SHOCK, BURN, AND LACERATION HAZARDS • Disconnect power to oven and wait until oven is cool before attempting to service light bulbs. • Handle glass cover carefully to reduce risk of breakage. If lamp cover is difficult to remove, do not force. Contact a qualified service provider for repairs.
-
Page 50: Troubleshooting
TROUBLESHOOTING Read before calling for service Midea is committed to providing you with a quality appliance that works as expected.If you find something that is not working as anticipated, check the table below for helpful hints and advice that might save you the time and expense of calling for repair. - Page 51 OVEN COOKING RESULTS NOT WHAT POSSIBLE SOLUTIONS EXPECTED Is the proper oven temperature • See “Oven Temperature Control” calibration set? section. Was the Oven preheated? • See “Baking” section. • See “Positioning Racks and Are the racks positioned properly? Bakeware” section. Is there proper air circulation around •...
- Page 52 2. All warranty service is provided exclusively by our authorized Midea Service Providers, in the U.S. and Canada. Midea Customer Service In the U.S.A. or Canada, call 1-888-365-2230 If outside the 50 States of the United States or Canada, contact your authorized Midea dealer to determine whether another warranty applies. LIMITED WARRANTY WHAT IS COVERED...
- Page 53 Consumable parts (i.e. light bulbs, batteries, air or water filters, etc.) Defects or damage caused by the use of non-genuine Midea parts or accessories. 6. Damage from accident, misuse, abuse, fire, floods, electrical issues, acts of God or u with products not approved by Midea.
- Page 54 If you want a longer or more comprehensive warranty than the limited warranty that comes with this major appliance, you should ask Midea or your retailer about buying an extended warranty.
-
Page 55: Trademarks, Copyrights And Legal Statement
Midea may constitute trademark infringement or unfair competition in violation of relevant laws. This manual is created by Midea and Midea reserves all copyrights thereof. No entity or individual may use, duplicate, modify, distribute in whole or in part this manual, or bundle or sell with other products without the prior written consent of Midea. -
Page 56: Data Protection Notice
European Economic Area. Further information are provided on request. You can contact our Data Protection MideaDPO@midea.com. To exercise your rights such as right to object your personal date being processed for direct marketing purposes, please contact us via MideaDPO@midea.com. To find further information, please follow the QR Code. - Page 59 CUISINIÈRE ÉLECTRIQUE MANUEL DE L'UTILISATEUR MER30B12AWWC Avis de mise en garde : Avant d’utiliser ce produit, veuillez lire attentivement ce manuel et le conserver pour consultation future. La conception et les spécifications sont susceptibles d'être modifiées sans préavis pour l'amélioration du produit. Consultez votre revendeur ou le fabricant pour plus de détails.
- Page 60 THANK YOU LETTER LETTRE DE REMERCIEMENT Merci d'avoir choisi Midea! Avant d'utiliser votre nouveau produit Midea, veuillez lire attentivement ce manuel pour vous assurer que vous savez comment utiliser les caractéristiques et fonctions o ertes par votre nouvel appareil en toute sécurité.
-
Page 61: Consignes De Sécurité
CONSIGNES DE SÉCURITÉ DEFINITIONS DE SECURITE • Les avertissements et les consignes de sécurité de ce manuel ne couvrent pas toutes les conditions et situations susceptibles de se produire. Il vous incombe de faire preuve de bon sens, de prudence et d'attention lors de l'installation, de l'entretien et de l'utilisation de votre four. - Page 62 AVERTISSEMENT Lire toutes les consignes de sécurité avant d'utiliser ce produit. Le non-respect de ces instructions peut entraîner un incendie, un choc électrique, des blessures graves, voire la mort. Il est de la responsabilité du propriétaire de s'assurer que toute personne utilisant l'appareil sait comment l'utiliser en toute sécurité.
- Page 63 d'installation. - Faire glisser complètement la cuisinière contre le mur de manière à ce que le pied de nivellement s'engage dans le support anti basculement. • Si la cuisinière est mise hors service, assurer la fermeture de la porte ou la retirer pour minimiser les risques de basculement.
- Page 64 • NE PAS réparer ni remplacer aucune pièce de l'appareil à moins que cela ne soit spécifiquement recommandé dans le manuel. Toute autre réparation doit être confiée à un prestataire de services qualifié. • Cet appareil doit être raccordé à une source électrique à...
- Page 65 • Nettoyer uniquement les pièces et les zones répertoriées dans la section "Nettoyage et entretien" de ce manuel. AVERTISSEMENT USAGE GENERAL • Ne pas ranger de matériaux inflammables ou d'articles sensibles à la température à l'intérieur du four, dans le tiroir de rangement, ou sur le dessus ou à...
- Page 66 AVERTISSEMENT PLAQUE DE CUISSON VITROCERAMIQUE Le Témoin de Surface Chaude s'allume si une surface de cuisson est trop chaude pour être touchée, même si la surface de cuisson est éteinte. Faire preuve de prudence car la surface de la plaque de cuisson peut être encore chaude après que le témoin de surface chaude s'est éteint.
- Page 67 • Pour les aliments contenant du sucre sous quelque forme que ce soit, nettoyer tous les déversements et toutes les souillures dès que possible. Laisser la plaque de cuisson refroidir légèrement. Ensuite, en portant des gants de cuisine, retirer les éclaboussures à...
- Page 68 • NE PAS TOUCHER LES ELEMENTS CHAUFFANTS DE LA PLAQUE DE CUISSON OU LES ZONES PROCHES DES ELEMENTS – Les éléments chauffants de la plaque de cuisson peuvent être chauds même s'ils sont de couleur foncée. Les zones situées à proximité...
- Page 69 • L'huile chaude peut provoquer de graves brûlures. Ne jamais déplacer des ustensiles de cuisine contenant de la graisse chaude. Attendre qu'elle ait refroidi avant de vous en débarrasser. • N'utiliser les températures élevées qu'en cas de nécessité. Afin d’éviter les éclaboussures, faire chauffer l'huile lentement à...
- Page 70 • Ne pas obstruer les orifices du four. • Toujours placer les grilles du four à l'endroit souhaité lorsque le four est froid. Si la grille doit être déplacée alors que le four est chaud, ne pas laisser le support de récipient entrer en contact avec l'élément chauffant du four.
- Page 71 • Ne pas obstruer les orifices du four ou toute autre fente ou ouverture de l'appareil. FR-12...
-
Page 72: Spécifications
SPÉCIFICATION MODÈLE MER30B12AWWC 120/240 V~ 60 Hz - 9.65 kW SOURCE DE COURANT 120/208 V~ 60 Hz - 7.238 kW DIMENSIONS DU PRODUIT A. Profondeur de 25,63 po (65,1 cm). De l'arrière de la cuisinière à l'avant de la table de cuisson B. -
Page 73: Présentation Du Produit
PRÉSENTATION DU PRODUIT Diagramme des pièces de la gamme SCHÉMA DE LA CUISINIÈRE : A. Bouton de la table de cuisson B. Panneau de commande C. Bouton de la table de cuisson D. Surface en vitrocéramique E. Lumière du four F. - Page 74 RISQUE D'ÉTOUFFEMENT ATTENTION PETITES PIÈCES. PAS POUR LES ENFANTS DE MOINS DE 3 ANS. FR-15...
-
Page 75: Installation Du Produit
INSTALLATION DU PRODUIT Informations de sécurité POUR VOTRE SÉCURITÉ ET CELLE DES AUTRES, VEUILLEZ LIRE TOUTES LES INSTRUCTIONS DE SÉCURITÉ AVANT D'INSTALLER CET APPAREIL. Ce manuel contient des messages de sécurité importants pour cet appareil. Le non-re- spect des instructions peut entraîner des risques potentiels pour votre sécurité ou pour le produit, ce qui peut entraîner des blessures corporelles. - Page 76 S’il manque quoi que ce soit, vérifier soigneusement les matériaux d’emballage pour voir s’il manque des articles. Si les articles ne peuvent pas être localisés, communiquer avec le service à la clientèle de Midea au 1-888-365-2230 ou consulter la page midea.com/ca/support pour obtenir de l’aide.
- Page 77 Outils nécessaires : Pour terminer l’installation, avoir les outils suivants à portée de main : Gants résistants aux Ruban à mesurer Toile de protection coupures, lunettes de (pour confirmer ou carton sécurité et chaussures à l’espace (facultatif – pour embout d’acier (pour votre d’installation) protéger le plancher) sécurité...
- Page 78 Retirer l’ancien appareil AVERTISSEMENT RISQUE D’INCENDIE ET D’EXPLOSION • L’installation et la réparation doivent être effectuées par un installateur ou une agence d’entretien qualifié. MISE EN GARDE LACÉRATION, OBJET ÉTRANGER, RISQUE D’ÉCRASEMENT • Lors de l’installation, du déplacement ou de l’entretien de tout appareil, porter un équipement de protection approprié, y compris des gants résistant aux coupures, des chaussures à...
- Page 79 Avant de commencer le processus d’installation, confirmer que l’espace d’installation respecte les dimensions et les dégagements suivants. Ne pas placer la cuisinière à un endroit où elle pourrait être exposée à des courants d’air forts; sceller toutes les ouvertures dans le mur, le plancher ou les armoires dans l’espace d’installation.
- Page 80 lorsque le bas d'une armoire en bois ou en métal est protégé par au moins 1/4 po (0,64 cm) de carton épais ignifuge recouvert d'au moins une feuille de métal n° 28 MSG [0,015 po (0,4 mm)], 0,015 po (0,4 mm) d'acier inoxydable d'épaisseur, 0,024 po (0,6 mm) d'aluminium ou cuivre de 0,020 po (0,5 mm).
- Page 81 Connexion de l’alimentation électrique : AVERTISSEMENT RISQUE DE DÉCHARGE ÉLECTRIQUE • L’installation doit être mise à la terre conformément aux codes locaux ou, en l’absence de codes locaux, au Code national de l’électricité, NFPA 70 ou au Code canadien de l’électricité, CSA C22.1-02. •...
- Page 82 Pour les installations au Canada, il suffit de brancher le cordon d’alimentation à la prise résidentielle. La prise doit être correctement mise à la terre et conforme au Code canadien de l’électricité (norme C22.1 de la CSA, partie 1) et à toute exigence du code local de l’électricité. Ce four est fabriqué...
- Page 83 REMARQUE N'installez pas le cordon d'alimentation sans un serre-câble. Le support de décharge de traction DOIT être installé avant de réinstaller le couvercle du bornier. Vous devez acheter un cordon à la longueur souhaitée qui correspond correctement à la configuration de la prise. REMARQUE À...
- Page 84 E. Replacez le couvercle du fil sur le dos de la cuisinière et replacez les vis retirées plus tôt. Assurez-vous qu'aucun fil n'est pincé entre le couvercle et le dos de la cuisinière. Remettez en place le couvercle du bornier s'il a été retiré. Compression Bornier de conduit...
- Page 85 Mode d'emploi du cordon d'alimentation à 4 broches IMPORTANT : Le fil neutre du circuit d'alimentation doit être connecté à la borne neutre située en bas au centre du bornier. Les câbles d'alimentation doivent être connectés aux bornes inférieure gauche et inférieure droite du bornier. Le fil de mise à...
- Page 86 B. Insérez l'extrémité du fil central (blanc/neutre) dans l'ouverture du bornier inférieur central. Sur certains modèles, le fil devra être inséré à travers l'ouverture de la tresse de mise à terre, puis dans l'ouverture du bloc central inférieur. Insérez les deux bouts de fil dénudés latéraux dans les ouvertures inférieures gauche et droite du bornier.
- Page 87 B. Insérez l'extrémité du fil central (blanc/neutre) dans l'ouverture du bornier inférieur central. Sur certains modèles, le fil devra être inséré à travers l'ouverture de la tresse de mise à terre, puis dans l'ouverture du bloc central inférieur. Insérez les deux bouts de fil dénudés latéraux dans les ouvertures inférieures gauche et droite du bornier.
- Page 88 être remplacé, une trousse de remplacement vous sera fournie gratuitement si vous communiquez avec le service à la clientèle de Midea au 1-888-365-2230 ou consultez la page midea.com/ca/support. Si la cuisinière est déplacée vers un autre endroit, les supports anti- basculement doivent également être déplacés et installés avec elle.
- Page 89 COMMENT INSTALLER LE SUPPORT ANTI-BASCULEMENT 1. Retirez le support anti-basculement de l'endroit où il est collé sur la grille du four à l'intérieur du four. 2. Déterminez la méthode de montage à utiliser : au sol ou au mur. Si vous avez un sol en pierre ou en maçonnerie, vous pouvez utiliser la méthode de montage mural.
- Page 90 S’assurer que le pied arrière de la cuisinière est correctement engagé dans le support anti-basculement. Si une inspection visuelle n’est pas possible : - Faire glisser la cuisinière vers l’avant - Confirmer que le support anti- basculement est bien fixé au plancher ou au mur dans la bonne position selon les instructions d’installation.
- Page 91 4. Saisir fermement la porte par les côtés et la soulever vers le haut pour la sortir de la face du four. Ne pas soulever la porte par la poignée pour réduire le risque de bris de sa vitre. Réinstallation de la porte : 1.
- Page 92 Pour retirer le tiroir, sortir complètement le tiroir et tirer vers le haut, puis sortir le tiroir. Pour réinstaller le tiroir, alignez ses rails avec les rails de la cuisinière et pousser le tiroir jusqu’à ce qu’il soit complètement fermé. Ouvrir et fermer le tiroir pour vous assurer que les rails fonctionnent correctement.
- Page 93 2. Une fois que vous avez vérifié le niveau de gauche à droite, faites une autre lecture en déplaçant le niveau et en le plaçant en diagonale au fond du four. Si la cuisinière n'est toujours pas plane, ajustez à nouveau les pieds de nivellement jusqu'à ce que tous les angles du niveau soient équilibrés.
-
Page 94: Instructions D'utilisation
INSTRUCTIONS D'UTILISATION Examen Des Contrôles: SCHÉMA DU PANNEAU DE COMMANDE BRÛLEUR OPTIONS DE BRÛLEUR ARRIÈRE DROIT AVANT GAUCHE CUISSON AU FOUR BRÛLEUR RÉGLAGES BRÛLEUR AVANT DROIT ARRIÈRE GAUCHE DU FOUR BOUTON DE COMMANDE • Les boutons de commande peuvent être réglés entre "HI" et "LOW". •... - Page 95 3. Se familiariser avec les commandes et les fonctions décrites dans ce manuel. 4. S’assurer que les éléments de surface et le four fonctionnent comme prévu. Communiquer avec le service à la clientèle de Midea au 1-888-365-2230 ou consulter la page midea.com/ca/support immédiatement si l’appareil ne fonctionne pas comme prévu.
- Page 96 CLEAR/OFF La touche « CLEAR/OFF » permet d'arrêter toutes les fonctions à l'exception du verrouillage des commandes. LUMIÈRE DU FOUR Appuyez sur la touche « OVEN LIGHT » pour allumer ou éteindre les lumières. Lorsque « Bake » ou « Broil » démarre, la lampe du four s'allumera automatiquement. START La touche «...
- Page 97 COMMENT CHANGER L'ÉCHELLE DE TEMPÉRATURE DU FOUR EN FAHRENHEIT : • Pour remettre l'échelle de température du four en Fahrenheit (F), répétez les étapes 1 à 3 ci-dessus. Pendant le réglage, la lettre « F » apparaîtra sur l'a chage au lieu d'un «...
- Page 98 Retrait et insertion des grilles : MISE EN GARDE RISQUE DE BRÛLURE • Toujours placer les grilles à l’endroit désiré lorsque le four est froid. Si la grille doit être déplacée alors que le four est chaud, ne pas laisser le support à...
- Page 99 Positions de la Grille: Pour de meilleures performances, régler la grille de façon à ce que les aliments soient placés au centre du four. Pour la plupart des aliments, il s'agit de la position de grille #3. FONCTION FOUR POSITION DE LA GRILLE Cuisson Grand rôti/Dinde Utiliser la grille 1...
- Page 100 Pour de meilleurs résultats lors de la cuisson de gâteaux étagés sur 2 grilles dans la partie centrale du four, utilisez les grilles 3 et 5. Pour une cuisson uniforme, décalez les moules à gâteaux sur la grille inférieure afin qu'ils ne soient pas placés directement sous les moules à...
- Page 101 BAKE (CUISSON) Conçu pour les recettes de cuisson générales, la fonction BAKE applique la chaleur à la fois par le haut et par le bas afin d'obtenir des performances de cuisson exceptionnelles. Cette fonction est idéale pour les aliments de petite et moyenne taille qui ne nécessitent qu'une seule position de grille au centre du four comme les plats en cocotte, les repas surgelés, les gâteaux à...
- Page 102 COOK TIME La fonction de temps de cuisson est disponible en mode « Bake » ou « Broil Hi/Lo ». COMMENT RÉGLER LA FONCTION DE TEMPS DE CUISSON 1. Lorsque vous cuisinez avec « Bake » , si vous souhaitez régler le temps de cuisson, appuyez sur la touche «...
- Page 103 ATTENTION RISQUE D'INTOXICATION ALIMENTAIRE NE LAISSEZ PAS LES ALIMENTS REPOSER DANS LE FOUR PLUS D'UNE HEURE AVANT OU APRÈS LA CUISSON. CETTE PRATIQUE PEUT CONDUIRE À UNE INTOXICATION ALIMENTAIRE OU À UNE MALADIE. FONCTIONNEMENT DE LA SURFACE DE CUISSON AVERTISSEMENT RISQUE D’INCENDIE •...
- Page 104 Types d’éléments de cuisson : Toutes les cuisinières Midea sont dotées de quatre éléments de cuisson (capacité à élever les aliments à des températures de cuisson sécuritaires). Au fur et à mesure que les éléments de cuisson fonctionnent, ils s’activent et s’éteignent automatiquement, même au réglage le plus élevé, pour maintenir les niveaux de puissance.
- Page 105 Ustensiles de cuisson TIROIR DE RANGEMENT ATTENTION LORSQUE LE FOUR EST UTILISÉ, LE TIROIR PEUT DEVENIR CHAUD. NE RANGEZ PAS DE PLASTIQUE, DE TISSU OU D'AUTRES OBJETS QUI RISQUENT DE FONDRE OU DE BRÛLER DANS LE TIROIR. ÉVENT DU FOUR ATTENTION L'ÉVENT DU FOUR ÉVACUE L'AIR CHAUD ET L'HUMIDITÉ...
- Page 106 Utilisez des ustensiles de cuisson à fond plat pour de meilleurs résultats de cuisson et une meilleure e cacité énergétique. La taille des ustensiles de cuisson doit correspondre à la surface de cuisson indiquée sur la table de cuisson. Les ustensiles de cuisson ne doivent pas dépasser de plus de 1/2 po (1,3 cm) de la zone.
- Page 107 Indicateurs de la surface de cuisson : Toutes les cuisinières Midea sont dotées d’indicateurs distincts qui avertissent l’utilisateur que la surface de cuisson est en cours d’utilisation et qu’elle est chaude. Indicateur de surface allumée : Certains modèles indiquent qu'un élément de la plaque de cuisson est allumé...
- Page 108 MISE EN GARDE RISQUE DE BRÛLURE • Utiliser uniquement des poignées ou des gants isolants secs lors de l’utilisation du four. • Le four est ventilé à l'arrière de la plaque de cuisson et sous le panneau de commande. Lorsque le four est en cours d'utilisation, cette zone peut devenir très chaude.
-
Page 109: Nettoyage Et Entretien
NETTOYAGE ET ENTRETIEN AVERTISSEMENT Risque de basculement • Si la cuisinière est déplacée pour le nettoyage, l’entretien ou toute autre raison, confirmer que le dispositif anti-basculement est engagé conformément aux instructions d’installation. • Un enfant ou un adulte peut faire basculer la cuisinière et être tué. •... - Page 110 Saleté modérée : • Des nettoyants pour table de cuisson en verre disponibles dans le commerce peuvent être utilisés. Suivre les instructions sur l’emballage du produit. Résidus très brûlés : • Nettoyer avec un nettoyant pour surface de cuisson en verre offert sur le marché.
- Page 111 AVIS POUR PRÉVENIR LES DOMMAGES SUPERFICIELS Ne pas utiliser de tampons à récurer, de nettoyants abrasifs, de produits chimiques liquides puissants, de laine d’acier ou de nettoyants pour four, car cela pourrait endommager la finition du panneau de commande. Pour de meilleurs résultats, il est recommandé...
- Page 112 Lampes de four : MISE EN GARDE RISQUES D’ÉLECTROCUTION, DE BRÛLURE ET DE DÉCOLORATION • Couper l’alimentation électrique du four et attendre que le four soit froid avant d’essayer de réparer les ampoules. • Manipuler soigneusement le couvercle de verre pour réduire le risque de bris. Si le couvercle de la lampe est difficile à...
-
Page 113: Dépannage
DÉPANNAGE À lire avant d'appeler le service. Midea s'engage à vous fournir un appareil de qualité qui fonctionne comme prévu. Si vous trouvez quelque chose qui ne fonctionne pas comme prévu, consulter le tableau ci-dessous pour obtenir des astuces et des conseils utiles qui pourraient vous faire gagner du temps et des frais d'appel pour réparation. - Page 114 SOLUTIONS POSSIBLES RÉSULTATS DE LA CUISSON DU FOUR NON CONFORMES AUX ATTENTES La température du four est-elle • Voir la section « Contrôle de la correctement calibrée? température du four ». Le four a-t-il été préchau é? • Voir la section « Cuisson ». Les grilles sont-elles correctement •...
- Page 115 GARANTIE LIMITÉE EST DE FAIRE RÉPARER OU DE REMPLACER L’APPAREIL, TEL QUE SPÉCIFIÉ CI-DESSUS. Le service doit être fourni par une entreprise de service désignée par Midea. Cette garantie limitée est valide uniquement dans les 50 États des États-Unis ou au Canada et s’applique uniquement lorsque le gros appareil est utilisé...
- Page 116 8. Défauts esthétiques, notamment les éraflures, bosses, fissures ou tout autre dommage au fini de l’appareil, à moins que ces dommages soient dus à des vices de matériaux ou de fabrication et soient signalés à Midea dans les 30 jours suivant la date d’achat.
- Page 117 EXONÉRATION DE RESPONSABILITÉ DANS LES DOMAINES NON COUVERTS PAR LA GARANTIE Midea décline toute responsabilité quant à la qualité ou la durabilité de l’appareil, en cas de dépannage ou de réparation nécessaire sur ce gros appareil ménager, autre que les engagements énoncés dans la présente garantie. Si vous souhaitez une garantie plus étendue ou plus complète que la garantie limitée fournie avec ce...
- Page 118 Ce manuel est créé par Midea et Midea se réserve tous les droits d'auteur. Aucune entité ou personne ne peut utiliser, dupliquer, modifier, distribuer en tout ou en partie ce manuel, ou regrouper ou vendre avec d'autres produits sans l'autorisation écrite...
-
Page 119: Avis De Protection Des Données
économique européen. De plus amples informations sont fournies sur demande. Vous pouvez contacter notre responsable de la protection des données à l'adresse MideaDPO@midea.com. Pour exercer vos droits, tels que le droit de vous opposer à ce que vos données personnelles soient traitées à...
Need help?
Do you have a question about the MER30B12AWWC and is the answer not in the manual?
Questions and answers