Table of Contents
Advertisement
Quick Links
Advertisement
Table of Contents

Related Manuals for otometrics Otoscan


Summary of Contents for otometrics Otoscan
- Page 1 Otoscan User Guide Doc. No. 7-50-1420-EN/U2 Part No. 7-50-14200-EN...
- Page 2 Copyright notice The manufacturer authorizes GN Otometrics A/S to publish manuals approved and released by the manufacturer. © 2017, 2017 GN Otometrics A/S. All rights reserved. ® Otometrics, the Otometrics Icon, AURICAL, MADSEN, ICS and HORTMANN are registered trademarks of GN Otometrics A/S in the U.S.A. and/or other countries.
-
Page 3: Table Of Contents
User Guide Table of Contents Introduction Intended use Unpack and get acquainted with Otoscan Log into the system Manage patient records Prepare patient for scanning The scanning session Manage patient orders Log out 10 Cleaning, service and maintenance 11 Troubleshooting... -
Page 4: Introduction
The primary function of Otoscan is to make digital 3D scans of the patient's ear canal and pinna, to be used in the man- ufacture of custom in-ear devices. The scans are transformed by the scanning software into image files that are ready for use in 3D modeling. -
Page 5: Intended Use
Local regulations must be complied with at all times. " NOTE : This will probably require updating of hazards and risks documentation, but they currently seem to disagree any- way: Otometrics - Otoscan... -
Page 6: Unpack And Get Acquainted With Otoscan
User Guide "1093 Hazard Analysis_7-38-00193 Rev01" states "audiologists or doctors" trained..., whereas the "1093 OTOscan Regu- latory Plan_7-38-00190 Rev00" states "Typical users of this type of product are trained audiologists and hearing instrument dispensers.” Intended conditions of use The scanner is intended for transient use. - Page 7 The Otoscan PC The PC is dedicated to be used exclusively for the Otoscan procedure. It has the dual function of powering the scanner dur- ing use and controlling the scanner and the data derived from the scanning process.
- Page 8 PC, please refer to the user instructions from the PC manufacturer, which are supplied with the PC. The Otoscan cradle Unpacking the Otoscan cradle The scanner ► 8 As the cradle serves as protection for the scanner during shipping, please refer to the section for unpack- ing instructions.
- Page 9 3.3.1 Connect the scanner Otoscan is fully assembled on delivery, and you simply have to connect cables. Caution To connect the scanner to the PC, use only the supplied USB cables.
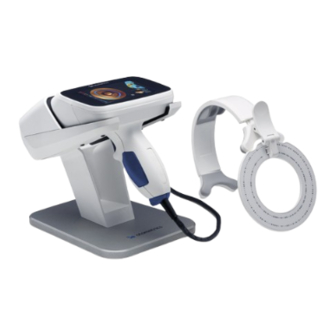
- Page 10 The scanner is an advanced unit with built-in laser scanners and cameras. These components work together to capture accurate scans of the ear canal and pinna in order to form a 3D digital impression of the ear. The Otoscan accessories ► 13 The patient headset (see ) serves as the reference point for the entire process.
- Page 11 The Scanning module controls the power to the scanner. This means that the scanner will be turned on automatically when you initiate a scan from the PC Scanning module. Log into the system To access the Otoscan software application, you will need a registered user name and a password. See ► 14 Warning •...
- Page 12 When appropriate, you can also make scanner selections on the PC screen by means of a PC mouse or the PC's touch pad. Caution The Otoscan touchscreen display may get hot during heavy use. Do not touch the display surface for longer • than 1 minute.
- Page 13 In order to maximize safe operation of the scanner with patients, make sure that your work space is free of obstacles, including on the floor. The Otoscan accessories Unpacking the accessories Unpack the headset and (if relevant) optional training material and place them next to the scanner.
-
Page 14: Log Into The System
Log into the system User ID and password All Otoscan users will need a user ID (the user’s email address) and password in order to access the Otoscan Session Man- ager and the web Portal. The Portal is accessed via the Session Manager. - Page 15 To continue without starting the update, just log into the system. Log into the system The system will prompt you to enter your user name and password: 1. Enter the user name and password that you have received from the Otoscan administrator in your clinic. Login 2.
-
Page 16: Manage Patient Records
Otoscan training opportunities We wish to ensure that you get a good start using the Otoscan system, and that you quickly gain confidence in using the equipment in a safe and efficient manner. Therefore, a range of training opportunities and training materials are available. - Page 17 Enter either the patient's name, ID, Date of Birth (DOB), or latest activity with the patient in the appropriate fields. The list on the right will narrow down as you type. Clear Filter If you need to reset the filter in order to make a new search, click the button Otometrics - Otoscan...
- Page 18 New scans will not overwrite earlier scans. If more scans exist for an ear, the other scans can be found via the drop-down list at the top of each frame, for the Left or Right ear respectively. Otometrics - Otoscan...
- Page 19 Add Patient 1. Click the button in the top bar. 2. Enter all relevant patient information. Required fields (noted by an asterisk *) are: Last name - First name (or Patient ID), Date Of Birth (DOB), and Gender. Otometrics - Otoscan...
-
Page 20: Prepare Patient For Scanning
If you want to return to the Patient list, click the button in the upper left corner. For instructions on how to add a patient record in the Portal database, please see the Otoscan Portal manual. Prepare patient for scanning Procedure Perform otoscopy and ear canal cleaning ►... - Page 21 – an estimate of the time the scanning will take per ear – an explanation as to why it is important that the headset is not displaced – that the patient should minimize movements during the scanning Otometrics - Otoscan...
- Page 22 Ask the patient to try to speak up before unavoidable moves - for example an upcoming sneeze. Place the Otoscan headset The patient must be wearing the Otoscan headset for the scanner to operate. Tracking cameras on the scanner use a visual reference on the patient-worn headset to determine the position of the scanner during use.
-
Page 23: The Scanning Session
• Clean scanner and park it. See End the scanning session ► 34 Caution Before scanning the patient’s ear, make sure that you have cleaned the probe tip and checked the place- • ment of the headset. Otometrics - Otoscan... - Page 24 • damage the eyes. Starting point: This procedure assumes that you have already opened the relevant patient record from the Otoscan Patient module. See Open patient record ► 17 Prepare It also assumes that you have examined, instructed, and positioned the patient as described in the section: patient for scanning ►...
- Page 25 It is very important for an accurate and safe scan that this step is carried out correctly. Before proceeding, please also observe the following warnings and cau- tions: Otometrics - Otoscan...
- Page 26 For safe operation, the user is responsible for visually determining a safe scanning depth for the individual patient and should always be aware of the distance to the tympanic membrane. Otometrics - Otoscan...
- Page 27 The depth measurement and warning shown on the screen are based on the “0” reference point specified by the user and average canal lengths as recommended by Otometrics, and are provided as guidelines only. The depth measurement and depth warning do NOT represent the actual safe scanning depth of the patient’s ear canal.
- Page 28 The depth measurement and warning shown on the screen are based on the “0” reference point specified by the user and average canal lengths as recommended by Otometrics, and are provided as guidelines only. The depth measurement and depth warning do NOT represent the actual safe scanning depth of the patient’s ear canal.
- Page 29 3D image and dragging the mouse in any direction. For an accurate 3D digital impression, gaps indicated with a yellow outline should be rescanned to fill them in. Smaller Fig. 22 ► 29 gaps outlined in black do not require additional scanning. See Otometrics - Otoscan...
- Page 30 The Line laser is used first for scanning the flatter surfaces and reaches most of the visible surfaces of the ear. During Line scanning, the probe is to be positioned so that it faces the area to be scanned and is close to (but not touching) the surface of the skin. Otometrics - Otoscan...
- Page 31 After reviewing the scan for completeness, start saving it by selecting the Save icon. You now get three options: Return • - to continue scanning the same ear Mark Horizontal Mark horizontal ► 32 • . See Save Save scan ► 32 • . See Otometrics - Otoscan...
- Page 32 At this point the scans will be rotating slowly in the frames, allowing you to give them a final examination. If you can approve the scan, either continue to scan the other ear, or close the Scanning module: Select the other ear ► 33 • Continue to scan the other ear. See Otometrics - Otoscan...
- Page 33 1. If both ears are to be scanned, now reposition the headset on to the opposite ear. Again, make sure to center the headset on the ear and check that no hair obstructs the dot pattern on the headset. Place the Otoscan headset ► 22 If in doubt, review the procedure from: Position the 2.
-
Page 34: Manage Patient Orders
Portal user manual. Open the Portal Upon completion of the ear scan(s) for the current patient, the next step is to connect to the online Otoscan Portal in order to create an order. The Portal is a web application that allows hearing healthcare providers to access their scans and make online orders to the hearing instrument and ear mold manufacturers. - Page 35 On the keyboard, hold down the key, while pressing the key. • Or click the Otoscan icon on the Windows task bar at the bottom of the screen. To return to the open Portal: • On the keyboard, hold down the key, while pressing the key.
-
Page 36: Log Out
Return from the Portal to the Patient module after use ► For information about how to close the Portal after use, see Cleaning, service and maintenance 10.1 Cleaning instructions Never use sharp or pointed objects for cleaning! Otometrics - Otoscan... - Page 37 Use a new, soft and slightly damp alcohol wipe to clean and disinfect the inner surface of the headset (side that touches cli- ent’s head). Note Do not use alcohol wipes to clean outer surface of headset where dot pattern is visible. • Note Alcohol wipes should be disposed of according to local regulations. • Otometrics - Otoscan...
- Page 38 Please contact your supplier to schedule at least one annual calibration check of the scanner. • Furthermore, we recommend that the calibration be checked, if the equipment has suffered any potential damage. Service and repair ► 38 • When sending the scanner in for calibration, observe the packing instructions given in Otometrics - Otoscan...
-
Page 39: Troubleshooting
Check that Caps lock is not activ- valid not correct. User names are case sensitive. ated on your PC. Try again. Contact the clinic's Otoscan admin- istrator if the problem persists. Login failed, service not found. (404) Login failed, service error. (500) You must be online to use the for- The PC has no connection to the internet. - Page 40 • Contact your supplier for tech- nical support if the failure per- sists. ERROR: Failed to launch Otoscan Update. Failed to open Scanning module An error prevented the Scanning module Contact your supplier for technical from starting up.
- Page 41 • Inspect for any signs of visible damage and contact your local distributor for replacement in case of any malfunctioning or signs of damage. • Contact your supplier for tech- nical support if the failure per- sists. Otometrics - Otoscan...
-
Page 42: Standards And Warnings
This requirement applies in the European Union. Do not dispose of these products as unsorted municipal waste. You can return your device and accessories to Otometrics, or to any Otometrics supplier. You can also con- tact your local authorities for advice on disposal. - Page 43 ( audiologists and other trained health care professionals : The "1093 Hazard Analysis_7-38-00193 Rev01" states "audiologists or doc- tors" trained..., whereas the "1093 OTOscan Regulatory Plan_7-38-00190 Rev00" states "Typical users of this type of product are trained audiologists and hearing instrument dispensers.”) in 3D imaging of the ear canal, concha, and helix portions of the outer ear.
- Page 44 • RF emissions from Otoscan are very low and are not likely to cause any interference in nearby electronic equipment. However, local devices placed in close vicinity of Otoscan may experience a negative effect or loss of functionality. When assembling an electro-medical system, the person carrying out the assembly must take into account that other connected equipment which does not comply with the same safety requirements as this product (e.g.
-
Page 45: Technical Specifications
• The device can be disposed of as normal electronic waste, according to local regulations. Technical specifications Type identification The Otoscan scanner is type 1093 from Otometrics A/S. Scanning system Scanning modes - Canal Ring, using 360 blue LED light... - Page 46 IEC 60601-1, Class II, Type BF. Applied parts are Scanner Probe and Housing. Laser safety In accordance with the Class 2 limits of IEC 60825 IEC 60601-1-2 13.1 Accessories Accessory Name Part Number Desktop cradle 8-35-42400 Headset 1-12-74000 Training kit 8-61-20000 Otometrics - Otoscan...
- Page 47 Otoscan. Guidance and manufacturer's declaration - electromagnetic emissions for all equipment and systems Otoscan is intended for use in the electromagnetic environment specified below. The user of Otoscan should ensure that it is used in such an environment. Emissions test...
- Page 48 TV broadcast cannot be predicted theoretically with accuracy. To assess the electromagnetic environment due to fixed RF transmitters, an elec- tromagnetic site survey should be considered. If the measured field strength in the location in which Otoscan is used exceeds the applicable RF compliance level above, the Otoscan should be observed to verify normal operation.
-
Page 49: Other References
: These guidelines may not apply in all situations. Electromagnetic propagation is affected by absorption and reflection from structures, objects and people. Other references For user documentation for Otoscan, press F1 or click the Help icon in the Otoscan software application. (OBS: Webhelp not yet implemented) - Page 50 15 Manufacturer Otometrics - Otoscan...
Need help?
Do you have a question about the Otoscan and is the answer not in the manual?
Questions and answers