Table of Contents
Advertisement
Quick Links
Download this manual
See also:
User Manual
Advertisement
Table of Contents

Related Manuals for otometrics MADSEN OTOflex 100


Summary of Contents for otometrics MADSEN OTOflex 100
- Page 1 MADSEN OTOflex 100 & OTOsuite Immittance Module Reference Manual Doc. No.7-50-0880-EN/22 Part No.7-50-08800-EN...
- Page 2 Copyright notice © 2010, 2016 GN Otometrics A/S. All rights reserved. ® Otometrics, the Otometrics Icon, AURICAL, MADSEN, ICS and HORTMANN are registered trademarks of GN Otometrics A/S in the U.S.A. and/or other countries. Version release date 2016-10-10 (144154) Technical support Please contact your supplier. Otometrics - MADSEN OTOflex 100...
-
Page 3: Table Of Contents
3.4.3.1 Inserting batteries 3.4.3.2 Battery type setting 3.4.3.3 First time charging 3.4.3.4 Charging status 3.4.3.5 Powering status 3.4.4 Switching MADSEN OTOflex 100 on and off MADSEN OTOflex 100 main description Switching MADSEN OTOflex 100 on and off Language setting Keypad main functions... - Page 4 7.3.3.1 Mounting the cap 7.3.3.2 Removing the cap 7.3.4 Daily probe check 7.3.5 Users 7.3.6 Selecting patient folder and test type in MADSEN OTOflex 100 7.3.7 Test flow setup 7.3.8 Selecting the test ear Preparing the patient 7.4.1 Inspecting the patient’s ear 7.4.2 Fitting the eartip on the probe...
- Page 5 8.9.4 Settings - Reflex Decay 8.10 ETF-P (Eustachian Tube Function - Perforated) 8.10.1 Softkeys and functions 8.10.2 ETF-P - procedure 8.10.3 Viewing ETF-P results Managing Test Results in MADSEN OTOflex 100 When testing is done Swap ear results Deleting measurements Deleting test results Communicating and synchronizing with OTOsuite 9.5.1 Synchronizing data...
- Page 6 11.12 Saving measurements 11.12.1 Tests and subtests 11.12.2 Standards used in NOAH 11.13 Preparing for the next patient 12 Data management in MADSEN OTOflex 100 12.1 Data handling 12.1.1 Interruption of communication 12.1.2 Synchronization 12.2 Uploading test results to OTOsuite 12.3 Data clean-up...
- Page 7 18.1.1 MADSEN OTOflex 100 symbols 18.1.2 Charger unit symbols 18.1.3 The OTOsuite Immittance module 18.2 Warning notes 18.2.1 MADSEN OTOflex 100 warning notes 18.2.2 Charger unit warning notes 18.3 Manufacturer 18.3.1 Responsibility of the manufacturer Otometrics - MADSEN OTOflex 100...
- Page 8 19 Technical specifications App. 1 MADSEN OTOflex 100 Immittance methodology and features App. 1.1 An introduction to immittance App. 1.1.1 Immittance testing App. 1.2 Tympanometry App. 1.2.1 Tympanometry testing on infants App. 1.2.2 Tympanometric features App. 1.2.3 ETF-I (Eustachian Tube Function - Intact) App.
-
Page 9: Introduction
NOAH The NOAH System is a HIMSA product for managing clients/patients, launching hearing test applications and fitting soft- ware, and storing audiological test results. MADSEN OTOflex 100 test results can be stored in the NOAH database via OTO- suite. The OTOsuite Immittance module The OTOsuite Immittance module offers real time presentation of test results and full test control of MADSEN OTOflex 100 directly from a PC. -
Page 10: Intended Use
This makes it ideal for use with children and adults. MADSEN OTOflex 100 can be configured for a wide variety of tests, and it can be operated entirely manually or pro- grammed for the user’s own combination of manual and automatic operation. In user-programmable tests the user can select the default parameters of a particular test, and combine tests to form a sequence of preset tests. -
Page 11: Safety
Standards and safety ► 171 Safety information is stated where it is relevant, and general safety aspects are described in 1.4.2 Installation Installing MADSEN OTOflex 100 ► 13 • To install the new system, see • To install OTOsuite, see the OTOsuite User Guide. -
Page 12: Unpacking And Storing
2 Unpacking and storing Unpacking and storing To install and get started with MADSEN OTOflex 100 and the OTOsuite Immittance module, follow the sequence below: • Install OTOsuite on the PC before you connect to MADSEN OTOflex 100 from the PC. -
Page 13: Front View
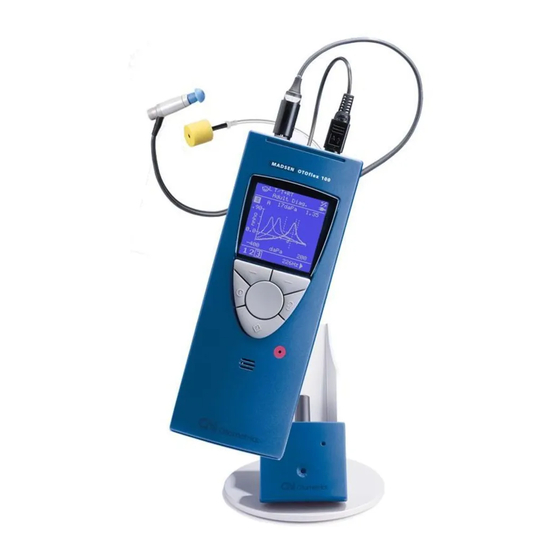
2. Install MADSEN OTOflex 100 as described in Views of MADSEN OTOflex 100 This section provides you with views of MADSEN OTOflex 100 and its charger from various angles, as well as instructions on how to assemble the charger. Front view ► 13 Top view ►... -
Page 14: Top View
3 Installing MADSEN OTOflex 100 3.1.2 Top view Contralateral socket Pneumatic connection Probe socket 3.1.3 Bottom view Battery casing with cover Charger cavity 3.1.4 Reverse side view Track for probe cable Labels Otometrics - MADSEN OTOflex 100... -
Page 15: The Charger
3 Installing MADSEN OTOflex 100 3.1.5 The charger Front view Charger tab for charging the device Charging indicator Probe test cavity Base Rear view Power socket Otometrics - MADSEN OTOflex 100... -
Page 16: The Probe
Immittance testing is facilitated by a moderately quiet room. A sound cabin or sound treated room is not necessary. To ensure safe performance, you must make sure that MADSEN OTOflex 100 is correctly installed and that the require- Standards and safety ► 171 ments listed in are complied with. -
Page 17: Desktop Installation
1. Use the hexagonal key to screw the hexagonal screws into place. 2. Tighten the screws well so that the charger is stable when you place MADSEN OTOflex 100 in the char- ger. Charger body Charger base Hexagonal screws... -
Page 18: Wall Mount Installation
Powering 3.4.1 Powering MADSEN OTOflex 100 MADSEN OTOflex 100 MADSEN OTOflex 100 is powered by batteries. Caution Use only the battery types listed in Technical specifications ► 176. • Otometrics - MADSEN OTOflex 100... -
Page 19: Powering The Charger
Technical specifications ► 176. • MADSEN OTOflex 100 checks the battery type when you switch it on or place it in the charger, and will prompt you for the battery type if it seems to be wrongly configured. Battery If this is the case, change the battery type setting in the device to reflect the battery type you have inserted. See type setting ►... -
Page 20: Inserting Batteries
Before you can operate MADSEN OTOflex 100, insert the batteries in MADSEN OTOflex 100. • Leave it to charge in the MADSEN OTOflex 100 charger for at least 14 hours, and preferably overnight, before you switch on MADSEN OTOflex 100. -
Page 21: Battery Type Setting
Battery type setting ► 21 5. Check the battery type setting in MADSEN OTOflex 100: See 6. If you are using rechargeable batteries, leave MADSEN OTOflex 100 to charge for at least 14 hours, and preferably Powering the charger ► 19 overnight, before you put it into use (see for details). -
Page 22: Charging Status
3 Installing MADSEN OTOflex 100 1. Insert rechargeable NiMH batteries in the device. 1. Place the device in the charger. 2. Leave the device to charge for at least 14 hours, and preferably overnight, before putting it into use. The batteries will reach full capacity when they have been recharged a couple of times. -
Page 23: Switching Madsen Otoflex 100 On And Off
3.4.4 Switching MADSEN OTOflex 100 on and off Switching on Press and hold the key on the keypad until the start-up screen appears (approximately 2-3 seconds). -
Page 24: Madsen Otoflex 100 Main Description
If needed, create new test settings to suit your methods of testing. Language setting If the language setting in your MADSEN OTOflex 100 has not been set to the desired language, you can do so yourself: Otometrics - MADSEN OTOflex 100... -
Page 25: Keypad Main Functions
9. Press the softkey to go to the test screen. Keypad main functions You can access most of the functions in MADSEN OTOflex 100 from the menu, or by pressing one or more keys and softkeys. Left softkey On/Off Press & hold Press &... - Page 26 4 MADSEN OTOflex 100 main description Scroll wheel Scroll up • Moves the focus up or to the left, or decreases a selected value • Scroll down Moves the focus down or to the right, or increases a selected value Select •...
-
Page 27: The Display - Test Mode
Ear selection: the ear selection icon shows the ear selected for testing. Connection indicator: Bluetooth communication disabled in menu. Connection indicator: Bluetooth communication is established. Connection indicator: Bluetooth communication is interrupted. Power indicator. MADSEN OTOflex 100 receives power from the charger. Otometrics - MADSEN OTOflex 100... -
Page 28: Controls And Menu Selections
Curve selector. See the specific test procedures. Controls and menu selections You can access most of the functions available in MADSEN OTOflex 100 via the menu, or by pressing one or more keys and softkeys. There are a number of shortcuts and softkeys available for quick and easy navigation of MADSEN OTOflex 100. - Page 29 4 MADSEN OTOflex 100 main description Start sequence Sequence testing ► 60 Actions Test selector Test Selector mode ► 30 Printers.. Printing ► 89 Patient & User.. My settings.. Test setups ► 120 > Load Settings.. Save Settings > Save Settings As >...
-
Page 30: Test Selector Mode
4 MADSEN OTOflex 100 main description Advanced.. Advanced settings and actions > Dissociate from PC > Users.. > Device settings.. Device info > (password protected) Service.. Brightness Bluetooth Battery type Altitude ab(ove) sea (level) Bat(tery) power save Bat(tery) power off... -
Page 31: The Text Editor
Print test results ( 4.5.3 The Text Editor If you are testing using MADSEN OTOflex 100 as a stand-alone device, use the text editor to enter patient data in MADSEN OTOflex 100. Entering data In some screens you can enter text and numeric values. - Page 32 4 MADSEN OTOflex 100 main description Keypad Function Left softkey Cancel • Do not use the edited text Right softkey • Accept the edited text Select • Press to access field • Press to enter character • Press and hold to enter character selection mode Scroll wheel •...
-
Page 33: The Tympanometric Curve Selector
Layered curves > , all recorded tympanograms for the ear are shown overlayered with the selected curve highlighted. MADSEN OTOflex 100 Icons The following icons are used in MADSEN OTOflex 100: 4.6.1 Navigation and editing symbols Arrow left Arrow right... -
Page 34: Powering
4 MADSEN OTOflex 100 main description Ear right Insert Mark Unmark Menu Test or character select mode Patient Play Pressure build-up positive, ETF-P Pressure build-up negative, ETF-P Return to previous menu Return to test screen Start semi-automatic testing Start automatic testing... -
Page 35: Communication
4 MADSEN OTOflex 100 main description 4.6.3 Communication Bluetooth communication disabled Bluetooth communication enabled. MADSEN OTOflex 100 connected to OTOsuite MADSEN OTOflex 100 disconnected from OTOsuite Printer 4.6.4 Messages error message info message warning_message 4.6.5 Leakage Probe leak status Blocked... -
Page 36: Navigating In The Otosuite Immittance Module
Opens the dialog box for selecting a specific test device. See Connecting a test device ► 44 Tympanometry toolbar Show previous/next curves The Tympanometry screen ► 39 Toggles between specific curves on the tympanogram. See Otometrics - MADSEN OTOflex 100... -
Page 37: The Control Panels
Click the icon in the toolbar to activate the Control Panel. When you activate MADSEN OTOflex 100, the settings used in the device are automatically shown in the Control Panel. Communication between OTOsuite and MADSEN OTOflex 100 ► 44 Otometrics - MADSEN OTOflex 100... -
Page 38: Sequence Selection
5 Navigating in the OTOsuite Immittance module Note If you are using MADSEN OTOflex 100 without using the Immittance module controls, you may choose not • to display the Control Panel. Select Tools > Configuration Wizard... > and click Next until the Preferences screen is displayed. -
Page 39: The Tympanometry Screen
The tympanogram can be viewed in four different ways • traditional total admittance, Y • traditional baseline compensated admittance, Y • susceptance, B, and conductance, G; both total and compensated • component compensated admittance, Y Otometrics - MADSEN OTOflex 100... -
Page 40: The Acoustic Reflex Screens
Numerical values or crossed out numerical values indicate whether a reflex has been detected or not. No. of intensities more than 1 This applies when the measurement setting is set to • Blank fields indicate that the test has not been performed. Otometrics - MADSEN OTOflex 100... -
Page 41: The Reflex Threshold Screen
In the top right corner of the screen, the most recent tympanogram, if available for the currently used probe tone, is displayed, and a marker on the pressure axis indicates the current ear canal pressure. The curve number is also indicated. Otometrics - MADSEN OTOflex 100... -
Page 42: The Reflex Decay Screen
In the top right corner of the screen, the most recent tympanogram, if available for the currently used probe tone, is displayed, and a marker on the pressure axis indicates the current ear canal pressure. The curve number is also indicated. Otometrics - MADSEN OTOflex 100... -
Page 43: The Etf-P Screen
ETF-P table. Delete 3. To delete a line, click on the line and press on your keyboard. 4. To delete the entire measurement, click on the graph and press Delete on your keyboard. Otometrics - MADSEN OTOflex 100... -
Page 44: Bluetooth
For further information on communicating with OTOsuite, see the OTOsuite documentation. Connecting a test device The first time you set up communication between MADSEN OTOflex 100 and OTOsuite, do as follows: 1. MADSEN OTOflex 100 must be turned on and not connected to another PC. -
Page 45: Deleting A Test Device
Upgrading of the firmware will leave your device settings unchanged. The new firmware may take up slightly more MADSEN OTOflex 100 memory than the previous version. If the memory is full of patient results, the upgrade process will automatically erase some of the oldest patient results from the MADSEN OTOflex 100 memory if needed (results that have been saved or printed will be deleted first). - Page 46 6 Communication between OTOsuite and MADSEN OTOflex 100 Kernel Upgrade 6. The window appears. Note Your MADSEN OTOflex 100 name and serial number will • differ from that shown. "New Kernel for Upgrade" will display the newest firmware version available.
-
Page 47: Preparing For Testing
The probe with the long cable (optional accessory) is best suited for diagnostic and clinical test purposes. It allows for pla- cing MADSEN OTOflex 100 near the patient, or for using it wall-mounted in a fixed position, without the cap mounted. If needed, see Removing the cap ►... -
Page 48: Connecting Probe And Insert Phone
7 Preparing for testing 7.3.2 Connecting probe and insert phone The following applies both to the MADSEN OTOflex 100 probe and the E-A-RTONE® 3A insert phone. Probe Contralateral Socket Pneumatic connection Probe socket The MADSEN OTOflex 100 probe Plug the probe into the probe socket. Make sure that you insert the pin for the pneumatic pump into the pneumatic con- nection. - Page 49 1. Fit the probe, and if needed, insert phone onto MADSEN OTOflex 100. 2. Mount the cap on MADSEN OTOflex 100: Place the two small projections (located on the rear side of the cap) in the groove on the top front edge of MADSEN OTOflex 100.
-
Page 50: Removing The Cap
7.3.3.2 Removing the cap 1. Remove the probe from the cap. 2. Remove the cap from MADSEN OTOflex 100. To do so, press the wings of the cap gently towards each other and ease the cap out of its groove. -
Page 51: Daily Probe Check
7.3.5 Users If several users are using MADSEN OTOflex 100, you can select a user for the session, or create a new user. OTOsuite reports show the selected user. The user selected in MADSEN OTOflex 100 is reflected in personalized set- tings and protocols. -
Page 52: Selecting Patient Folder And Test Type In Madsen Otoflex 100
You can create more than one folder for each patient if needed. MADSEN OTOflex 100 with NOAH If you are using MADSEN OTOflex 100 with the Immittance module and NOAH, and you have created a new Patient, the patient’s name is downloaded from NOAH to MADSEN OTOflex 100. -
Page 53: Test Flow Setup
Test Selector mode ► 30 7.3.8 Selecting the test ear Regardless of the type of test you have selected in MADSEN OTOflex 100, you must select the ear on which you wish to start the test. • In MADSEN OTOflex 100 you can select the first ear to be tested: Menu >... -
Page 54: Preparing The Patient
Warning Choking hazard! Do not leave eartips unsupervised within the reach of children. • Note Accurate testing is only guaranteed if you use the eartips approved specifically for MADSEN OTOflex 100 • by Otometrics. Note Check the sound channels in the probe tip every time you have used the probe.Even small amounts of ceru- •... -
Page 55: Fitting The Probe In The Patient's Ear
– Make sure that the cable is not drawn tight, as this may result in the probe being pulled out of position. Otometrics - MADSEN OTOflex 100... -
Page 56: Leakage And Other Probe Problems
7 Preparing for testing During testing, MADSEN OTOflex 100 and the Immittance module will show a probe icon indicating leakage, if any. Leakage and other probe problems ► 56 7.4.4 Leakage and other probe problems Testing may be complicated by a number of factors which can result in leakage or probe problems. -
Page 57: Ready To Start Testing
6. The test data will be saved as the new patient’s data. Ready to start testing Patient & User 1. When you switch on MADSEN OTOflex 100, you are first presented with the screen. Text Editor The Text Editor ► 31 2. -
Page 58: Fast Routine Testing
3. Select the user (if the device is not connected to OTOsuite). 4. Insert first the contralateral insert phone and then the MADSEN OTOflex 100 probe. 5. Press the right softkey for 1 second to start the sequence (automatic or manual). -
Page 59: General Keypad Functions For Testing
8 Testing with MADSEN OTOflex 100 General keypad functions for testing MADSEN OTOflex 100 has 1 scroll wheel and 5 keys. Scroll wheel • – Turn the scroll wheel to the right or left to highlight areas on the screen. -
Page 60: Sequence Testing
A test sequence is a predefined set of automatic tests which can be performed automatically. MADSEN OTOflex 100 will always perform the most recently selected sequence, regardless of whether it has been selec- ted in the OTOsuite Immittance module or in MADSEN OTOflex 100. -
Page 61: Screening
The press-and-hold function is disabled, and only the currently selected measurement type will be performed. 8.3.2 Running a test sequence from MADSEN OTOflex 100 In test mode the sequence currently selected is shown at the top of the test screen. -
Page 62: Screening Tympanometry
The test starts automatically with tympanometry testing and continues automatically to reflex screening. (if Reflex Screening is selected) Prepare MADSEN OTOflex 100 to start measuring as soon as seal is achieved: Preparing for testing ► 47 1. Do as described in 2. -
Page 63: Reflex Screening
8 Testing with MADSEN OTOflex 100 Procedure 4. Apply the probe to the patient’s ear with a steady grip. The test starts automatically as soon as a good probe fit with an airtight seal is achieved. Warning If the patient is troubled by the test, stop the test. The test is interrupted and •... - Page 64 8 Testing with MADSEN OTOflex 100 Procedure Prepare MADSEN OTOflex 100 to start measuring as soon as seal is achieved: Preparing for testing ► 47 1. Do as described in 2. Load a test setting configured for screening patients in the relevant age group. See recommended settings below.
-
Page 65: The Reflex Screening Result
8 Testing with MADSEN OTOflex 100 Setting Value Auto resume on seal Menu Procedure options.. > >) This function is ideal for speeding up the test procedure. – If the screening eartip is removed from the patient’s ear, the test continues from the intensity it came to or was interrupted in, when there is seal. - Page 66 8 Testing with MADSEN OTOflex 100 Selected test setting Selected test and frequency The initial reflex screening test screen with ipsilateral 1 kHz stimulus highlighted. Start As indicated by the softkey, the screening is auto- matically performed for all preset stimuli.
-
Page 67: Tympanometry
8 Testing with MADSEN OTOflex 100 Tympanometry Note It is recommended that you perform a tympanometric test before making any acoustic reflex meas- • urement, and determine the acoustic reflex threshold before making a reflex decay measurement. 8.5.1 Diagnostic tympanometry... -
Page 68: The Diagnostic Tympanometry Result
8 Testing with MADSEN OTOflex 100 Procedure The test progresses as follows: – The pump increases the pressure to the set value, and the sweep starts. – The admittance for each pressure point is plotted out on the screen and forms the tym- panogram curve. - Page 69 8 Testing with MADSEN OTOflex 100 The Tymp test screen Tymp test screen provides the tympanometric curves, norm area, the resulting Type, TPP, and ECV/EBV for the curve shown. Note The probe tone shown in the test screen applies •...
-
Page 70: Changing View Settings
You must manually toggle the to the next curve number to preserve a previously recorded tympanogram. ETF-I (Eustachian Tube Function - Intact) Note This test is available only if MADSEN OTOflex 100 supports diagnostic testing. • Otometrics - MADSEN OTOflex 100... -
Page 71: Settings - Etf-I
8 Testing with MADSEN OTOflex 100 Procedure 1. Select the Tympanometry test screen. 2. Record a tympanogram. 3. Instruct the patient to perform either Valsalva’s or Toynbee’s man- euver. 4. Advance to the next curve number. 5. Record a second tympanogram. -
Page 72: Reflex Threshold Testing
Always comply with local practice and recommendations for presenting loud stimuli. Measurements saved MADSEN OTOflex 100 automatically keeps the last 3 deflection curves measured. When saving in NOAH, up to 52 individual reflex deflection curves (screening, threshold and decay) are saved. Priority is given to deflection curves documenting increasing deflections with increasing stimulus intensity above the threshold. -
Page 73: Softkeys And Functions
8 Testing with MADSEN OTOflex 100 3. If contralateral stimulation is used in the test, make sure that both the ipsilateral probe and the contralateral phone are in place before you start the measurement. Ear Selector 4. If needed, toggle the to select the ear on which you wish to start the test. -
Page 74: Reflex Threshold - Procedure
8 Testing with MADSEN OTOflex 100 Softkeys Functions Right Start stimulus. If safety intensity level is > safety limit: request confirmation to con- tinue anyway Stop stimulus. Scroll wheel Select intensity. Flashing value indicates intensity warning (>108 dB SPL in 2 cc) - Page 75 8 Testing with MADSEN OTOflex 100 Semi-automatic RT testing Scroll wheel – Use the to select the stimulus (frequency and ipsi/contra) to be tested. – Press the right-hand softkey to start a semi-automatic reflex threshold search for the selec- ted stimulus.
-
Page 76: Viewing Reflex Threshold Results
8 Testing with MADSEN OTOflex 100 The test progresses as follows If a threshold is not found immediately: • The stimulus intensities will increase until a reflex threshold is registered or until the max. intensity is reached. If a threshold is found immediately: •... -
Page 77: Settings - Reflex Threshold
8 Testing with MADSEN OTOflex 100 • The dashed horizontal line in each reflex graph indicates the predefined reflex criterion.It is offset from the base line marker on the vertical axis. Changing view settings You can change the following view settings to customize your view. None of these settings influence the test data as such. -
Page 78: Reflex Decay Testing
8 Testing with MADSEN OTOflex 100 Menu selection Setting Menu More settings.. • Depending on your settings, you can select the type of verification to be used: The > > Auto Settings.. > Verification lowest stimulus intensity, where the reflex criterion was met, may be retested for reproducibility, or the next one or two intensity levels can be used to confirm the reflex growth properties. -
Page 79: Softkeys And Functions
8 Testing with MADSEN OTOflex 100 During testing Warning If the patient is troubled by the test, stop the test. The test is interrupted and the • pump pressure is relieved immediately.Already measured results are kept. 8.9.1 Softkeys and functions... -
Page 80: Reflex Decay - Procedure
8 Testing with MADSEN OTOflex 100 8.9.2 Reflex Decay - procedure Note To avoid automatic testing being interrupted because of high stimulus intensity levels when reaching the • warning limits, it is recommended that you set the max. intensity to 95 dB HL. - Page 81 8 Testing with MADSEN OTOflex 100 Manual RD testing – Adjust the intensitiy and press the right-hand softkey to present the stimulus. If you repeat a measurement at a specific intensity, the previous measurement for that intensity will be overwritten. You cannot see several curves with the same intensity.
-
Page 82: Viewing Reflex Decay Results
8 Testing with MADSEN OTOflex 100 8.9.3 Viewing Reflex Decay results Since a reflex decay measurement typically is made using either ipsilateral or contralateral stimulus side (not both), only two measurements are saved, i.e. different stimuli and/or ipsi/contra. This Reflex Decay test result example shows the half-life time and the reflex decay curve for the 0.5 kHz contralateral stimulus. -
Page 83: Etf-P (Eustachian Tube Function - Perforated)
8 Testing with MADSEN OTOflex 100 Setting Value Toolbar icon Custom TPP offset Control Panel Checked • The pressure is offset from the TPP by the TPP offset defined in Tools Options Reflex Threshold General Custom TPP > > >... -
Page 84: Etf-P - Procedure
8 Testing with MADSEN OTOflex 100 Pressure build functions Softkeys Pressure build functions depending on the setting of Initial pressure Right Pressure control Pressure Up Pressure Down Activate to automatically build up pressure until the first opening of the Eustachian tube or max. pressure is reached. The pressure control is automatically reversed after one of the two criteria has been reached. -
Page 85: Viewing Etf-P Results
8.10.3 Viewing ETF-P results The ETF-P test screen in MADSEN OTOflex 100 provides a simple view for quickly assessing the Eustachian tube function. For more extensive analysis, use the ETF-P screen post-analysis tool OTOsuite Immittance module to retrieve the numer- ical pressure values. -
Page 86: When Testing Is Done
Test flow setup ► 53 Swap ear results If you have tested a patient with the wrong ear selected in MADSEN OTOflex 100, you can swap the ear results so that they are assigned to the other ear. You can swap ear results during a session or after a session. Swapping applies to all tests made on that patient. -
Page 87: Communicating And Synchronizing With Otosuite
Select Device in the Immittance module, the data is synchronized. If the Patient Folder in the Immittance module and MADSEN OTOflex 100 are not the same, you will be prompted to Synchronizing data ► 87 select the Patient Folder you would like to continue with. See 9.5.1... - Page 88 9 Managing Test Results in MADSEN OTOflex 100 The most recent change, regardless of whether it was made in MADSEN OTOflex 100 or in the Immittance module, will be applied or synchronized. Otometrics - MADSEN OTOflex 100...
-
Page 89: Printing
Printing You can print results from MADSEN OTOflex 100 or from OTOsuite. If you print from MADSEN OTOflex 100, when it is connected to OTOsuite, printing will be done on the PC’s default printer. See the OTOsuite documentation. If you print via MADSEN OTOflex 100, when it is not connected to OTOsuite, you must first select the MADSEN OTOflex Printing from MADSEN OTOflex 100 ►... -
Page 90: Testing With The Otosuite Immittance Module
A test sequence is a predefined set of automatic tests which can be performed automatically. MADSEN OTOflex 100 will always perform the most recently selected sequence, regardless of whether it has been selec- ted in the OTOsuite Immittance module or in MADSEN OTOflex 100. -
Page 91: Screening
Preparing for testing Preparing for testing ► 47 1. Do as described in 2. Make sure that MADSEN OTOflex 100 is switched on. Tympanometry 3. Launch the Immittance module with the test selected. -
Page 92: Screening Tympanometry
Screening is selected) 1. In order to prepare MADSEN OTOflex 100 to start measuring as soon as seal is achieved, do the following: 2. Load a test setting configured for screening patients in the relevant age group. See recommended settings below. - Page 93 This function is ideal for speeding up the test procedure. Stop when results are available Tools Options Tymp. and Reflex > > Scr. > ) The measurement stops automatically when satisfactory values have been registered. Otometrics - MADSEN OTOflex 100...
-
Page 94: Reflex Screening
If sequence testing is selected, the test starts with tympanometry testing and continues with reflex screening. 1. In order to prepare MADSEN OTOflex 100 to start measuring as soon as seal is achieved, do the following: Preparing for testing ► 47 2. - Page 95 – The screening eartip must remain in place against the patient’s ear. If the probe is removed, the test is interrupted. Otometrics - MADSEN OTOflex 100...
-
Page 96: Tympanometry
Blank fields indicate that the test has not been performed. 11.3 Tympanometry Note It is recommended that you perform a tympanometric test before making any acoustic reflex meas- • urement, and determine the acoustic reflex threshold before making a reflex decay measurement. Otometrics - MADSEN OTOflex 100... -
Page 97: Diagnostic Tympanometry
The admittance for each pressure point is plotted out on the screen and forms the tym- panogram curve. – Tympanometric test results are shown in a results view in the top right corner of the win- dow. Otometrics - MADSEN OTOflex 100... - Page 98 Sweep direction value depends on the value set in Sweep direction Control Panel Negative Default: The air pressure determines the direction of the pressure sweep from a positive value to a negative value or vice versa. Otometrics - MADSEN OTOflex 100...
-
Page 99: Settings - Diagnostic Tympanometry
Type, if selected (if normal region and baseline are enabled). B. the tympanometric curves C. norm area, if selected Viewing the tympanogram The tympanogram can be viewed in four different ways • traditional total admittance, Y • traditional baseline compensated admittance, Y Otometrics - MADSEN OTOflex 100... -
Page 100: Installing Madsen Otoflex
B, and conductance, G; both total and compensated • component compensated admittance, Y 11.4 ETF-I (Eustachian Tube Function - Intact) Note This test is available only if MADSEN OTOflex 100 supports diagnostic testing. • Procedure 1. Select the Tympanometry test screen. -
Page 101: Acoustic Reflex Testing
It is recommended that you perform a tympanometric test before making any acoustic reflex meas- • urement, and determine the acoustic reflex threshold before making a reflex decay measurement. Note This test is available only if MADSEN OTOflex 100 supports diagnostic testing. • Reflex Threshold testing ► 102 •... -
Page 102: Reflex Threshold Testing
11.6.1 Reflex Threshold - procedure Note To avoid automatic testing being interrupted because of high stimulus intensity levels when reaching the • warning limits, it is recommended that you set the max. intensity to 95 dB HL. Otometrics - MADSEN OTOflex 100... - Page 103 Control Panel. The settings in Options Reflex Threshold Stimulus types Control the threshold search > > > > Manual RT testing If a threshold is not found during automatic or semi-automatic testing, you can test specific stimulus intensities manually. Otometrics - MADSEN OTOflex 100...
- Page 104 After the pause, the test resumes at the intensity it came to or was interrupted in. Continuing the test 1. When you have finished testing one ear, switch ears, if needed. 2. To continue testing, click Start and test the other ear. Otometrics - MADSEN OTOflex 100...
- Page 105 The curve number is also indicated. Audiogram • The applicable acoustic reflex threshold symbols appear in the audiogram in the bottom Not found right corner of the screen. The symbol is used until the threshold level has been reached. Otometrics - MADSEN OTOflex 100...
-
Page 106: Viewing Reflex Threshold Results
If a measurement consists of more than 3 intens- ities, click the graph selector to scroll between the graphs. Otometrics - MADSEN OTOflex 100... -
Page 107: Settings - Reflex Threshold
Note When the Custom TPP offset setting is changed in Acous- • tic Reflex Threshold, this setting is automatically applied in the Acoustic Reflex Decay test setting to ensure consistent reflex testing, but not vice-versa. Otometrics - MADSEN OTOflex 100... -
Page 108: Reflex Decay Testing
11.7 Reflex Decay testing Note If you are using a MADSEN OTOflex 100 Quick Check test device, you cannot perform Acoustic Reflex • Decay testing from the OTOsuite Immittance module. Note It is recommended that you perform a tympanometric test before making any acoustic reflex meas- •... -
Page 109: Reflex Decay - Procedure
Automatic RD testing 1. Click Start in the Auto section of the Control Panel to start a fully automatic reflex decay meas- urement for the preset stimuli. Otometrics - MADSEN OTOflex 100... - Page 110 Deflection graph The deflection graph is limited by blue markers indicating stimulus on and off. A third marker appears as indication of the half-life time where the curve decreases to 50% of its initial deflection. Otometrics - MADSEN OTOflex 100...
-
Page 111: Viewing Reflex Decay Results
If there is a probe leak, the test is interrupted. You must resume testing manually if testing is paused due to a leak. Testing resumes automatically when a proper seal is obtained if test- ing was paused due to a leak. Otometrics - MADSEN OTOflex 100... -
Page 112: Etf-P - Procedure
1. Record a tympanogram to confirm the perforation. The resulting tympanogram curve will be flat, and the ear canal volume will be abnormally high because it includes the volume of the entire middle ear. Diagnostic tympanometry ► 97 Otometrics - MADSEN OTOflex 100... -
Page 113: The Etf-P Post-Analysis Tool
• The pressure values denoting the openings and closings of the Eustachian tube are determined from the plateaus of the curve. 11.8.1 The ETF-P post-analysis tool You can adjust the time-pressure graphs manually, if needed: Otometrics - MADSEN OTOflex 100... -
Page 114: Managing Test Results
The eartip may be old or hardened • the threaded ring holding the probe tip has not been tightened properly • The pneumatic probe plug has not been inserted properly in OTOflex • the probe tip has not been tightened properly Otometrics - MADSEN OTOflex 100... -
Page 115: Testing The Other Ear
You can save 3 separate tympanometric measurement results for each ear. If you wish to delete any of the Deleting data ► 114 curves, see Note Contralateral measurements, when saved, apply to the stimulus ear. • Otometrics - MADSEN OTOflex 100... -
Page 116: Tests And Subtests
If an action contains only ontralateral ecay measurements ETF-P ETFP ETF-P (Eustachian Tube Function - Perforated) 11.13 Preparing for the next patient When you have finished testing a patient and wish to test a new patient: Otometrics - MADSEN OTOflex 100... - Page 117 2. Select or create a new patient. If you have not already saved the test results, you will be prompted to do so. Click Save Cancel as needed. 3. Prepare for the next patient, as described in Preparing for testing ► 47 Otometrics - MADSEN OTOflex 100...
-
Page 118: Data Management In Madsen Otoflex 100
If you have made changes to for instance reflex threshold or tympanometric classification values, either in OTOsuite or in MADSEN OTOflex 100, these changes are given a time stamp. The most recent change, regardless of whether it was made in OTOsuite or in MADSEN OTOflex 100, will be applied or synchronized. -
Page 119: Uploading Test Results To Otosuite
Patient folders that have been saved in OTOsuite or printed will be deleted by MADSEN OTOflex 100 when the memory is running full. If you want MADSEN OTOflex 100 to have as much memory available as possible, you can clean up the data stored in MADSEN OTOflex 100:... -
Page 120: Test Setups
A test setup consists of settings, including procedure options such as currently selected test sequence, auto start on seal, etc., which apply to the entire range of tests available in MADSEN OTOflex 100. You can make changes to specific settings and save these changes as a test setup of your choice. - Page 121 13 Test settings in MADSEN OTOflex 100 Frequently used settings Menu • When you press , the most frequently used test-specific settings you can view/change are shown. Scroll to view other menu items. Otometrics - MADSEN OTOflex 100...
-
Page 122: Uploading Test Settings To The Immittance Module
You can change and save these settings as specific measurement setups with a specific name, or you can download a setup of your choice from the Immittance module. When you activate MADSEN OTOflex 100, the settings used in MADSEN OTOflex 100 are automatically shown in the Con- trol Panel and the Measurement Settings dialog box in the OTOsuite Immittance module. -
Page 123: Editing A Test Setup
13 Test settings in MADSEN OTOflex 100 Standard adult setups Standard infant setup • • Infant • Pedi • • • TICD You can save these setups under a name of your choice, and then change them as needed. To create a specific Test Setup, do the following: Menu My Settings.. -
Page 124: General Actions
New patient folder Use this function for instance before you start testing a new patient. Menu MADSEN OTOflex 100 automatically creates a new patient folder when switched on, of if Procedure options.. ‘Patient’ prompt >... - Page 125 Select this function to delete an entire patient folder. Del. all printed patients Select this function to delete all patients that have been printed. Del. all patients Select this function to delete all patients in the MADSEN OTOflex 100 memory. Otometrics - MADSEN OTOflex 100...
-
Page 126: Procedure Options
13 Test settings in MADSEN OTOflex 100 Note Patient folders that have been saved or printed will be deleted automatically when the MADSEN OTOflex • 100 memory is full. 13.2.2 Procedure options These settings apply regardless of the test type or sequence selected. To access these settings:... - Page 127 Default: Auto free memory Setting for defining automatic deletion of patient folders from the MADSEN OTOflex 100 memory, when memory is close to running full and a new patient folder is to be created. Old patient folders are deleted according to the following rules:...
-
Page 128: Advanced
13 Test settings in MADSEN OTOflex 100 Intensity safety When Intensity safety is on, no stimulus intensities higher than 115 dB SPL (measured in a 2cc cavity) can be selected or will be applied. Stimulus intensities up to the technical limits of the device and probe can be selected and applied. -
Page 129: Device Settings
13 Test settings in MADSEN OTOflex 100 Dissociate from If selected, any user trying to connect and control MADSEN OTOflex 100 will get a warning Users.. • > Create New User.. The Text Editor ► 31 on how to enter text in the fields in this screen. - Page 130 This setting applies when MADSEN OTOflex 100 is running on battery power. After this time period in active mode without any user actions on MADSEN OTOflex 100 or via OTOsuite, MADSEN OTOflex 100 will enter power save mode where the display changes to a power save screen and the auto start and auto resume functions stop working.
-
Page 131: Tympanometry Setup
13 Test settings in MADSEN OTOflex 100 Ch(ar)g(er) power save This setting applies when MADSEN OTOflex 100 is placed in a powered charger and uses rechargeable batteries. After this time in active mode without any user actions on MADSEN OTOflex 100 or via OTOsuite, MADSEN OTOflex 100 will enter power save mode where the display changes to a power save screen and the auto start and auto resume functions stop working. - Page 132 13 Test settings in MADSEN OTOflex 100 Probe Tone Menu > Scroll to select the appropriate frequency for this measurement setup. Adult default: 226 Hz Infant default: 1000 Hz If 226 Hz is selected, you can set admittance to be shown in the admittance unit mmho or...
- Page 133 13 Test settings in MADSEN OTOflex 100 Auto next curve Menu More settings.. > Select to define whether the system will automatically select the next curve Start number available for the new measurement results when you press to start a new measurement.
-
Page 134: Screening Tympanometry
13 Test settings in MADSEN OTOflex 100 Sweep direction Menu More settings.. > The air pressure determines the direction of the pressure sweep from a positive value to a negative value or vice versa. Positive • - from a negative towards a positive value Negative •... -
Page 135: Etf-I Setup
13 Test settings in MADSEN OTOflex 100 13.3.2 ETF-I setup The following settings are useful: Layered curves Menu > Set to to enable a typical ETF-I setting with layered tympanograms. Note This setting is not saved as part of a measurement setup. - Page 136 13 Test settings in MADSEN OTOflex 100 Stimulus1 Menu > More settings.. 500 Hz, 1000 Hz, 2000 Hz, 4000 Hz, BBN. Default: 1000 Hz Stimulus2 Menu > More settings.. 500 Hz, 1000 Hz, 2000 Hz, 4000 Hz, BBN, Default: 2000 Hz...
-
Page 137: Acoustic Reflex Threshold Setup
13 Test settings in MADSEN OTOflex 100 No. of intensities Menu More settings.. > 1, 2 or 3. Define whether you wish to use more than one intensity during testing. If set to 1, testing uses only max intensity. If set to 2, testing starts at max intensity - intensity increment and continues with max intensity if no reflex was found. - Page 138 13 Test settings in MADSEN OTOflex 100 Use TPP offset Menu > Select or deselect the use of pressure offset to stabilize the eardrum. To change the Menu More settings.. TPP offset current setting, select > > : TPP is used if available...
- Page 139 13 Test settings in MADSEN OTOflex 100 Show 2000 Hz Menu More settings.. > Select the stimulus type to be included in manual threshold testing. Default: Show 3000 Hz Menu More settings.. > Select the stimulus type to be included in manual threshold testing.
- Page 140 13 Test settings in MADSEN OTOflex 100 Stimulus1 Menu > More settings.. > Auto Settings.. 500 Hz, 1000 Hz, 2000 Hz, 3000 Hz, 4000 Hz, BBN, LBN, HBN. Default: 1000 Hz Stimulus2 Menu > More settings.. > Auto Settings.. 500 Hz, 1000 Hz, 2000 Hz, 3000 Hz, 4000 Hz, BBN, LBN, HBN,...
- Page 141 13 Test settings in MADSEN OTOflex 100 Max. intensity Menu More settings.. Auto Settings.. > > Select the desired maximum level of the stimulus intensity (up to 105 dB HL). Default: 105 dB HL Note To avoid automatic testing being interrupted because of high stimulus •...
-
Page 142: Acoustic Reflex Decay Setup
13 Test settings in MADSEN OTOflex 100 13.6 Acoustic Reflex Decay setup The following settings are useful: Probe Tone Menu > Decay can be measured only with a 226 Hz probe tone. Default: 226 Hz With a probe tone at 226 Hz, you can set admittance to be shown in the admittance unit mmho or µ... - Page 143 13 Test settings in MADSEN OTOflex 100 Show 1000 Hz Menu More settings.. > Select the stimulus type to be included in reflex decay testing. Default: Pre-stim(ulus) Menu > More settings.. time Defines the recording time before each stimulus is presented.
-
Page 144: Etf-P Setup
13 Test settings in MADSEN OTOflex 100 13.7 ETF-P setup The following settings are useful: Initial pressure Menu > The pressure used for the first part of the test. Default value: (itive) Pos(itive) Pressure Menu > Select the maximum positive pressure to be presented to the ear canal/middle-ear cavity. -
Page 145: Immittance Module Settings
SPL (measured in a 2cc cavity) can be selected or will be applied. Stimulus intensities up to the technical limits of the device and probe can be selected and applied. A warning triangle is displayed on-screen whenever intensities above 115 dB SPL are selected. Default: Otometrics - MADSEN OTOflex 100... -
Page 146: View Settings
Changes the admittance/compliance unit on the vertical axis for 226 Hz probe tone use. See the description of admit- tance/compliance in the MADSEN OTOflex 100 Guide. The admittance axis can be configured to exclude the ear canal component. This is called... - Page 147 The tympanometric peak in the graph will represent the estim- ated admittance of the middle ear only. See the description of Static Admittance in the MADSEN OTOflex 100 documentation. Baseline compensated Scale Select to access the fields...
- Page 148 +200 to -400 or +400 to -600. If the +200 to -400 range is selected, but a wider custom pressure range is used, the pressure scale will automatically be set to +400 to - 600. Otometrics - MADSEN OTOflex 100...
-
Page 149: Reflex Threshold View Settings
Admittance axis Unit Changes the admittance/compliance unit on the vertical axis for 226 Hz probe tone use. See the description of admit- tance/compliance in the MADSEN OTOflex 100 Guide. Scale For defining the scale setting relating to the selected unit. Reflex Screening Always show Lists the stimulus types that are always shown. -
Page 150: Etf-P View Settings
Tymp. and Reflex Scr. view settings ► 146 as described in 1000 Hz Infant default Recommended for testing on infants younger than 4-6 months. See also the MADSEN OTOflex 100 Guide. For frequencies higher than 226 Hz, admittance is shown only Y scale mmho. The value in automatically changes to mmho. -
Page 151: Tympanometry: Test Settings
Enable or disable to define whether the system will automatically select the next curve number available for the new measurement res- Start ults when you press to start a new measurement. The tympanometry graph shows a maximum of 3 curves per ear per patient. Otometrics - MADSEN OTOflex 100... -
Page 152: Screening Tympanometry
ETF-I: Control Panel settings No special settings are needed for ETF-I tests, except for the following: Control Panel Sweep direction Make sure that the same sweep direction is used for all the curves to be compared. Otometrics - MADSEN OTOflex 100... -
Page 153: Etf-I: Test Settings
The value in Y scale automatically changes to mmho. 1000 Hz Infant default Recommended for testing on infants younger than 4-6 months. See also the MADSEN OTOflex 100 Guide. 14.3.3.2 Reflex Screening: Test settings Tools Options Tymp. and Reflex Scr. -
Page 154: Reflex Threshold Setup
When you perform a Reflex Threshold measurement, there are a number of settings you can adjust. These settings are Tools Options Reflex Threshold Meas- available either in the Control Panel on the left side of the screen, or in the > > > urement dialog. Otometrics - MADSEN OTOflex 100... -
Page 155: Reflex Threshold: Control Panel Settings
1000 Hz Infant default Recommended for testing on infants younger than 4-6 months. See also the MADSEN OTOflex 100 Guide. Custom TPP offset Select or deselect the use of pressure offset to stabilize the eardrum. Control Panel... -
Page 156: Reflex Threshold: Test Settings
To avoid automatic testing being interrupted because of high stimulus intensity levels when reaching the warning limits, it is recommended that you set the max. intensity to 95 dB HL. Otometrics - MADSEN OTOflex 100... -
Page 157: Reflex Decay Setup
When you perform a Reflex Decay measurement, there are a number of settings you can adjust. These settings are avail- able either in the Control Panel on the left side of the screen, or in the Tools > Options > Reflex Decay > Measurement dialog. Otometrics - MADSEN OTOflex 100... -
Page 158: Reflex Decay: Control Panel Settings
Infant default: Ipsi • Ipsi Stimulus is presented in the probe ear where the measurements are made. • Contra Stimulus is presented through an earphone or insert phone in the ear opposite to the probe ear. Otometrics - MADSEN OTOflex 100... -
Page 159: Reflex Decay: Test Settings
Defines the inter-stimulus interval. Default value: 0.5 seconds Stimulus types (Auto- Stimulus types Select the stimulus types to be included/excluded. At least one stim- matic) ulus type must always be selected. Available types: 500 Hz, 1000 Hz. Otometrics - MADSEN OTOflex 100... -
Page 160: Etf-P Setup
While the pump is operating, a scale at the top of the screen indic- ates the current pump position graphically, i.e. the proportion of the pump’s capacity being used to obtain the static pressure used for the measurement. Otometrics - MADSEN OTOflex 100... -
Page 161: Service And Maintenance
MADSEN OTOflex 100 must only be checked or serviced by authorized personnel. Warning Do not disassemble the MADSEN OTOflex 100 charger, as there is a risk of electric shock. • For the sake of safety and in order not to void the warranty, service and repair of electro-medical equipment should be car- ried out only by the equipment manufacturer or by service personnel at authorized workshops. -
Page 162: Maintenance
15 Service and maintenance 15.3 Maintenance MADSEN OTOflex 100 requires no preventive maintenance. However, it is recommended that you observe the guidelines described in Calibration ► 162 • Probe cleaning and maintenance ► 162 • Cleaning MADSEN OTOflex 100 ► 166 •... -
Page 163: Cleaning And Disinfecting The Probe Tip
If you have replaced the probe tip and/or the acoustic filter, do a probe test. insert the probe tip into the test cavity of MADSEN OTOflex 100 without first cleaning and disinfecting the probe tip. See Daily probe check ► 51 15.4... -
Page 164: Cleaning And Disinfecting The Probe Tip
Thorough cleaning of the probe tip is required after use in infected ear canals. Cleaning the threaded • ring may also be necessary. Methods The probe tip material is highly resistant to a wide range of temperature and chemical influences. Otometrics - MADSEN OTOflex 100... -
Page 165: Changing The Wax Filter
15.4.2 Changing the wax filter Note Never immerse the MADSEN OTOflex 100 probe into water or other cleaning solutions. • Changing the wax filter If you are warned that there is a probe error, or that the probe is not OK, check whether the probe tip is blocked. If it is not, the wax filter of the probe may be damaged or blocked by cerumen. -
Page 166: Eartips
Dispose of eartips after use. Disposal MADSEN OTOflex 100 eartips and foam eartips for the E-A-RTONE® 3A insert phone are disposable, and should not be Disposable articles ► 167 cleaned or re-used. Always throw away disposable eartips after use on a patient. See... -
Page 167: Disposable Articles
Incorrect handling, applying excessive charging current can overcharge or destroy the batteries. • The battery terminals must under no circumstances be short-circuited. • Do not open, alter or dismantle the charger. Battery disposal • Dispose of batteries according to local regulations. Otometrics - MADSEN OTOflex 100... -
Page 168: Configuring The Immittance Module
If you continue to have connection problems, click to see the con- nectivity status. This may help you or the Otometrics support team to dia- gnose connection problems. 2. A text states which Bluetooth connection is currently being used – the OTOair dongle, Microsoft Bluetooth stack, Widcomm Bluetooth stack, or Unknown Bluetooth stack. -
Page 169: Troubleshooting
• Charge the batteries (if rechargeable) or fit the power button. • The batteries need charging MADSEN OTOflex 100 with new batteries. (if rechargeable) or repla- cing. MADSEN OTOflex 100 powers The batteries need charging (if Charge the batteries (if rechargeable) or fit off and cannot power on even rechargeable) or replacing. -
Page 170: Probe-Fit Related Problems
Test device does not perform Battery status low in test device. Recharge the correctly test device. Preparing Air hose/cable connection prob- Check the connections. See MADSEN OTOflex 100 ► 47 lems 17.4 Probe-fit related problems Leakage Problem Possible cause Solution... -
Page 171: Standards And Safety
This requirement applies in the European Union. Do not dispose of these products as unsorted municipal waste. You can return your device and accessories to Otometrics, or to any Otometrics supplier. You can also con- tact your local authorities for advice on disposal. -
Page 172: Charger Unit Symbols
Consult user manual for warnings and cautions. Follow instructions for use. Complies with Medical Devices Directive 93/42/EEC and RoHS Directive (2011/65/EC). UL recognized component for Canada and the United States. Suitable for alternating current only. Otometrics - MADSEN OTOflex 100... -
Page 173: The Otosuite Immittance Module
Use only rechargeable batteries when MADSEN OTOflex 100 is placed in the charger unit. If you are using alkaline batteries, do not attempt to charge your MADSEN OTOflex 100. Your alkaline batteries may be damaged and leak, and this may in turn cause damage to MADSEN OTOflex 100. -
Page 174: Charger Unit Warning Notes
In case of defects, please make a detailed description of the defect(s) and contact your supplier. Do not use a defective instrument. 2. The device can be disposed of as normal electronic waste, according to local regulations. Otometrics - MADSEN OTOflex 100... -
Page 175: Manufacturer
The equipment is used in accordance with the instructions for use. The manufacturer reserves the right to disclaim all responsibility for the operating safety, reliability and performance of equipment serviced or repaired by other parties. Otometrics - MADSEN OTOflex 100... -
Page 176: Technical Specifications
19 Technical specifications Technical specifications Type identification MADSEN OTOflex 100 is type 1012 from GN Otometrics A/S Compliance measuring system Probe tone: 226 Hz at 85dB SPL ± 1.5 dB 1000Hz at 75dB SPL ± 1.5 dB THD: < 3% in 2 cc Frequency accuracy: ±0.5%... - Page 177 Unit of admittance graph Y-axis ml, cc, mmho, µl Unit of graph X-axis daPa, s Display Graphic 128x128 dots BT antenna BT antenna: Chip multilayer antenna for 2.4 GHz Antenna gain: 2 dBi Antenna impedance: 50 Ohm Otometrics - MADSEN OTOflex 100...
- Page 178 MADSEN OTOflex 100: 0.6 kg/1.3 lb Charger unit: 0.23 kg/0.5 lb Charger unit Type identification: Charger unit is type 1012 Charger from GN Otometrics A/S Power: 100 - 240 VAC ±10%, 50/60 Hz Power consumption < 10 VA Otometrics - MADSEN OTOflex 100...
- Page 179 Equipment should be calibrated regularly according to EN 61027 and ANSI S3.39 Essential performance MADSEN OTOflex 100 has no essential performance and accordingly, the applicable requirements are as stated in the fol- lowing: 1. Impedance/admittance as defined by EN 61027 Type 1, ANSI S3.39 Type 1.
- Page 180 19 Technical specifications Otometrics - MADSEN OTOflex 100...
-
Page 181: App. 1 Madsen Otoflex 100 Immittance Methodology And Features
226 Hz probe tone. Further, because the middle ear admittance is primarily determined by stiffness (compliant susceptance) in this frequency region, the middle ear compliance can only be considered isolated using low fre- quency probe tones. In MADSEN OTOflex 100, you can choose between any of the compliance or admittance units , or mmho respect- ively, when you use a 226 Hz probe tone. -
Page 182: App. 1.2 Tympanometry
App. 1 MADSEN OTOflex 100 Immittance methodology and features App. 1.2 Tympanometry In tympanometry you can measure the acoustic admittance of the middle ear system as a function of ear canal air pressure. The resulting tympanogram is predominantly determined by the ear cavity volumes, the mobility of the eardrum and the ossicular chain, and the middle ear air pressure. - Page 183 App. 1 MADSEN OTOflex 100 Immittance methodology and features measured at 200 daPa (approximates the isolated ear canal component). In accordance with this, static admittance is often referred to as the "peak to tail difference". The SA is shown only when the baseline compensation is enabled, i.e. when the admittance is shown relative to the baseline admittance.
-
Page 184: App. 1.2.3 Etf-I (Eustachian Tube Function - Intact)
In addition, Type D may be used to indicate a multiple peaked tympanogram. Adult 226 Hz tymp classification system MADSEN OTOflex 100 uses the Adult 226 Hz norm originating partly from Jerger. The determination of types A, Ad, As, B, and C is based on the location (pressure and static admittance) of the peak of the tympanogram as shown: •... -
Page 185: App. 1.3 Acoustic Reflex Testing
App. 1 MADSEN OTOflex 100 Immittance methodology and features How to perform the maneuver 1. Instruct the patient to block the nostrils by pinching the nose using the thumb and index finger. 2. Instruct the patient to swallow a few times. It may help to provide some water to drink. -
Page 186: App. 1.3.2 Acoustic Reflex Threshold
App. 1 MADSEN OTOflex 100 Immittance methodology and features Infant testing Acoustic reflex testing may also be used for infant screening purposes. The main objective is to confirm general middle ear function. For this purpose, a test protocol using a 1000 Hz probe tone, ipsilateral stimulation and broad band noise stim- ulus is recommended. -
Page 187: App. 1.5 Susceptance And Conductance, B/G
App. 1 MADSEN OTOflex 100 Immittance methodology and features as a sudden pressure drop toward, but not necessarily reaching, atmospheric pressure (0 daPa). This is repeated until the pressure is equalised or until the test time has elapsed. The pressures at which the tube opens and closes are reported as test results. -
Page 188: App. 1.5.2 Conductance, G
App. 1 MADSEN OTOflex 100 Immittance methodology and features Positive Susceptance Compliance Susceptance If a major portion of the probe tone energy flows through the elements of the ear, is positive. The ear is in this case stiffness controlled. This is true when the probe tone frequency is less than the resonance frequency of the ear. -
Page 189: App. 1.5.4 Component Compensation
App. 1 MADSEN OTOflex 100 Immittance methodology and features High frequency probe tones Since the B/G viewing is of interest only for high frequency probe tones, this method is clinically valuable in conjunction with multi frequency tympanometry where the normative data is based on resonance frequency. However, even when... - Page 190 App. 1 MADSEN OTOflex 100 Immittance methodology and features whether the admittance change is due to a change in Mass Compliance contribution, it is still an absolute change rel- ative to the ear canal admittance reference point. Otometrics - MADSEN OTOflex 100...
-
Page 191: App. 2 Glossary
App. 2 Glossary App. 2.1 Terminology Symbols/characters GN Otometrics A/S Manufacturer of MADSEN OTOflex 100. OTOsuite The name of the PC software package that communicates with the test device and addi- tional device. 226 Hz tymp unit The unit used for tympanograms measured with 226 Hz probe tone. A selection of volume units (cc, cm , and ml) and mmho is available. - Page 192 Determines if the deflection scale for a reflex decay measurement must be linear or log- ear/logarithmic) arithmic. Deflection threshold The minimum deflection value regarded as sufficient to safely distinguish between a present or absent reflex response. Otometrics - MADSEN OTOflex 100...
- Page 193 Determines whether an ETF-P test starts with a test at positive or negative applied pres- sure. Intensity safety off A mode where the safety limits are temporarily disabled (a warning is displayed on the dis- play as long as this mode is active). Implemented for research purposes. Otometrics - MADSEN OTOflex 100...
- Page 194 The highest negative pressure that will be applied during the ETF-P test. The pressure will be reached as there is no spontaneous opening of the Eustachian tube for negative pres- sures NiMH Rechargeable battery type Otometrics - MADSEN OTOflex 100...
- Page 195 A test performed in the test cavity to verify correct function of the probe and optionally to adjust the cavity readout Probe tone The frequency of the steady tone emitted by the probe during measurement of admit- tance (226 Hz or 1000 Hz) Otometrics - MADSEN OTOflex 100...
- Page 196 A search for the reflex threshold for a single stimulus type threshold measurement Shoulder harness Accessory placed over the patient's shoulder to which probe cables can be fixed via a cable clip to relief strain Sound pressure level (SPL) Scientific intensity level scale Otometrics - MADSEN OTOflex 100...
- Page 197 Test cavity A well defined cavity used to test/adjust volume readings and probe function. Test device A physical apparatus like MADSEN OTOflex 100 used for assessment of the hearing or bal- ance condition of a patient Test mode A mode where the currently selected test or test sequence can be controlled.
- Page 198 All settings controlling the presentation of results. View settings cannot be saved expli- citly, but will be remembered automatically. Wall mount Shelf designed for the test device. Year (yy) Year Zodiac Another immittance device from GN Otometrics A/S Otometrics - MADSEN OTOflex 100...
-
Page 199: App. 2.2 Abbreviations
Ipsi Ipsilateral Low band noise Middle ear pressure NiMH Battery type, rechargeable Post meridiam Reflex decay test Reflex screening test Reflex threshold test Static admittance Static compliance Sound pressure level Tympanometry, tympanogram Tympanometric peak pressure Otometrics - MADSEN OTOflex 100... - Page 200 App. 2 Glossary Otometrics - MADSEN OTOflex 100...
-
Page 201: Index
Configuration Wizard 168 power off mode 130 Contra power save mode 130 setting, acoustic reflex screen- rechargeable 20 ing 136 set type in device 21 Contral Battery type stim output setting, acoustic settings 130 reflex threshold 140 Otometrics - MADSEN OTOflex 100... - Page 202 26, 59 show admittance data 37 setting 127 show conductance and sus- Eartips ceptance data 37 disposal 166 toggle reflex curve 37 Editing data 32 used in device 33 Entering data 31 Otometrics - MADSEN OTOflex 100...
- Page 203 25, 60 Norm type select in display 59 setting 134 select key 26, 31 softkeys 26, 60 Test Selector softkeys 31 Patient auto create new 128 Patient folders Language selection 131 description 52 Otometrics - MADSEN OTOflex 100...
- Page 204 Screening tympanometry 62, 92 setting 135 settings 134 acoustic reflex threshold Scroll wheel 25, 60 setting 137 Select key 26, 31 tympanometry setting 132 Sequence Procedure option settings 126 setup setting 127 Otometrics - MADSEN OTOflex 100...
- Page 205 First ear to test 127 pre-stim time, acoustic reflex for acoustic reflex threshold 139 screening 135 pre-stim time, RD 159 for acoustic reflex pre-stim time, RT 157 threshold 137 pressure range 133 for ETF-I 135 Otometrics - MADSEN OTOflex 100...
- Page 206 Hz, acoustic reflex decay 142 verification include 141 show xxx Hz, acoustic reflex viewing in OTOsuite 122 threshold 138 Softkeys 26 start intensity, acoustic reflex General use 26, 60 threshold 141 Test Selector 31 Otometrics - MADSEN OTOflex 100...
- Page 207 Toynbee’s maneuver 184 side, acoustic reflex screening setting 136 acoustic reflex decay start intensity, acoustic reflex setting 142 threshold setting 141 acoustic reflex threshold stim time setting, acoustic reflex setting 138 decay 143 ART setting 155, 158 Otometrics - MADSEN OTOflex 100...
- Page 208 132 screening 62, 92 settings 131 testing infants 182 type, description 183 Tympanometry, screening settings 134 User interface 36 Users 51 Valsalva’s maneuver 184 View settings tympanometry 70 Views 13 Wax filter 165 Otometrics - MADSEN OTOflex 100...
Need help?
Do you have a question about the MADSEN OTOflex 100 and is the answer not in the manual?
Questions and answers