Table of Contents
Advertisement
Quick Links
EVK-IRIS-W10
Evaluation kit for IRIS-W10 series modules
User guide
Abstract
This document describes how to set up and use the EVK-IRIS-W10 evaluation kits for prototyping
the IRIS-W10 open CPU, multiradio modules. It also describes the different options for debugging
and the development capabilities included in the evaluation board.
UBX-23007837 - R03
C1-Public
www.u-blox.com
Advertisement
Table of Contents

Subscribe to Our Youtube Channel
Related Manuals for Ublox IRIS-W10 Series


Summary of Contents for Ublox IRIS-W10 Series
- Page 1 EVK-IRIS-W10 Evaluation kit for IRIS-W10 series modules User guide Abstract This document describes how to set up and use the EVK-IRIS-W10 evaluation kits for prototyping the IRIS-W10 open CPU, multiradio modules. It also describes the different options for debugging and the development capabilities included in the evaluation board.
-
Page 2: Document Information
EVK-IRIS-W10 - User guide Document information Title EVK-IRIS-W10 Subtitle Evaluation kit for IRIS-W10 series modules Document type User guide Document number UBX-23007837 Revision and date 9-Jan-2024 Disclosure restriction C1-Public This document applies to the following products: Product name EVK-IRIS-W101 EVK-IRIS-W106 u-blox or third parties may hold intellectual property rights in the products, names, logos, and designs included in this document. -
Page 3: Table Of Contents
EVK-IRIS-W10 - User guide Contents Document information ..........................2 Contents ................................3 Product description ..........................5 1.1 Overview ................................ 5 1.2 Kit includes ..............................5 1.2.1 EVK-IRIS-W101 ........................... 5 1.2.2 EVK-IRIS-W106 ........................... 5 1.3 Key features ..............................5 1.4 Block diagram .............................. 6 Setting up the evaluation board ....................... - Page 4 EVK-IRIS-W10 - User guide 3.13 Jumpers ..............................37 3.14 Test points ..............................40 Appendix ..............................41 Glossary ..............................41 Related documentation ........................... 42 Revision history ............................43 Contact ................................43 UBX-23007837 - R03 Contents Page 4 of 43 C1-Public...
-
Page 5: Product Description
EVK-IRIS-W10 board and includes setup instructions for starting development. All pins and interfaces supported on IRIS-W10 series modules are easily accessible from the evaluation board. Simple USB connections serve as the physical interfaces for the power, programming COM ports, debugging, and USB peripheral connectors. -
Page 6: Block Diagram
EVK-IRIS-W10 - User guide IRIS-W10 open CPU modules, based on the NXP RW612, support: • Wi-Fi 6 IEEE 802.11a/b/g/n/ac/ax, Dual band WiFi 2.4/5 GHz • IEEE 802.15.4 supporting Thread®, Matter™ over Wi-Fi, and Ethernet • Bluetooth LE subsystem supporting Bluetooth 5.3 in 2.4 GHz band •... -
Page 7: Setting Up The Evaluation Board
EVK-IRIS-W10 - User guide Setting up the evaluation board Connect the external power supply to the EVK as described in powering the board section. • The green status LED (D10) is lit when the internal EVK 3V3 supply is active. •... -
Page 8: Wi-Fi Example Application
EVK-IRIS-W10 - User guide flash_config.c SDK\boards\rdrw612bga\flash_config Replace the “ ” in the folder with the updated version, which includes an updated FCB (Flash configuration block) and supports flash_config.c low-density Macronix 8MB QSPI Flash. The updated file is available in the u-blox short range open CPU GitHub repository [6]. - Page 9 EVK-IRIS-W10 - User guide rw612_wifi_cli.hex. Flash the wifi_cli application file Figure 4: Flashing wifi_Cli application Reset the module and open a UART console (using Putty, TeraTerm, or another terminal emulator), and set the serial port to 115200 baud rate and run different feature sets in the wifi_cli application.
-
Page 10: Software Development
EVK-IRIS-W10 - User guide ⚠ The device can only operate as an Access Point (AP) on channel 1 – 11 in the 2.4 GHz band and on channels 36, 40, 44, and 48 in the 5 GHz band. Configure device B as Station with iperf client To configure device B as a Station with iperf server, open a terminal session and enter: wlan-add test1 ssid NXPAP ip:192.168.10.3,192.168.10.1,255.255.255.0 channel 48 wpa2 12345678... -
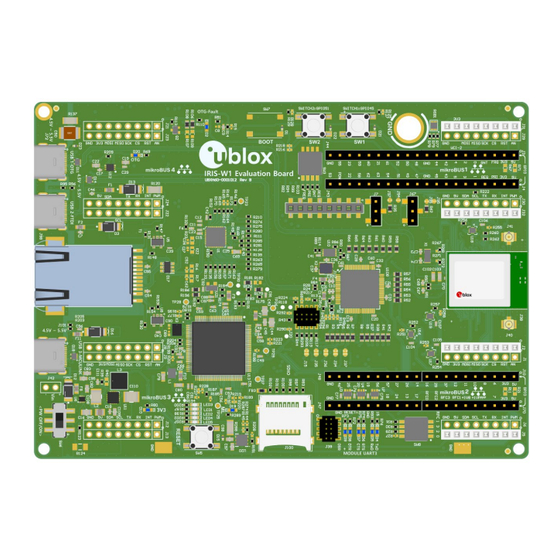
Page 11: Hardware Description
EVK-IRIS-W10 - User guide Hardware description ☞ Design files for the EVK-IRIS-W10 PCB are available from your local u-blox support team. Figure 6 shows the major functions provided by EVK-IRIS-W10. Figure 6: Header and major function locations 3.1 Power EVK-IRIS-W10 has four potential power sources: Source Component / Input range... -
Page 12: Powering The Board
EVK-IRIS-W10 - User guide 3.1.1 Powering the board After applying power to one of the sources described in Table 1, slide SW6 shown in Figure to the ON position to power-on the EVK. The input voltage VBUS-OUT is extended to: •... - Page 13 EVK-IRIS-W10 - User guide 3.3 V Linear regulator (U20) 3.1.1.2 U20 (NCP692MN33T2G is intended to supply power to the MCU-LINK chip with Figure minimum interference to the IRIS-W10 radio module. Figure 9: 3.3V linear regulator (U20) Resistors R151, R144, and R288 must be populated with 0603 0R, and, in this case, R208, R145, R274, and R287 must be disconnected.
-
Page 14: Iris-W10 Module Power
EVK-IRIS-W10 - User guide In this mode, the status of the USB-ID signal defines whether the EVB or IRIS-W10 module works as either an OTG host (supply the voltage to a device board), or an OTG device. USB-ID is connected to the ground or left floating, as shown in Figure Figure 11: J72 schematic 3.1.1.4... -
Page 15: Current Measurement
EVK-IRIS-W10 - User guide 3.1.3 Current measurement The evaluation board provides two current-sensing headers, as shown in Figure 14. • J7 for current measurement of the VDD module supply • J67 for current measurement of the VDD-IO module supply Module Current Measurement Module IO Current Measurement +3V3 +3V3... -
Page 16: Automatic Bootloader / Bootstrap
EVK-IRIS-W10 - User guide 3.2.1 Automatic bootloader / Bootstrap Figure 16 shows bootloader configuration and sources available to user. Several signals and DIP switch combinations used to configure the EVK so it can boot in several scenarios. Figure 16: Bootloader schematic EVK has two main methods to bootstrap IRIS-W10 module: Default method - Using DIP switch SW3 with resistors R82, R94, R99 and R103 Four active-high signals (EXT-FREQ, EXT-PRI, EXT-GNT, EXT-REQ) are used to select... -
Page 17: Buttons
EVK-IRIS-W10 - User guide 3.3 Buttons In addition to the RESET and BOOT buttons, EVK-IRIS-W1 has two more momentary push- button switches. These switches are active-low or high and connect to ground or +3V3 when pressed. The buttons and the associated GPIO signals are shown in Figure 17 Table Figure 17: EVK schematic - user buttons... - Page 18 EVK-IRIS-W10 - User guide +3V3 RGB1 GPIO44-UCX-RGB-R 0 4 02 750R GPIO43-UCX-RGB-G 0 4 02 470R GPIO42_UCX-RGB-B 0 4 02 360R 0 4 02 470R GREEN Figure 18: Schematic – RGB and power LED +3V3 UART status LED 470R GPIO11_U3-DTR 0 4 02 470R GPIO12_U3-DSR...
-
Page 19: Serial Communication
EVK-IRIS-W10 - User guide 3.5 Serial communication EVK-IRIS-W1 provides two options for serial communication and debugging: • MCU-Link (default) chip • FTDI chip 3.5.1 MCU-Link The MCU-Link is a powerful and cost-effective debug a that seamlessly integrates with the MCUXpresso Integrated Developer Environment (IDE). It is also compatible with third-party IDEs that support CMSIS-DAP protocol. - Page 20 EVK-IRIS-W10 - User guide To use the MCU-Link as a SWD debugging probe for an external MCU through J20, populate R13, R43, R68, R217, R224, R290, R292, R294, R296 with 0 Ω resitors and disconnect resistors R44, R45, R48, R116, R117, R119, R291, R293. IRIS-W10 GPIO/Function Connection MCU-Link pin...
-
Page 21: Usb-To-Uart Ftdi
EVK-IRIS-W10 - User guide Figure 22 shows the hardware version setting resistor group with related connections that are described in Table 7. For more information about MCU-Link hardware and firmware, see also the MCU-Link Pro documentation [10]. Figure 22: MCU-LINK hardware version and LEDs MCU-Link pin Hardware version Function... -
Page 22: Jtag/Swd Debug Interfaces
EVK-IRIS-W10 - User guide IRIS-W10 pin name IRIS-W10 function Resistor/Jumper enable Interface IC function GPIO6/JTAG-TCK R1/J15 FTDI-JTAG-TCK, Pin 16, U108 GPIO8/JTAG-TDI R3/J36 FTDI- JTAG-TDI, Pin 17, U108 GPIO9/JTAG-TDO R4/J34 FTDI- JTAG-TDO, Pin 18, U108 GPIO7/JTAG-TMS R5/J35 FTDI- JTAG-TMS Pin 19, U108 GPIO10/JTAG-RESETn R6/J37 FTDI-... - Page 23 EVK-IRIS-W10 - User guide The IRIS-W10 module SWD interface, GPIO13-SWDCLK and GPIO14-SWDIO, are connected to the MCU-LINK interface and J45 needles connector simultaneously by default through 0R resistors R2 and R12 those GPIOs could be also connected to J20 by disconnecting the last two resistors and populate resistors R48, R116 with 0 R.
-
Page 24: Khz Low Frequency Clock
EVK-IRIS-W10 - User guide Figure 25: jumpers default connections JTAG-TCK GPIO6_U1-CTS-CS_JTAG-TCK GPIO6_U1-CTS-CS JTAG-TMS GPIO7_U1-CLK_JTAG-TMS GPIO7_U1-CLK JTAG-TDI GPIO8_U1-TxD-MISO-SCL-WS_JTAG-TDI GPIO8_U1-TxD-MISO-SCL-WS JTAG-TDO GPIO9_U1-RxD-MOSI-SDA-TRX_JTAG-TDO GPIO9_U1-RxD-MOSI-SDA-TRX RESETn GPIO10_U1-RTS_JTAG-nRST GPIO10_U1-RTS Figure 26: External JTAG debug interface demultiplexing 3.7 32.768 kHz low frequency clock The evaluation board has a 32.768 kHz crystal connected to the IRIS-W10 module that allows use of the external crystal oscillator option to source the RTC clock which is not enabled by default. -
Page 25: Mikrobus Slots
EVK-IRIS-W10 - User guide 3.8 mikroBUS slots EVK-IRIS-W10 has four mikroBUS standard compatible slots with multiple choices of RESET signal for each slot. All slots are not enabled to use by default, and that is mainly due to the multiplexing of the Flexcomm interfaces pins of the NXP RW612 chip as shown in Table 11. -
Page 26: Mikrobus 1 Slot
EVK-IRIS-W10 - User guide mikroBUS 1 mikroBUS 2 mikroBUS 3 mikroBUS 4 SDIO GPIO18 INT* SDIO-D2 GPIO27 PWM* GPIO46 GPIO47 GPIO48 GPIO49 GPIO50 RESET RESET RESET RESET Table 12: mikroBUS slots other pin configuration, (*) default connection GPIO 18 INT GPIO 27 PWM mikroBUS 1 mikroBUS 2... -
Page 27: Mikrobus 2 Slot
EVK-IRIS-W10 - User guide Figure 28: mikroBUS 1 schematic UART MOSI MISO mikroBUS 1 GPIO 2 J27* GPIO 3 J25* Table 15: mikroBUS 1 working standard options, (*) default connection 3.8.2 mikroBUS 2 slot This slot is connected to the Flexcomm interface 2, cannot be used either as SPI standard simultaneously with SDIO function, which shares GPIO 15 and GPIO 16. -
Page 28: Mikrobus 3 Slot
EVK-IRIS-W10 - User guide Figure 30: mikroBUS 2 schematic UART MOSI MISO mikroBUS 2 GPIO 13 J28* GPIO 14 J26* Table 16: mikroBUS 2 working standard options, (*) default connection 3.8.3 mikroBUS 3 slot This slot is connected to the Flexcomm interface 1 that cannot be used with the JTAG interface that shares all GPIOs on this slot, as shown in Figure To enable this slot:... -
Page 29: Mikrobus 4 Slot
EVK-IRIS-W10 - User guide Figure 32: mikroBUS3 schematic UART MOSI MISO mikroBUS 3 GPIO 9 J18* GPIO 8 J16* Table 17: mikroBUS 3 working standard options, (*) default connection 3.8.4 mikroBUS 4 slot This slot is connected to the Flexcomm interface 1 that cannot be used totally with RMII function, which shares GPIO55, GPIO 56 and GPIO 57 as shown in Figure To enable this slot:... -
Page 30: Rmii
EVK-IRIS-W10 - User guide Figure 33: mikroBUS4 schematic UART MOSI MISO mikroBUS 4 GPIO 57 J19* GPIO 56 J17* Table 18: mikroBUS 4 working standard options, (*) default connection 3.9 RMII The IRIS-W10 EVB supports RMII standard through 10BASE-T/100BASE-TX Physical Layer Transceiver U1 (KSZ8081MNXRNB) and 1 Port RJ45 Surface Mount 10/100 Base-T, AutoMDIX T1 (74980111211). -
Page 31: Rmii Strap-In Options
EVK-IRIS-W10 - User guide Figure 34: RMII demultiplexing resistors schematic IRIS-W10 pin name IRIS-W10 function Related resistors Interface Pin on U1 GPIO63/RMII-RXER R285/R141 PHY-RXER Pin 20 GPIO60/RMII-TXEN R280 PHY-TXEN Pin 23 GPIO62RMII-CRSDV R281/R140 PHY-CRSDV Pin 18 GPIO56/RMII-MDC R263 PHY-DMC Pin 12 GPIO57/RMII-MDO R265 PHY-MDIO... -
Page 32: Sdio 3
EVK-IRIS-W10 - User guide Figure 35: PHY circuit strapping options Configuration Description PHYAD [2:0] PHY ADDR 00-XXX (00010 DEFAULT) CONFIG [2:0] IF MODE 001 RMII 101 RMII Back-to-Back (not supported) xxx Reserved-not used ISOLATE mode Pull-up = Enable Pull-down (default) = Disable SPEED SPEED mode SPEED Pull-up (default) = 100Mbps... - Page 33 EVK-IRIS-W10 - User guide Figure 36: SDIO schematic Figure 37: SDIO jumpers schematic UBX-23007837 - R03 Hardware description Page 33 of 43 C1-Public...
-
Page 34: Pin Headers
EVK-IRIS-W10 - User guide Figure 38: Jumpers J55, J56, J57, J58, J59, J60 default connection IRIS-W10 pin name IRIS-W10 function Resistor/Jumper enable Interface IC function GPIO15/SDIO-CLK R100/J55 SDIO-CLK GPIO16/SDIO-D3 R97/J56 SDIO-D3 GPIO17/SDIO-CMD R98/J57 SDIO-CMD GPIO19/SDIO-D0 R101/J58 SDIO-D0 GPIO20/SDIO-D1 R102/J59 SDIO-D1 GPIO18/SDIO-D2 R83/J60 SDIO-D2... - Page 35 EVK-IRIS-W10 - User guide Several GPIOs described in Table Table Table • are connected to the pin headers by default and can’t be disconnected • are connected to the pin headers by default but can be disconnected • are not connected to the pin headers by default but can be connected •...
- Page 36 EVK-IRIS-W10 - User guide GPIO Header Pin Connection How to connect, disconnect, disconnect other locations GPIO45 Default and can’t disconnect Release SW1 GPIO46 Default and can’t disconnect Disconnect MikroBUS 3- AN Disconnect MikroBUS 2- AN GPIO47 Default and can’t disconnect GPIO48 Default and can’t disconnect Disconnect MikroBUS 1- AN...
-
Page 37: Qspi Memory
EVK-IRIS-W10 - User guide Header +3.3V 6,8,9,10 Table 24: Power signals mapping to the pin headers 3.12 QSPI memory The EVK-IRIS-W10 provides an option for external memory. A Quad SPI PSRAM (U2), shown Figure 40 Table 25, can be optionally mounted on the rear side of EVK board. •... - Page 38 EVK-IRIS-W10 - User guide Table 26 shows all jumper types and locations on the EVK, while Table 27 shows the default function and alternate function of each jumper – if applicable. Jumper Jumper type Location Jumper Jumper type Location Solder-bridge open Bottom Solder-bridge open Bottom...
- Page 39 EVK-IRIS-W10 - User guide Jumper Default connection Alternate function J47-15 Connect GPIO 16 to U17 Connect SDIO-D3 Connect GPIO 17 to U17 Connect SDIO-CMD Connect GPIO 19 to U3-RTS Connect SDIO-D0 Connect GPIO 20 to U3-CTS Connect SDIO-D1 Connect GPIO 18 to mikroBUS-INT Connect SDIO-D2 Connect GPIO 27 to mikroBUS3-PWM Cannot be connected simultaneously with J88, J89, J90...
-
Page 40: Test Points
EVK-IRIS-W10 - User guide 3.14 Test points Table 28 describes the function of each test point on the EVK. Test point Function Test point Function MUSB-OTG-VBUS TP22 MUSB-OTG-ID TP23 ENET_B-CAST-OFF Chassis-GND TP24 TP25 P1_1-MCULINK Chassis-GND TP26 P1_9-MCULINK TP27 P1_20-MCULINK TP28 P1_21-MCULINK TP29 P1_31-MCULINK... -
Page 41: Appendix
EVK-IRIS-W10 - User guide Appendix A Glossary Abbreviation Definition Clock Central Processing Unit Clear To Send Direct Current DC-DC DC to DC converter Device Firmware Update Evaluation Kit Flash Configuration Block FICR Factory Information Configuration Register GPIO General Purpose Input / Output Low Drop-Out voltage regulator Low Energy Light Emitting Diode... -
Page 42: Related Documentation
EVK-IRIS-W10 - User guide Related documentation IRIS-W10 data sheet, UBX-23002331 IRIS-W10 system integration manual, UBX-23003263 MCU-Link JTAG/SWD Debug Probe | NXP Semiconductors MCUXpresso Integrated Development Environment (IDE) https://www.segger.com/downloads/jlink/ Github repo u-blox-sho-OpenCPU FTDI FT231XQ-R Datasheet, FT231X (ftdichip.com) https://www.nxp.com/docs/en/nxp/data-sheets/LPC55S6x_DS.pdf https://www.mikroe.com/click [10] https://www.nxp.com/docs/en/user-manual/UM11673.pdf [11] https://www.nxp.com/downloads/en/schematics/MCU-LINK-PRO-SCH.pdf [12]... -
Page 43: Revision History
EVK-IRIS-W10 - User guide Revision history Revision Date Name Comments 04-Sep-2023 habd, Initial release for EVK-IRIS-W10 PT1 24-Nov-2023 habd Updated for changes in new prototype spin of the board. Revised ch2 in Setting up the evaluation board. Added Starting up the EV section.
Need help?
Do you have a question about the IRIS-W10 Series and is the answer not in the manual?
Questions and answers