
Related Manuals for Hoover ONEPWR Emerge


Summary of Contents for Hoover ONEPWR Emerge
- Page 1 EMERGE CORDLESS VACUUM EMERGE PET CORDLESS VACUUM USER GUIDE F18OPSV22Z F18OPSV22J2...
-
Page 2: Important Safety Information
• Only Hoover ONEPWR batteries and chargers should be used with this machine. • Only Hoover ONEPWR recommended tools and accessories should be used with this machine. - Page 3 IMPORTANT SAFETY INFORMATION • Keep all openings clear and free from debris as this may affect the airflow/suction. • Turn off all controls on the machine before disconnecting or connecting the battery. • Always protect the charger power cord from heated surfaces or near open flames.
- Page 4 IMPORTANT SAFETY INFORMATION BATTERY SAFETY PRECAUTIONS • Replace the battery with a Hoover ONEPWR battery only. Use of another battery may present a risk of fire or explosion. • Do not attempt to disassemble the battery, remove any component projecting from the battery terminals and do not dispose of in a fire.
-
Page 5: General Information
GENERAL INFORMATION Technical Specifications F18OPSV22Z F18OPSV22J2 Product Description Hoover ONEPWR Emerge Hoover ONEPWR Emerge Cordless Vacuum Pet Cordless Vacuum Console Model Number BH53600ANZV BH53602ANZV Product Weight 2.8kg 3.09kg (without battery pack) Dust Cup Capacity 600ml 600ml Runtime* Up to 45 mins... -
Page 6: Machine Overview
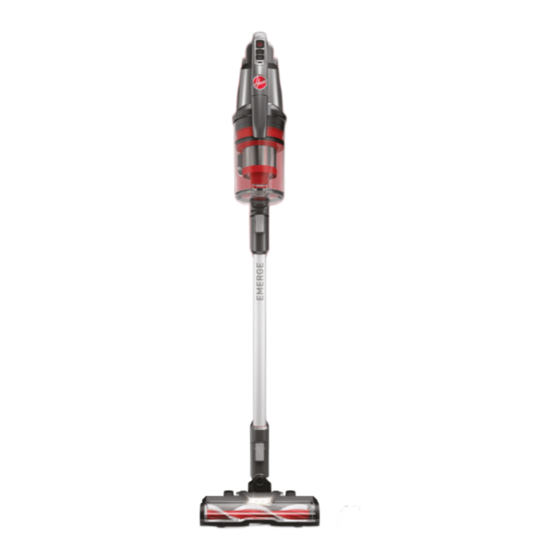
MACHINE OVERVIEW EMERGE CORDLESS VACUUM Carry Handle Filter (hidden) Dirt Cup Release Button Dirt Cup Dirt Release Button (hidden) Handheld Crevice Tool (hidden) Power ON/OFF Reduce Suction Increase Suction Battery Level Indicator Light Reach Wand Reach Wand Crevice Tool (hidden) Floorhead with LED Lights Brushbar Battery Dock... - Page 7 SAFETY GUIDE MACHINE OVERVIEW EMERGE PET CORDLESS VACUUM Carry Handle Filter (hidden) Dirt Cup Release Button Dirt Cup Dirt Release Button (hidden) Handheld Crevice Tool (hidden) Power ON/OFF Reduce Suction Increase Suction Battery Level Indicator Light Reach Wand Reach Wand Crevice Tool (hidden) All-Terrain Floorhead with LED Lights Brushbar and Brushroll Battery Dock...
-
Page 8: Assembling The Vacuum
ASSEMBLY ASSEMBLING THE VACUUM Push the reach wand down onto the Push the handheld down onto the reach Fit the dirt cup onto the hooks, then rock floorhead until it clicks into place. wand until it clicks into place. it up into the handheld so it secures into place. - Page 9 ASSEMBLY ATTACHING THE WALL MOUNT IMPORTANT: The wall mount is not designed to hold the full weight of the vacuum. The floorhead should be positioned flat on the surface of the floor to support the weight of the vacuum while the wall mount positions the vacuum in the upright position.
-
Page 10: Charging The Battery
CHARGING YOUR PRODUCT CHARGING THE BATTERY THIS MACHINE IS ONLY TO BE USED WITH HOOVER ONEPWR BATTERIES AND CHARGER. PLEASE READ THE BATTERY AND CHARGER USER GUIDES BEFORE USE. NOTE: Before first use, ensure the battery is fully charged. Failure to fully charge the battery before first use may result in poor battery performance. -
Page 11: Getting Started
GETTING STARTED OPERATION WARNING: The brushbar in the floorhead constantly rotates when activated. Never use the floorhead on one spot for an extended period of time as the brushbar may damage the surface. To prevent any damage being sustained, test on an inconspicuous area of the flooring/surface first. CAUTION: Always take extra care when using the vacuum on the stairs. -
Page 12: Handheld Mode
GETTING STARTED HANDHELD MODE WARNING: To reduce the risk of personal injury, always turn power switch off and remove battery before connecting or disconnecting accessories. Press the release button on reach wand Push the chosen accessory into the Accessories can also be attached onto and pull to separate. - Page 13 GETTING STARTED USING THE ACCESSORIES WARNING: To reduce the risk of personal injury, always turn power switch off and remove battery before connecting or disconnecting accessories. NOTE: All of the accessories, including the 2-in-1 tool, upholstery tool, motorised pet tool and floorhead, can be attached directly onto the handheld, reach wand or powered hose.
-
Page 14: Cleaning And Maintenance
CLEANING AND MAINTENANCE WARNING: To reduce the risk of personal injury, always turn power switch off and remove battery before cleaning or servicing. IMPORTANT: Avoid using solvents when cleaning plastic parts. Most plastics are susceptible to damage from various types of commercial solvents and may be damaged by their use. Use a clean cloth to remove dirt, dust, oil, grease, etc. -
Page 15: Cleaning The Filter
CLEANING AND MAINTENANCE CLEANING THE FILTER IMPORTANT: The filter should be tapped over a bin every 4-6 uses, to remove dirt and debris, and replaced every 6-9 months, depending upon use. The filter should be washed every 3 months, or when required. Allow the filter to completely dry before reinstalling. - Page 16 CLEANING AND MAINTENANCE REMOVING AND CLEANING THE BRUSHBAR (MODEL F18OPSV22Z) NOTE: If the brushbar in the floorhead has been obstructed, the brushbar motor protection sensor may activate. The brushbar will stop and the machine may switch off. To reset, switch the machine off and remove the battery. Remove the floorhead from the reach wand/handheld and clear any obstruction.
- Page 17 CLEANING AND MAINTENANCE REMOVING AND CLEANING THE BRUSHBAR (MODEL F18OPSV22J2) NOTE: If the brushbar or brushroll in the floorhead has been obstructed, the motor protection sensor may activate. The brushes will stop and the machine may switch off. To reset, switch the machine off and remove the battery. Remove the floorhead from the reach wand/handheld and clear any obstruction.
- Page 18 CLEANING AND MAINTENANCE REMOVING AND CLEANING THE BRUSHROLL (MODEL F18OPSV22J2) NOTE: If the brushbar or brushroll in the floorhead has been obstructed, the motor protection sensor may activate. The brushes will stop and the machine may switch off. To reset, switch the machine off and remove the battery. Remove the floorhead from the reach wand/handheld and clear any obstruction.
-
Page 19: Safety Guide
SAFETY GUIDE CLEANING AND MAINTENANCE REMOVING AND CLEANING THE MOTORISED PET TOOL BRUSHBAR (MODEL F18OPSV22J2) NOTE: If the brushbar in the motorised pet tool has been obstructed, the brushbar motor protection sensor may activate. The brushbar will stop and the machine may switch off. To reset, switch the machine off and remove the battery. -
Page 20: Checking For Blockages
CLEANING AND MAINTENANCE CHECKING FOR BLOCKAGES WARNING: To reduce the risk of personal injury, always turn power switch off and remove battery before cleaning or servicing. Remove the dirt cup and reach wand. Press the dirt cup release button and Check the powered floorhead for any Check and clear any dirt and debris from remove the dirt cup. -
Page 21: Troubleshooting
TROUBLESHOOTING WARNING: To reduce the risk of personal injury, always turn power switch off and remove battery before cleaning or servicing. There is an accessory missing • Check the contents on the box to make sure the part is definitely included with your machine. Why does the machine have no power? •... - Page 22 HOOVER.COM.AU HOOVER.CO.NZ...
Need help?
Do you have a question about the ONEPWR Emerge and is the answer not in the manual?
Questions and answers
We cannot get the filter lid back on. It keeps popping off. This machine is brand new! What can we do. I have studied the instructions carefully.
To fix the filter lid on a Hoover Emerge that keeps popping off, make sure the separator and filter are properly fitted before using the machine. Align the notches correctly when installing the lid: there is a larger notch and a smaller notch that must match with their corresponding parts. Press the lid firmly into place, ensuring it locks securely. If the lid is not aligned or pressed down fully, it may pop off during use.
This answer is automatically generated
Hello! The brush/rollers rotate on hardwood but not on carpet. I assume it is meant to rotate on any floor surface, is that right?