Table of Contents
Advertisement
Quick Links
KeyPad TouchScreen Benutzerhandbuch
Aktualisiert am 7. August 2023
KeyPad TouchScreen ist eine drahtlose Tastatur mit Touchscreen für die
Verwaltung des Ajax-Sicherheitssystems. Benutzer können sich mit
Smartphones authenti zieren,
Etikett
Schlüsselanhänger,
Bestehen
Karten und
Codes. Das Gerät ist für den Einsatz in Innenräumen konzipiert.
Das KeyPad TouchScreen kommuniziert mit einer Hub-Zentrale über zwei
sichere Funkprotokolle. Die Tastatur verwendet Jeweller, um Alarme und
Ereignisse zu übertragen, und Wings, um eine Firmware zu aktualisieren, die
Liste der Gruppen, Räume und andere zusätzliche Informationen zu übertragen.
Die Kommunikationsreichweite ohne Hindernisse beträgt bis zu 1.700 Meter.
Weitere Informationen
Funktionelle Elemente
Advertisement
Table of Contents

Related Manuals for AJAX KeyPad TouchScreen


Summary of Contents for AJAX KeyPad TouchScreen
- Page 1 KeyPad TouchScreen Benutzerhandbuch Aktualisiert am 7. August 2023 KeyPad TouchScreen ist eine drahtlose Tastatur mit Touchscreen für die Verwaltung des Ajax-Sicherheitssystems. Benutzer können sich mit Smartphones authenti zieren, Etikett Schlüsselanhänger, Bestehen Karten und Codes. Das Gerät ist für den Einsatz in Innenräumen konzipiert.
- Page 2 7. Perforierter Teil der Montageplatte zur Ausgabe von Kabeln durch die Wand. 8. Eingebauter Summer. Manipulationstaste 10. QR-Code mit der Geräte-ID. Es wird verwendet, um die Tastatur zum Ajax- System hinzuzufügen. 11. Ein-/Aus-Taste. 12. Klemmen zum Anschluss eines fremden Netzteils. Sie können bei Bedarf aus den Halterungen entfernt werden.
-
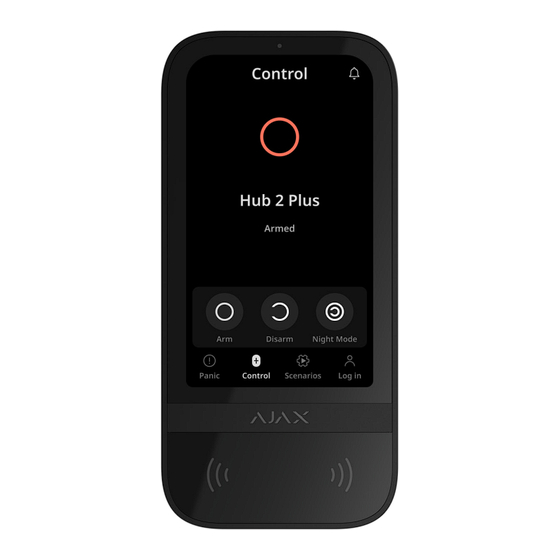
Page 3: Operating Principle
KeyPad TouchScreen interface inherits the Ajax Security System app. It is available to choose dark or light interface appearance. A touchscreen display with a 5-inch diagonal allows you to access the security mode of an object or any group and to control automation scenarios. -
Page 4: Security Control
A. When external power is connected, the pre-installed batteries are used as a backup power source. Security control KeyPad TouchScreen can arm and disarm the entire object or separate groups, and activate Night mode. Use the Control tab to change the security mode. You can control the security with KeyPad TouchScreen using: 1. - Page 5 The number of personal codes and keypad access codes depends on the hub model Access rights and codes can be adjusted in Ajax apps. If the code is compromised, it can be changed remotely, eliminating the need to call an installer to the object.
-
Page 6: Emergency Buttons
KeyPad TouchScreen allows to control the groups’ security (if Group mode is enabled ). You can also adjust in the keypad settings which groups will be shared (keypad groups). By default, all groups are available for viewing on the keypad display in the Control tab. You can learn more about group security... - Page 7 Fire. Auxiliary alert. In Ajax app an admin or a PRO with the rights to con gure the system can select the number of buttons to display in the Panic tab. There are two options available in the KeyPad TouchScreen...
- Page 8 KeyPad TouchScreen indication is shown on the display only when it is active. Built-in buzzer noti es about alarms, door openings and entry/exit delays. Fire alarm muting In case of a re alarm in the system, you can mute it with KeyPad TouchScreen.
-
Page 9: Duress Code
To re-open the muting screen, press the icon on the KeyPad TouchScreen display. To instantly display the re alarm muting screen on the KeyPad TouchScreen, enable the Always Active Display toggle in the KeyPad settings. Also, connect the third-party power supply. - Page 10 . During this time, the hub will ignore all codes and access devices while informing the security system users about attempted unauthorized access. KeyPad TouchScreen will turn off the reader and block access to all tabs. The keypad display will show an appropriate noti cation.
- Page 11 The addressability of Ajax devices allows sending events to the PRO Desktop or the CMS the type of the device, its name, security group, and virtual room. Note that the list of transmitted parameters may differ depending on the kind of CMS and the selected protocol for communication with the monitoring station.
-
Page 12: Adding To The System
KeyPad TouchScreen is incompatible with Hub, Hub Plus and third-party security control panels. To connect KeyPad TouchScreen to the hub, the keypad must be located at the same secured facility as the system (within the range of the hub radio network). - Page 13 KeyPad TouchScreen works with one hub. When connected to a new hub, it stops sending events to the old one. When added to a new hub, the keypad is not removed from the device list of the old hub. This must be done through the Ajax app. Malfunctions...
- Page 14 When a KeyPad TouchScreen malfunction is detected, the Ajax app displays a malfunction counter on the device icon. All malfunctions are shown in the keypad states. Fields with malfunctions will be highlighted in red. A malfunction is displayed if: The keypad enclosure is open (tamper is triggered).
- Page 15 Icons in the app The icons in app display some keypad states. To access them: 1. Sign in to the Ajax app 2. Select the hub. 3. Go to the Devices tab. Icon Meaning Jeweller signal strength. Displays the signal strength between the hub and the device.
-
Page 16: Icons On The Display
Displayed when the keypad is operating via a extender Pass/Tag reading is enabled in KeyPad TouchScreen settings. Chime on opening is enabled in KeyPad TouchScreen settings. Device is permanently deactivated. Learn more Device has tamper triggering events permanently deactivated. - Page 17 Appears on the display when the required States The states include information about the device and its operating parameters. The states of KeyPad TouchScreen can be found in the Ajax apps: 1. Go to the Devices tab.
- Page 18 2. Select KeyPad TouchScreen from the list. Parameter Value Clicking on opens the list of the KeyPad TouchScreen malfunctions. Malfunction The eld is displayed only if a malfunction is detected. Clicking on opens the instructions for updating the keypad’s rmware.
- Page 19 Attenuation Test menu. The battery charge level of the device: Battery low Battery Charge When the batteries are low, the Ajax apps and the security company will receive appropriate noti cations. After sending a low battery noti cation, the keypad can work for up to 2 weeks.
- Page 20 Connected — external power supply is connected to the device. Disconnected — the external power is disconnected. The device runs on batteries. Learn more Displayed when the Always Active Display Always Active Display toggle is enabled in the keypad settings and external power supply is connected.
- Page 21 delays When enabled, the keypad beeps about Exit Delays in Night Mode when leaving in Night Mode. When enabled, a siren noti es about opening detectors triggering in the Disarmed system mode. Chime on opening Learn more Displayed if the noti cations about arming/disarming, entry/exit delay, and opening Beep Volume are activated.
- Page 22 Device No. Number of the device loop (zone). Settings To change the KeyPad TouchScreen settings in the Ajax app: 1. Go to the Devices tab. 2. Select KeyPad TouchScreen from the list. 3. Go to Settings by clicking on the icon.
- Page 23 events feed. To change the name of the device, click on the text eld. The name can contain up to 12 Cyrillic characters or up to 24 Latin characters. Selecting the virtual room to which KeyPad TouchScreen is assigned. Room The room name is displayed in the text of SMS and noti cations in the events feed.
- Page 24 Select the optimal sensitivity the keypad will respond to approaching as you prefer. Ajax re When enabled, users can mute detectors alarm (even Interconnected) with keypad. Mute Fire Alarm Learn more When enabled, the security mode can be Pass/Tag Reading controlled with Pass and Tag access devices.
- Page 25 Learn more Switches the device to the signal attenuation test mode. Signal Attenuation Test Learn more Allows deleting all hubs associated with Tag or Pass from device memory. Pass/Tag Reset Learn more User Guide Opens the KeyPad TouchScreen user manual in...
-
Page 26: Security Management
Ajax app. Allows the user to disable the device without removing it from the system. Three options are available: No — the device operates in normal mode and transmits all events. Entirely — the device does not execute Permanent Deactivation... - Page 27 Selecting which groups will be shared and available for management by all authorized users. All system groups and groups created after Shared Groups adding KeyPad TouchScreen to the hub are shared by default. Group Mode Available if is enabled. When enabled, to have access to the control...
- Page 28 system integrity check display. Enable this. It may take some time to display the list. This reduces the time of the keypad operation from the pre-installed batteries. Automation Scenarios Setting Value Activates/deactivates scenarios management from the keypad. When disabled, the Scenarios tab is hidden Scenarios Management from the keypad display.
-
Page 29: Display Settings
Setting Value When enabled, the user can send an emergency signal or call for help from the keypad Panic tab. On-Screen Emergency Buttons When disabled, the Panic tab is hidden from the keypad display. Selecting the number of buttons to display on the Panic tab. - Page 30 The toggle is enabled by default. The display Auto Adjust backlight brightness is automatically adjusted depending on the ambient light level. Selecting the display backlight level: from 0 to 100% (0 — the backlight is minimal, 100 — the backlight is maximum). Sets in increments of 10%.
- Page 31 1. Indicates the security status and also the Entri/Exit delays 2. Chimes on opening. 3. Informs about alarms. We do not recommend using KeyPad TouchScreen instead of the siren. The keypad buzzer is used only for additional noti cations. Ajax sirens are designed to scare away intruders and attract attention.
- Page 32 the keypad only. Learn more The beep loudness depends on the con gured buttons’ volume. Beep on delays When enabled, the built-in buzzer beeps about a delay when entering. Entry Delays Learn more When enabled, the built-in buzzer beeps about a delay when leaving.
- Page 33 Very Loud. Buttons Adjusting the buzzer noti cation volume for Volume interactions with the keypad display. Alarms reaction Setting the mode when the built-in buzzer enables an alarm: Always — an audible alarm will be activated regardless of the system security mode. Audible Alarm Only when armed —...
- Page 34 Setting the keypad response to device alarms KeyPad TouchScreen can react to the alarms of each detector in the system with a built-in buzzer. The function is useful if you do not need to activate the buzzer in case of the alarm of a speci c device, for example, to LeaksProtect leakage detector triggering.
- Page 35 Setting the keypad response to pressing the panic button in the Ajax apps You can con gure the keypad response to alarm when the panic button is pressed in the Ajax apps. To do this, follow these steps: 1. Open the Ajax app. 2. Go to the Devices tab.
- Page 36 LED indicator before the system is disarmed: Con rmed intrusion/hold-up alarm. Single intrusion/hold-up alarm. Lid Opening. 3. Select the required KeyPad TouchScreen in the Devices menu. Click Back to save the parameters. 4. Click Back. All values will be applied.
- Page 37 How to set Chime If Chime on opening is enabled, KeyPad TouchScreen notify you with a short beep if the opening detectors are triggered when the system is disarmed. The feature is used, for example, in stores, to notify employees that someone has entered the building.
- Page 38 Keypad access codes User access codes Unregistered user codes Cards and key fobs adding KeyPad TouchScreen can work with Tag key fobs Pass cards , and third-party devices that support DESFire® technology. Before adding third-party devices that support DESFire®, make sure they have enough free memory to handle the new keypad.
- Page 39 Hub Hybrid (2G) Hub Hybrid (4G) How to add a Tag or Pass to the system 1. Open the Ajax app. 2. Select the hub to which you want to add a Tag or Pass. 3. Go to the Devices tab.
- Page 40 The screen for switching the keypad to the registration mode will appear on all KeyPad TouchScreen of the system. When an admin or PRO with rights to con gure the system starts registering Tag/Pass at one keypad, the rest will switch to the initial state.
- Page 41 The screen for switching the keypad to the resetting mode will appear on all KeyPad TouchScreen of the system. When an admin or PRO with rights to con gure the system starts resetting Tag/Pass at one keypad, the rest will...
-
Page 42: Bluetooth Setting
9. Put Pass or Tag with the wide side to the keypad reader for a few seconds. It is marked with wave icons on the body. Upon successful formatting, you will receive a noti cation in the Ajax app and on the keypad display. If the formatting fails, try again. - Page 43 3. In the Permissions section, disable the Security management via Bluetooth toggle. 2. Allow the Ajax Security System app to use Bluetooth if it was not previously granted. In this case, the warning appears at KeyPad TouchScreen States. Pressing the symbol opens the window with explanations of what to do.
- Page 44 3. We recommend con guring Geofence for the stable performance of Bluetooth authentication. The warning appears at KeyPad TouchScreen States if Geofence is disabled and the app is not allowed to use the smartphone location. Pressing the symbol opens the window with...
- Page 45 Bluetooth authentication can be unstable if Geofence function is disabled. You will need to launch and minimize the app if the system switches it to the sleep mode. You can control the system faster via Bluetooth, when the Geofence function is activated and con gured.
- Page 46 If pre-authorization is enabled, the Arming without Code feature is unavailable in the keypad settings. You can authenticate in two ways: 1. In the Control tab. After login, the user will see the shared groups of the system (if the group mode is activated). They are speci ed in the keypad settings: Security Management →...
- Page 47 The keypad display switches to the initial screen after 10 seconds from the last interaction with it. Enter the code or bring a personal access device again to control the system with KeyPad TouchScreen. Pre-authorization with a keypad code Pre-authorization with a personal code...
- Page 48 Turn on the smartphone Bluetooth, Location and unlock the screen. KeyPad TouchScreen is locked for the time speci ed in the settings if an incorrect code is entered or an unveri ed access device is brought three times in a row within 1 minute.
- Page 49 If a general code is used, the name of the keypad from which the security mode was changed is displayed. The step sequence to change the security mode with the keypad depends on whether user pre-authorization is enabled in the KeyPad TouchScreen settings.
- Page 50 If pre-authorization is enabled Security control of the object Security control of the group Using a duress code If pre-authorization is disabled Security control of the object Security control of the group Using a duress code Example of entering codes Code Example Note...
- Page 51 1. Activate the keypad by approaching it or holding your hand in front of the sensor. Perform pre-authorization if necessary. 2. Bring Tag/Pass or smartphone. Two-stage arming KeyPad TouchScreen can participate in two-stage arming but cannot be used as a second-stage device. The two-stage arming process using Tag, Pass or...
- Page 52 Green — arming process started. Yellow — arming is incomplete. White — armed. Managing scenarios with the keypad KeyPad TouchScreen allows you to create up to six scenarios to control one or a group of automation devices. To create a scenario: 1. Open the Ajax app .
- Page 53 11. Press Back to return to the Automation Scenarios menu. 12. If necessary, activate the Pre-authorization toggle. Created scenarios are displayed in the app: KeyPad TouchScreen → Settings → Automation Scenarios → Keypad Scenarios. You can turn them off, adjust settings, or delete them at any time.
- Page 54 LED indicator; built-in buzzer. KeyPad TouchScreen indication is shown on the display only when it is active. Icons that indicate some system or keypad states are displayed in the upper part of the Control tab. For example, they can indicate re alarm, system restoration after alarm, and chime on opening.
- Page 55 If noti cations for Night Mode The system or the group is The built-in buzzer emits a Activation/Deactivation are switched to the Night Mode. short beep. enabled. If noti cations for The built-in buzzer emits two The system is disarmed. Arming/Disarming are short beeps.
- Page 56 Sound noti cations of malfunctions If any device is o ine or the battery is low, KeyPad TouchScreen can notify system users with an audible sound. The keypad’s LED indicator will also blink. Malfunction noti cations will be displayed in the events feed, SMS, or push noti cation.
-
Page 57: Functionality Testing
Functionality testing The Ajax system offers several types of tests to help select the correct installation place for the devices. Tests do not start immediately. However, the waiting time does not exceed the duration of one “hub—device” polling interval. -
Page 58: Device Placement
A list of recommended partners is available here KeyPad TouchScreen is best placed indoors near the entrance. This allows disarming the system before the entry delays have expired and quickly arming the system when leaving the premises. -
Page 59: Signal Strength
The recommended installation height is 1.3-1.5 meters above the oor. Install the keypad on a at, vertical surface. This allows KeyPad TouchScreen to be rmly attached to the surface and to avoid false tamper triggering. Signal strength The Jeweller and Wings signal strength is determined by the number of undelivered or corrupted data packages over a certain period of time. -
Page 60: Installation
8. In places where the acoustic signal can be attenuated (inside furniture, behind thick curtains, etc.). Installation Before installing KeyPad TouchScreen, ensure that you have selected the optimal location that complies with the requirements of this manual. To mount a keypad: 1. - Page 61 If the LED indicator doesn’t light up during placing on SmartBracket, check the tamper status in the Ajax app, the integrity of the fastening, and the tightness of the keypad xation on the panel.
- Page 62 KeyPad TouchScreen is equipped with terminals for connecting 10.5V–14 V⎓ power supply unit. Recommended electrical parameters of the power supply unit: 12 V⎓, current from 0.5 A. The connection of the external power supply is recommended when you need a display to be always active and to avoid rapid discharge of batteries.
- Page 63 1 — to output the cable through the wall. 2 — to output the cable from the bottom. It is enough to break out one of the perforated parts. 2. De-energize external power supply cable. 3. Connect the cable to the terminals by observing polarity (marked on the plastic).
-
Page 64: Maintenance
5. Turn on the keypad and place it on the mounting panel. 6. Check the status of batteries and external power in the Ajax app and the overall operation of the device. Maintenance Check the functioning of KeyPad TouchScreen regularly. The optimal frequency of checks is once every three months. - Page 65 Warranty for the Limited Liability Company “Ajax Systems Manufacturing” products is valid for 2 years after the purchase. If the device does not function correctly, please contact the Ajax Technical Support rst. In most cases, technical di culties can be resolved remotely.
Need help?
Do you have a question about the KeyPad TouchScreen and is the answer not in the manual?
Questions and answers