Creative Sound Blaster Audigy 2 Platinum eX User Manual
Creative sound blaster audigy 2 user's guide
Hide thumbs
Also See for Sound Blaster Audigy 2 Platinum eX:
- User manual (87 pages) ,
- User manual (82 pages) ,
- User manual (21 pages)
Table of Contents
Advertisement
Advertisement
Table of Contents
Troubleshooting

Related Manuals for Creative Sound Blaster Audigy 2 Platinum eX


Summary of Contents for Creative Sound Blaster Audigy 2 Platinum eX
- Page 2 Creative Sound Blaster Audigy 2 Platinum eX Information in this document is subject to change without notice and does not represent a commitment on the part of Creative Technology Ltd. No part of this manual may be reproduced or transmitted in any form or by any means, electronic or mechanical, including photocopying and recording, for any purpose without the written permission of Creative Technology Ltd.
- Page 3 Important: This PDF file has been designed to provide you with complete product knowledge. The following are instructions on how to make use of this PDF file effectively by launching applications and help files, as well as accessing relevant web sites, where applicable, via specially prepared links.
- Page 4 Contents...
-
Page 5: Table Of Contents
Remote Control Functions... 1-9 Installing Hardware Installation Steps ... 2-1 Step 1: Prepare the Sound Blaster Audigy 2 Platinum eX hardware... 2-1 Step 2: Prepare your computer... 2-2 Step 3: Install the audio card ... 2-3 Step 4: Install the joystick... 2-3 Step 5: Install the cables ... - Page 6 Updating Windows 2000 (Service Pack 3)... 3-5 Updating Windows with Digital Video Update... 3-5 Using Audigy 2 Software Creative Sound Blaster Audigy 2 Applications... 4-1 Demos... 4-2 Sound Blaster Audigy 2 Getting Started Demo ... 4-2 Sound Blaster Audigy 2 Feature Showcase Demo ... 4-2 Introduction to the Sound Blaster Audigy 2 software suite ...
- Page 7 General Specifications Features... A-1 Connectivity... A-3 Sound Blaster Audigy 2 Platinum eX Card... A-3 Sound Blaster Audigy 2 Platinum eX External I/O Module... A-4 Troubleshooting and FAQs Problems Installing Software... B-1 Problems with Sound... B-1 Problems with File Transfers on Some VIA Chipset Motherboards... B-5 Insufficient SoundFont Cache ...
- Page 8 Introduction...
-
Page 9: High-Definition Digital Audio Entertainment
High-definition Thank you for purchasing Sound Blaster Audigy 2 Platinum eX card, the Sound Blaster Audigy 2 Platinum eX External I/O Module and an IR digital audio remote control. It is the most complete affordable high-definition digital audio entertainment solution you entertainment can find on the market today. -
Page 10: What Is Eax Advanced Hd
What is EAX ® ADVANCED advantage of the increased processing capabilities of the Sound Blaster Audigy 2 processor, EAX ADVANCED HD delivers a host of new features to achieve high definition audio for gaming and music enhancement. The EAX ADVANCED HD Game Audio Library takes in-game audio and acoustic simulation to a whole new level. -
Page 11: Package Contents
Package Contents The following items are included in your package: ❑ Sound Blaster Audigy 2 Platinum eX card ❑ Sound Blaster Audigy 2 Platinum eX External I/O Module and IR remote control ❑ AD_LINK cable ❑ Power converter Cable The items listed here may vary ❑... -
Page 12: Internet Multimedia And Entertainment
Other Internet applications may have higher system requirements or may require a microphone. Refer to the application’s online Help documentation for details. Getting More Refer to the information on Creative applications. The Information interactive introduction to Sound Blaster Audigy 2 and demonstrates the card’s capabilities. Visit the View the contents of the Sound Blaster Audigy 2 Installation and Applications CD for additional libraries and other software. -
Page 13: Technical Support
Technical Support Visit http://www.soundblaster.com/support/faq/ Document The following typographical conventions are used throughout this manual: Conventions for general help. The notepad icon indicates information that is of particular importance and should be considered before continuing. The alarm clock designates a caution or warning that can help you avoid situations involving risk. -
Page 14: About Your Sound Blaster Audigy 2 Platinum Ex Hardware
About your Sound Blaster Audigy 2 Platinum eX hardware... -
Page 15: What You Need
Audigy 2 Platinum eX card Sound Blaster AD_LINK cable Joystick/MIDI bracket Figure 1-1: What you need. Audigy 2 Platinum eX External I/O Module Phillips-head screwdriver (not Power Converter Cable included) About your Sound Blaster Audigy 2 Platinum eX hardware 1-1... -
Page 16: Your Sound Blaster Audigy 2 Platinum Ex Card
The Audigy 2 Platinum eX card works as a stand-alone audio card. However to enjoy all the features available, you need to connect it to the External I/O Module. Figure 1-2: Jacks, connectors and ports About your Sound Blaster Audigy 2 Platinum eX hardware 1-2... -
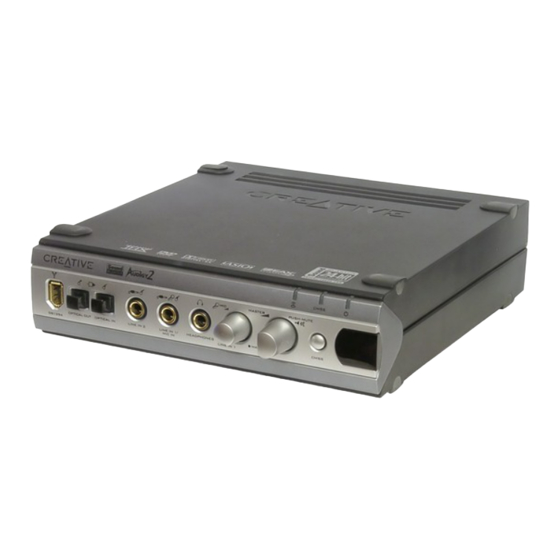
Page 17: Your Audigy 2 Platinum Ex External I/O Module
Your Audigy 2 Your Sound Blaster Audigy 2 Platinum eX External I/O Module has these jacks, connectors and controls: Platinum eX External I/O Module Click any circled number in the diagram to see a description of the item. • To connect your existing... - Page 18 Sound Blaster Audigy 2 Platinum eX card. Table 1: The Sound Blaster Audigy 2 Platinum eX card Joystick/MIDI connector Connects to the Joystick/MIDI bracket for gamepads, other input and MIDI devices. AD_LINK 2 port Connects to the External I/O Module’s AD_LINK2 port to supply power.
- Page 19 Controls the overall output volume. CMSS Switch Turns the Creative MediaSource MultiSpeaker Surround Infrared Receiver Lets you control your computer via the IR remote control. Description ® feature on or off. About your Sound Blaster Audigy 2 Platinum eX hardware 1-5...
- Page 20 SPDIF Digital Out Mini DIN jack Outputs digital audio via mini DIN cable. AD_LINK 1 Connector Connects to the Sound Blaster Audigy 2 Platinum eX card's AD_LINK 1 cable's connector. AD_LINK 2 Connector (SB1394/FireWire port) Connects to the Sound Blaster Audigy 2 Platinum eX card's AD_Link 2 connector via the supplied 1.8 meter (5-feet) AD_LINK cable.
-
Page 21: Adjusting The Volume-Level Of Headphones And Microphone
On the front panel of the External I/O Module, turn the respective control knob: ❑ Counterclockwise to decrease the headphone volume or microphone gain. ❑ Clockwise to increase the headphone volume or microphone gain. About your Sound Blaster Audigy 2 Platinum eX hardware 1-7... -
Page 22: Using Creative Surround Mixer
1. Click Start -> Programs -> Creative -> Sound Blaster Audigy 2 -> Surround Mixer. 2. On the Master Control panel of Creative Surround Mixer, make sure that there is no red “X” on the Speaker button under the Volume slider. Otherwise, click the Speaker button. This will unmute the headphones output. -
Page 23: Remote Control Functions
Previous button To resume normal Goes to the playback, press the previous track or Play/Pause button. menu page. eject the disc. About your Sound Blaster Audigy 2 Platinum eX hardware 1-9 button... - Page 24 Press to mute audio. Master Volume buttons Press the Volume Up (+) or Volume Down (-) button to control the master volume of your computer and Sound Blaster Audigy 2 Platinum eX. About your Sound Blaster Audigy 2 Platinum eX hardware 1-10...
-
Page 25: Installing Hardware
Installing Hardware This chapter tells you how to install the Sound Blaster Audigy 2 Platinum eX hardware. -
Page 26: Installation Steps
Installation Steps Step 1: Prepare the 1. Place the Sound Blaster Audigy 2 Platinum eX External I/O Module near your computer. 2. Locate the AD_LINK cable that links your External I/O Module to your Sound Blaster Audigy 2 Sound Blaster Platinum eX card. -
Page 27: Step 2: Prepare Your Computer
Step 2: Prepare your 1. Turn off your computer and all peripheral devices. 2. Touch a metal plate on your computer to ground yourself and to discharge any static electricity, and computer then unplug the power cord from the wall outlet. 3. -
Page 28: Step 3: Install The Audio Card
Step 3: Install the 1. Align the audio card with the PCI slot and press the card gently but firmly into the slot as shown in Figure 2-3. audio card 2. Do not force the audio card into the slot. Make sure that the gold traces of the card’s PCI connector are aligned with the PCI bus connector on the motherboard before you insert the card into the PCI expansion slot. -
Page 29: Step 5: Install The Cables
Step 5: Install the 1. Connect the AD_LINK 1 connectors on the AD_LINK cable first. With the connector’s side springs pressed down, push the connector until it clicks firmly into place on both the audio card and the cables External I/O module. 2. -
Page 30: Digital Cd Audio Extraction
5. Connect your CD-ROM or DVD drive’s analog audio output cable to the Audigy 2 Platinum eX card’s Aux_IN connector. 6. If your CD-ROM or DVD drive has a digital SPDIF audio output connector, you may wish to skip Step 5 and use a two-pin digital audio cable (available separately) to connect the drive to the Audigy 2 Windows 98 SE users can also Platinum eX card’s CD_SPDIF connector instead, for better sound quality. -
Page 31: Step 6: Connect To Ac Power Socket
2. Plug the power cord into the AC wall outlet, and turn on the computer. AC power socket To connect your Sound Blaster Audigy 2 Platinum eX card and External I/O Module to other devices, see “Connecting Related Peripherals” on page 2-7. -
Page 32: Connecting Related Peripherals
Connecting Sound Blaster Audigy 2 Platinum eX will give you endless hours of listening pleasure. Figure 2-7 shows you how to connect related peripherals to your Sound Blaster Audigy 2 Platinum eX to optimise your Related enjoyment. Peripherals Click any circled number in the diagram to see a description of the item. -
Page 33: Connecting Related Peripherals (Cont'd)
Connecting Related Peripherals (cont’d) Click any circled number in the diagram to see a description of the item. Dolby Digital (AC-3) Amplifier SPDIF In Figure 2-8: Connecting peripherals to the External I/O Module. Other IEEE 1394 devices you can connect: •... - Page 34 Connect to external analog stereo devices like cassette recorders, tuners or other line- level sound sources. SPDIF Digital Out jack Outputs up to 6.1-channels or compressed AC-3 SPDIF output for connection to digital surround decoders and amplifiers or digital speaker systems, like the Creative Inspire 5.1 speaker system. Installing Hardware 2-9...
- Page 35 Connect IEEE-compliant 1394/Firewire devices like Digital Video camcorders or the NOMAD Jukebox. Mini DIN SPDIF connector Found on Creative digital speaker systems like the Creative Inspire 5.1™, which can be connected to the External I/O Module’s SPDIF Digital Output via a Mini DIN-to- mini plug convertor.
-
Page 36: Connecting Speakers Systems
If you have a 5.1 or 6.1 channel speaker system, you can “upmix” your stereo sources (such as MP3, WMA, MIDI and Wave) to 6.1 channels by using the Creative MultiSpeaker Surround (CMSS) Speakers technology. To upmix, you need to enable the CMSS feature in Creative EAX console. Refer to the EAX ADVANCED HD Systems For discrete 7-channel amplifiers or systems, use a 3.5 mm... -
Page 37: Positioning Your Speakers
Positioning Your If you are using four to six speakers, place them to form a circle around you Speakers (Figure 2-10), and the speakers angled toward you. Make sure that the computer monitor is not blocking the path of your front speakers. Good speaker placement can You may want to adjust the relative enhance your movie enjoyment,... -
Page 38: Installing Software
Installing Software This chapter tells you how to install the Sound Blaster Audigy 2 Platinum eX software. -
Page 39: Installing Drivers And Applications
Windows operating systems. 1. After you have installed the Sound Blaster Audigy 2 Platinum eX card and Audigy 2 Platinum eX External I/O Module, turn on your computer. Windows automatically detects the audio card and device drivers. -
Page 40: Using Creative Software Autoupdate
The files will then be dynamically retrieved and installed on your system for you. As the files are to Creative Labs during the customised for your specific OS, language and Creative hardware, they are smaller and take less time to Software AutoUpdate process. -
Page 41: Uninstalling And Reinstalling The Applications And Device Drivers
Uninstalling and At times you may need to uninstall or reinstall some or all of the audio card's applications and device drivers to correct problems, change configurations, or upgrade outdated drivers or applications. The Reinstalling the following instructions tell you how to do so in all Windows operating systems. Applications and Before you begin, close all audio card applications. -
Page 42: Installing/Uninstalling Selected Audio Drivers And Applications
5. In the InstallShield Wizard dialog box, select the Remove option. 6. Click the Yes button. 7. Restart your computer when prompted. To uninstall Creative MediaSource and all its components, do the following: 1. Click Start -> Settings -> Control Panel. 2. Double-click the Add/Remove Programs icon. -
Page 43: Updating Windows 2000 (Service Pack 3)
3. Click the Install/Uninstall tab (or the Change or Remove Programs button) 4. Select the Creative MediaSource entry, then click the Add/Remove (or Change/Remove) button. 5. In the InstallShield Wizard dialog box, click the Custom Uninstallation button, and then click the Next button. -
Page 44: Using Audigy 2 Software
Using Audigy 2 Software Find out how the software accompanying your audio card can be used to control and customise the card for best performance. -
Page 45: Creative Sound Blaster Audigy 2 Applications
We recommend that you familiarise yourself with their functions in order to make full use of Blaster Audigy 2 Sound Blaster Audigy 2 Platinum eX’s rich features. Applications Demos: Providing an overview of Sound Blaster Audigy 2’s features ❑... -
Page 46: Demos
Three demo packages have been included to showcase the basic as well as the advanced features of your Sound Blaster Audigy 2 Platinum eX hardware. We recommend that you play them at least once in order to have a good overview of your card’s features. -
Page 47: Introduction To The Sound Blaster Audigy 2 Software Suite
Creative Just like the Start button in Windows, Creative MediaSource Go! Launcher provides a single point of access to most of the software programs you need, to control and customise Sound Blaster Audigy 2 Platinum eX. MediaSource Go! Creative MediaSource Go! Launcher consists of four tabs: Programs, Product Settings, Product Support Launcher and Companion Products. -
Page 48: Creative Mediasource Player
MediaSource Player and Recorder, refer to the online Help. Creative Managing a huge collection of audio CDs and MP3 files can be a headache. With Creative MediaSource Organizer, you can find any recording easily, no matter where it is stored on your hard disk or external MediaSource storage devices. - Page 49 CDs can take up to 50 MB per song. To reduce storage on your hard disk, you can convert converting songs tracks from audio CDs into smaller 4 to 5 MB MP3 files. Creative MediaSource Organizer’s built-in Rip Now module lets you easily extract tracks from audio CDs, then convert them to MP3 and WMA formats at high resolution bit rates of 320 Kbps and 160 Kbps, respectively.
-
Page 50: Creative Mediasource Dvd-Audio Player
Storing music on If you have a CD-writer, another way to reduce music storage on your computer’s hard disk is to record audio tracks onto CD-R or CD-RW for playback on many consumer hi-fi devices. Creative MediaSource recordable CD Organizer’s Burn CD module lets you create your own audio and MP3 CDs from WAV, MP3 and WMA files. -
Page 51: Audio Effects: Environmental Sound Processing
CMSS 3D: Simulating Creative MultiSpeaker Surround (CMSS) 3D makes ordinary two-channel (Left and Right Stereo) sound seem to surround you, even through only two speakers. For users with 5.1 or 6.1 multichannel speaker Surround Sound systems, CMSS can also simulate surround sound from ordinary stereo. -
Page 52: Creative Surround Mixer
For more information and usage details on EAX Console, refer to the Creative EAX Creative Surround Use Creative Surround Mixer to select the device you wish to listen to or record from. It operates in two possible modes. Click the Basic Mode or Advanced Mode button to switch between the two modes:... -
Page 53: Creative Minidisc Center
You can use external MIDI input devices to audition your MIDI banks and instruments. First, connect a MIDI input device to your audio card and then select that device in the Creative SoundFont Bank Manager. Once you discover the power of SoundFont technology, you will be amazed at the sound design possibilities available. -
Page 54: Creative Wave Studio
For more information and usage details on Creative Audio Stream Recorder 2, refer to its Creative Wave When you need to edit sound files, use Creative Wave Studio. This application supports popular file formats like WAV and AIFF. With Wave Studio, you can convert between file formats and edit out any Studio section of sound. -
Page 55: A General Specifications
General Specifications Technical details of the Sound Blaster Audigy 2 Platinum eX card and External I/O Module. -
Page 56: Features
General Specifications Technical details of Sound Blaster Audigy 2 Platinum eX card and your Audigy 2 Platinum eX External I/O Module. Features ❑ PCI Specification Version 2.1 compliant PCI Bus Mastering ❑ Bus mastering reduces latency and speeds up system performance ❑... - Page 57 ❑ Crossover bass frequency (10-200 Hz): adjustable to standalone subwoofer units for desired bass level ❑ Adjustable Center, Rear Center and LFE level control ❑ Multispeaker technology Creative MultiSpeaker ❑ Upmixes mono or stereo sources to 6.1 channels Surround (CMSS) ❑...
-
Page 58: Connectivity
Connectivity Sound Blaster Audigy 2 Platinum eX Card ❑ 2 x line-level analog outputs via stereo jacks on rear bracket: Front and Rear Line-Outs 1 and 2 Audio Outputs ❑ Stereo headphone (32-ohm load) support on Line Out 1 ❑ 1 x line-level three channel analog output via 4-pole 3.5 mm minijack on rear bracket: Front Center, Rear Center and Subwoofer channel ❑... -
Page 59: Sound Blaster Audigy 2 Platinum Ex External I/O Module
Sound Blaster Audigy 2 Platinum eX External I/O Module ❑ One headphone output with auto detection via ¼” stereo jack with volume control Inputs and outputs on ❑ One shared line-level analog Line/Microphone input (Line-In 1/Mic-In) via ¼” stereo jack. Shared front panel input selectable via knob. -
Page 60: B Troubleshooting And Faqs
Troubleshooting and FAQs This section provides solutions to problems you may encounter during installation or normal use. -
Page 61: Problems Installing Software
❑ The headphones are connected to the Headphones jack. software configuration ❑ In the Speaker Selection tab of Creative Speaker Settings, the Headphones option is selected in the Speaker/Headphone Selection box. ❑ In the Basic tab of Creative Surround Mixer, the recording source selected is “What U Hear”. - Page 62 Mixer.” on page B-2. To record an individual analog source: ❑ In the Record panel of the Basic tab in Creative Surround Mixer, make sure the recording source selected is Analog Mix (Line/CD/Aux/PC). ❑ In the Source panel, mute the analog sources that you do not want to record — by clicking the Speaker button to change it to a button with a red cross sign on it.
- Page 63 No audio output when playing digital files such as .WAV, MIDI files or AVI clips. Check the following: ❑ The speakers’ volume control knob, if any, is set at mid-range. Use Creative Surround Mixer to adjust the volume, if necessary.
- Page 64 Basic tab of Creative Surround Mixer. For example, the CD Audio balance in Windows Volume Control is on the left but in Creative Surround Mixer you have panned the CD Audio to the right. Troubleshooting and FAQs B-4...
-
Page 65: Problems With File Transfers On Some Via Chipset Motherboards
This ensures that your analog sources will not turn silent when you pan them in Creative Surround Mixer. Problems with After you install the Sound Blaster Audigy 2 Platinum eX card on a VIA chipset motherboard, you may see one of the following:... -
Page 66: Insufficient Soundfont Cache
• obtaining the most current BIOS for your motherboard *Content in these web sites is controlled by other companies. Creative bears no responsibility for information or downloads obtained from them. This information is provided only as a convenience to you. -
Page 67: Problems With The Joystick
❑ Load smaller SoundFont banks instead; or add more RAM to your system. Do one of the following: • In the Configure Bank dialog box of Creative SoundFont Bank Manager, select a smaller The trade-off of a smaller • Increase the system RAM on your computer. For more details, visit the SoundFont file is its lower sound quality. -
Page 68: Problems With Multiple Audio Devices
You may have an existing audio device installed in your computer. The audio device may be an audio card Multiple Audio or an onboard audio chipset. Before you install your Sound Blaster Audigy 2 Platinum eX card, you are Devices advised to completely uninstall and remove your existing audio device. -
Page 69: Problems With Sound Blaster Live! Series Or Sound Blaster Pci512 Card
Click the Yes button to continue with the installation of the Sound Blaster Audigy 2 Platinum eX card. After the installation of the audio card, completely uninstall the existing card and remove the audio card from your computer. -
Page 70: Resolving I/O Conflicts
4. Double-click Sound, Video And Game Controllers, and then select Creative Sound Blaster Live! Series or Creative Sound Blaster PCI512. 5. Click the Properties button. 6. In the Properties dialog box: If you have an Original Configuration (Current) check box: •... -
Page 71: Problems With Encore Dvd Player
1. In the Windows system tray, right-click the Disc Detector icon, and then click Properties. Player 2. On the General tabbed page of the Creative Disc Detector dialog box, make sure that the Enable Disc Detector check box is selected. -
Page 72: Problems With Dv Driver For Windows 98 Se/2000/Me/Xp
Problems with The DV camcorder is not working properly. The MSDV camcorder driver may not be the latest version (v4.10.2226 or later). DV driver for To solve this problem: Windows 98 SE/ 1. Visit the 2000/Me/XP DirectX 8.0 files. 2. Install the above file into your computer. Note: If the problem still persists, the MSDV camcorder driver may not be fully optimised for your DV camcorder. -
Page 73: Problems In Xp
The 1394 DVConnect driver does not run on Windows XP. You may see the message when you install hardware drivers from companies other than Creative. If you do, you may choose to click the Continue Anyway button. Device drivers not signed by Microsoft may be used in Windows XP, and need not impair or destabilise your computer. -
Page 74: Problems With Digital Audio Devices
Problems with Intermittent hissing or no sound is heard from my digital speakers. Make sure you select the sampling rate of the PCM SPDIF output of your Digital Out connector to match Digital Audio the requirements of the receiving device. You may need to select a lower digital output sampling rate. The Devices choices available are 48 kHz and 96 kHz. - Page 75 5. Double-click the ATA/ATAPI IDE Controllers icon. Your IDE channels will appear. 6. Right-click the Primary IDE Channel icon. 7. Click Properties. 8. In the Properties dialog box, click the Advanced Settings tab. 9. Click the DMA if available check box to select it. 10.
Need help?
Do you have a question about the Sound Blaster Audigy 2 Platinum eX and is the answer not in the manual?
Questions and answers