Creative Sound Blaster X-Fi Installation Manual
Creative sound blaster x-fi
Hide thumbs
Also See for Sound Blaster X-Fi:
- User manual (94 pages) ,
- Quick start manual (1 page) ,
- Quick start manual (1 page)
Table of Contents
Advertisement
Creative Sound Blaster X-Fi card installation
HP xw Workstation series
This document describes the hardware and software installation of the Creative Sound Blaster X-Fi. For
more information, refer to the Installation and Application CD.
Kit contents
●
Sound Blaster X-Fi audio card
●
Front audio adapter cable (for HP xw6000 or xw8000
series workstations, see the system requirements
section)
●
Cable clip
●
Support arm
System requirements
●
HP xw Workstation series (except the HP xw3100 Workstation)
●
Microsoft Windows XP® Service Pack 1 (SP1) or newer operating system
●
Optical drive
●
Empty PCI or PCI-x slot (see Note on page 4)
Warranty information
Any warranty information is superseded by the HP warranty term provided in the warranty document.
ENWW
●
●
●
© 2007 Hewlett-Packard Development Company, L.P. The HP Invent logo is a registered
trademark of Hewlett-Packard Development Company, L.P. Microsoft and Windows are
U.S. registered trademarks of Microsoft Corporation. Printed in the U.S.
Installation and Application CD
Regulatory compliance notices
Warranty information
HP xw Workstation series
1
Advertisement
Table of Contents

Subscribe to Our Youtube Channel
Related Manuals for Creative Sound Blaster X-Fi


Summary of Contents for Creative Sound Blaster X-Fi
-
Page 1: System Requirements
Creative Sound Blaster X-Fi card installation HP xw Workstation series This document describes the hardware and software installation of the Creative Sound Blaster X-Fi. For more information, refer to the Installation and Application CD. Kit contents ● ● Sound Blaster X-Fi audio card Installation and Application CD ●... -
Page 2: Warnings And Cautions
— Failure to follow the workstation preparation instructions and these result in an improperly installed processor, causing extensive system damage. — Processor socket pins are delicate and bend easily. Use extreme care when placing the processor in the socket. Creative Sound Blaster X-Fi card installation ENWW... - Page 3 CAUTION: To prevent damage to this system, observe the following Electro Static Discharge (ESD) precautions while performing the system parts removal/replacement procedures: — Work on a static-free mat. — Wear a static strap to ensure that any accumulated electrostatic charge is discharged from your body to the ground.
-
Page 4: Step 1-Preparing The Workstation
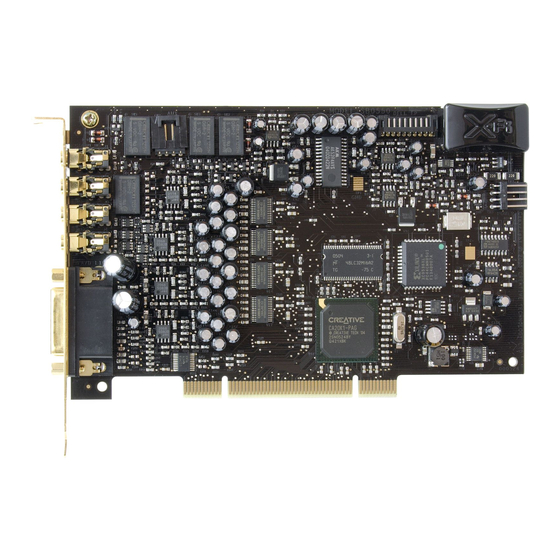
If your system came with a CD audio cable that connects the optical drive to the system board, disconnect the cable from the system board. Leave the other end of the cable connected to the optical drive. Creative Sound Blaster X-Fi card installation ENWW... - Page 5 Do not connect the CD audio cable to the VIDEO_IN connector on the Sound Blaster card. Figure 1 Sound Blaster X-Fi XtremeMusic card Figure 2 Sound Blaster X-Fi XtremeGamer card If you ship your workstation, install a hold down on the card. See...
-
Page 6: Shipping Your Hp Workstation
Your workstation might have other support arms already installed over other slots (not shown in picture). Push the arm into the housing (1). Slide the arm back to lock it in place (2). Figure 3 Preparing the support arm Creative Sound Blaster X-Fi card installation ENWW... - Page 7 Engage the hooks in the openings along the edge of the rear of the chassis. Figure 4 Engaging the support hooks Rotate the support arm down, and compress the spring of the arm until it snaps into place. Figure 5 Installing the support arm ENWW Shipping your HP workstation...
- Page 8 Insert the arm by engaging the hooks in the openings along the edge of the rear of the chassis. Figure 6 Engaging the support hooks Lower the arm over the card. Figure 7 Lowering the support arm Creative Sound Blaster X-Fi card installation ENWW...
-
Page 9: Creative Sound Blaster X-Fi カードの取り付 け
Creative Sound Blaster X-Fi カードの取り付 け HP xw シリーズ ワークステーション このマニュアルでは、Creative Sound Blaster X-Fi のハードウェアおよびソフトウェアの取り付けに ついて説明します。詳細については、Installation and Application(インストールとアプリケーショ ン)CD を参照してください。 キットの内容 ● ● Sound Blaster X-Fi オーディオ カード Installation and Application(インストール とアプリケーション)CD ● ● フロント オーディオ アダプタ ケーブル(HP xw6000 規制準拠に関するご注意... - Page 10 用していただくために』は、HP の Web サイト(http://www.hp.com/ergo/)から[日本語]を選択して 参照できます。また、製品に Documentation CD(ドキュメンテーション CD)が付属している場合 は、この CD にも収録されています。 警告! 製品の出荷パッケージに の記号が付いている場合は、製品の重さによるけがを防ぐため に、製品は必ず 2 人で持ち上げてください。 注意: 静電気の放電により、ワークステーションの電子部品が破損することがあります。作業を始 める前に、アースされた金属面に触れるなどして、身体にたまった静電気を放電してください。 注意: プロセッサを取り外すか交換するときは、次の注意事項に従ってください。 — プロセッサを正しく取り付けないと、システム ボードを損傷することがあります。プロセッサの取 り付けは、HP 認定の販売代理店またはサービス プロバイダにお任せください。自分で取り付ける場 合は、開始前に、すべての操作手順を注意深くお読みください。 — ワークステーションの準備手順に従わないと、プロセッサが適切に取り付けられず、システムの大 きな損傷を招く原因となります。 — プロセッサ ソケットのピンは壊れ易くて曲がり易いものです。プロセッサをソケットに取り付ける ときは、十分に注意してください。 Creative Sound Blaster X-Fi カードの取り付け JAWW...
- Page 11 注意: システムの損傷を防ぐため、システム部品の取り外し/交換の手順を実行する際は、静電気 (ESD)に関する以下の注意事項を守ってください。 — 静電気防止マットの上で作業をしてください。 — 静電気ストラップを着用して、蓄積されたすべての静電気が確実に身体から地面に放電されるよう にしてください。 — 作業対象の装置に静電気防止マット、静電気ストラップ、および周辺装置を接続して、装置共通の アースを作成してください。 HP オプション製品は、HP ワークステーション製品用に設計されています。また、徹底した 注記: 信頼性検査が行われ、高い品質基準において製造されています。このため、HP では、自社で製造販 売したオプションのみ品質保証します。 JAWW 警告および注意...
- Page 12 を使用します。PCI-X は、xw8000 および xw9000 シリーズのワークステーションでのみ使用で きます。 Sound Blaster カードを取り付け、PCI リテイナを固定します。 フロント オーディオ ケーブルを、システム ボードのフロント オーディオ ヘッダから外します。 手順 3 でシステム ボードから取り外したフロント オーディオ ケーブルを、Sound Blaster カー ドのフロント オーディオ コネクタに接続します。 オプティカル ドライブをシステム ボードに接続する CD オーディオ ケーブルがシステムに付属 している場合は、そのケーブルをシステム ボードから外します。オプティカル ドライブに接続 されている他のケーブルの端子はそのままにしておきます。 Creative Sound Blaster X-Fi カードの取り付け JAWW...
- Page 13 手順 5 で外した CD オーディオ ケーブルを、Sound Blaster カードの AUX_IN(1)または CD_IN (2)コネクタに接続します。 CD オーディオ ケーブルを Sound Blaster カードの VIDEO_IN コネクタに接続しないで 注意: ください。 図 1 Sound Blaster X-Fi XtremeMusic カード 図 2 Sound Blaster X-Fi XtremeGamer カード ワークステーションを搬送する場合は、カードにホールド ダウンを取り付けます。詳しくは、 「6 ページの 「HP ワークステーションの搬送」 」を参照してください。...
- Page 14 オ デバイスへのオーディオ接続には、X-Fi サウンド カードからのオーディオ出力を使用します。 HP ワークステーションの搬送 HP xw6000、xw8000、xw9000 シリーズ ワークステーションを搬送するときは、搬送用のサポート アームを取り付けます。 デスクトップで標準的な方法で使用している場合は、搬送時のサポートは必要ありません。 注記: お使いのワークステーションは、下図と異なる場合があります。 カード サポート アセンブリへのサポート アームの追加(HP xw8000/xw9000 シリーズ ワークステーションのみ) 新しいアームを追加し、ハウジングの底から挿入します。新しいアームによって X-Fi カードを 支える必要があるので、正しい位置を選択します。ご使用のワークステーションの他のスロット に、既に別のサポート アームが取り付けられている場合があります(図には示されていませ ん) 。 アームをハウジングに押し込みます(1) 、アームを後ろにスライドしてロックします(2) 。 図 3 サポート アームの準備 Creative Sound Blaster X-Fi カードの取り付け JAWW...
- Page 15 フックをシャーシの背面のエッジに沿って開口部に引っ掛けます。 図 4 サポート フックの取り付け サポート アームを下に回し、パチンと止まるまでアームのばねを縮めます。 図 5 サポート アームの取り付け JAWW HP ワークステーションの搬送...
- Page 16 HP xw6000 シリーズ ワークステーションのサポート アームの取り付け フックをシャーシの背面のエッジに沿って開口部に引っ掛けて、アームを挿入します。 図 6 サポート フックの取り付け アームをカードの上まで下げます。 図 7 サポート アームを下げる Creative Sound Blaster X-Fi カードの取り付け JAWW...
Need help?
Do you have a question about the Sound Blaster X-Fi and is the answer not in the manual?
Questions and answers