Sage Smart Grinder Pro Quick Start Manual
Hide thumbs
Also See for Smart Grinder Pro:
- Instruction book (25 pages) ,
- Quick manual (68 pages) ,
- User manual (112 pages)
Advertisement
Quick Links
Advertisement

Related Manuals for Sage Smart Grinder Pro


Summary of Contents for Sage Smart Grinder Pro
- Page 1 Smart Grinder ™ SCG820...
- Page 2 • To eliminate a choking hazard RECOMMENDS for young children, safely discard the protective cover SAFETY FIRST fitted to the power plug. At Sage we are very safety • This appliance is for household ® conscious. We design and use only. Do not use the...
- Page 3 If damaged and maintenance with the appliances. other than cleaning is required • Do not attempt to operate please contact Sage the appliance by any Customer Service or go method other than those to sageappliances.com described in this booklet.
- Page 4 OPERATING YOUR NEW APPLIANCE WE RECOMMEND SAFETY FIRST • This appliance can be used by The symbol shown persons with reduced physical, indicates that this appliance sensory or mental capabilities should not be disposed of or a lack of experience and in normal household waste.
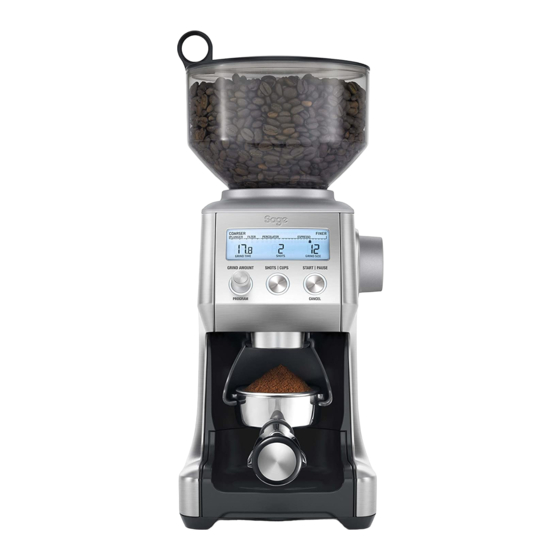
- Page 5 OPERATING YOUR NEW APPLIANCE KNOW YOUR NEW APPLIANCE A. Bean Hopper Lid B. Bean Hopper C. Hardened Stainless Steel Conical Burrs D. Backlit LCD Screen E. GRIND AMOUNT/PROGRAM Dial SHOTS/CUPS Button G. Grind Outlet H. Grind Tray Grind Size Dial J.
- Page 6 220–240V outlet and switch Power ‘ON’. ENERGY SAVING FEATURE The grinder will automatically switch off if not used after 5 minutes. STEP 1: ASSEMBLING YOUR SAGE SMART Insert the appropriate portafilter cradle size. Insert GRINDER ™ your portafilter into the cradle.
- Page 7 OPERATING YOUR NEW APPLIANCE STEP 2: NOTE Selecting your SHOTS/CUPS If the Grind Size Dial is tight, run the grinder Select the desired amount of ground coffee by pressing the START/PAUSE/CANCEL required by pressing the SHOTS/CUPS button. button while turning the Grind Size Dial. This will release coffee grounds caught between the burrs.
- Page 8 10 seconds. • Press again within this time to resume grinding the remaining dose. SHOTS CUPS START PAUSE CANCEL FEATURES OF YOUR SAGE GRIND AMOUNT SHOTS CUPS START PAUSE SMART GRINDER™ PRO Automatic Grinding PROGRAM...
- Page 9 OPERATING YOUR NEW APPLIANCE ADJUSTING YOUR GRIND AMOUNT Program Function Once you have set your required dose, Increasing the Grind Amount you can program this time into the number To increase the grind amount selected, turn the of shot(s) currently displayed on the LCD. GRIND AMOUNT dial to the right.
- Page 10 OPERATING YOUR NEW APPLIANCE ADJUSTING CONICAL BURRS Some types of coffee may require a wider grind range to achieve an ideal extraction or brew. A feature of your Smart Grinder™ Pro is the ability to extend this range with an adjustable upper burr. We recommend making only one adjustment at a time.
- Page 11 CARE, CLEANING & STORAGE CARE, CLEANING & STORAGE NOTE Empty beans from the hopper Do not use alkaline or abrasive cleaning and grind out any excess beans agents, steel wool or scouring pads, as (see below). these can damage the surface. Unplug power cord from power outlet before cleaning.
- Page 12 TROUBLESHOOTING PROBLEM POSSIBLE CAUSE WHAT TO DO Grinder does • Grinder not plugged in. • Plug power cord into power outlet. not start after • Grinder has overheated. • Remove power plug from power outlet. pressing START/ Leave for 20 minutes to cool down •...
- Page 13 Sage ® Freephone (UK Landline): 0808 178 1650 Mobile Calls (National Rate): 0333 0142 970 www.sageappliances.co.uk customerservice@sageappliances.co.uk Register your product and get What’s on your mind? more from your purchase Our constant aim is to improve Product registration takes only a few...
Need help?
Do you have a question about the Smart Grinder Pro and is the answer not in the manual?
Questions and answers