Sage the Dose Control Pro BCG600 / SCG600 - Electric Coffee Grinder Manual
- Quick manual (88 pages)
Advertisement
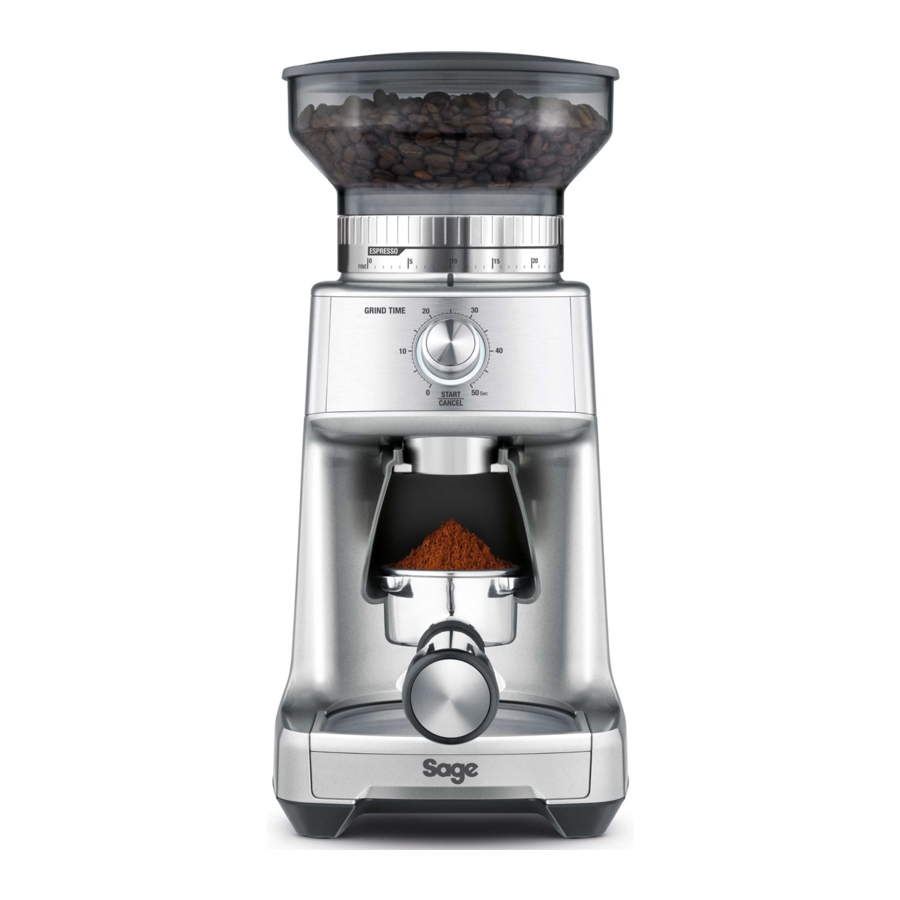
GETTING TO KNOW YOUR NEW APPLIANCE

- Bean Hopper Lid
- Bean Hopper
- Hardened Stainless Steel Conical Burrs. Removable and Adjustable Upper Burr
- Grind Size Collar
- GRIND TIME Dial
- START / CANCEL Button
- Grind Outlet
- 50mm blade
- Grind Tray
ACCESSORIES
- Adjustable Razor ™ Dose Trimming Tool
- Portafilter Cradle 50–54mm
- Portafilter Cradle 58mm
OPERATING YOUR NEW APPLIANCE
BEFORE FIRST USE
Remove and safely discard all promotional labels and packing materials attached to your Sage® appliance. Wash hopper, and cradles in warm soapy water and dry thoroughly. Wipe exterior of grinder with a soft damp cloth and dry thoroughly. Place grinder on flat level surface and plug power cord into 220-240V outlet and switch Power 'ON'.
ASSEMBLING YOUR SAGE CONTROL DOSE™ PRO
Bean Hopper
Align tabs on the base of the bean hopper and insert hopper into position. Holding the hopper, press down firmly and turn the bean hopper dial 45° to lock into position.
A "click" sound will be heard when the hopper is properly locked in place.

Ensure the hopper and the Grind Size Collar is aligned properly.
Fill with fresh coffee beans and secure lid on top of bean hopper.
NOTE
If the bean hopper has not been locked into position, the GRIND TIME dial will not be illuminated.
GRINDING FOR ESPRESSO COFFEE
Use single wall filter baskets when grinding fresh coffee beans. Use the finer 1–25 settings in the ESPRESSO range.

- Insert the appropriate portafilter cradle size. Insert your portafilter into the cradle.
![]()
- Selecting Grind Amount
Select the desired amount of ground coffee required by turning the GRIND TIME dial.

- Tamping the Ground Coffee
After dosing the portafilter with freshly ground coffee, tamp down with between 15-20kg of pressure. - Trimming the Dose
The adjustable Razor™ Dose Trimming Tool allows you to trim the puck to the right level for a consistent extraction.
Select the correct width blade of the Razor™ to match the diameter of your filter basket. The Razor™ has three blades of varying widths: 58mm, 54mm and 50mm. The 58mm and 54mm arealready fitted within the Razor™ body. The 50mm is separate.
If you require the 50mm blade, turn the adjustment dial past #1 until the 54mm blade is fully extended and able to be pulled from the body.

If you require the 50mm blade, turn the Adjustable Dial past #1 until the 54mm blade is fully extended and able to be pulled from the body.
![]()


NOTE
The Adjustable Dial may feel tight as you continue to wind it towards the end of its travel.
Insert the 50mm blade into the body. Wind the Adjustable Dial until the blade is retracted past #4. Press the 50mm and 58mm blades at the same time, towards the centre of the body until a "click" sound can be heard.

Adjust the Razor™ to the setting in the table below for your Sage® espresso machine. This is a starting point for your dose height.
| Sage® Espresso Machine | Portafilter Size | Dose Height |
| Model name starting with "SES9" | 58mm | 2 |
| Model name starting with "SES8" | 54mm | 2.5 |
After tamping the coffee, insert the Razor™ into the filter basket until it rests on the rim of the basket. The blade of the dosing tool should penetrate the surface of the tamped coffee.
If the blade does not penetrate the surface of the tamped coffee, your coffee is under dosed. Increase the amount of dosed coffee by adjusting the GRIND TIME dial.
Rotate the Razor™ back and forth while holding the portafilter on an angle over the knock box to trim off a little excess coffee.

- Select Your Grind Size
For espresso, we recommend starting with grind size setting 15 and rotating the Hopper (to adjust the Grind Size Collar) either coarser or finer.


NOTE
If the Grind Size Collar is tight, run the grinder by pressing the START / CANCEL button while turning the Hopper. This will release coffee grounds caught between the burrs.
GRINDING INTO A GRINDS CONTAINER OR COFFEE FILTER
- Remove cradle by sliding out from under the grind outlet.
![]()
Place your container or coffee filter directly under grind outlet.
![]()
- Select the required amount of ground coffee by rotating the GRIND TIME dial.
- Select Your Grind Size
Rotate the Hopper to adjust the Grind Size Collar until it reaches the required brewing method range.


FEATURES OF YOUR SAGE DOSE CONTROL™ PRO
Pause Function
You can pause the grinder during operation, allowing you to collapse or settle the coffee in the Portafilter.
- Press the START / CANCEL button to start the grinding operation.
- During grinding, press the START / CANCEL button to pause the grinding operation for up to 10 seconds.
The START / CANCEL button will slowly flash while paused. - Press START / CANCEL again within this time to resume grinding the remaining dose. Or press and hold the START / CANCEL button for 1 second to cancel.
Manual
Grinding manually allows you to have complete control over how much coffee is dispensed.
- Press and hold the START / CANCEL button to grind for as long as you require.
- Release START / CANCEL button to stop grinding.
| COFFEE CHART* | ||||
| Brewing Method | Espresso | Percolator | Drip | French Press or Plunger |
| Grind Size | Fine | Medium | Medium Coarse | Coarse |
| Grind Setting | 1-25 | 26-34 | 35-45 | 46-55 |
| Amount (Shot / Cup) | 6 secs per shot 10 secs per 2 shots | 3 secs per cup | 3 secs per cup | 2 secs per cup |
*This coffee chart should be used as starting point to adjust your grind time and / or size, as both may vary when using different coffee bean types, age and degree of roast.
ADJUSTING CONICAL BURRS
Some types of coffee may require a wider grind range to achieve an ideal extraction or brew.
A feature of your Dose Control™ Pro is the ability to extend this range with an adjustable upper burr.
- Unlock hopper
![]()
- Hold hopper over container & turn dial to release beans into container
![]()
- Align hopper into position
![]()
- Run grinder until empty
![]()
- Remove hopper
![]()
- Remove upper burr
![]()
- Remove wire handle from both sides of the burr
![]()
- Default setting is 6
![]()
- Move adjustable top burr, 1 number, coarser or finer
![]()
- Align the number with the handle opening
![]()
- Insert wire handle from both sides of the burr
![]()
- Push upper burr firmly into position
![]()
- Lock upper burr
![]()
- Align hopper into position
![]()
- Press down firmly & rotate to lock into position
![]()
- Check your extraction
![]()


CARE, CLEANING & STORAGE
CARE, CLEANING & STORAGE
- Empty beans from the hopper and grind out any excess beans (see below).
- Unplug power cord from power outlet before cleaning.
- Wash the hopper lid and bean hopper in warm soapy water, rinse and dry thoroughly.
- Wipe and polish exterior of appliance with a soft damp cloth.
CLEANING CONICAL BURRS
Regular cleaning helps the burrs achieve consistent grinding results which is especially important when grinding for espresso coffee.
- Unlock hopper
![]()
- Hold hopper over container & turn dial to release beans into container
![]()
- Align hopper into position
![]()
- Run grinder until empty
![]()
- Remove hopper
![]()
- Remove upper burr
![]()
- Clean upper burr with a brush
![]()
- Clean lower burr with cleaning brush
![]()
- Clean grind outlet with brush
![]()
- Push upper burr firmly into position
![]()
- Lock upper burr
![]()
- Align hopper into position
![]()
- Lock hopper
![]()


TROUBLESHOOTING
| PROBLEM | POSSIBLE CAUSE | WHAT TO DO |
| Grinder does not start after pressing START / CANCEL button |
|
|
| Motor starts but no ground coffee coming from grind outlet |
|
|
Can't adjust the Grind Size Collar |
|
|
Unable to lock bean hopper into position |
|
|
Not enough / too much coffee grind |
|
|
Portafilter overfills |
| |
Emergency stop? |
|

Documents / ResourcesDownload manual
Here you can download full pdf version of manual, it may contain additional safety instructions, warranty information, FCC rules, etc.
Download Sage the Dose Control Pro BCG600 / SCG600 - Electric Coffee Grinder Manual
Advertisement


Need help?
Do you have a question about the the Dose Control Pro BCG600 and is the answer not in the manual?
Questions and answers