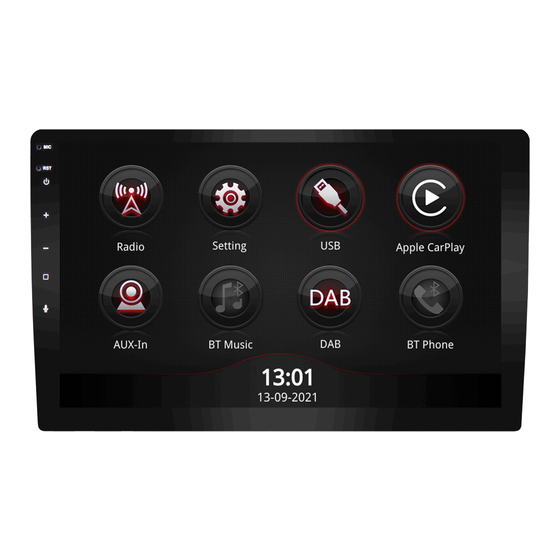
INTENDED USE OF THE DEVICE This device is only suitable for use in a vehicle with an on-board voltage of 12 volts, negative ground. In the event of misuse, incorrect installation or changes, the operating license and the warranty become void.
GENERAL INFORMATION Legal Notice • ESX or Audio Design GmbH are in no way affiliated with the car manufacturer or any of its subsidiar- ies or affiliated companies connected to, or is acting on its behalf or with its authorization.
SAFETY INFORMATION • Note any time the traffic regulations of the country in which the device is operated. • Please ensure, that with the engine turned off the vehicle‘s battery does not discharge fully. The de- vice is another electrical consumer which must be operated with the engine running, other-wise the vehicle‘s battery will be discharged and the vehicle can not be started.
1. BRIEF OVERVIEW 1.1 FUNCTION KEYS ON THE DEVICE Kamera-Direct-Key for connected rear camera (press longer) Symbol Function Description Mute Briefly tap here to switch the mute function on or off. Sleep mode Long tap here to switch sleep mode on or off. Increase volume Tap here to increase the volume.
1. KURZER ÜBERBLICK 1.2 OPERATING THE TOUCH SCREEN You can open the individual functions by briefly In some menus it is possible to swipe the content tapping them once. up or down. You can both tap and swipe on sliders. In some menus you can also swipe the lower control elements to the side to display further functions.
2. SETTINGS 2.1 SET TIME & DATE Tap on „Settings” in the main menu. Set here the „Time & Date“. 2.2 SOUND SETTINGS Tap on „Sound“ in the submenu “Setting“. Under „Beep” you can switch key tones on or off. Under „Reverse Vol“...
2. SETTINGS 2.2 SOUND SETTINGS Under „Balance“ you can determine the acoustic Under „Loudness“ you can give the audio signal center of the stage with „FAD*” and „BAL”. more loudness overall. Thus, the highs and mids To do this, move the crosshairs on the left are reproduced more intensely.
2. SETTINGS 2.2 SOUND SETTINGS Under „Volume control“ another submenu Here you can adjust the volume of the individual opens. applications to one another. 2.3 GENERAL SETTINGS Tap on „Setting“ in the main menu. Tap on „General“. Here you can set the screen brightness separately for day and night mode.
Page 10
Some vehicles are not compatible. The ESX device is CAN bus compatible, but for this you need a corresponding vehicle- specific CAN bus adapter or a CAN bus module. Then learning the steering wheel remote control is not necessary.
Page 11
2. SETTINGS 2.3 GENERAL SETTINGS Under „Radio area“ another submenu opens. Select the region in which you are currently located. Use the slider below to switch „RDS“ on or off. Swipe the „Settings“ menu up to view additional The radio data system enables the transmission of functions.
Page 12
2. SETTINGS 2.3 GENERAL SETTINGS WARNING: You can reset the device to its Under „Select microphone“ you can choose delivery status with the „Reset factory data“ which microphone to use. Setting „F“ activates button. All settings will be deleted. The device will the internal microphone on the front panel.
3. FUNCTIONS 3.1 RADIO FM/AM (ANALOG) The station presets FM1, FM2, FM3, AM1 In the main menu, tap on „Radio”. First start and AM2 gradually fill up with 6 stations each, „Scan“ to search for all receivable stations in the depending on the reception situation.
Page 14
3. FUNCTIONS 3.1 RADIO FM/AM (ANALOG) If you swipe the lower area to the left, additional The „AF“ function automatically selects the functions appear. strongest frequency for the set radio station, which broadcasts on several frequencies. Under „PTY“ you can select the category which With “TA”...
3. FUNCTIONS 3.2 USB If you have connected a USB storage medium to the device, you can access it using the „USB“ function. Compatible media file types such as MP3, MP4, 3GP, JPG or similar common formats must be on the medium.
3.4 MEDIA CONNECT (ANDROID) In order to be able to operate a smartphone with Android OS on the ESX device, connect it to the USB port „Android Auto“ of the device with its charging cable. Please note the information in the separately enclosed installation guide.
With the „BT Music“ function, you can wirelessly stream audio signals from your smartphone to the ESX device. To do this, you must first pair your smartphone with the ESX device via Bluetooth. Please note the information under „3.8 BT Phone“ on the next page.
Bluetooth devices in the area with . Make sure version, you have to agree to the pairing with the that the Bluetooth function is activated in your ESX device and access to the contacts. The ESX device name is „ESX VN1030“. smartphone.
Page 19
You can enter a phone number directly under “Keyboard” and dial it with the green handset There you can deactivate the Bluetooth function of the ESX device with „BT“ or load the contacts button. from your smartphone. The last calls received or made are displayed The contacts and phone numbers stored in your under „History“.
Need help?
Do you have a question about the VISION ANDROID Series and is the answer not in the manual?
Questions and answers