Crestron UC-AUDIO-POD Product Manual
Crestron flex pod wireless audio solution
Hide thumbs
Also See for UC-AUDIO-POD:
- Product manual (72 pages) ,
- Product manual (74 pages) ,
- Product manual (74 pages)

Related Manuals for Crestron UC-AUDIO-POD


Summary of Contents for Crestron UC-AUDIO-POD
- Page 1 UC-AUDIO-POD and UC-AUDIO-HUB Crestron Flex Pod Wireless Audio Solution Product Manual Crestron Electronics, Inc.
- Page 2 Crestron disclaims any proprietary interest in the marks and names of others. Crestron is not responsible for errors in typography or photography.
-
Page 3: Table Of Contents
Contents Overview Crestron Flex Pod Wireless Speaker and Microphone Crestron Flex Hub Wireless Transceiver Crestron Flex Pod Wireless Audio Kit with Hub and Pod Features UC-AUDIO-POD Features UC-AUDIO-HUB Features Specifications UC-AUDIO-POD Specifications UC-AUDIO-HUB Specifications Installation UC-AUDIO-POD Installation In the Box... - Page 4 Status Settings Security 802.1x Configuration XiO Cloud Service Crestron Settings App Resources Crestron Support and Training Programmer and Developer Resources Related Documentation iv • Contents Product Manual — Doc. 9392B...
-
Page 5: Overview
Qatar, United Arab Emirates, Yemen, Oman, Hong Kong, Singapore and Iraq NOTE: For simplicity within this documentation, the term "pod" is used for the UC-AUDIO-POD and "hub" is used for the UC-AUDIO-HUB, except noted otherwise. The information provided in this product manual is applicable to the following pod and hub variants: Crestron Flex Pod Wireless Speaker and Microphone The Crestron Flex pod variants listed below are functionally similar. -
Page 6: Features
The pod wirelessly connects and transfers audio to and from a paired Crestron Flex UC-AUDIO-HUB. The connected hub receives and sends audio to a UC Engine through a USB-C® connection. Up to four pods can connect with the hub, providing omnidirectional sound in small to large conference rooms and multi-purpose meeting spaces. - Page 7 The configuration and connection status of the pod can be monitored through a simple web user interface with no prior setup. Deploying pods across multiple room types, firmware updates, monitoring, and management can be controlled using the XiO Cloud® service. Product Manual — Doc. 9392B UC-AUDIO-POD and UC-AUDIO-HUB • 7...
-
Page 8: Uc-Audio-Hub Features
UC-AUDIO-HUB Features The Crestron Flex UC-AUDIO-HUB is a wireless transceiver and auto mixer that connects with up to four paired Crestron Flex UC-AUDIO-POD devices through Digital Enhanced Cordless Telecommunications (DECT™) technology. The hub receives audio from the pods' microphones, auto- mixes the audio, and transfers it to a UC Engine through a USB-C connection. -
Page 9: Specifications
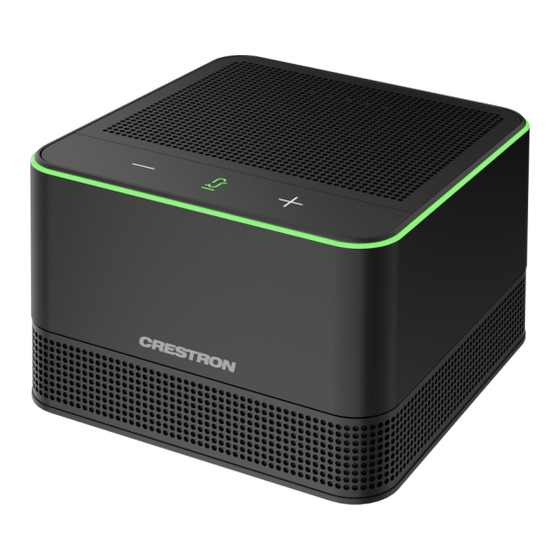
Green LED indicates microphone is unmuted Mic Mute Red LED indicates microphone is muted Volume Level White LED indicates the speaker volume Buttons Speaker Volume Up / Capacitive, backlit Down Mic Mute Capacitive, backlit Product Manual — Doc. 9392B UC-AUDIO-POD and UC-AUDIO-HUB • 9... - Page 10 4.40 in. (112 mm) Depth 4.40 in. (112 mm) Weight 1.6 lb (726 g) Compliance Regulatory Model: M202109002 IC, CE, FCC Part 15 Class B digital device, Intertek® Listed for US & Canada 10 • UC-AUDIO-POD and UC-AUDIO-HUB Product Manual — Doc. 9392B...
- Page 11 Dimension Drawings Product Manual — Doc. 9392B UC-AUDIO-POD and UC-AUDIO-HUB • 11...
- Page 12 1.35 in. (34 mm), 1.77 in. (45 mm) with bracket Width 5.04 in. (128 mm), 5.36 in. (137 mm) with bracket Depth 5.04 in. (128 mm) Weight 8.9 oz (253 g) without bracket 12 • UC-AUDIO-POD and UC-AUDIO-HUB Product Manual — Doc. 9392B...
- Page 13 Compliance Regulatory Model: M202109001 IC, CE, FCC Part 15 Class B digital device, Intertek® Listed for US & Canada Dimension Drawings Product Manual — Doc. 9392B UC-AUDIO-POD and UC-AUDIO-HUB • 13...
-
Page 14: Installation
Refer to the following for instructions on how to install the pod: In the Box Qty. Description UC-AUDIO-POD, Crestron Flex Pod Wireless Speaker and Microphone Additional Items PWR Pack, 5VDC, 3A, 100-240VAC IN, USB-C Connector (2059526) Bracket, Steel (2059413) Screw, 04-40, 3/16 in., Pan Head, Steel (2007148) 14 •... -
Page 15: Install The Pod
Install the Pod The UC-AUDIO-POD can be placed on any flat surface or secured on a table using the UC-AUDIO-POD- TTMK tabletop mounting kit (sold separately). Refer to UC-AUDIO-POD-TTMK Installation on page 16 to install the pod with the tabletop mounting kit. -
Page 16: Uc-Audio-Pod-Ttmk Installation
Install the Pod using UC-AUDIO-POD-TTMK The UC-AUDIO-POD-TTMK is an optional mounting kit for the pod. The easy-to-install kit includes a plastic flange, threaded tube and two nuts to mount the pod on a table. An adhesive strip is attached to the bottom of the flange to prevent the pod from rotating on the table. - Page 17 3. Secure the cable by attaching the cable retention clip with a 04-40, 3/16 in. screw. 4. Attach the kit's flange to the bottom of the pod with the three 02-56 X 3/16 in. screws. Product Manual — Doc. 9392B UC-AUDIO-POD and UC-AUDIO-HUB • 17...
- Page 18 NOTE: Peeling off the adhesive strip is optional. This ensures the pod remains tightened and cannot be rotated when mounted on the table. 6. Slide the kit's threaded tube into the cutout hole of the table. 18 • UC-AUDIO-POD and UC-AUDIO-HUB Product Manual — Doc. 9392B...
- Page 19 7. Tighten and adjust the threaded tube with one nut first to achieve the desired resistance against the tube's motion. 8. Tighten the other nut to prevent the upper nut from slipping. Product Manual — Doc. 9392B UC-AUDIO-POD and UC-AUDIO-HUB • 19...
-
Page 20: Uc-Audio-Hub Installation
Refer to the following for instructions on how to install the hub: In the Box Qty. Description UC-AUDIO-HUB, Crestron Flex Hub Wireless Transceiver Additional Items MTG Bracket with rail clip, plastic (4519035) Screw, 06-32, 3/8 in., (2007225) PWR Pack, 24VDC 0.75A, 100~240VAC IN, (2045865) Install the Hub The hub can be mounted on a wall, DIN rail, or placed on any flat surface. - Page 21 2. Insert the hub into the mounting bracket until it snaps into place. 3. Install a 6-32 x 3/8 in. screw to each side of the mounting bracket to secure the hub. Product Manual — Doc. 9392B UC-AUDIO-POD and UC-AUDIO-HUB • 21...
-
Page 22: Connections
Once the hub is connected to the laptop or UC Engine, pair the pod to the hub if it has not been paired before. For more information, refer to Pairing on page 22 • UC-AUDIO-POD and UC-AUDIO-HUB Product Manual — Doc. 9392B... -
Page 23: Pairing
2. Press and hold the PAIR button at the bottom of the pod until the LED ring at the top blinks blue, then green twice quickly, and finally turns solid green indicating the pod is successfully paired to the hub. For more information, refer to Pod LED Indicators on page Product Manual — Doc. 9392B UC-AUDIO-POD and UC-AUDIO-HUB • 23... - Page 24 3. Once a pod is paired to the hub, follow the same procedure for the remaining pods. NOTE: Only one pod can be paired at a time. Wait until a pod's pairing is confirmed before pairing another one. 24 • UC-AUDIO-POD and UC-AUDIO-HUB Product Manual — Doc. 9392B...
-
Page 25: Unpair The Pod From The Hub
For firmware updates, all pods should be kept in the same room with power on and within 50 ft (approx. 15m) of the paired hub. Pods are automatically updated by the paired hub after the hub receives a firmware update. Product Manual — Doc. 9392B UC-AUDIO-POD and UC-AUDIO-HUB • 25... -
Page 26: Led Indicators And Buttons
LED Indicators and Buttons This section provides the following information: • UC-AUDIO-POD LED Indicators and Buttons • UC-AUDIO-HUB LED Indicators and Buttons UC-AUDIO-POD LED Indicators and Buttons Pod LED Indicators Refer to the following table for information about the pod LED indicators: LED Indicator... -
Page 27: Pod Buttons
Refer to the following table for the pod button functions: Buttons Functions Volume Up (+) Increases volume. Volume Down (-) Decreases volume. Mic Mute/Unmute Mute or unmute microphone. Reset Factory restore. Pair Pairs the pod to the hub. Product Manual — Doc. 9392B UC-AUDIO-POD and UC-AUDIO-HUB • 27... -
Page 28: Volume Functions
1. Press and hold the RESET button (using a paper clip) at the bottom of the pod for more than ten seconds to initiate a factory restore. 2. The LED ring blinks blue twice quickly, confirming the reset has initiated. 28 • UC-AUDIO-POD and UC-AUDIO-HUB Product Manual — Doc. 9392B... -
Page 29: Uc-Audio-Hub Led Indicators And Buttons
On, 1/2s Off...) Green Blink twice quickly then change to Pod is paired successfully. solid Blink twice quickly then change to Pod pairing was unsuccessful. blinking blue (1/2s On, 1/2s Off...) Product Manual — Doc. 9392B UC-AUDIO-POD and UC-AUDIO-HUB • 29... -
Page 30: Hub Buttons
2. All LEDs on the front of the hub blink red three times, confirming the reset has initiated. NOTE: All pods should be factory restored before pairing again with a factory restored hub. 30 • UC-AUDIO-POD and UC-AUDIO-HUB Product Manual — Doc. 9392B... -
Page 31: Configuration
To access the web configuration interface: 1. Connect the hub to the same network as the host computer. 2. Use the Device Discovery tool in the Crestron Toolbox™ software to discover the hub and its IP address on the network. - Page 32 Click Create User. The Device Administration page appears. 6. Enter the username and password in their respective fields and select Sign In to continue. The web user interface is displayed. 32 • UC-AUDIO-POD and UC-AUDIO-HUB Product Manual — Doc. 9392B...
-
Page 33: Action
The Action drop-down menu is displayed at the top right side of the interface and provides quick access to common hub functions, such as: Save Changes Revert Reboot Restore Update Firmware Download Logs Manage Certificates Action Menu Product Manual — Doc. 9392B UC-AUDIO-POD and UC-AUDIO-HUB • 33... - Page 34 No to cancel the restore. Update Firmware Select Update Firmware to upgrade the hub's firmware manually with a downloaded PUF (package update file). Update Firmware Dialog Box 34 • UC-AUDIO-POD and UC-AUDIO-HUB Product Manual — Doc. 9392B...
- Page 35 Select Download Logs to download the hub message logs for diagnostic purposes. The message files download as a compressed .tgz file. Once the compressed file is downloaded, extract the message log files to view them. Product Manual — Doc. 9392B UC-AUDIO-POD and UC-AUDIO-HUB • 35...
- Page 36 The Machine certificate will be provided by the network administrator, along with the certificate password. Web Server: The Web Server certificate is a digital file that contains information about the identity of the web server. 36 • UC-AUDIO-POD and UC-AUDIO-HUB Product Manual — Doc. 9392B...
- Page 37 Actions column to delete the certificate. A pop-up dialog box is displayed asking if the CA should be deleted. 3. Select Yes to delete the certificate or No to cancel. Product Manual — Doc. 9392B UC-AUDIO-POD and UC-AUDIO-HUB • 37...
-
Page 38: Status
Select + More details at the bottom of the Device tab to display an expanded section that shows additional hub information. If + More Details is selected, select - Less details to collapse the section. 38 • UC-AUDIO-POD and UC-AUDIO-HUB Product Manual — Doc. 9392B... - Page 39 Default Gateway: The gateway router address, shown only if an Ethernet connection is active Link Active: Reports whether the Ethernet connection is active (true) or inactive (false) MAC Address: The unique hub MAC (media access control) address for the Ethernet adapter Product Manual — Doc. 9392B UC-AUDIO-POD and UC-AUDIO-HUB • 39...
- Page 40 If unmuted, the microphone color changes to green. Volume: The pod volume level Audio Status: Displays the pod audio status, either active or inactive Signal Strength: The pod radio frequency signal strength Firmware Version: The pod firmware version 40 • UC-AUDIO-POD and UC-AUDIO-HUB Product Manual — Doc. 9392B...
-
Page 41: Settings
Settings Selections Each selection is described in the sections that follow. System Setup Select System Setup to configure date/time, network, audio and XiO Cloud settings. Settings Tab - System Setup Product Manual — Doc. 9392B UC-AUDIO-POD and UC-AUDIO-HUB • 41... - Page 42 Time: Enter the current time for the hub (in 24-hour format) using the pop-up menu that is displayed. Select the Save Changes button displayed on the top right to save the settings. 42 • UC-AUDIO-POD and UC-AUDIO-HUB Product Manual — Doc. 9392B...
- Page 43 Secondary Static DNS: The secondary DNS (domain name server) address used to resolve the hub domain to a IPv4 address Primary LAN: Displays the domain Domain Name: Displays the domain name of the host Product Manual — Doc. 9392B UC-AUDIO-POD and UC-AUDIO-HUB • 43...
- Page 44 Select the Save Changes button displayed on the top right to save the new network entries. Audio Select the + (plus) icon next to Audio (Autosaved) to display the following audio settings. Settings Tab - System Setup (Audio) 44 • UC-AUDIO-POD and UC-AUDIO-HUB Product Manual — Doc. 9392B...
- Page 45 When Locate All is selected, the Locate tab in the pod status table is activated for the paired pods. The LED ring of the paired pods then starts blinking blue (rapidly and continuously) with an audio tone indicating the location of the respective pods. Product Manual — Doc. 9392B UC-AUDIO-POD and UC-AUDIO-HUB • 45...
- Page 46 Unpair All: When Unpair All is selected, the Unpair/Remove tab in the pod status table is activated for the paired pods. NOTE: Firmware Upgrade and Upgrade All are not available with the initial launch of these products. These features will be available at a later date. 46 • UC-AUDIO-POD and UC-AUDIO-HUB Product Manual — Doc. 9392B...
- Page 47 Select Auto Update to display the following auto update settings. The hub can be automatically updated with the latest firmware at scheduled intervals. Settings Tab - Auto Update Select the + (plus) icon next to Auto Update to display the following auto update settings. Product Manual — Doc. 9392B UC-AUDIO-POD and UC-AUDIO-HUB • 47...
- Page 48 Update Firmware Now: Selecting Update Firmware Now causes the firmware to be updated at the current time. However, the scheduled day of week, time of day and the poll interval remain in effect. 48 • UC-AUDIO-POD and UC-AUDIO-HUB Product Manual — Doc. 9392B...
- Page 49 Remote Server Address: Enter the IP address or Fully Qualified Domain Name (FQDN) in the Remote Server Address. Remote Server Port: Enter the port number in the Remote Server Port. The range is 0 to 65535. Product Manual — Doc. 9392B UC-AUDIO-POD and UC-AUDIO-HUB • 49...
- Page 50 Please note that spaces are not allowed. Trusted Certificate Authorities: Select the trusted certificate authorities from the list. Select the Save Changes button displayed on the top right to save the remote syslog entries. 50 • UC-AUDIO-POD and UC-AUDIO-HUB Product Manual — Doc. 9392B...
-
Page 51: Security
User and group settings are also displayed under Security. Current User Select the Current User tab to view read-only information or to change the password for the current user. Current User Tab Product Manual — Doc. 9392B UC-AUDIO-POD and UC-AUDIO-HUB • 51... - Page 52 3. Select OK to save the new password, or select Cancel to cancel the change. Users Select the Users tab to view and edit information for the hub users. Users Tab 52 • UC-AUDIO-POD and UC-AUDIO-HUB Product Manual — Doc. 9392B...
- Page 53 Active Directory User: Reports whether the user is (Yes) or is not (No) authenticated through Active Directory Groups: Lists any groups that contain the user Select OK to return to the Users page. Product Manual — Doc. 9392B UC-AUDIO-POD and UC-AUDIO-HUB • 53...
- Page 54 Action column to delete the user. A pop-up dialog box is displayed asking whether the user should be deleted. Select Yes to delete the user or No to cancel deleting the user. 54 • UC-AUDIO-POD and UC-AUDIO-HUB Product Manual — Doc. 9392B...
- Page 55 NOTE: A user must be added to an Active Directory group to be selected as an Active Directory user. Select OK to save any changes and to return to the Users page. Select Cancel to cancel creating a new user. Product Manual — Doc. 9392B UC-AUDIO-POD and UC-AUDIO-HUB • 55...
- Page 56 5, 10, or 20 users. An Action column is also provided for each group that allows various actions to be performed. The following selections may be selected from the Action column. 56 • UC-AUDIO-POD and UC-AUDIO-HUB Product Manual — Doc. 9392B...
- Page 57 Actions column to delete the group. A pop-up dialog box is displayed asking whether the group should be deleted. Select Yes to delete the group or No to cancel deleting the group. Product Manual — Doc. 9392B UC-AUDIO-POD and UC-AUDIO-HUB • 57...
- Page 58 Active Directory Group: Slide the toggle to the right to use authentication via Active Directory for the group. Select OK to save any changes and to return to the Groups page. Select Cancel to cancel creating a new group. 58 • UC-AUDIO-POD and UC-AUDIO-HUB Product Manual — Doc. 9392B...
-
Page 59: 802.1X Configuration
Username: If EAP MSCHAP V2- password is selected for Authentication Method, enter a username that is required for authentication. Password: If EAP MSCHAP V2- password is selected for Authentication Method, enter a password that is required for authentication. Product Manual — Doc. 9392B UC-AUDIO-POD and UC-AUDIO-HUB • 59... - Page 60 Select Manage Certificates from the Action menu to add or remove CAs from the list. The Manage Certificates dialog box is displayed with the Root tab selected. For more information, refer to Manage Certificates on page 60 • UC-AUDIO-POD and UC-AUDIO-HUB Product Manual — Doc. 9392B...
-
Page 61: Xio Cloud Service
XiO Cloud® service allows supported devices across an enterprise to be managed and configured from one central and secure location in the cloud. Supported Crestron® devices are configured to connect to the service out of the box. Use of the service requires a registered XiO Cloud account. To register for an XiO Cloud account, refer to https://www.crestron.com/Legal/XiO-Cloud-Monitoring-Services-TOU... -
Page 62: Crestron Settings App
Crestron Settings App The hub web user interface can be accessed through the Crestron Settings App if the hub is connected to a UC Engine. Crestron recommends using a keyboard and mouse connected to the UC Engine when using the Crestron Settings app. - Page 63 If the hub is connected to a UC Engine, auto-update is disabled even if it is connected to the network. Click Done to exit the Crestron Settings app. Product Manual — Doc. 9392B UC-AUDIO-POD and UC-AUDIO-HUB • 63...
-
Page 64: Resources
Resources The following resources are provided for the UC-AUDIO-POD and UC-AUDIO-HUB. NOTE: You may need to provide your Crestron.com web account credentials when prompted to access some of the following resources. Crestron Support and Training Crestron True Blue Support Crestron Resource Library Crestron Online Help (OLH) Crestron Training Institute (CTI) Portal... - Page 65 This page is intentionally left blank. Product Manual — Doc. 9392B UC-AUDIO-POD and UC-AUDIO-HUB • 65...
- Page 66 Crestron Electronics, Inc. Product Manual — Doc. 9392B 15 Volvo Drive, Rockleigh, NJ 07647 11/27/23 Tel: 888.CRESTRON Specifications subject to Fax: 201.767.7656 change without notice. www.crestron.com...
Need help?
Do you have a question about the UC-AUDIO-POD and is the answer not in the manual?
Questions and answers