Table of Contents
Advertisement
Quick Links
Advertisement
Table of Contents

Related Manuals for Electrolux LKR64001NW


Summary of Contents for Electrolux LKR64001NW
- Page 1 EN User Manual | Cooker LKR64001NW...
-
Page 2: Table Of Contents
WE’RE THINKING OF YOU Thank you for purchasing an Electrolux appliance. You’ve chosen a product that brings with it decades of professional experience and innovation. Ingenious and stylish, it has been designed with you in mind. So whenever you use it, you can be safe in the knowledge that you’ll get great results every time. -
Page 3: Safety Information
SAFETY INFORMATION Before the installation and use of the appliance, carefully read the supplied instructions. The manufacturer is not responsible for any injuries or damage that are the result of incorrect installation or usage. Always keep the instructions in a safe and accessible location for future reference. - Page 4 • Only a qualified person must install this appliance and replace the cable. • This appliance is intended for use up to an altitude of 2000 m above sea level. • This appliance is not intended to be used on ships, boats or vessels.
-
Page 5: Safety Instructions
• WARNING: The appliance and its accessible parts become hot during use. Care should be taken to avoid touching heating elements. • Always use oven gloves to remove or insert accessories or ovenware. • Before maintenance, cut the power supply. •... - Page 6 2.2 Electrical Connection • Make sure that the ventilation openings are not blocked. • Do not let the appliance stay unattended WARNING! during operation. Risk of fire and electric shock. • Deactivate the appliance after each use. • Be careful when you open the appliance •...
- Page 7 • Discoloration of the enamel or stainless use abrasive products, abrasive cleaning steel has no effect on the performance of pads, solvents or metal objects. the appliance. • If you use an oven spray, follow the safety • Use a deep pan for moist cakes. Fruit instructions on the packaging.
-
Page 8: Installation
3. INSTALLATION 3.3 Anti-tilt protection WARNING! Refer to Safety chapters. CAUTION! Install the anti-tilt protection to prevent 3.1 Technical data the appliance from falling under incorrect loads. The anti-tilt protection only works when the appliance is put in a correct Dimensions area. -
Page 9: Product Description
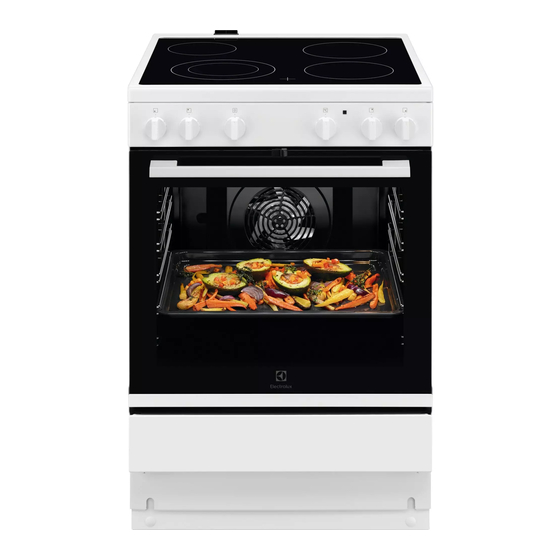
4. PRODUCT DESCRIPTION 4.1 General overview Knob for the heating functions Control knob (for the temperature) Temperature indicator / symbol Knobs for the hob Heating element Lamp Shelf support, removable Shelf positions 4.2 Hob overview Cooking zone Residual Heat Indicator 145 mm 180 mm 180 mm... -
Page 10: Before First Use
5. BEFORE FIRST USE 5.4 Deactivating the mechanical WARNING! door lock - in the main oven Refer to Safety chapters. 1. Press the door trim B at each side. The seal releases. 5.1 Initial Cleaning Remove all accessories and removable shelf supports from the oven. -
Page 11: Hob - Daily Use
Deactivating the appliance does not deactivate the mechanical door lock. 6. HOB - DAILY USE To activate the outer ring: turn the knob WARNING! clockwise through a light resistance to Refer to Safety chapters. Then turn the knob counterclockwise to the correct heat setting. - Page 12 7.2 Minimum cookware diameter Do not use cookware on the ceramic hob Cooking Cookware diam‐ Power (W) with bases with pronounced edges or zone eter (mm) ridges, e.g. cast iron pans. These could scratch or scour the hob surface Left rear 125 - 145 1200 permanently.
-
Page 13: Hob - Care And Cleaning
Heat setting Use to: Time Hints (min) 7 - 8 Heavy fry, hash browns, loin steaks, 5 - 15 Turn over when needed. steaks. Boil water, cook pasta, sear meat (goulash, pot roast), deep-fry chips. 8. HOB - CARE AND CLEANING 8.2 Cleaning the hob WARNING! •... - Page 14 Symbol Oven function Application Circulated cooking To roast or roast and bake food with the same cooking tempera‐ ture on more than one shelf position, without flavour transfer‐ ence. Hot Air To bake on up to two shelf positions at the same time and to dry food.
-
Page 15: Oven - Hints And Tips
1. Turn the knob for the oven functions to Wire shelf: select an oven function. Push the shelf between the guide bars of the 2. Turn the knob for the temperature to shelf support. select a temperature. 3. To deactivate the oven turn the knobs for the oven functions and temperature to the off position. - Page 16 Cakes and pastries at different heights do not always brown equally. There is no need to change the temperature setting if an unequal The temperature and baking times in the browning occurs. The differences equalize tables are guidelines only. They depend during baking.
- Page 17 Food Temperature Time (min) Shelf posi‐ (°C) tion Wholemeal loaf 160 - 170 35 - 45 2 + 4 Rye bread, mix 2 + 4 - baking 160 - 170 60 - 70 2 + 4 Baguettes 180 - 200 20 - 30 2 + 4 Pancakes...
- Page 18 Food Temperature (°C) Time (min) Shelf posi‐ tion Lasagne, frozen 170 - 190 2 + 4 30 - 45 Pasta gratin 165 - 175 40 - 50 2 + 4 Chips, frozen 180 - 200 2 + 4 30 - 45 Tarts, home made - pre-baking, roll 165 - 175 15 - 20...
- Page 19 Food Temperature (°C) Time (min) Shelf posi‐ tion Biscuits 160 - 180 6 - 15 3 - 4 Choux pastry 170 - 190 30 - 45 3 - 4 Swiss rolls 190 - 210 10 - 12 3 - 4 Fruit tarts, short crust pastry 175 - 200 pre-baking, roll 10 -...
- Page 20 10.7 Pizza Table Food Temperature (°C) Time (min) Shelf position Ciabatta rolls 200 - 220 10 - 20 Foccacia 220 - 230 10 - 20 Ciabatta 190 - 200 15 - 25 Fruit tarts, short crust pastry 170 - 180 35 - 45 Fruit tarts, crumble pastry 175 - 200...
- Page 21 Food Temperature (°C) Time (min) Shelf position Fish fillet 300 g 25 - 35 Meat Food Temperature (°C) Time (min) Shelf position Meat in pouch 250 g 25 - 35 Meat skewers 500 g 30 - 40 Small baked items Food Temperature (°C) Time (min)
- Page 22 Food Temperature (°C) Time (min) Shelf posi‐ tion Dish cake 150 - 160 30 - 40 2 + 4 Sponge cakes / Madeira cakes 150 - 160 50 - 60 Meringues 90 - 120 2 + 4 Meringue bases 90 - 120 2 + 4 - heating with oven turned off...
- Page 23 Veal Food Temperature (°C) Time (min / kg) Shelf posi‐ tion 60 - 70 2 - 3 Fillet of beef Other. Can be browned off after roasting under the grill or with top / bottom heat at 250°C. If you are using a meat probe, remove it before grilling.
- Page 24 Food Temperature (°C) Time (min / kg) Shelf posi‐ tion Rump steak - roasting 50 - 60 2 - 3 Roast beef 90 - 120 1 - 3 Other. Can be browned off after roasting under the grill or with top / bottom heat at 250°C. If you are using a meat probe, remove it before grilling.
- Page 25 10.13 Roasting with Turbo Grilling Beef Food Quantity Temperature Time (min) Shelf posi‐ (°C) tion Roast beef or fillet: rare per cm. of thickness 5 - 6 190 - 200 Roast beef or fillet: medium per cm. of thickness 180 - 190 6 - 8 Roast beef or fillet: well done per cm.
- Page 26 10.14 Grilling in general • Grill only flat pieces of meat or fish. WARNING! Always grill with the oven door closed. • Always grill with the maximum temperature setting. • Set the shelf into the shelf position as The grilling area is set in centre of the shelf. recommended in the grilling table.
- Page 27 Fruit Shelf position Food Temperature (°C) Time (h) 1 position 2 positions Plums 60 - 70 8 - 10 2 / 4 Apricots 60 - 70 8 - 10 2 / 4 Apple slices 60 - 70 6 - 8 2 / 4 Pears 60 - 70...
-
Page 28: Oven - Care And Cleaning
11. OVEN - CARE AND CLEANING WARNING! Refer to Safety chapters. 11.1 Notes on cleaning Clean the front of the appliance only with a microfibre cloth with warm water and a mild de‐ tergent. Use a cleaning solution to clean metal surfaces. Clean stains with a mild detergent. - Page 29 Install the shelf supports in the opposite sequence. CAUTION! Make sure that the longer fixing wire is in the front. The ends of the two wires must point to the rear. Incorrect installation can cause damage to the enamel. 2. Pull the door trim to the front to remove it. 11.4 Removing the oven door 3.
-
Page 30: Troubleshooting
3. Clean the oven ceiling with a soft cloth 2. Clean the glass cover. with warm water and a cleaning agent, 3. Replace the oven lamp with a suitable and let it dry. 300 °C heat-resistant oven lamp. Install the heating element in the opposite Use the same oven lamp type. -
Page 31: Energy Efficiency
......... Serial number (S.N.) ......... 13. ENERGY EFFICIENCY 13.1 Product Information according to EU Ecodesign Regulations for hob Model identification LKR64001NW Type of hob Hob inside Freestanding Cooker Number of cooking zones Heating technology Radiant Heater Diameter of circular cooking zones Left front 21.0 cm... - Page 32 13.3 Product Information and Product Information Sheet according to EU Ecodesign and Energy Labelling Regulations for ovens Supplier's name Electrolux Model identification LKR64001NW 947941424 Energy Efficiency Index 95.3 Energy efficiency class Energy consumption with a standard load, conventional mode 0.95 kWh/cycle Energy consumption with a standard load, fan-forced mode 0.82 kWh/cycle...
-
Page 33: Environmental Concerns
Help protect the environment and human health by recycling waste of electrical and Electrolux Appliances AB - Contact Address: electronic appliances. Do not dispose of Al. Powstancow Slaskich 26, 30-570 Krakow, appliances marked with the symbol... - Page 36 867338931-D-152023...
Need help?
Do you have a question about the LKR64001NW and is the answer not in the manual?
Questions and answers