
Related Manuals for Hanna Instruments HI84531-02


Summary of Contents for Hanna Instruments HI84531-02
- Page 1 Instruction Manual HI 84531 TOTAL ALKALINITY MINITITRATOR & pH METER for Water Analysis w w w. h a n n a i n s t . c o m...
- Page 2 Dear Customer, Thank you for choosing a Hanna Instruments product. Please read this instruction manual carefully before using this meter. This manual will provide you with the necessary information for correct use of this meter, as well as a precise idea of its versatility.
-
Page 3: Table Of Contents
ELECTRODE CONDITIONING AND MAINTENANCE ..............40 ACCESSORIES ........................41 WARRANTY ........................42 All rights are reserved. Reproduction in whole or in part is prohibited without the written consent of the copyright owner, Hanna Instruments Inc., Woonsocket, Rhode Island, 02895, USA. -
Page 4: Preliminary Examination
PRELIMINARY EXAMINATION Please examine this product carefully. Make sure that the instrument is not damaged. If any damage occurred during shipment, please notify your Dealer. Each HI 84531 minititrator is supplied complete with: • HI 84531-70 Reagent Kit for titrable alkalinity in water •... -
Page 5: Significance Of Use
A dedicated HELP key aids in setup, calibration, status and troubleshooting. Other features: • pH meter / mV meter • Stir speed control • Data can be stored using the log feature and then exported to a USB stick or transferred to a PC using the USB connection •... -
Page 6: Specifications
SPECIFICATIONS Titrator Range Low Range (LR): 30.0 - 400.0 mg/L CaCO 0.6 - 8.0 meq/L CaCO High Range (HR): 300 - 4000 mg/L CaCO 6.0 - 80.0 meq/L CaCO Resolution LR: 0.1 mg/L / 0.1 meq/L HR: 1 mg/L / 0.1 meq/L Accuracy LR: ±... -
Page 7: Principle Of Operation
REQUIRED REAGENTS Code Description HI 84531-50 Low Range Titrant HI 84531-51 High Range Titrant HI 84531-55 Calibration Standard PRINCIPLE OF OPERATION Water alkalinity determinations are based on the neutralization of all basic species contained in the sample by titration with an acid: OH¯... -
Page 8: Functional Description
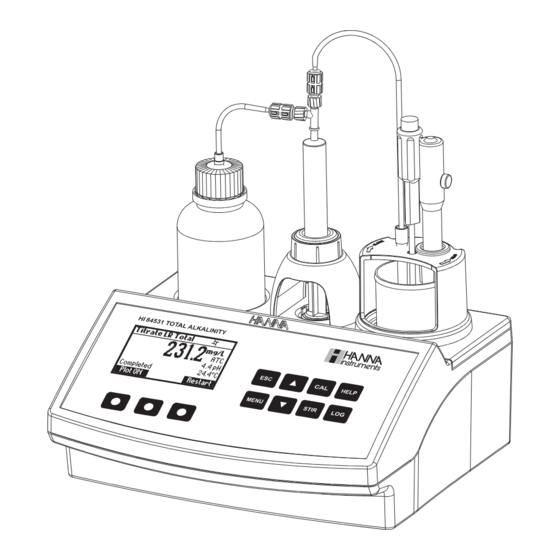
FUNCTIONAL DESCRIPTION OVERHEAD VIEW 1) Titrant bottle 2) Liquid Crystal Display (LCD) 3) Keypad 4) Electrode holder 5) Dispensing tube FRONT VIEW REAR VIEW 6) Temperature probe 7) pH Electrode 8) Electrode holder 9) Beaker 10) Power switch 11) USB connector (PC interface) 12) USB connector (Storage interface) 13) Power adapter 14) BNC electrode connector... - Page 9 KEYPAD FUNCTION ESC - used to leave the current screen and to return either to the previous screen or to the main screen. In Setup menu, exits a parameter without changing the value. - used to modify the parameter values, to scroll the information displayed while viewing a help screen or to move between the options from the instrument’s Setup menu CAL - used to access the Electrode and Pump calibration options HELP - used to access/exit the instrument’s contextual help...
-
Page 10: Titrator Startup
5) Stirrer and reading status 6) Main reading information 7) pH temperature compensation mode (Manual or Automatic) 8) Temperature reading DOSING PUMP The dosing pump is based on a valve that automatically moves the titrant between the titrant bottle and syringe when filling the syringe and between the syringe and sample when dispensing. A replaceable 5 mL plastic syringe is used to limit the amount of titrant used per test to ensure the highest possible accuracy. -
Page 11: Setup Menu
SETUP MENU The titrator’s setup menu may be accessed from the main screen (meter or titrator) by pressing the MENU key, then Setup. A list of setup parameters will be displayed with currently configured setting. While in the setup menu, it is possible to modify the instrument’s operation parameters. The ARROW keys permit the user to scroll the setup parameters. - Page 12 Calibration Timeout Disabled or 1 to 7 days. Set the number of days before the pH calibration expired warning message is displayed. Press Modify to access the calibration timeout screen. Use the ARROW keys to select the value. Press Select to confirm or ESC to return to the setup menu without saving the changes.
- Page 13 Date Press the Modify key to change the date and date format. Press Format to cycle between the available date formats. Press to highlight the value to be modified. Use the ARROW keys to change the value. Press Accept to confirm the new value or ESC to return to the setup.
- Page 14 Use the ARROW keys or to increase/decrease the value. Press Accept to confirm the value or ESC to return to the setup menu. LCD Backlight Press Modify to change the backlight level. The default value is 3. Use the ARROW keys or to increase/ decrease the backlight level.
-
Page 15: Guide To Display Codes
Meter Information Press Select to view the firmware version, language version, mV factory calibration date and time, temperature factory calibration date and time and method version. Press ESC to return to the setup menu. Restore Factory Settings Press Select to restore the factory settings. Press Yes to confirm the restore process or No to return without restoring. - Page 16 Titration screen when a titration is in progress. Prime burette screen. Prime burette screen when the dosing system is running. This error message appears when the pump is not working properly. Check the tubing, valve and syringe. Press Restart to try again. This screen appears when the titrator is in calibration mode.
- Page 17 This error message appears during pump calibration when the end point can not be reached and the maximum amount of titrant is exceeded. Check standard, electrode and/or dosing system and try again. The calibration was outside the acceptable limits. Prepare a new standard and try again. This error message appears when the pH reading exceeds the acceptable input limits (-2.00 <...
- Page 18 The “Wrong Buffer” message is displayed when the pH value is outside of the acceptable range. Clean the electrode by following the Cleaning Procedure and/or check the buffer concentration before continuing the pH calibration. Press the ESC key to exit pH calibration mode. TITRATION MESSAGES This screen is displayed when the instrument is in titration mode.
-
Page 19: Electrode Preparation
ELECTRODE PREPARATION PREPARATION PROCEDURE Remove the electrode protective cap. DO NOT BE ALARMED IF ANY SALT DEPOSITS ARE PRESENT. This is normal with electrodes and they will disappear when rinsed with distilled/deionized water. During transport tiny bubbles of air may have formed inside the glass bulb. The electrode cannot function properly under these conditions. - Page 20 • Immerse the pH and the temperature probe approximately 2 cm (0.8”) into the buffer paying attention not to touch the stir bar. To enter Electrode Calibration follow the next steps: • Press CAL key then Electrode. • The electrode calibration screen will be displayed. •...
- Page 21 • Place the second beaker with calibration buffer in the beaker holder. Rinse the electrodes in a beaker containing the second buffer rinsing solution. • Place the electrode holder (with electrodes) on the top of the beaker and secure it by turning clockwise and press STIR.
- Page 22 • If the measured offset isn’t within the preset limits (±45 mV), the meter will display the message “Buffer Contaminated” alternatively with ”Electrode Dirty/Broken”. • If the computed slope isn’t within the preset limits, the meter will display the message “Wrong Slope”.
-
Page 23: Ph Buffer Temperature Dependence
Note: • To clear a previous calibration and to return to the default value, press Clear at any time after entering calibration mode. If Clear is invoked during the first calibration point the instrument returns to the measurement mode. • The Clear key is displayed only if a previous calibration exists. pH BUFFER TEMPERATURE DEPENDENCE Temperature has an effect on pH. -
Page 24: Dosing Pump Installation
DOSING PUMP INSTALLATION To install dosing pump follow the procedure below: • Extend the plunger on the 5 mL syringe to its maximum volume. • Place the syringe in the dedicated spot on the top of the meter (1). • Arrange the bottom of the syringe into the holder on the pump (2). Once the syringe is in place lower the barrel until it sits flush on the holder. - Page 25 Note: The aspiration tube must be inserted in the titrant bottle. The dosing tip must be placed over a rinse beaker. • To prime the burette, select Prime option from Titration mode. keys and press Start. • Adjust the rinses number by pressing the •...
-
Page 26: Pump Calibration Procedure
PUMP CALIBRATION PROCEDURE The calibration of the pump must be performed every time the syringe, pump tube, the titrant bottle or the pH electrode is changed. A pump calibration is recommended before each set of titrations, after the titrator is left idle for several hours or once daily. •... - Page 27 • Rinse the pH electrode with deionized water and immerse into the calibration solution until the reference junction is completely submerged. Be sure that the tip of the electrode is not hitting the stir bar. If necessary additional distilled or deionized water can be added.
-
Page 28: Titration Procedure
TITRATION PROCEDURE For best accuracy, before taking any measurement, ensure that the pump is calibrated on the selected range following the “Pump Calibration Procedure” (see page 26). Note: Verify that the instrument has been calibrated (pH and pump) before performing any titrations. - Page 29 • Rinse the pH electrode with deionized water and immerse into the sample until the reference junction is completely submerged. Be sure that the tip of the electrode is not hitting the stir bar. • Insert the dosing tip into the titrant tube sleeve. IT IS CRITICAL THAT THE TIP BE IMMERSED APPROXIMATELY 0.25 CM (0.1") INTO THE SOLUTION BEING TITRATED.
- Page 30 • Press Restart to begin a new titration or ESC to return to the titration menu. • If the concentration exceeds the range limits the exceeded range limit will be displayed blinking. Another titration can be started by pressing Restart. •...
- Page 31 VIEW/DELETE TITRATOR RECORDED DATA Press MENU then Recall to access the Titrator logs. When an external USB storage device is connected, the Export key is displayed. It saves the meter and titrator logs in two text format files on the storage device. Press Meter or Titrator to view the respective logs.
- Page 32 Press Plot to visualize the titration curve or ESC to return to the previous screen. On the titration curve, the end point volume and pH are displayed. The titration data (Total Titrant Volume on the x- axis and pH on the y-axis) can be scanned through with the doted line by using the ARROW keys. To zoom on the titration curve press Zoom.
-
Page 33: Ph Measurement
Press Pump to view the pump’s last calibration time, date and slope. If a calibration hasn’t been performed, the message “Not Calibrated” will be displayed. pH MEASUREMENT The HI 84531 can be used as a pH meter for direct measurements. Verify that the instrument has been calibrated before taking pH measurements. - Page 34 In order to take pH measurements, follow the next steps: • Submerge the tip of pH electrode 2 cm (0.8’’) and the temperature probe into the sample to be tested and stir gently. Allow time for the electrode to stabilize. When the reading becomes stable, the (unstable measurement) symbol will disappear.
- Page 35 VIEW/DELETE RECORDED pH DATA Press MENU key while in pH meter screen then Recall to access the meter logs. When an external USB storage device is connected, the Export key is displayed. It saves the meter and titrator logs in two text format files on the storage device. Press Meter or Titrator to view the respective logs.
- Page 36 Press Yes to delete the record or No to return to the previous screen without deleting. Deleting a single record will renumber the list of records. If the pH log is empty, the message “No records available!” will be displayed. pH METER GLP INFORMATION The pH meter GLP screens displays the pH calibration data.
-
Page 37: Pc Interface And Data Transfer
PC INTERFACE AND DATA TRANSFER Data stored on meter with the LOG function during pH/mV measurement and titrations can be transferred from the meter to a USB stick using the Export function from the log recall menu. Two text files are transferred on the USB stick. These files can be used for further analysis on a PC. The logged data can also be transferred from the instrument to the PC using a USB cable. -
Page 38: Troubleshooting Guide
TROUBLESHOOTING GUIDE k a o e h t r t c e e d o p i t w o l s e r n o p / e s c x e s s e e v i a e l n i n u l o n o i t... - Page 39 r e t f a r t i n o i t e h t o r B n e k e l e o r t c . e d c e h l c / k n a e e h t e l e o r t c...
-
Page 40: Electrode Conditioning And Maintenance
ELECTRODE CONDITIONING AND MAINTENANCE STORAGE PROCEDURE To assure a quick response time, the glass bulb should be kept moist and not allowed to dry out. Replace the solution in the protective cap with a few drops of HI 70300 or HI 80300 Storage Solution. -
Page 41: Accessories
ACCESSORIES REAGENTS HI 84531-50 Low Range Titrant (120 mL) HI 84531-51 High Range Titrant (120 mL) HI 84531-55 Calibration Standard (230 mL) pH CALIBRATION SOLUTIONS HI 7004M Buffer Solution pH 4.01 (230 mL) HI 7007M Buffer Solution pH 7.01 (230 mL) HI 70083M Buffer Solution pH 8.30 (230 mL) HI 7010M... -
Page 42: Warranty
If the repair is not covered by the warranty, you will be notified of the charges incurred. If the instrument is to be returned to Hanna Instruments, first obtain a Returned Goods Authorization number from the Technical Service department and then send it with shipping costs prepaid. When shipping any instrument, make sure it is properly packed for complete protection. - Page 43 To avoid damages or burns, do not put the instrument in microwave ovens. For your and the instrument’s safety, do not use or store the instrument in hazardous environments. Hanna Instruments reserves the right to modify the design, construction or appearance of its products without advance notice.
- Page 44 Hanna Instruments Inc. Highland Industrial Park 584 Park East Drive Woonsocket, RI 02895 USA Technical Support for Customers Tel. (800) 426 6287 Fax (401) 765 7575 E-mail tech@hannainst.com www.hannainst.com Local Sales and Customer Service Office MAN84531 11/13 Printed in ROMANIA...
Need help?
Do you have a question about the HI84531-02 and is the answer not in the manual?
Questions and answers