Table of Contents
Advertisement
Available languages
Available languages
Quick Links
REVERSIBLE WOODTURNING
CHUCK
Mandrin réversible pour tour
Portabrocas reversible para
torneado de madera
Instruction manual
Manuel d'utilisation
Manual de instrucciones
www.deltaportercable.com
INSTRUCTIVO DE OPERACIÓN, CENTROS
DE SERVICIO Y PÓLIZA DE GARANTÍA.
LÉASE ESTE INSTRUCTIVO
ANTES DE USAR EL PRODUCTO.
IMPORTANT SAFETY INSTRUCTIONS
Read all warnings and operating instructions before using
any tool or equipment. When using tools or equipment, basic safety
precautions should always be followed to reduce the risk of personal injury.
Improper operation, maintenance or modification of tools or equipment
could result in serious injury and property damage. There are certain
applications for which tools and equipment are designed. Delta Machinery strongly
recommends that this product NOT be modified and/or used for any application other than
for which it was designed.
If you have any questions relative to its application DO NOT use the product until you have
written Delta Machinery and we have advised you. Contact us online at www.deltaportercable.
com or by mail at Technical Service Manager, Delta Machinery, 4825 Highway 45 North,
Jackson, TN 38305. In Canada,125 Mural St. Suite 300, Richmond Hill, ON, L4B 1M4)
Information regarding the safe and proper operation of this tool is available from the
following sources:
• Power Tool Institute, 1300 Sumner Avenue, Cleveland, OH 44115-2851or online at www.
powertoolinstitute.org
• National Safety Council, 1121 Spring Lake Drive, Itasca, IL 60143-3201
• American National Standards Institute, 25 West 43rd Street, 4 floor, New York, NY 10036
www.ansi.org - ANSI 01.1 Safety Requirements for Woodworking Machines
• U.S. Department of Labor regulations www.osha.gov
SAfeTy gUIDeLINeS - DefINITIoNS
It is important for you to read and understand this manual. The information it contains relates to
protecting YOUR SAFETY and PREVENTING PROBLEMS. The symbols below are used to help
you recognize this information.
Indicates an imminently hazardous situation which, if not avoided, will
result in death or serious injury.
Indicates a potentially hazardous situation which, if not avoided, could
result in death or serious injury.
Indicates a potentially hazardous situation which, if not avoided, may
result in minor or moderate injury.
Used without the safety alert symbol indicates a potentially hazardous
situation which, if not avoided, may result in property damage.
Some dust created by power sanding, sawing, grinding, drilling,
and other construction activities contains chemicals known to the State of California
to cause cancer, birth defects or other reproductive harm. Some examples of these
chemicals are:
•
lead from lead-based paints,
•
crystalline silica from bricks and cement and other masonry products, and
•
arsenic and chromium from chemically-treated lumber.
Your risk from these exposures varies, depending on how often you do this type of work.
To reduce your exposure to these chemicals: work in a well ventilated area, and work with
approved safety equipment, al ways wear NIOSH/OSHA approved, properly fit ting face mask
or res pi ra tor when us ing such tools.
SPeCIfIC SAfeTy RULeS
To reduce the risk of injury, turn unit off and disconnect it from power
source before installing and removing accessories, before adjusting or when making
repairs. An accidental start-up can cause injury.
Since accessories other than those offered by Delta have not been tested with
this product, use of such accessories could be hazardous. For safest operation, only Delta
recommended accessories should be used with this product. Teknatool accessories offered
for its NOVA G3 chuck are also approved for this chuck.
To avoid serious personal injury, follow these rules:
• Be sure eye protection which complies with current ANSI standard Z87.1 is worn. We
recommend that a full face shield be used at all times.
• Be sure chuck is properly secured on lathe spindle. Follow mounting instructions for your
lathe for faceplates and other spindle fixtures.
• for safety, do not rotate chuck under power without wood being gripped.
• excessive speed is a serious lathe hazard. Always turn at the slowest speed possible.
• Speed will vary with wood blank size. The larger the blank the slower the speed. Always
follow proper speed guidelines.
• Do not attempt to use the chuck unless the lathe speeds are known, you must strictly
follow the maximum speed limits set out in the operating section of this manual. Do
not exceed them under any circumstances.
• eXAMINe WooD CARefULLy. Only mount wood that is sound, if any cracks, splits, or
weakness is found in wood - do not mount on chuck. Do not mount any wood that is likely to
break up during turning (e.g. rotten or spongy wood). Do not use poorly jointed or laminated
wood.
• Make sure wood is clamped firmly. Follow mounting instructions for different gripping
modes and jaw types. In the expansion mode do not use undue force or jaws may split the
wood.
• Do not exceed maximum guidelines in this manual for wood blank diameters or
lengths set out in this manual for different modes and jaw types.
• Do NoT USe WITH ANy CoPyTURNeR oPeRATIoNS.
• Check wood is securely held in chuck, before operation. Check grip by vigorously
wrenching wood blank back and forth. If any loosening occurs, re-examine holding area
for adequate grip (following mounting guidelines) and any damage to holding area. Rotate
manually to make sure of clearance before switching power on.
•
The jaw slides can extend about 1/4" (6.35 mm) beyond the body of the chuck to give a
wider range of expansion, if required. To reduce the risk of injury, always avoid bodily contact
with the chuck.
• Irregular or out of balance stock needs to be turned at the slowest possible speed
until it is in balance. For use in reverse rotation, make sure chuck is securely locked with
set screw before use. Use only hand held woodturning chisels to shape wood being held in
chuck.
• Use the right chisel for the job and do not force tools. Use safe and commonly approved
chisel techniques. Wherever possible stand to one side of the revolving wood.
• Wear proper clothing. Do not wear any loose clothing, neck ties, gloves, bracelets, rings
or other jewellery that could get caught in moving parts. Wear protective hair covering to
contain long hair.
• Do not operate chuck or lathe while under the influence of drugs, alcohol or any medi-
cation.
• Keep children and visitors away. All children and visitors should be kept a safe distance
from the work area. Make workshop childproof with padlocks, master switches, or by
removing starter keys.
NOTES: Before using the 46-461 Lathe Chuck, read and understand this instruction sheet
and the lathe owner's manual. If you do not have a manual, contact the supplier of your lathe
to obtain one before using the lathe and chuck. User must be professionally trained to use
this chuck. Vocational school courses recommended. As with other chucking methods, an
extremely cautious and sensible approach is necessary. With the 46-461 Lathe Chuck it is not
possible to give exact directions as to the amount of tightening pressure required for work-
holding. Closely follow strict guidelines in this manual for different jaw types on wood blank
46-461
diameters and length, plus turning speed.
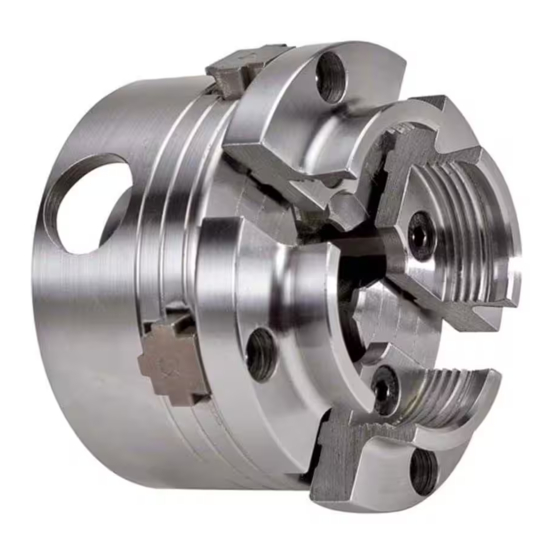
CoNTeNTS (fIg. 1)
A. Chuck body
B. Set screw
C. 3 mm hex wrench (for set screw)
D. 2" (50 mm) chuck jaws (4)
E. 4 mm hex wrench (for countersunk screws)
F. 6mm countersunk screws (8)
G. Wormwood screw
H. Chuck key
ASSeMBLy of MAIN CHUCK BoDy (fIg. 2-3)
The chuck is made to fit a lathe spindle with a 1"- 8 TPI.
NOTE: Check that the chuck thread specification matches the lathe spindle thread you have.
This is important for accuracy. The chuck body must contact an accurate register on lathe,
either a shoulder on a spindle or the bearing face to ensure the chuck will run true. If further
modifications are needed (e.g. spacer) these are the responsibility of the user. A good check is
to see whether it screws home the same as a faceplate or similar spindle fitting.
To assemble the chuck to your lathe:
1. Screw the chuck body (A) to the headstock (or spindle nose).
2. Lock chuck to headstock with set screw (B). Insert set screw at hole (I) and tighten securely.
ASSeMBLy of INCLUDeD 2" (50 mm) CHUCK JAWS (fIg. 1, 4)
Attaching Jaws
1.
First, wipe clean all jaw slides (J), especially the contact surfaces.
2.
Jaw slides are numbered one to four and have a corresponding jaw (D) of the same number.
This may be represented by dots if numbers are not present. (For example, three dots would
go with the number "3" etc.)
3.
Place a jaw on its correct jaw slide and position it into the groove, matching the holes in the
jaw with the holes in the jaw slide. The first few times, you may need to geNTLy tap the jaws
into the locater slot with a block of wood or plastic mallet.
4.
Place 6 mm countersunk screws (F) in jaws and screw them to finger tightness. When both
screws are in, tighten fully and then loosen half a turn.
5.
Repeat this to the remaining three jaws. Next, using the chuck key (H), scroll all jaws to the
middle until they come together. With all jaws touching and with equal pressure on each, tighten
all screws. This will eliminate any run out.
6.
Ensure that there are no gaps between the jaws. (If a gap does appear, it is probably because
a jaw is on its wrong number.)
Removing Jaws
1.
Using the 4 mm Allen key supplied, unscrew all 6 mm countersunk screws (there are eight of
them). The jaws will come away once these screws are released.
2.
Sometimes due to dust particle build up (after heavy turning) the jaws may need a very light
tap with a plastic hammer to dislodge them.
3.
It is important to keep them in their set and not mixed up with other jaws of the same type.
CHUCK oPeRATIoN (fIg. 5)
To open and close jaws, insert chuck key (H) Fig. 5 into hole in chuck body and twist key
clockwise to open jaws and counter-clockwise to close. The jaw slides are equipped with an
auto-stop feature that prevents them from being removed.
USINg THe WooDWoRM SCReW (fIg. 6, 7)
ing operations.
Place the boss section (X) of the woodworm screw (G) into the center of the chuck and close
jaws into the slots. Before final tightening make sure that the front of the boss section of the
screw is seated behind and against the 2" (50mm) jaws (Y). This will prevent any tendency
for the boss section to creep forward when the screw is being used. Thread the pre-drilled
workpiece onto the woodworm screw until it is seated firmly against the jaws. Recommended
pre-drill size is 9/32" (7mm) for soft woods and 5/16" (8mm) for hard woods.
NOTE: In Fig. 7, the chuck is shown with one jaw slide removed for clarity only. Do not use
woodworm screw without all four slides in place and tightened securely.
The woodworm screw provides 39/64" (15.5 mm) of thread beyond the jaws. Irregular, rough tree
blanks (e.g. small sections of tree limbs) not exceeding the sizes below can be held quite firmly
but caution must be exercised. Check for adequate contact. Do not use the screw for very large
wood blanks. It is intended for small bowl and screw chucking work. The maximum capacity
which should be mounted on the screw is 10" (250 mm) diameter by 4" (100 mm) depth. Do not
exceed 600 rpm for this operation, and use tailstock with a live center for support.
DO NOT USE this chuck unless it is properly fitted to spindle.
Tighten set screw (B) securely before turning in reverse.
To avoid personal injury, do not use the woodworm screw (G) for reverse turn-
Advertisement
Table of Contents

Related Manuals for Delta 46-461


Summary of Contents for Delta 46-461
- Page 1 Vocational school courses recommended. As with other chucking methods, an extremely cautious and sensible approach is necessary. With the 46-461 Lathe Chuck it is not possible to give exact directions as to the amount of tightening pressure required for work- holding.
- Page 2 We cannot guarantee repairs made or attempted by others. MAINTENANCE You can also write to us for information at Delta Machinery, 4825 Highway 45 North, Jackson, To reduce the risk of injury, turn unit off and disconnect it from power source Tennessee 38305 - Attention: Product Service.
- Page 3 To register your tool for warranty service visit our website at www.deltaportercable.com. en marche. Delta will repair or replace, at its expense and at its option, any new Delta machine, machine • Pour obtenir une plus grande expansion, les mâchoires coulissantes peuvent dépasser part, or machine accessory which in normal use has proven to be defective in workmanship le corps du mandrin d’environ 6,35 mm (1/4 po), le cas échéant.
- Page 4 Cette fonction est prévue pour le façonnement de bols et de plats au tour lorsque le diamètre Cette garantie constitue la seule garantie de Delta et le recours exclusif des clients en ce qui de la pièce de bois brut n’est pas plus grand que 4 po (100 mm). Dans le cas de pièces de bois concerne les produits défectueux ;...
- Page 5 (H) para deslizar todas las mordazas hacia el medio hasta que se junten. Cuando NOTAS: Antes de utilizar el portabrocas para torno 46-461 lea y comprenda esta hoja de todas las mordazas se toquen, aplique la misma presión sobre ellas y ajuste todos los instrucciones y el manual del usuario del torno.
- Page 6 Delta rechaza expresamente todas las demás com para tener acceso a una lista de centros de servicio o llame a la línea de ayuda de Delta garantías, expresas o implícitas, tanto de comerciabilidad como de idoneidad para un propósito o de Machinery al 1-800-223-7278.
Need help?
Do you have a question about the 46-461 and is the answer not in the manual?
Questions and answers