Table of Contents
Advertisement
Foreword
Precautions
Because this product is an open device, it must be installed in a dustproof, moisture-resistant,
shock/impact-resistant case before use. Protective measures (such as only special tools or a
key can open the case) should be used to prevent operation by non-maintenance personnel or
accidental impacts, which may cause risk and damage.
Note: Please comply with the precautions in this user guide. If failure to comply with these
precautions and guidelines cause the controller or peripheral products to malfunction, this may
lead to such severe consequences as fire or shocks and even injury or death.
Note: Shock hazard! To avoid electric shocks, after the device has been powered up, please do
not touch the AC power terminals. When checking the input power, make sure that power is off.
To avoid personal injury and damage to other equipment, because this product is an open
device, please avoid using in hazardous application situations. Please install this device on
equipment with fail safe protective devices.
This device is not equipped with a power switch or fuses. This products application system
should therefore have a switch or circuit-breaker, and the switch or circuit-breaker must be in
locations easily accessible to operators and have clearly visible on-off markings.
To avoid the danger caused, in the same expansion cassette or I/O expansion module, when a
channel is connected to high voltage, other channels cannot be connected to a safe low voltage
circuit.
Précautions
Comme ce produit est un appareil ouvert, il doit être installé dans un boîtier étanche à la
poussière, à lhumidité et aux chocs / chocs avant utilisation. Des mesures de protection (telles
que seuls des outils spéciaux ou une clé peuvent ouvrir le boîtier) doivent être utilisées pour
empêcher le fonctionnement par du personnel non chargé de la maintenance ou des chocs
accidentels, qui peuvent entraîner des risques et des dommages.
Remarque: veuillez respecter les précautions de ce guide de lutilisateur. Si le non -respect de
ces précautions et directives entraîne un dysfonctionnement du contrôleur ou des produits
périphériques, cela peut entraîner des conséquences graves comme un incendie ou des chocs
et même des blessures ou la mort.
Remarque: risque délectrocution! Pour éviter les chocs électriques, une fois que lappareil a été
mis sous tension, veuillez ne pas toucher les bornes dalimentation CA. Lors de la vérification
de la puissance dentrée, assurez -vous que lalimentation est coupée.
Pour éviter des blessures corporelles et des dommages à dautres équipements, car ce produit
est un appareil ouvert, veuillez éviter de lutiliser dans des situations dapplication dange reuses.
Veuillez installer cet appareil sur un équipement doté de dispositifs de protection à sécurité
intégrée.
Cet appareil nest pas équipé dun interrupteur dalimentation ou de fusibles. Le système
DTM temperature controller operating manual
Advertisement
Table of Contents

Related Manuals for Delta DTM Series


Summary of Contents for Delta DTM Series
- Page 1 Foreword Precautions Because this product is an open device, it must be installed in a dustproof, moisture-resistant, shock/impact-resistant case before use. Protective measures (such as only special tools or a key can open the case) should be used to prevent operation by non-maintenance personnel or accidental impacts, which may cause risk and damage.
- Page 2 Foreword dapplication de ce produit doit donc avoir un interrupteur ou un disjoncteur, et linterrupteur ou le disjoncteur doit être dans des endroits facilement accessibles aux opérateurs et avoir des marquages marche-arrêt clairement visibles. Pour éviter le danger causé, dans la même cassette dextension ou le même module dextension E / S, lorsquun canal est connecté...
- Page 3 Foreword installed. 15. To avoid possible damage due to different system voltages, confirm that the contacts on each expansion cartridge or I/O expansion module are the same voltage as the system. 16. All measurement expansion modules, expansion cartridges, and I/O expansion modules must be compatible with the DTM system.
-
Page 4: Table Of Contents
DTM Temperature Controller Operating Manual V3.0 Contents Chapter 1: Product Introduction 1.1 Product Overview ......................1-1 1.2 Product Features ......................1-1 1.3 External Appearance of Product and Names of Parts ........... 1-2 1.4 Purchase Information ....................... 1-3 1.5 Product Dimensions ......................1-4 Chapter 2: Specifications and System Configuration 2.1 Electrical Specifications .................... - Page 5 3.2.2 Input Error Settings ....................3-4 3.3 Other Input Function Settings ..................3-5 3.3.1 Channel Disabled ....................3-5 3.3.2 Temperature Units ....................3-5 3.3.3 Cold Junction Compensation Selection ..............3-6 3.3.4 Input channel status ....................3-7 Chapter 4: Output and Alarm Function Configuration 4.1 Output Functions ......................
- Page 6 6.4 Multi-loop control function ....................6-11 6.4.1 Enable Multi-loop control function ................6-11 6.4.2 Input channel assignment description ................ 6-12 6.4.3 Auto multi-loop control function description ..............6-13 6.4.4 Manual multi-loop control function ................6-14 6.4.5 Auxiliary SV and auxiliary output percentage ............. 6-15 6.4.6 Read the auxiliary output percentage of the output channel ........
-
Page 7: Chapter 1: Product Introduction
1.2 Product Features The DTM series is a multi-loop modular temperature controller, and its modular design can facilitate installation and application by users. The host collects data and input channels are isolated from each other for high communication efficiency and measurement stability. Users can also define functions, and assign communications function addresses. -
Page 8: External Appearance Of Product And Names Of Parts
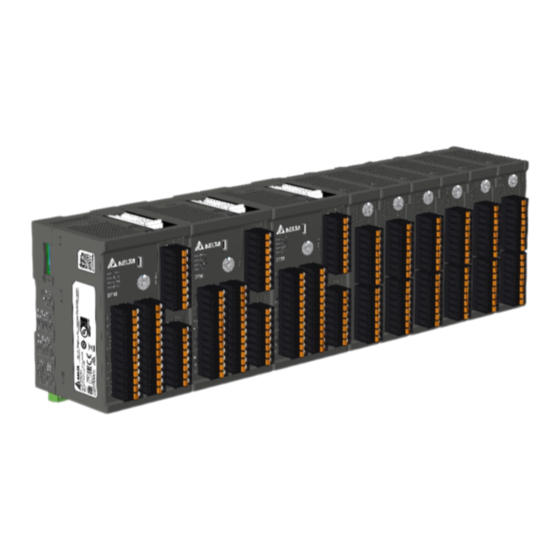
Chapter 1: Product Introduction 1.3 External Appearance of Product and Names of Parts Measurement Host Serial Name LED status light RJ45 connector(left)/ Mini connector(right) Node number selection dial Sensor input terminal Protective cover of expansion output port DIN rail fastener RS485 communications terminal Power input terminal Side protective cover... -
Page 9: Purchase Information
Chapter 1: Product Introduction 1.4 Purchase Information Series name Deltas DTM series temperature controller (includes side protective cover) R = USB + RS485 1 Communications interface E = Ethernet + RS485 04 = 4 channel 2 Number of input channels... -
Page 10: Product Dimensions
Chapter 1: Product Introduction 1.5 Product Dimensions Measurement Host (units: mm) Measurement expansion module (units: mm) I/O expansion module (units: mm) DTM temperature controller operating manual... -
Page 11: Chapter 2: Specifications And System Configuration
Chapter 2: Specifications and System Configuration Chapter 2 Specifications and System Configuration 2.1 Electrical Specifications Input power 24V DC Operating voltage 90% ~ 110% of rated voltage Host Max. (maximum number of channels ) 6W + 5W × number of measurement expansion modules in parallel + 3W ×... -
Page 12: Temperature Sensor Type And Temperature Range
Chapter 2: Specifications and System Configuration RS485: support the Modbus protocol with RTU/ASCII communications format Communication Ethernet: support Modbus TCP and Ethernet/IP, IEEE802.3, IEEE802.3u protocol transmission method USB: support USB2.0 communications standard Transmission cable Category 5e shielding 100M (Ethernet) Internal connection Provides internal connection terminals with 24V power and communications signal functions provided... -
Page 13: Performance
Chapter 2: Specifications and System Configuration 2.3 Performance Thermocouple : ±(0.3% FS, +1℃) Temperature display precision Platinum measurement resistance: ±(0.2% FS, +1℃) 0 to 5 VDC: ±(0.3% of reading, +0.03V) 0 to 10 VDC: ±(0.3% of reading, +0.03V) Analog input 0 to 20 mA: ±(0.3% of reading, +0.05mA) precision 4 to 20 mA: (0.3% of reading, +0.04mA) -
Page 14: Station Number Settings
Chapter 2: Specifications and System Configuration 2.4 Station Number Setting Station number Corresponding Module function selection dial station number functions Setting range: 0-F Measurement RS485 station Default settings: 1 1-F, 0=10 host number Measurement Internal station 1~F, 0= invalid expansion module number I/O expansion Internal station... - Page 15 Chapter 2: Specifications and System Configuration Example: The following figure illustrates a set of normal operating DTM group station number settings, DTME08 node no. dial 2 RS485 station number 2 Internal station number 0; DTMN08 node no. dial 2&A No external communication Internal station number 2 & A; different from DO &...
-
Page 16: Rs485/Usb Communications Protocol Settings
DTMR series host models have a USB communication, which can be connected via DTM soft (software and operation manual can be downloaded from Delta website). USB connection is only used for parameter or function setting, because USB has no signal isolation, it cannot be used for long-term monitoring. -
Page 17: Ethernet Communications Protocol Settings
1 Port Transmission method IEEE802.3, IEEE802.3u Cables Category 5e shielding 100M Speed 10/100 Mbps Auto-Defect ICMP, IP, TCP, UDP, DHCP, BOOTP, Modbus Protocol TCP, EtherNet/IP, Delta Configuration Modbus TCP Items Specifications Normal Device type Server Maximum number of connections... - Page 18 Chapter 2: Specifications and System Configuration EtherNet/IP Items Specifications Device type Adapter Normal Topology support Star Maximum number of CIP connections 8 (Servers) (Number of communication lines that can be connected) Maximum number of TCP connections 8 (Servers) CIP Service (Number of devices that can type_ IO be connected)
-
Page 19: Modbus Tcp Communication Standards
Chapter 2: Specifications and System Configuration 2.6.3 MODBUS TCP Communication Standards The supported function codes and communication addresses are the same as RS485. Please refer to the RS485 communication section in Appendix A. Since DTME08 / E04 is an IP address resolution machine, when editing communication instructions, the address of its RS485 station number can be written to any value. -
Page 20: Initial Power On State
Chapter 2: Specifications and System Configuration 2.7 Initial Power on State When the DTM has a main station collection function, it enters the initialization state after power on, and the host will collect the setting parameters of each expansion module via the internal communications bus, which will take approximately 30 sec. -
Page 21: Run/Stop Status At Power On
Chapter 2: Specifications and System Configuration Internal communications error Other error Hx9B8 Hx9B0~Hx9B7 (input channels 1~8) Bit0 There are more than 7 measurement Input temperature value is unstable (any expansion modules input point) Bit1 Main station data collection error Sensor input line is severed or not connected (any input point) Bit2 Internal communications line severed Input sensor error (any input point) -
Page 22: Definitions Of Commonly Used Terms
Chapter 2: Specifications and System Configuration 2.8 Definitions of Commonly Used Terms Abbreviation Definition Present Value Setpoint Value Output Alarm ALM-H Alarm High ALM-L Alarm Low Current Transformer Thermocouple Resistance Temperature Detector 2.9 Restoring Default Settings The DTMs default setting values can be restored using the following steps: Write the value [H1234] to address [Hx25C], and write the value [H1357] to address [Hx25A], turn off power, and turn on power again. -
Page 23: Chapter 3: Input Function Configuration
Chapter 3 Input Function Configuration 3.1 Input Functions The DTM series allows the setting of input channel type as thermocouple pair, resistance temperature detection, analog voltage input, or analog current input. 3.1.1 Input Function Settings Hardware connection: (as shown in the following figure and table) A. -
Page 24: Input Type, Range, And Corresponding Communications Content
Chapter 3: Input Function Configuration Software settings: (communications addresses are shown in the table below) A. Input sensor type: Write the communications address corresponding to the configured value; the settings must be consistent with the hardware-connected sensors B. Input range settings: SV high limit: Depending on the input sensor type and range, set the sensors upper limits;... -
Page 25: Read The Present Value And Setpoint Value
Chapter 3: Input Function Configuration 0V-10V analog input -1999 ~ 19999 0-20mA analog input -1999 ~ 19999 4-20mA analog input -1999 ~ 19999 0-50mV analog input -1999 ~ 19999 Thermocouple C type 0 - 2300°C Table - Input type, range, and the corresponding communications content Note: The default is a K-type thermocouple pair. -
Page 26: Analog Input (Voltage, Current) Applications
Chapter 3: Input Function Configuration 3.1.4 Analog Input (Voltage, Current) Applications When input channels are chosen as having analog voltage or current input, the selected analog input type and range should correspond to the input upper and lower limits of the setting range; After the input measures an analog signal, the system will compare with the setting range before converting the corresponding displayed input value. -
Page 27: Other Input Function Settings
Chapter 3: Input Function Configuration The calculation formula is: Displayed value = measured value * (1 + input error gain value / 1000)+ input error adjustment value Example: The measured value is 25.0°C, input error gain value is 100, and the displayed value is 25.0 * (1 + 100 / 1000)+ 0 = 27.5°C Digital filtering factor Hx030... -
Page 28: Cold Junction Compensation Selection
Chapter 3: Input Function Configuration 3.3.3 Cold Junction Compensation Selection When using a thermocouple sensor, the factory default setting is internal cold contact compensation. The following provides the settings of cold contact compensation as external compensation in special applications. Correspondence between communication address and content is shown in the following table. Name Address Host:... -
Page 29: Input Channel Status
Chapter 3: Input Function Configuration junction compensation. H0007: CH7 is the external cold junction temperature, and the remaining channels are all used compensated by using the temperature value of CH7 as the external cold junction. H0008: CH8 is the external cold junction temperature, and the remaining channels are all used the temperature value of CH8 as the external cold junction compensation. -
Page 30: Chapter 4: Output And Alarm Function Configuration
Chapter 4: Output and Alarm Function Configuration Chapter 4 Output and Alarm Function Configuration 4.1 Output Functions Outputs consist of control outputs and alarm outputs. Each channel can provide 2 control outputs and 3 alarm outputs. 4.1.1 Explanation of Output Functions Control outputs: Can be set as heating outputs or cooling outputs. -
Page 31: Output Peak Shift Function Setting
Chapter 4: Output and Alarm Function Configuration OUT1 control action Hx0C8 Hx0C9 Hx0CA Hx0CB Hx0CC Hx0CD Hx0CE Hx0CF OUT2 control action Hx0D0 Hx0D1 Hx0D2 Hx0D3 Hx0D4 Hx0D5 Hx0D6 Hx0D7 OUT1 upper limit Hx0E8 Hx0E9 Hx0EA Hx0EB Hx0EC Hx0ED Hx0EE Hx0EF OUT1 lower limit Hx0F0 Hx0F1... -
Page 32: Alarm Functions
Chapter 4: Output and Alarm Function Configuration Note: x indicates internal station number. Example: As shown in the figure below, if it is wished to assign the [output 2 of input channel 1] of the measurement expansion module at internal station 2 to [channel 1] of the I/O expansion module of internal station 4, write the content of [H0040] to address [H2198]. - Page 33 Chapter 4: Output and Alarm Function Configuration D. Alarm functions -hold: When an alarm is activated, the alarm signal will continue until the turn-off control is used E. alarm functions -record peak: Can record the highest or lowest temperature values after the alarm function being set Configuring Alarm output functions...
-
Page 34: Alarm Function Settings
Chapter 4: Output and Alarm Function Configuration Configuring Alarm output functions Alarm mode values control is implemented, the corresponding alarm will be generated when in a Stop state. Programmable End action: When the programmable control is implemented, the corresponding alarm will be generated when in a End state. - Page 35 Chapter 4: Output and Alarm Function Configuration ALM3 option Hx080 Hx081 Hx082 Hx083 Hx084 Hx085 Hx086 Hx087 ALM1 max. Hx980 Hx981 H982 Hx983 Hx984 Hx985 Hx986 Hx987 ALM1 min. Hx988 Hx989 Hx98A Hx98B Hx98C Hx98D Hx98E Hx98F ALM2 max. Hx990 Hx991 Hx992 Hx993...
-
Page 36: Other Output Function Settings
Chapter 4: Output and Alarm Function Configuration 4.4 Other Output Function Settings 4.4.1 Output Level When Input Sensor Error When the input sensor is abnormal, the DTM host and the measurement expansion module can be set this parameter to make the corresponding output operate. Users can therefore find out from the output level of specific channels which input channels are in an abnormal state (see [Section 2.7.1] for error status communications addresses). -
Page 37: Chapter 5: Control Functions And Operating Instructions
Chapter 5: Control Functions and Operating Instructions Chapter 5 Control Functions and Operating Instructions 5.1 Control Functions This device provides several control modes, including the following: PID, On_Off, programmable PID, Slope control, Automatic/Manual switching. 5.1.1 Explanation of Control Functions PID: When set for heating or cooling output, the program will perform PID calculations on the present value (PV) and setpoint value (SV), and output the results of calculations for use in temperature control. - Page 38 Chapter 5: Control Functions and Operating Instructions Figure – Positive Deadband Figure – Negative Deadband ON_OFF: When set for heating output, if the PV value is greater than the SV value, the output will be [Off]; when the PV value is smaller than the [SV value - adjustment sensitivity configured value], the output will be [On].
- Page 39 Chapter 5: Control Functions and Operating Instructions implementation step is set as Soak as a default. The temperature is first set as the target temperature X, and the temperature is then held at X. The time required for this whole process is T E.
- Page 40 Chapter 5: Control Functions and Operating Instructions Example: The following settings have been made: Pattern 0, steps 0 parameters, SV00=30.0, T00 = 1, pattern 1, step 0 parameters, SV10=100.0, T10 Pattern 0, step 1 parameters, SV01=30.0, T01 = 1, pattern 1, step 1 parameters, SV11=100.0, T11 = Pattern 0, step 2 parameters, SV02=40.0, T02 = 1, pattern 1, step 2 parameters, SV12=60.0, T12 = 1 Pattern 0, step 3 parameters, SV03=40.0, T03 = 1, pattern 1, step 3 parameters, SV13=60.0, T13 = 1 Pattern 0, step 4 parameters, SV04=60.0, T04 = 1, pattern 1, step 4 parameters, SV14=50.0, T14 = 1...
-
Page 41: Control Function Settings
Chapter 5: Control Functions and Operating Instructions B. Switching from manual control to PID control: If the output was 40% before switching from manual control to PID control, the program will take 40% as an initial value in PID calculations after switching to PID, and will generate a new control output Notes: If power to the device is turned off while under manual control status, the original output ... - Page 42 Chapter 5: Control Functions and Operating Instructions J. Wait time: Setting range: 0~999, units: 1 sec K. Step SV: Setting range: -2000~18000, units: 0.1℃ L. Step time: Setting range: 0~900, units: 1 sec M. % OUTx power (Automatic): Read the output operating quantity calculated in each PID control cycle under programmable control N.
- Page 43 Chapter 5: Control Functions and Operating Instructions % OUT1 power Hx278 Hx279 Hx27A Hx27B Hx27C Hx27D Hx27E Hx27F (Automatic) % OUT2 power Hx280 Hx281 Hx282 Hx283 Hx284 Hx285 Hx286 Hx287 (Automatic) Control status Hx248 Hx249 Hx24A Hx24B Hx24C Hx24D Hx24E Hx24F Auto-tuning Hx250...
- Page 44 Chapter 5: Control Functions and Operating Instructions Pattern 0 Pattern 1 Pattern 2 Pattern 3 Pattern 4 Pattern 5 Pattern 6 Pattern 7 Step0 SV Step 0 Hx440 Hx442 Hx444 Hx448 Hx44A Hx44C Hx44E Hx446 Step0 Hx447 setting Hx441 Hx443 Hx445 Hx449 Hx44B...
-
Page 45: Multiple-Group Pid Option Settings
Chapter 5: Control Functions and Operating Instructions 5.2 Multiple-group PID Option Settings When under PID control, the system provides 4 PID groups and 7 parameters (group SV value, proportional band, integration time, derivative time, cooling side proportional band, cooling side integration time, cooling side derivative time) as setting options for users. - Page 46 Chapter 5: Control Functions and Operating Instructions Name Description integral time range: 0 ~ 9,999 PID Group1 Hx503 Hx50B Hx513 Hx51B Hx523 Hx52B Hx533 Hx53B derivative time PID Group1 unit: 0.1 cooling Hx504 Hx50C Hx514 Hx51C Hx524 Hx52C Hx534 Hx53C proportional range: 0 ~ 9,999 band...
- Page 47 Chapter 5: Control Functions and Operating Instructions Name Description Reservation 3 Hx587 Hx58F Hx597 Hx59F Hx5A7 Hx5AF Hx5B7 Hx5BF PID Group4 SV unit: 0.1 Hx5C0 Hx5C8 Hx5D0 Hx5D8 Hx5E0 Hx5E8 Hx5F0 Hx5F8 PID Group4 unit: 0.1 proportional Hx5C1 Hx5C9 Hx5D1 Hx5D9 Hx5E1 Hx5E9 Hx5F1 Hx5F9 range: 0 ~ 9,999 band range: 0 ~ 9,999...
-
Page 48: Chapter 6: Operating Instructions For Other Auxiliary Functions
Chapter 6: Operating Instructions for Other Auxiliary Functions Chapter 6 Operating Instructions for Other Auxiliary Functions 6.1 Self-definition of Functions (Default) 6.1.1 Explanation of Self-definition of Functions (Default) Self-definition of functions (default) refers to the placement of functions commonly used together in the same communications group. - Page 49 Chapter 6: Operating Instructions for Other Auxiliary Functions Internal Automatic Control OUT1 OUT2 H0A30- station Reserved Reserved Reserved control mode control control H0A37 number/ area area area Group mode transfer action action channel H0A38- Reserved Reserved Reserved Reserved Reserved Reserved Reserved Reserved H0A3F...
- Page 50 Chapter 6: Operating Instructions for Other Auxiliary Functions (Group 1) (Group 1) (Group 1) Group SV H0AC8- Reserved Reserved Reserved Reserved Reserved Reserved Reserved value H0ACF area area area area area area area (Group 1) Proportio Integratio Derivative Internal Proportion Integration Derivative nal band...
-
Page 51: Self-Definition Of Functions (Self-Defined)
Chapter 6: Operating Instructions for Other Auxiliary Functions 6.2 Self-definition of Functions (Self-defined) 6.2.1 Explanation of self-definition of functions (self-defined) The self-definition of functions (self-defined) refers to placement of the communication addresses of data content that the user needs to read and to write in a system-designated communications block (H0C00~H1CFF) in accordance with the users needs, and then reading and writing the needed data content from that communications block (H0B00~H1BFF). - Page 52 Chapter 6: Operating Instructions for Other Auxiliary Functions Internal station Device type: Read communication address multiple commands PC (host computer) Perform self-definition of functions After self-definition of functions single command Corresponding communications block Communications address definition block Data content read block Figure -Schematic diagram of self-definition of functions (self-defined) Note: The arrangement of group field content of self-definition of functions (self-defined) will affect the communication efficiency.
- Page 53 Chapter 6: Operating Instructions for Other Auxiliary Functions Group1 Group2 Group3 Group4 Group1 Group2 Group3 Group4 Left picture: the best order Right picture: the poor order DTM temperature controller operating manual...
-
Page 54: Ct Alarm Functions
Chapter 6: Operating Instructions for Other Auxiliary Functions 6.3 CT Alarm Functions 6.3.1 Explanation of CT Alarm Functions Each channel in the DTM system and measurement expansion modules provides two CTs (CT1, CT2); When a user wishes to use CT functions, there are two methods that can be used to check the current: The first method consists of directly performing CT current detect of the corresponding station number CT module (see item g. - Page 55 Chapter 6: Operating Instructions for Other Auxiliary Functions Figure - Schematic diagram of CT use (in the left figure, CT2s output 2 is an IO expansion module; in the right figure, CT2s output 2 is an expansion ca ssette) D. Designated CT channels: (communication addresses are shown in the table below) Depending on the DTM host or measurement expansion module to be assigned, in accordance with the internal station number (y: 1~F) and channel (z: 0~7), write the content of H00yz to the corresponding communication address...
- Page 56 Chapter 6: Operating Instructions for Other Auxiliary Functions Table –Communications content of CT mode settings Notes: y is the internal station number of DTM-CT030. F. Read the CT current value: (communication addresses are shown in the table below) According to the different monitoring requirements for CT current, DTM provides three different modes of current measurement.
- Page 57 Chapter 6: Operating Instructions for Other Auxiliary Functions G. CT current value when output is ON or OFF: (communication addresses are shown in the table below) Read the current value of the corresponding channel according to the internal station number of DTM-CT030.
-
Page 58: Multi-Loop Control Function
Chapter 6: Operating Instructions for Other Auxiliary Functions 6.4 Multi-loop control function The multi-loop control function provides users with the option of controlling multiple sets of outputs with one master loop, which can save a large number of sensors and complicated wiring in specific applications. After the user switches the DTM host to the multi-loop control function mode, the original standard mode is no longer applicable to the output setting and control mode of the output expansion module, and special output setting and control mode will be used. -
Page 59: Input Channel Assignment Description
Chapter 6: Operating Instructions for Other Auxiliary Functions 6.4.2 Input channel assignment description After enable the multi-loop control mode, you must first allocate the input channel of measurement devices corresponding to each output channel of the output expansion module. The position of the input channel of the measurement host and expansion module is expressed: xy, x=0~F (internal station number);... -
Page 60: Auto Multi-Loop Control Function Description
Chapter 6: Operating Instructions for Other Auxiliary Functions Note: In the above table, x is the internal station number of the measurement host or measurement expansion module. If the output points of the same output expansion module are allocated to the measurement host and the measurement expansion module at the same time, the corresponding communication addresses of the measurement host and the measurement expansion module must be read and written separately. -
Page 61: Manual Multi-Loop Control Function
Chapter 6: Operating Instructions for Other Auxiliary Functions Notes: 1. In the above table, x is the internal station number of the measurement host or measurement expansion module. If the output points of the same output expansion module are allocated to the measurement host and the measurement expansion module at the same time, the corresponding communication addresses of the measurement host and the measurement expansion module must be read and written separately. -
Page 62: Auxiliary Sv And Auxiliary Output Percentage
Chapter 6: Operating Instructions for Other Auxiliary Functions 6.4.5 Auxiliary SV and auxiliary output percentage In auto multi-loop control mode and manual multi-loop control mode, each output channel of the output expansion module needs to write the auxiliary SV value and the auxiliary output percentage. Auxiliary SV value and auxiliary output percentage use the same communication address section, but they will not be used at the same time due to different setting modes. -
Page 63: Read The Auxiliary Output Percentage Of The Output Channel
Chapter 6: Operating Instructions for Other Auxiliary Functions 6.4.6 Read the auxiliary output percentage of the output channel In the auto multi-loop control mode, each output channel only needs to be written into the auxiliary SV value. If you need to confirm the actual output percentage of the output channel, you can read the auxiliary output amount of each output channel from the address in the following table. -
Page 64: Dtm-Dox
Chapter 6: Operating Instructions for Other Auxiliary Functions 6.5 DTM-DOX 6.5.1 Control output The 16 points of control output is divided into H and L groups with 8 points each.。 16 points of output are all OPEN DRAIN output types, with 50mA short-circuit current limiting ... -
Page 65: Chapter 7: Appendix
Chapter 7: Appendix Chapter 7 Appendix 7.1 RS485 & Ethernet Communications 7.1.1 Comm. commands for DTM Host and Measurement Expansion Module Before turning on power to the DTM host, first set dip switches, station number addresses, and all attribute expansion module station number addresses. Function code (Function): H03 = read the register content, up to 64 words;... - Page 66 Chapter 7:Appendix Name Description Bit0: standby ALM3 refer to Chapter Hx070 Hx071 Hx072 Hx073 Hx074 Hx075 Hx076 Hx077 action unit: 1s ALM3 delay Hx078 Hx079 Hx07A Hx07B Hx07C Hx07D Hx07E Hx07F range: 0~100 Bit3: PV peak value ALM3 Bit2: hold Hx080 Hx081 Hx082...
- Page 67 Chapter 7: Appendix Name Description 20s) Sensor fail OUT1 unit: 0.1 % Hx100 Hx101 Hx102 Hx103 Hx104 Hx105 Hx106 Hx107 power level OUT2 unit: 0.1(PV unit) control Hx118 Hx119 Hx11A Hx11B Hx11C Hx11D Hx11E Hx11F range: 0 ~ 9,999 hysteresis OUT2 power range: 0.1 %...
- Page 68 Chapter 7:Appendix Name Description channel Bit3~0: channel location 0: Stop 1: Run Control 2: Program ends Hx248 Hx249 Hx24A Hx24B Hx24C Hx24D Hx24E Hx24F status 3: Program pause 0: Stop Auto-tuning Hx250 Hx251 Hx252 Hx253 Hx254 Hx255 Hx256 Hx257 1: In progress PV value unit: 0.1 Hx268...
- Page 69 Chapter 7: Appendix Name Description Record lowest Hx988 Hx989 Hx98A Hx98B Hx98C Hx98D Hx98E Hx98F ALM1 min. alarm value Record highest Hx990 Hx991 Hx992 Hx993 Hx994 Hx995 Hx996 Hx997 ALM2 max. alarm value Record lowest Hx998 Hx999 Hx99A Hx99B Hx99C Hx99D Hx99E Hx99F...
- Page 70 Chapter 7:Appendix Measurement Expansion module: H0000: CH1 ~ CH8 are all used internal cold junction compensation. (factory default) H0009: CH1 ~ CH8 are all compensated by the external cold junction temperature transmitted from the DTM host. H0001: CH1 is the external cold junction temperature, and the remaining channels are all used the temperature value of CH1 as the external cold junction compensation.
-
Page 71: Operating Commands For Expansion Cassette Series
Chapter 7: Appendix 7.1.2 Operating Commands for Expansion Cassette Series Output adjustment value settings for DTM-BDC or DTM-BDL expansion cassette (see Section 1.4 for device types) that can be calibrated. Analog output current adjustment increment: 1μA/scale; Analog output voltage adjustment increment: 1mV/scale Name Description... -
Page 72: Dtm-Ct Series Accessory Operating Commands
Chapter 7:Appendix 7.1.4 DTM-CT Series Accessory Operating Commands When DTM-CT is combined with output status and alarm setting, there are the following distinctions according to the value written in Hx262: Set the content of address Hx262 to 0: According to DTM host or measurement expansion module corresponding to the CT channel, when the output is on, the CT alarm current value is measured;... -
Page 73: Programmable Control Planning Table Parameter Settings
Chapter 7: Appendix 7.1.5 Programmable Control Planning Table Parameter Settings Name Description Step remaining Unit: sec Hx2B0 Hx2B1 Hx2B2 Hx2B3 Hx2B4 Hx2B5 Hx2B6 Hx2B7 time(sec) Step remaining Unit: min Hx2B8 Hx2B9 Hx2BA Hx2BB Hx2BC Hx2BD Hx2BE Hx2BF time(min) Pattern status 0 ~ 7 Hx290 Hx291... -
Page 74: Pid Group Parameter Settings
Chapter 7:Appendix 7.1.6 PID Group Parameter Settings Name Description PID Group1 SV unit: 0.1 Hx500 Hx508 Hx510 Hx518 Hx520 Hx528 Hx530 Hx538 PID Group1 unit: 0.1 proportional Hx501 Hx509 Hx511 Hx519 Hx521 Hx529 Hx531 Hx539 range: 0 ~ 9,999 band PID Group1 range: 0 ~ 9,999 Hx502... -
Page 75: Modbus Communications Function Code
Chapter 7: Appendix Name Description time PID Group3 cooling range: 0 ~ 9,999 Hx586 Hx58E Hx596 Hx59E Hx5A6 Hx5AE Hx5B6 Hx5BE derivative time Reservation 3 Hx587 Hx58F Hx597 Hx59F Hx5A7 Hx5AF Hx5B7 Hx5BF PID Group4 SV unit: 0.1 Hx5C0 Hx5C8 Hx5D0 Hx5D8 Hx5E0 Hx5E8 Hx5F0 Hx5F8 PID Group4 unit: 0.1 proportional... - Page 76 Chapter 7:Appendix Read command Read reply string Write command Write reply string (word) ‘0’ ‘4’ content ‘3’ content ‘3’ ‘0’ ‘0’ ‘E’ ‘E’ ‘2’ ‘0’ ‘8’ ‘8’ Address H1001 LRC1 check ‘B’ ‘0’ LRC1 check code ‘F’ LRC1 check ‘F’ Data content code code...
- Page 77 Chapter 7: Appendix CRC highest bit H15 CRC check code: RTU uses CRC to perform error checking. The following is an explanation of calculation steps and example program: Step 1: Enter the 16-bit register of content consisting of FFFFH, and term it the "CRC" register. Step 2: Perform the Exclusive OR operation on the first byte of the command information and the least byte of the 16-bit CRC register, and return results to the CRC register.
-
Page 78: Installation Method
Chapter 7:Appendix 7.2 Installation Method 7.2.1 Host Host installation Attach with DIN Rail fastener Hang the DIN Rail fastener at the top of the controller diagonally on the DIN Rail Press down on the DIN Rail fastener at the bottom of the controller to lock it Confirm that the DIN Rail fastener is correctly fastened Removal from Host Use a flat screwdriver or other tools to insert into the DIN Rail fasteners square hole. -
Page 79: Expansion Cassette
Chapter 7: Appendix 7.2.2 Expansion Cassette Note: When adding/replacing an expansion cassette, make sure power has been shut off to the Host, and power up the Host after installation. The products in this series do not support hot swapping; please perform installation only after power has been turned off. - Page 80 Chapter 7:Appendix Installing a cassette Push the cassette fastener until it is facing the OPEN location Insert the cassette in the direction shown in the diagram, and push until it is in the lowest position Push the cassette fastener until it is facing the LOCK position, which completes cassette attachment Removing a cassette Push the cassette fastener until it is facing the OPEN location, and remove the cassette...
-
Page 81: Measurement Expansion Module, I/O Expansion Module
Chapter 7: Appendix 7.2.3 Measurement Expansion Module, I/O Expansion Module Notes: If a measurement expansion module and I/O expansion module must be used at the same time, complete installation of the measurement expansion module before installing the I/O expansion module When installing expansion modules, make sure to fit them on the expansion channel guides in order to ensure correct installation When adding/replacing a measurement expansion module or I/O expansion module, make sure power has been... -
Page 82: Installation Guidelines
Chapter 7:Appendix Replacing a module Use a flat screwdriver or other tools to open the DIN Rail fasteners Replace the modules in the direction shown in the diagram. Make sure to fit them on the expansion channel guides in order to ensure correct replacement Ethernet and Internet connection: Notes: Connect CAT-5e network cable to the DTME08 or DTME04 RJ-45 port, as shown in the... -
Page 83: Terminal Configuration Diagram
Chapter 7: Appendix 7.2.5 Terminal Configuration Diagram Host and measurement expansion modules - external contacts of input terminals Host - external contacts of power and communications terminals DTM temperature controller operating manual 7-19... - Page 84 Chapter 7:Appendix I/O expansion modules: I/O expansion modules: I/O expansion modules: Relay I/O expansion modules: CT Linear current, linear voltage, open drain(DOX) pulse voltage Expansion cassettes: Expansion cassettes: Relay Linear current, linear voltage, pulse voltage DTM temperature controller operating manual 7-20...
-
Page 85: Ethernet/ Ip Software Setting
Chapter 7: Appendix 7.3 Ethernet/ IP Software Setting This chapter describes how to set up DTME series models through Delta communication software DCISoft, and explains the fields on each setting page. Before opening the setting page, DCISoft must first select Ethernet in the communication settings. After the setting is complete, you can open the DTME series model setting page through broadcast search and specified IP search. - Page 86 Click the “Search” icon in DCISoft to search for all Delta’s Ethernet products on the network by search function. The modules found are displayed in the left-hand side column, and the device list of all modules is displayed on the right-hand side column.
- Page 87 Chapter 7: Appendix Click the module you need in the left-hand side column to display the device list of the module in the right-hand side column. Double click the device on the right-hand side column to enter the setup page of the device. The setup page for DTMEXX DTM temperature controller operating manual 7-23...
- Page 88 Chapter 7:Appendix Search for Designated Module Click “Communication Card” in the left-hand side column. Right click the mouse and select “Configure” to search for the designated module. Select DTME to be searched. Click “OK” and DCISoft will start to search for the existing DTME cards on the network.
- Page 89 Chapter 7: Appendix Device list of the existing DTME Search for Designated IP If the device and PC are not on the same local area network, or the communication card cannot be found by broadcasting, please use the specified IP method to search. Set the communication type to “Ethernet”...
-
Page 90: Basic Settings
Chapter 7:Appendix Click “IP Search” icon to start searching for the designated IP. The DTMEXX found is displayed in the right-hand side column. Double click the device to be set up to enter its setup page. 7.3.2 Basic Settings The basic settings include the settings for device name, network and timer. The basic ... - Page 91 Chapter 7: Appendix Device name There can be many DTMEXX cards on the network. Therefore, you can set up a device name for the module to be controlled to identify it when you need to search for it. Network setup (1)IP Configuration: There are 2 types of IP configuration: Static IP and DHCP.
-
Page 92: Network Settings
Chapter 7:Appendix 7.3.3 Network Settings The first step for all the equipment to connect to the network is to have its own IP (Internet Protocol) address. The IP address is like a number for every device on the network to be identified. Setting up static IP of the PC ... - Page 93 Chapter 7: Appendix Click to enter the contents of Internet Protocol Version 4 (TCP / IP), as shown in the figure The IP address can be set to 192.168.0.1. After clicking "OK", the IP address setting of the PC is completed.
-
Page 94: Ip Filter
Chapter 7:Appendix 7.3.4 IP Filter The IP filter is used for restricting the connection of the network in case some uncertain IP will cause errors. Only the IP set within the allowed range can establish the connection; other IPs will be rejected. Setting up IP filter ... -
Page 95: Security
Chapter 7: Appendix 7.3.5 Security After you set up all the functions and network environment for DTMEXX, to prevent the set values from being modified, you can set up passwords to lock the settings in DTMEXX. Setting up password 1. -
Page 96: Returning To Default Settings
Chapter 7:Appendix 7.3.6 Returning to Default Settings For the setting of DTME, if you want to clear all the previous settings and return to the default settings, you can check the option of returning to default settings on the page of returning to default settings. Setting up factory setting ... -
Page 97: Application Examples
Chapter 7: Appendix 7.3.7 Application Examples Set up and Clear Password Application Using DCISoft to set up and clear the password in DTMEXX Steps Set up password in DTMEXX. Unlock DTMEXX. Clear password in DTMEXX. See 7.3.1 for the connection and communication settings. Open the setup pages for DTMEXX and switch to “Security”... - Page 98 Chapter 7:Appendix Check “Modify” and enter password “1234” into the “Password” and “Confirm Password” columns. Click “Apply” to save the password. Reopen the setup page, and all the settings are now locked by password. Enter the password and click “OK”. DTM temperature controller operating manual 7-34...
- Page 99 Chapter 7: Appendix Enter the password to unlock the settings and modify parameters. If you close the setup page now, the settings will remain being locked. To clear the password, leave the password columns blank and click “Apply”. After the password is cleared, you can then modify parameters. DTM temperature controller operating manual 7-35...
- Page 100 Chapter 7:Appendix IP Filter Protection Application Setting up IP filter protection (1) IP of DTMEXX: 192.168.0.4 Steps (2) Only allow 192.168.0.7 and 172.16.0.1~172.16.0.254 to establish See 7.3.1 for the connection and communication settings. Open the setup page for DTMEXX and switch to “IP Filter” page. Check “Enable IP Filter”.
- Page 101 Chapter 7: Appendix Enter “172.16.0.1” in No.2 Begin IP Address and “172.16.0.254” in End IP Address. Click “Apply”, then only equipment within the allowed IP range can be connected. Enter “172.16.0.1” in No.2 Begin IP Address and “172.16.0.254” in End IP Address. Click “Apply”, then only equipment within the allowed IP range can be connected.
-
Page 102: Product Service
After selecting Software among download categories, press Begins search This will let you download the DTM Soft installation file For more temperature control product data and product Q&A, visit the Delta websites download area: or visit our local service windows located worldwide.
Need help?
Do you have a question about the DTM Series and is the answer not in the manual?
Questions and answers