Rigol DG1032Z Manual
Function/arbitrary waveform generator
Hide thumbs
Also See for DG1032Z:
- User manual (180 pages) ,
- Performance verification manual (55 pages) ,
- Quick manual (37 pages)
Table of Contents
Advertisement
Advertisement
Chapters
Table of Contents

Related Manuals for Rigol DG1032Z


Summary of Contents for Rigol DG1032Z
- Page 1 RIGOL 快速指南 DG1000Z 系列 函数/任意波形发生器 2017 年 3 月 RIGOL TECHNOLOGIES, INC.
-
Page 3: 保证和声明
商标信息 RIGOL 是北京普源精电科技有限公司的注册商标。 文档编号 QGB09006-1110 声明 本公司产品受中国及其它国家和地区的专利 (包括已取得的和正在申请的专利) 保护。 本公司保留改变规格及价格的权利。 本手册提供的信息取代以往出版的所有资料。 本手册提供的信息如有变更,恕不另行通知。 对于本手册可能包含的错误, 或因手册所提供的信息及演绎的功能以及因使用本手册 而导致的任何偶然或继发的损失,RIGOL 概不负责。 未经 RIGOL 事先书面许可,不得影印、复制或改编本手册的任何部分。 产品认证 RIGOL 认证本产品符合中国国家产品标准和行业产品标准及 ISO9001:2008 标准和 ISO14001:2004 标准,并进一步认证本产品符合其它国际标准组织成员的相关标准。 联系我们 如您在使用此产品或本手册的过程中有任何问题或需求,可与 RIGOL 联系: 电子邮箱:service@rigol.com 网址:www.rigol.com DG1000Z 快速指南... -
Page 4: 安全要求
RIGOL 安全要求 一般安全概要 了解下列安全性预防措施,以避免受伤,并防止损坏本产品或与本产品连接的任何产品。 为避免可能的危险,请务必按照规定使用本产品。 使用正确的电源线。 只允许使用所在国家认可的本产品专用电源线。 将产品接地。 本产品通过电源电缆的保护接地线接地。为避免电击,在连接本产品的任何输入或输出端 子之前,请确保本产品电源电缆的接地端子与保护接地端可靠连接。 正确连接探头。 如果使用探头,探头地线与地电势相同,请勿将地线连接至高电压。 查看所有终端额定值。 为避免起火和过大电流的冲击,请查看产品上所有的额定值和标记说明,请在连接产品前 查阅产品手册以了解额定值的详细信息。 使用合适的过压保护。 确保没有过电压(如由雷电造成的电压)到达该产品。否则操作人员可能有遭受电击的危 险。 请勿开盖操作。 请勿在仪器机箱打开时运行本产品。 请勿将异物插入风扇的排风口。 请勿将异物插入风扇的排风口以免损坏仪器。 使用合适的保险丝。 只允许使用本产品指定规格的保险丝。 避免电路外露。 电源接通后,请勿接触外露的接头和元件。 怀疑产品出故障时,请勿进行操作。 如果您怀疑本产品出现故障,请联络RIGOL授权的维修人员进行检测。任何维护、调整 或零件更换必须由RIGOL授权的维修人员执行。 保持适当的通风。 通风不良会引起仪器温度升高,进而引起仪器损坏。使用时应保持良好的通风,定期检查 通风口和风扇。 DG1000Z 快速指南... -
Page 5: 安全术语和符号
RIGOL 请勿在潮湿环境下操作。 为避免仪器内部电路短路或发生电击的危险,请勿在潮湿环境下操作仪器。 请勿在易燃易爆的环境下操作。 为避免仪器损坏或人身伤害,请勿在易燃易爆的环境下操作仪器。 请保持产品表面的清洁和干燥。 为避免灰尘或空气中的水分影响仪器性能,请保持产品表面的清洁和干燥。 防静电保护。 静电会造成仪器损坏,应尽可能在防静电区进行测试。在连接电缆到仪器前,应将其内外 导体短暂接地以释放静电。 正确使用电池。 如果仪器提供电池,严禁将电池暴露于高温或火中。要让儿童远离电池。不正确地更换电 池可能造成爆炸(警告:锂离子电池) 。必须使用 RIGOL 指定的电池。 注意搬运安全。 为避免仪器在搬运过程中滑落,造成仪器面板上的按键、旋钮或接口等部件损坏,请注意 搬运安全。 安全术语和符号 本手册中的安全术语。 警告 警告性声明指出可能会造成人身伤害或危及生命安全的情况或操作。 注意 注意性声明指出可能导致本产品损坏或数据丢失的情况或操作。 产品上的安全术语。 DANGER 表示您如果不进行此操作,可能会立即对您造成危害。 WARNING 表示您如果不进行此操作,可能会对您造成潜在的危害。 CAUTION 表示您如果不进行此操作,可能会对本产品或连接到本产品的其他设备造 成损坏。 产品上的安全符号。 高电压 安全警告 保护性接地端 壳体接地端 测量接地端 DG1000Z 快速指南... -
Page 6: 保养与清洁
RIGOL 保养与清洁 保养 请勿将仪器放置在长时间受到日照的地方。 清洁 请根据使用情况经常对仪器进行清洁。方法如下: 断开电源。 用柔和的清洁剂或清水浸湿软布擦拭仪器外部。清洁带有液晶显示屏的仪器时,请注 意不要划伤 LCD 显示屏。 注意 请勿使任何腐蚀性的液体沾到仪器上,以免损坏仪器。 警告 重新通电之前,请确认仪器已经干透,避免因水分造成电气短路甚至人身伤害。 环境注意事项 以下符号表明本产品符合 WEEE Directive 2002/96/EC 所制定的要求。 设备回收 本产品中包含的某些物质可能会对环境或人体健康有害,为避免将有害物质释放到环境中 或危害人体健康,建议采用适当的方法回收本产品,以确保大部分材料可正确地重复使用 或回收。有关处理或回收的信息,请与当地权威机构联系。 DG1000Z 快速指南... -
Page 7: 文档概述
本手册中通常用 “方括号+文字 (加粗) ” 表示前面板或后面板上的一个连接器。 例如: [Counter]。 操作步骤: 本手册中通常用一个箭头“”表示下一步操作。例如:Sine 频 率 表示按下前面 板上的 Sine 功能键后再按 频率 菜单软键。 文档中的内容约定 DG1000Z 系列函数/任意波形发生器包含 DG1022Z、 DG1032Z 和 DG1062Z 三个型号。 本手册以 DG1062Z 为例,介绍其基本操作。有关更多详细信息,请参考《DG1000Z 系列函数/任意波形发生器用户手册》 。 型号 通道数 最大输出频率 DG1062Z 60MHz DG1032Z 30MHz DG1022Z 25MHz DG1000Z 系列函数/任意波形发生器均具有... -
Page 8: Table Of Contents
RIGOL 目录 保证和声明 ......................I 安全要求 ......................II 一般安全概要 ....................II 安全术语和符号 ....................III 保养与清洁 ...................... IV 环境注意事项 ....................IV 文档概述 ......................V 快速入门 ......................1 一般性检查 ....................... 1 调整手柄 ......................2 外观尺寸 ......................3 前面板概述 ....................... 4 后面板概述 ....................... 9 开机检查... -
Page 9: 快速入门
RIGOL 快速入门 一般性检查 1. 检查运输包装 如运输包装已损坏,请保留被损坏的包装或防震材料,直到货物经过完全检查且 仪器通过电性和机械测试。 因运输造成仪器损坏,由发货方和承运方联系赔偿事宜。RIGOL 公司恕不进行 免费维修或更换。 2. 检查整机 若存在机械损坏或缺失,或者仪器未通过电性和机械测试,请联系您的 RIGOL 经销商。 3. 检查随机附件 请根据装箱单检查随机附件,如有损坏或缺失,请联系您的 RIGOL 经销商。 DG1000Z 快速指南... -
Page 10: 调整手柄
RIGOL 调整手柄 要调整仪器的手柄,请握住仪器两侧的手柄并向外拉。然后将手柄旋转到所需位置。 操作方法如下图所示。 调整手柄 平放位置 移动位置 DG1000Z 快速指南... -
Page 11: 外观尺寸
RIGOL 外观尺寸 正视图 单位:mm 侧视图 单位:mm DG1000Z 快速指南... -
Page 12: 前面板概述
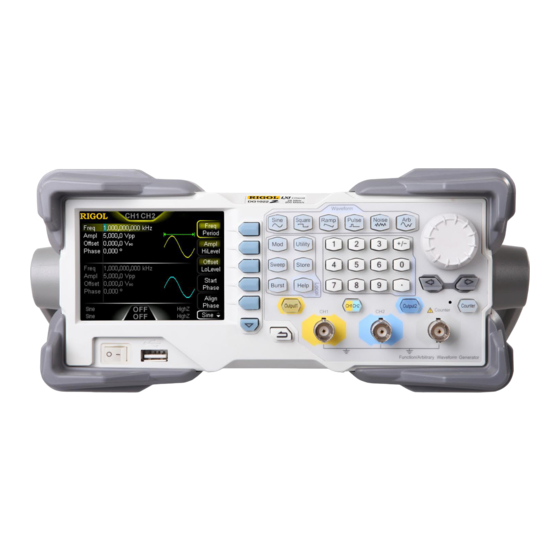
15 14 12 11 图 1 前面板 1. 电源键 用于开启或关闭信号发生器。 2. USB Host 支持 FAT32 格式 Flash 型 U 盘、RIGOL TMC 数字示波器、功率放大器(选件) 和 USB-GPIB 模块(选件) 。 U 盘:读取 U 盘中的波形文件或状态文件,或将当前的仪器状态或编辑的波 形数据存储到 U 盘中,也可以将当前屏幕显示的内容以图片格式(*.Bmp) 保存到 U 盘。 TMC 数字示波器:与符合 TMC 标准的 RIGOL 示波器进行无缝互联,读取... - Page 13 RIGOL 5. CH1 输出连接器 BNC 连接器,标称输出阻抗为 50Ω。 当 Output1 打开时(背灯变亮) ,该连接器以 CH1 当前配置输出波形。 6. CH2 输出连接器 BNC 连接器,标称输出阻抗为 50Ω。 当 Output2 打开时(背灯变亮) ,该连接器以 CH2 当前配置输出波形。 7. 通道控制区 用于控制 CH1 的输出。 — 按下该按键,背灯变亮,打开 CH1 输出。此时,[CH1] 连接 器以当前配置输出信号。 — 再次按下该键,背灯熄灭,此时,关闭 CH1 输出。...
- Page 14 RIGOL 10. 方向键 — 使用旋钮设置参数时,用于移动光标以选择需要编辑的位; — 使用键盘输入参数时,用于删除光标左边的数字。 — 存储或读取文件时,用于展开或收起当前选中目录。 — 文件名编辑时,用于移动光标选择文件名输入区中指定的字符。 11. 旋钮 — 使用旋钮设置参数时,用于增大(顺时针)或减小(逆时针)当前光标处的 数值。 — 存储或读取文件时,用于选择文件保存的位置或用于选择需要读取的文件。 — 文件名编辑时,用于选择虚拟键盘中的字符。 — 在 Arb 选择波形 内建波形 中,用于选择所需的内建任意波。 12. 数字键盘 包括数字键(0 至 9) 、小数点(.)和符号键(+/-) ,用于设置参数。 注意: 编辑文件名时,符号键用于切换大小写。 连续按两次小数点可将用户界面以*.Bmp 格式快速保存至 U 盘。...
- Page 15 RIGOL 提供带宽为 60MHz 的高斯噪声输出。 — 选中该功能时,按键背灯变亮。 — 可以设置噪声的幅度/高电平和偏移/低电平。 提供频率从 1μHz 至 20MHz 的任意波输出。 — 支持采样率和频率两种输出模式。 — 多达 160 种内建波形。 — 选中该功能时,按键背灯变亮。 — 可设置任意波的频率/周期、幅度/高电平、偏移/低电平和起 始相位。 14. 功能键 可输出多种已调制的波形。 — 提供多种调制方式: AM、 FM、 PM、 ASK、 FSK、 PSK 和 PWM。 — 支持内部和外部调制源。 — 选中该功能时,按键背灯变亮。...
- Page 16 RIGOL 该键可用于锁定和解锁键盘。 长按 Help 键,可锁定前面板 按键,此时,除 Help 键,前面板其它按键不可用。再次长 按该键,可解除锁定。 15. 菜单软键 与其左侧显示的菜单一一对应,按下该软键激活相应的菜单。 16. LCD 显示屏 3.5 英寸 TFT(320× 240)彩色液晶显示屏,显示当前功能的菜单和参数设置、 系统状态以及提示消息等内容,详细信息请参考“用户界面”一节。 DG1000Z 快速指南...
-
Page 17: 后面板概述
RIGOL 后面板概述 图 2 后面板 1. CH1 同步/外调制/触发连接器:[CH1/Sync/Ext Mod/Trig/FSK] BNC 母头连接器,标称阻抗为 50Ω,其功能由 CH1 当前的工作模式决定。 — Sync: 打开 CH1 输出时, 该连接器输出与 CH1 当前配置相匹配的同步信号。 — Ext Mod:若 CH1 开启 AM、FM、PM 或 PWM 并且使用外部调制源,该连 接器接收一个来自外部的调制信号。 — FSK:若 CH1 开启 ASK、FSK 或 PSK 并且使用外部调制源,该连接器接收一... - Page 18 RIGOL 3. 10MHz 输入/输出连接器:[10MHz In/Out] BNC 母头连接器,标称阻抗为 50Ω,其功能由仪器使用的时钟类型决定。 — 若仪器使用内部时钟源,该连接器(用作 10MHz Out)可输出由仪器内部晶 振产生的 10MHz 时钟信号。 — 若仪器使用外部时钟源,该连接器(用作 10MHz In)接收一个来自外部的 10MHz 时钟信号。 该连接器通常用于在多台仪器之间建立同步。有关上述各信号的更多详细信息, 请参考本产品用户手册。 4. LAN 接口 用于将信号发生器连接至计算机或计算机所在的网络,进行远程控制。本信号发 生器符合 LXI Core 2011 Device 类仪器标准,可与其他标准设备快速搭建测试系 统,轻松实现系统集成。 5. USB Device 接口 用于与计算机连接,通过上位机软件或用户自定义编程对信号发生器进行控制。 还可与 PictBridge 打印机连接,打印屏幕显示的内容。...
-
Page 19: 开机检查
RIGOL 开机检查 连接电源 请使用附件提供的电源线将信号发生器连接至 AC 电源中,如下图所示。本信号发生 器支持 100-240V,45-440Hz 规格的交流电源。最大输入功率不可超过 30W。当通过 该连接器将信号发生器连接到交流电源时,仪器自动调节至正确的电压范围,无需手 动选择电压范围。 图 3 连接电源 注意 为避免电击,请确保仪器正确接地。 开机 正确连接电源后,按下前面板的电源键 打开信号发生器。开机过程中仪器执行 初始化过程和自检过程。结束后,屏幕进入默认界面。如无法正常开机,请参考“故 障处理”一节处理。 设置系统语言 DG1000Z 系列函数/任意波形发生器支持多种语言菜单。您可以按 Utility Language,选择所需的语言类型。 DG1000Z 快速指南... -
Page 20: 用户界面
RIGOL 用户界面 DG1000Z 的用户界面包括三种显示模式:双通道参数(默认) 、双通道图形和单通道 显示。本手册着重以双通道参数显示模式为例介绍仪器的用户界面。 双通道参数模式 图 4 用户界面(双通道参数模式) 1. 通道输出配置状态栏 显示各通道当前的输出配置。 工作模式: 模拟调制波形: AM/FM/PM/ASK/FSK/PSK/ Sine/Square/Tria/UpRamp/DnRamp/Noise/Arb PWM/ 数字调制极性:Pos/Neg Sweep/Burst Sweep 类型:Linear/Log/Step Burst 类型:Ncycle/Infinite/Gated 所选波形: Sine 调制源的类型: 通道输出状态: 输出阻抗的类型: Ramp Int/Ext ON/OFF 高阻:显示 HighZ Pulse Sweep/Burst 触 负载:显示阻值(默认为 Noise 发源的类型:... - Page 21 RIGOL 2. 当前功能及翻页提示 显示当前已选中功能的名称。例如: “Sine”表示当前选中正弦波功能, “Edit” 表示当前选中任意波编辑功能。此外,功能名称右侧的上、下箭头用来提示当前 是否可执行翻页操作。 3. 菜单 显示当前已选中功能对应的操作菜单。 4. 状态栏 :仪器正确连接至局域网时显示。 :仪器工作于远程模式时显示。 :仪器前面板被锁定时显示。 :仪器检测到 U 盘时显示。 :仪器与功率放大器正确连接时显示。 5. 波形 显示各通道当前选择的波形。 6. 通道状态栏 指示当前通道的选中状态和开关状态。选中 CH1 时,状态栏边框显示黄色;选中 CH2 时,状态栏边框显示蓝色;打开 CH1 时,状态栏中“CH1”以黄色高亮显示; 打开 CH2 时,状态栏中“CH2”以蓝色高亮显示。 注意:可以同时打开两个通道,但不可同时选中两个通道。 7. 频率 显示各通道当前波形的频率。按相应的 频率/周期 使“频率”突出显示,通过...
-
Page 22: 双通道图形模式
RIGOL 双通道图形模式 按 Utility 系统设置 显示设置 显示模式 选择“双通道图形”即可切换为 双通道图形显示模式,如下图所示。 图 5 用户界面(双通道图形模式) 单通道显示模式 按 Utility 系统设置 显示设置 显示模式 选择“单通道显示”即可切换为 单通道显示模式,如下图所示。 图 6 用户界面(单通道显示模式) DG1000Z 快速指南... -
Page 23: 使用内置帮助系统
RIGOL 使用内置帮助系统 DG1000Z 内置帮助系统对于前面板上的每个功能按键和菜单软键都提供了帮助信息。 用户可在操作仪器的过程中随时查看任意键的帮助信息。 1. 获取内置帮助的方法 按下 Help 键, 背灯点亮, 然后再按下你所需要获得帮助的功能按键或菜单软键, 仪器界面显示该键的帮助信息。 2. 帮助的翻页操作 (上一行)/ (下一行)/ (上一 当帮助信息为多页显示时,通过菜单软键 (下一页) 或旋钮可滚动帮助信息页面。 页)/ 3. 关闭当前的帮助信息 当仪器界面显示帮助信息时,用户按下前面板上的返回键 ,将关闭当前显示 的帮助信息并跳转到相应的功能界面。 4. 常用帮助主题 连续按两次 Help 键打开常用帮助主题列表。此时,您可通过按 菜单软键或旋转旋钮滚动列表,然后按 选择 选中相应的帮助信息进行查看。 DG1000Z 快速指南... -
Page 24: 基本操作
RIGOL 基本操作 输出基本波形 DG1000Z 可从单通道或同时从双通道输出基本波形,包括正弦波、方波、锯齿波、脉 冲和噪声。本节主要介绍如何从 [CH1] 连接器输出一个正弦波(频率为 20kHz,幅 度为 2.5Vpp,偏移量为 500mV ,起始相位为 90°) 。 1. 选择输出通道 按通道选择键 CH1|CH2 选中 CH1。此时通道状态栏边框以黄色标识。 2. 选择正弦波 按 Sine 选择正弦波, 背灯变亮表示功能选中, 屏幕右方出现该功能对应的菜单。 3. 设置频率/周期 按 频率/周期 使“频率”突出显示,通过数字键盘输入 20,在弹出的菜单中选 择单位 kHz。 频率范围为 1μHz 至 60MHz。... - Page 25 RIGOL 范围为 0º 至 360º。 7. 启用输出 按 Output1 键,背灯变亮,[CH1] 连接器以当前配置输出正弦波信号。 8. 观察输出波形 使用 BNC 连接线将 DG1000Z 的[CH1]与示波器相连接,下图为由示波器观察到 的波形。 图 7 正弦波 DG1000Z 快速指南...
-
Page 26: 输出任意波
RIGOL 输出任意波 DG1000Z 可从单通道或同时从双通道输出仪器内建或用户自定义的任意波形。 本节主 要介绍如何从 [CH1] 连接器输出一个用户自定义的任意波(点编辑,采样率编辑模 式,高电平:4V,低电平:-2V,初始化点数:8,点 1 至点 4 的电压:4V,点 5 至点 8 的电压:-2V) 。 1. 选择输出通道 按通道选择键 CH1|CH2 选中 CH1。此时通道状态栏边框以黄色标识。 2. 启用任意波功能 按 Arb 键进入任意波设置界面。请先参考“输出基本波形”一章的介绍设置任 意波的频率、幅度、偏移和相位等参数。 3. 编辑任意波 按 Arb 编辑波形 打开任意波编辑菜单。 按 模式 选择“采样率” 。... -
Page 27: 输出谐波
RIGOL 输出谐波 DG1000Z 可作为一款谐波发生器,输出具有指定次数、幅度和相位的谐波。本节将介 绍从 [CH1] 连接器输出 2 次谐波和 4 次谐波,谐波幅度分别为 2Vpp 和 1Vpp,谐波 相位分别为 30°和 50°,谐波次数设为 5。 1. 选择输出通道 按通道选择键 CH1|CH2 选中 CH1。此时通道状态栏边框以黄色标识。 2. 设置基波参数 请参考“输出基本波形”一章的介绍设置基波的频率/周期、幅度/高电平、偏移/ 低电平、起始相位等参数。 3. 启用谐波功能 按 Sine 谐波 选择“打开” 。按 谐波参数 进入谐波设置菜单。 4. 设置谐波次数... -
Page 28: 输出 Am 已调波形
RIGOL 1) 按下 序号,使用数字键盘输入待设置谐波的序号 2,按 确认。 2) 按下 谐波相位,使用数字键盘输入相位的数值 30,然后在弹出的单位菜单 中选择单位°。 3) 参考步骤 1)和 2)设置 4 次谐波的相位为 50°。 8. 启用输出 按 Output1 键,背灯变亮,[CH1] 连接器以当前配置输出基波、2 次和 4 次 谐波。 9. 观察输出波形 使用 BNC 连接线将 DG1000Z 的 [CH1] 连接器与示波器相连接,下图为由示波 器观察到的波形。 图 8 谐波... - Page 29 RIGOL 3. 选择 AM 调制 按 Mod 类型 AM 键,启用 AM 功能。 启用 Mod 时,Sweep 或 Burst 功能将自动关闭(如果当前已打开)。 屏幕下方显示相应配置信息:Int 和 AM。 4. 设置调制波频率 按 调制频率 软键,使用数字键盘输入所需的频率值 200,然后在弹出的单位菜 单中选择所需的单位 Hz。 5. 选择调制波形 按 调制波形 软键,在弹出的波形菜单中选择 Sine。 6. 设置调制深度...
-
Page 30: 输出 Fsk 已调波形
RIGOL 输出 FSK 已调波形 FSK 调制时,信号发生器在两个预置频率(载波频率和跳频频率)间“移动”其输出 频率。本节将介绍从 [CH1] 连接器输出一个 FSK 波形(载波为 3kHz 的正弦波,幅 度为 5Vpp;跳跃频率为 500Hz,调制速率为 100Hz,调制极性为正极性) 。 1. 选择输出通道 按通道选择键 CH1|CH2 选中 CH1。此时通道状态栏边框以黄色标识。 2. 设置载波波形、频率和幅度 载波波形:按 Sine 选择正弦波作为载波波形。 载波频率:按 频率/周期 软键使“频率”突出显示,此时通过数字键盘输 入 3,然后在弹出的菜单中选择单位 kHz。 载波幅度:按 幅度/高电平 软键使“幅度”突出显示,此时通过数字键盘 输入 5,然后在弹出的菜单中选择单位 Vpp。... -
Page 31: 输出 Sweep 波形
RIGOL 输出 Sweep 波形 DG1000Z 可从单通道或同时从双通道输出 Sweep 波形。本节介绍如何从 [CH1] 连 接器输出 Sweep 波形(线性扫描,载波为正弦波,幅度为 5Vpp,频率范围为 50Hz~1kHz,扫描时间为 1s,内部触发源) 。 1. 选择输出通道 按通道选择键 CH1|CH2 选中 CH1。此时通道状态栏边框以黄色标识。 2. 设置 Sweep 的载波波形和幅度 波形:按 Sine 选择正弦波作为载波波形。 幅度: 按 幅度/高电平 软键使 “幅度” 突出显示, 此时通过数字键盘输入 5, 然后在弹出的菜单中选择单位 Vpp。... -
Page 32: 输出 Burst 波形
RIGOL 输出 Burst 波形 DG1000Z 可从单通道或同时从双通道输出具有指定循环数目的波形 (称为 Burst) 。本 节介绍如何从 [CH1] 连接器输出 Burst 波形 (3 个循环, 载波为正弦波, 幅度为 5Vpp, 周期为 1ms,猝发周期为 10ms,内部触发源,延时:1ms) 。 1. 选择输出通道 按通道选择键 CH1|CH2 选中 CH1。此时通道状态栏边框以黄色标识。 2. 设置 Burst 的载波波形、幅度和周期 波形:按 Sine 选择正弦波作为载波波形。 幅度:按 幅度/高电平 使“幅度”突出显示,通过数字键盘输入 5,然后在... -
Page 33: 远程控制
当仪器工作在远程模式时,用户界面显示 图标,前面板按键被锁定(Help 除 外)。此时,您可以按 Help 键退出远程模式。 1. 安装 Ultra Sigma 软件 获取 Ultra Sigma 软件,然后按照指导正确安装软件及所需组件。您可以登录 RIGOL 网站下载最新版本的 Ultra Sigma 软件。 2. 通过 USB 接口远程控制信号发生器 1) 连接设备 使用 USB 数据线连接信号发生器(USB Device)与计算机(USB Host) 。 2) 安装 USB 驱动 本信号发生器为 USB-TMC 设备, 将信号发生器与 PC 正确连接并且开机后 (信... - Page 34 RIGOL 3) 搜索设备资源 打开 Ultra Sigma,软件将自动搜索当前连接到 PC 上的信号发生器资源,您 也可以点击 进行搜索。 4) 查看设备资源 搜索到的资源将出现在 RIGOL Online Resource 目录下,并且显示仪器的型 号和 USB 接口信息,如图 11 所示: 图 11 查看 USB 仪器资源 5) 通讯测试 右击资源名 DG1062Z (USB0::0x1AB1::0x0642::DG1ZA000000000::INSTR) , 选 择 SCPI Panel Control,打开远程命令控制面板,即可通过该面板发送命令和读取数据。 图 12 通过 USB 读写命令...
-
Page 35: 故障处理
5. U 盘设备不能被识别: 检查 U 盘设备是否连接至其他仪器或计算机上可以正常工作。 确认使用的为 FAT32 格式 Flash 型 U 盘设备, 本仪器不支持硬盘型 U 盘设备。 重新启动仪器后,再插入 U 盘设备进行检查。 如果仍然无法正常使用 U 盘,请与 RIGOL 联系。 6. 如何以 dBm 为单位设置波形的幅度? 按 CH1|CH2 键选择所需通道。 检查 Utility 通道设置 输出设置 阻抗 是否为高阻。若是,此时... -
Page 36: 更多产品信息
(4) 确认测试是否处于强磁环境下进行; (5) 检查信号源以及测试系统的供电是否有强干扰; (6) 检查使用的测试设备的性能是否符合要求; (7) 确保使用的测试设备在校准周期内; (8) 检查使用的测试设备是否在其手册要求的工作条件下; (9) 检查所有的连接是否紧固; (10) 查看所有的线缆是否有内部损伤; (11) 确保操作符合性能校验手册要求的设置和流程; (12) 确认误差计算是否有失误; (13) 正确理解本产品对“典型值”的定义:指产品在特定条件下的性能指标。 更多产品信息 您可以使用菜单 Utility 系统信息 获取您的设备信息,包括型号、序列号和软件 版本号,还可查看所有选件的安装状态。 欲了解本产品更多信息,请查阅相关手册(您可登录RIGOL网站(www.rigol.com) 下载)。 《DG1000Z用户手册》:提供本产品的功能介绍及操作方法、远程控制方法、在使用 过程中可能出现的故障及处理方法、性能指标以及订货信息; 《DG1000Z编程手册》:提供本产品的SCPI命令集以及编程实例; 《DG1000Z数据手册》:提供本产品的主要特色和技术指标。 联系我们 如您在使用此产品或本手册的过程中有任何问题或需求,请与 RIGOL 联系: 电子邮箱:service@rigol.com 网址:www.rigol.com DG1000Z 快速指南... - Page 37 RIGOL Quick Guide DG1000Z Series Function/Arbitrary Waveform Generator Mar. 2017 RIGOL TECHNOLOGIES, INC.
- Page 39 Notices RIGOL products are covered by P.R.C. and foreign patents, issued and pending. RIGOL reserves the right to modify or change parts of or all the specifications and pricing policies at the company’s sole decision. Information in this publication replaces all previously released materials.
-
Page 40: Safety Requirement
Do Not Operate With Suspected Failures. If you suspect that any damage may occur to the instrument, have it inspected by RIGOL authorized personnel before further operations. Any maintenance, adjustment or replacement especially to circuits or accessories must be performed by RIGOL DG1000Z Quick Guide... - Page 41 Do not expose the battery (if available) to high temperature or fire. Keep it out of the reach of children. Improper change of a battery (lithium battery) may cause an explosion. Use the RIGOL specified battery only. Handle with Caution.
-
Page 42: Safety Notices And Symbols
RIGOL Safety Notices and Symbols Safety Notices in this Manual: WARNING Indicates a potentially hazardous situation or practice which, if not avoided, will result in serious injury or death. CAUTION Indicates a potentially hazardous situation or practice which, if not avoided, could result in damage to the product or loss of important data. -
Page 43: Allgemeine Sicherheits Informationen
RIGOL Allgemeine Sicherheits Informationen Ü berprüfen Sie diefolgenden Sicherheitshinweise sorgfältigum PersonenschädenoderSchäden am Gerätundan damit verbundenen weiteren Gerätenzu vermeiden. Zur Vermeidung vonGefahren, nutzen Sie bitte das Gerät nur so, wiein diesem Handbuchangegeben. Um Feuer oder Verletzungen zu vermeiden, verwenden Sie ein ordnungsgemä... - Page 44 RIGOL betreiben, dass eine Untersuchung durch RIGOL autorisiertem Personal durchgeführt wird. Jedwede Wartung, Einstellarbeiten oder Austausch von Teilen am Gerät, sowie am Zubehör dürfen nur von RIGOL autorisiertem Personal durchgeführt werden. Belü ftung sicherstellen. Unzureichende Belüftung kann zu Temperaturanstiegen und somit zu thermischen Schäden am Gerät führen.
-
Page 45: Sicherheits Begriffe Und Symbole
RIGOL Sicherheits Begriffe und Symbole Begriffe in diesem Guide: WARNING Die Kennzeichnung WARNING beschreibt Gefahrenquellen die leibliche Schäden oder den Tod von Personen zur Folge haben können. CAUTION Die Kennzeichnung Caution (Vorsicht) beschreibt Gefahrenquellen die Schäden am Gerät hervorrufen können. -
Page 46: Care And Cleaning
RIGOL Care and Cleaning Care Do not store or leave the instrument where it may be exposed to direct sunlight for long periods of time. Cleaning Clean the instrument regularly according to its operating conditions. Disconnect the instrument from all power sources. - Page 47 RIGOL DG1000Z Quick Guide...
-
Page 48: Document Overview
Freq. Content Conventions in this Manual DG1000Z series function/arbitrary waveform generator includes DG1022Z, DG1032Z and DG1062Z. In this manual, DG1062Z is taken as an example to illustrate the basic operations of the generator. For more details, please refer to DG1000Z Series Function/Arbitrary Waveform Generator User’s Guide. - Page 49 RIGOL Content Guaranty and Declaration ................I Safety Requirement ..................II General Safety Summary .................. II Safety Notices and Symbols ................IV Allgemeine Sicherheits Informationen ..............V Sicherheits Begriffe und Symbole ..............VII Care and Cleaning ..................VIII Environmental Considerations ................ VIII Document Overview ..................
-
Page 51: Quick Start
The consigner or carrier shall be liable for the damage to the instrument resulting from shipment. RIGOL would not be responsible for free maintenance/rework or replacement of the instrument. 2. Inspect the instrument In case of any mechanical damage, missing parts, or failure in passing the electrical and mechanical tests, contact your RIGOL sales representative. -
Page 52: To Adjust The Handle
RIGOL To Adjust the Handle To adjust the handle position of the instrument, please grip the handle by sides and pull it outward. Then, rotate the handle to the desired position. The operating method is shown below. Adjusting the handle... -
Page 53: Appearance And Dimensions
RIGOL Appearance and Dimensions Front View Unit: mm Side View Unit: mm DG1000Z Quick Guide... -
Page 54: Front Panel Overview
(*.Bmp) into the USB storage device. TMC DS: seamlessly interconnect with the RIGOL DS that meets the TMC standard. Read and store the waveform data collected by the DS and rebuilt waveform lossless. - Page 55 RIGOL 4. Return to the Previous Menu Quit the current menu and return to the previous menu. 5. CH1 Output Connector BNC connector. The nominal output impedance is 50Ω. When the Output1 is enabled (the backlight goes on), this connector outputs the waveform based on the current settings of CH1.
- Page 56 RIGOL Note To avoid damage to the instrument, the input signal voltage cannot exceed ± 7Vac+dc. 9. Counter Used to turn the counter on or off. — Press this key to turn the counter on, the backlight goes on and the indicator at the left of Counter blinks.
- Page 57 RIGOL Output Square with frequency from 1μHz to 25MHz and variable duty cycle. — The backlight goes on when this function is selected. — You can set the parameters for square waveform including Freq/Period, Ampl/HiLevel, Offset/LoLevel, Duty Cycle and Start Phase.
- Page 58 RIGOL — The backlight goes on when this function is selected. Output Burst waveform for Sine, Square, Ramp, Pulse and Arb (except DC). — 3 Burst types: NCycle, Infinite and Gated. — Noise can also be used to generate gated burst waveform.
-
Page 59: Rear Panel Overview
RIGOL Rear Panel Overview Figure 2 Rear Panel 1. [CH1/Sync/Ext Mod/Trig/FSK] It is a BNC (female) connector which nominal impedance is 50Ω. The function of this connector is determined by the work mode of CH1. — Sync: when the output of CH1 is enabled, this connector output the corresponding sync signal. - Page 60 RIGOL modulation source is selected, this connector accepts an external modulation signal. — FSK: when ASK, FSK or PSK of CH2 is enabled and external modulation source is selected, this connector accepts an external modulation signal which polarity can be set by users.
-
Page 61: Power On And Inspection
RIGOL Power On and Inspection To Connect to Power Please connect the generator to AC power supply using the power cord supplied in the accessories as shown in the figure below. The AC power supply specification of this generator is 100-240V, 45-440Hz. The maximum input power of the instrument cannot exceed 30W. -
Page 62: User Interface
RIGOL User Interface The user interface of DG1000Z provides three types of display modes: Dual Channels Parameters (default), Dual Channels Graph and Single Channel. This manual mainly introduces the user interface taking the first display mode as an example. Dual Channels Parameters Mode Figure 4 User Interface (Dual Channels Parameters Mode) 1. - Page 63 RIGOL 2. Current Function and Page Up/Down Indicator Display the function name selected currently. For example, “Sine” is displayed when the sine is selected and “Edit” is displayed when the arbitrary waveform editing function is selected. Besides, the up and down arrows at the right of the function name are used to indicate whether page up/down is permitted now.
-
Page 64: Dual Channels Graph Mode
RIGOL Dual Channels Graph Mode Press Utility System Display DispMode to select “Dual Graph”, as shown in the figure below. Figure 5 User Interface (Dual Channels Graph Mode) Single Channel Mode Press Utility System Display DispMode to select “Single View”, as shown in the figure below. -
Page 65: To Use The Built-In Help System
RIGOL To Use the Built-in Help System The built-in help system of DG1000Z provides help information for each key and menu softkey at the front panel. Users can view the help of any key when operating the instrument. 1. Acquire the built-in help Press Help and the backlight goes on. -
Page 66: Basic Operations
RIGOL Basic Operations To Output Basic Waveform DG1000Z can output basic waveforms (Sine, Square, Ramp, Pulse and Noise) from one of the channels separately or from the two channels at the same time. This section introduces how to output a sine waveform (Frequency: 20kHz, Amplitude: 2.5Vpp, DC Offset: 500mV... -
Page 67: To Output Arbitrary Waveform
RIGOL 6. To set the start phase Press Start Phase, and then use the numeric keyboard to input 90. Then, select ° from the pop-up menu. The start phase ranges from 0° to 360°. 7. To enable the output Press Output1 to turn CH1 output on. At this point, the backlight goes on and the [CH1] connector outputs waveform with the specified parameters. - Page 68 RIGOL 3. To edit arbitrary waveform Press Arb Edit Wform to open the arbitrary waveform editing menu. Press Mode to select “Sample Rate”. Press HiLevel, use the numeric keyboard to input 4 and select V from the pop-up menu.
-
Page 69: To Output Harmonics
RIGOL To Output Harmonics DG1000Z can be used as a harmonic generator to output harmonic with specified order, amplitude and phase. This section introduces how to output the 2 and 4 harmonics from the [CH1] connector (Harmonic Amplitude: 2Vpp and 1Vpp, Phase: 30°... - Page 70 RIGOL 6. To set harmonic amplitude Press Harmonic Ampl in the harmonic setting menu to set the amplitude of the and 4 harmonics. 1) Press SN, use the numeric keyboard to input 2 and press Sure. 2) Press Harmonic Ampl, use the numeric keyboard to input 2 and select Vpp from the pop-up menu.
-
Page 71: To Output Am Modulated Waveform
RIGOL To Output AM Modulated Waveform For amplitude modulation (AM), the amplitude of the carrier waveform varies with the instantaneous voltage of the modulating waveform. This section introduces how to output AM modulated waveform from the [CH1] connector (the carrier is sine with 5kHz frequency and 5Vpp amplitude, the modulating waveform is sine with 200Hz frequency and the modulation depth is 80%). -
Page 72: To Output Fsk Modulated Waveform
RIGOL Figure 9 AM Modulated Waveform To Output FSK Modulated Waveform For FSK (Frequency Shift Keying) modulation, the generator “shifts” its output frequency between two preset frequencies (carrier frequency and hop frequency). This section introduces how to output FSK modulated waveform from the [CH1] connector (the carrier is sine with 3kHz frequency and 5Vpp amplitude, the hop frequency is 500Hz, the FSK rate is 100Hz and the modulating polarity is Pos). -
Page 73: To Output Sweep Waveform
RIGOL 5. To set FSK rate Press FSK Rate, use the numeric keyboard to input 100 and select Hz from the pop-up menu. 6. To set modulating polarity Press Polarity to select the Pos polarity of the modulating waveform to control the output frequency. -
Page 74: To Output Burst Waveform
RIGOL 5. To set the start frequency and stop frequency Start Frequency Press Start/Center to highlight “Start”, and then use the numeric keyboard to input “50”. Then, select Hz from the pop-up menu. Stop Frequency Press Stop/Span to highlight “Stop”, and then use the numeric keyboard to input 1. - Page 75 RIGOL When Burst is enabled, Mod or Sweep function will be automatically disabled (if currently enabled). Int and Burst will be displayed in the bottom of the screen. 4. To set the burst type and Cycles Press Type to select NCycle. At this point, the Cycles in the screen is highlighted and can be edited.
-
Page 76: Remote Control
Programmable Instruments). This section introduces how to control the generator remotely by sending the SCPI commands using Ultra Sigma provided by RIGOL via the USB interface. For detailed information about the commands, please refer to the Programming Guide. When the instrument is working in remote mode, the indicator is displayed in the screen and the keys (except Help ) at the front panel are locked. - Page 77 RIGOL Figure 11 To View USB Instrument Resource 5) Communication test Right-click the resource name DG1062Z (USB0::0x1AB1::0x0642::DG1ZA000000000::INSTR) and select SCPI Panel Control to open the remote command control panel through which you can send commands and read data. Figure 12 Send and Read Commands via USB...
-
Page 78: Troubleshooting
The commonly encountered failures and their solutions are listed below. When you encounter those problems, please solve them following the corresponding steps. If the problem remains still, please contact RIGOL and provide your device information (Utility System Info). 1. The screen of the generator is still dark (no display) after pressing the power key: 1) Check whether the power is correctly connected. - Page 79 RIGOL If the USB storage device still cannot be used normally, please contact RIGOL. 6. How to set the amplitude of the waveform in dBm? Press CH1|CH2 to select desired channel. Check whether the setting in Utility Channel Set Output Set ...
-
Page 80: For More Product Information
Utility System Info. For more information about this instrument, refer to the relevant manuals by logging in to the official website of RIGOL (www.rigol.com) to download them. G1000Z User's Guide : introduces the functions of the instrument and the operation methods, remote control methods, possible failures and solutions in using the instrument, the technical specifications, and order information.
Need help?
Do you have a question about the DG1032Z and is the answer not in the manual?
Questions and answers