Advertisement
Quick Links
12" Variable Speed Drill Press
With Laser & Worklight
IMPORTANT:
For your own safety, read and follow all of the Safety
Guidelines and Operating Instructions before operating
this product.
Contact Us:
email: service@bucktool.com
https://www.bucktool.com
909-255-1088 (8AM-5PM PST)
GET IT DONE !
INSTRUCTION
MANUAL
Advertisement

Related Manuals for Bucktool DP12VL


Summary of Contents for Bucktool DP12VL
- Page 1 GET IT DONE ! 12" Variable Speed Drill Press With Laser & Worklight Contact Us: email: service@bucktool.com https://www.bucktool.com 909-255-1088 (8AM-5PM PST) IMPORTANT: INSTRUCTION For your own safety, read and follow all of the Safety Guidelines and Operating Instructions before operating MANUAL this product.
- Page 2 Through a combination of years of hard work and experience we’ve been able to bring you the BUCKTOOL brand you see today. We live for challenges and strive to make our customers 100% satisfied. What BUCKTOOL does for customers is special, and we want to share this with you.
- Page 3 DP12VL TABLE OF CONTENTS Specifications Specifications Safety guidelines Package contents Key parts diagram Operating instructions Maintenance Exploded view Parts list Troubleshooting Warranty SPECIFICATIONS Input 120VAC, 60Hz Chuck 1/32" - 5/8" Motor 6.2A Speed 580~3200RPM Swing 12" Spindle Travel 2" Table size 9-17/32"...
- Page 4 DP12VL GENERAL SAFETY RULES WARNING Read and understand all instructions. Failure to follow all instructions listed below, may result in electric shock, fire and/or serious personal injury. READ ALL INSTRUCTIONS KNOW YOUR POWER TOOL. Read the operator’s manual carefully. Learn the applications and limitations as well as the specific potential hazards related to this tool.
- Page 5 DP12VL that can get caught and draw you into moving parts. Rubber gloves and nonskid footwear are recommended when working outdoors. Also wear protective hair covering to contain long hair. ALWAYS WEAR EYE PROTECTION WITH SIDE SHIELDS WHICH IS MARKED TO COMPLY WITH ANSI Z87.1 WHEN USING THIS PRODUCT.
- Page 6 DP12VL extension cords with approved ground connection that are intended for use outdoors and so marked. STAY ALERT AND EXERCISE CONTROL. Watch what you are doing and use common sense. Do not operate tool when you are tired. Do not rush.
- Page 7 DP12VL ALWAYS CLAMP WORKPIECE OR BRACE AGAINST COLUMN TO PREVENT ROTATION. Never use your hand to hold the object while drilling. USE RECOMMENDED SPEED FOR DRILL ACCESSORY AND WORKPIECE MATERIAL. BE SURE DRILL BIT OR CUTTING TOOL IS SECURELY LOCKED IN THE CHUCK.
- Page 8 DP12VL Some examples of these chemicals are: Your risk from exposure to these chemicals varies, depending on how often you do this type of work. To reduce your exposure, work in a well-ventilated area and with approved safety equipment, such as dust masks that are specially designed to filter out microscopic particles.
- Page 9 DP12VL Before using an extension cord, inspect it for loose or exposed wires and cut or worn insulation. WARNING Keep the extension cord clear of the working area. Position the cord so that it will not get caught on lumber, tools or other obstructions while you are working with a power tool.
- Page 10 DP12VL In the event of a malfunction or breakdown, grounding provides a path of least resistance for electric current to reduce the risk of electric shock. This tool is equipped with an electric cord having an equipment-grounding conductor and a grounding plug.
- Page 11 DP12VL Package contents No. Description Qty. Head Assembly Column Assembly Work Table Base Chuck Arbor Chuck Chuck Key Table Lock Handles Hex Head Bolts Table Crank Handle Hex Wrenches (3mm & 4mm) Feed Handles Speed Handle Wedge...
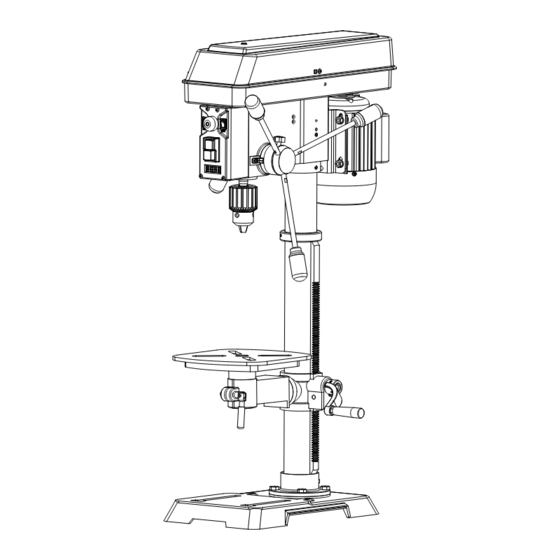
- Page 12 DP12VL Key parts diagram Pulley cover LED light switch Laser switch Feed handle Emergency stop button Power switch Motor LED panel Chuck Rall Work table Table crank handle Base...
- Page 13 DP12VL UNPACKING This product requires assembly. 1. Carefully remove the tool and any accessories from the box. Place it on a level work surface. NOTE: This tool is heavy. To avoid back injury, lift with your legs, not your back, and get help when needed.
- Page 14 DP12VL ATTACHING COLUMN TO BASE 1. Place the column assembly (1) on the base (2), aligning the column support holes to the base holes. 2. Install a hex head bolt (3) in each column support hole and tighten bolts using the adjustable wrench (not included).
- Page 15 DP12VL FEED HANDLES 1. Insert the three feed handles (1) into the threaded openings on the feed hub (2). 2. Manually tighten the handles into the openings. Use an adjustable wrench (not included) to grip the flats on the handles and fully tighten them.
- Page 16 DP12VL INSTALLING A DRILL BIT 1. Place the chuck key (1) into the side keyhole of the chuck (2), meshing the key with the gear teeth. 2. Turn the chuck key counterclockwise to open the chuck jaws (3). 3. Insert a drill bit (4) into the chuck far enough to obtain the maximum grip of the chuck jaws on the bit shank.
- Page 17 DP12VL RAISE OR LOWER THE TABLE 1. Loosen the support lock handle (1) and turn the crank handle (2) until the table is at the desired height. 2. Tighten the support lock handle before drilling. TILT THE TABLE 1. Loosen the bevel lock bolt (1) by turning it counterclockwise with an adjustable wrench (not included).
- Page 18 DP12VL SWITCHING ON/OFF 1. Turn the emergency STOP button (1) clockwise to release it, if it has already been activated. 2. Switch the product on by pressing the green ON button I (2) and wait until the drill bit has reached maximum speed.
- Page 19 DP12VL SPINDLE RETURN SPRING The spindle is equipped with an auto-return mechanism. The main components are a spring and a notched housing. The spring was properly adjusted at the factory and should not be readjusted unless absolutely necessary. 1. Unplug the drill press.
- Page 20 DP12VL DRILLING METAL • Use metal-piercing twist drill bits. • It is always necessary to lubricate the tip of the drill with oil to prevent overheating of the drill bit. • All metal workpieces should be clamped down securely. Any tilting, twisting, or shifting causes a rough drill hole, and increases the potential of drill bit breakage.
- Page 21 DP12VL ROUTINE INSPECTION Before each use, inspect the general condition of the tool. If any of these following conditions exist, do not use until parts are replaced. CHECK FOR: • Loose hardware or improper mounting, • Misalignment • Damaged cord/electrical wiring, •...
- Page 22 DP12VL WARNING To avoid injury from an accidental start, turn the switch OFF and always remove the plug from the power source before making any adjustments. SYMPTOM PROBABLE CAUSE CORRECTIVE ACTION 1) Incorrect belt tension 1) Adjust the belt tension.
- Page 23 DP12VL SYMPTOM PROBABLE CAUSE CORRECTIVE ACTION Clean the tapered surface of both Dirt, grease, or oil on the Chuck falls off the chuck and spindle with a tapered surface on the spindle household detergent. spindle or in the chuck 1) Defective or broken...
- Page 24 DP12VL...
- Page 25 DP12VL Item Description QTY. Item Description QTY. Cord Clamping Hook 31 Philips Screw M5x12 Circlip for Shaft φ24 32 Power Switch Circlip for Shaft φ35 33 Lamp/Laser Switch 34 Philips Screw ST4.2x20 Screw M8x12 35 Philips Screw M5x14 Bearing 36 Cord Clamping Plate Elastic Ring, Type A, Ø55...
- Page 26 DP12VL Item Description QTY. Item Description QTY. 61 Hex Bolt M8x12 90 Bevel Indicator 62 Spring Washer D8 91 Rack Collar 63 Motor Plate 92 Table Support 64 Flat Washer D8 93 Worm Gear 65 Hex Nut M8 94 Crank Handle...
- Page 27 DP12VL NOTE:...
- Page 28 DP12VL TWO-YEAR LIMITED WARRANTY Having Problems ? Give us a chance to help you before returning this product Email : service@bucktool.com https://www.bucktool.com 909-255-1088 (8AM-5PM PST) https://www.bucktool.com...
Need help?
Do you have a question about the DP12VL and is the answer not in the manual?
Questions and answers
I have a 12 inch Bucktool drill press model nodp12vl SN 24090089. The photoelectric;c counter does not work. Never has. The replacement you sent is installed. Still doesn’t work. I tied your answer team. No help at all.